How to configure Amazon's Route53 DNS for RedisLabs Enterprise Cluster
RedisLabs Enterprise Cluster (RLEC1) needs a proper DNS configuration to achieve high-availability (HA) and fail-over. This post describe how to configure Amazon Web Services’ (AWS) Route53 DNS properly.
You can find links to the related video recordings and printable materials at the end of this post.
- Video
- Prerequisites
- How does RLEC achieve failover ?
- Configuration
- Verification
- Materials and Links
- Footnotes
Video
Prerequisites
You need to have a domain name registered. Then, either you need to have Amazon’s Route53 as the primary/master nameserver (NS) for this domain or for a delegated zone under this domain. Finally, you need to have the zone (either the whole domain or a sub-zone) defined in AWS Route53.
How does RLEC achieve failover ?
If you have a three nodes RLEC. When your application wants to connect to an RLEC, it connects to any node in this cluster using its fully qualified domain name (FQDN), for example : node1.mycluster.enterprise.com. It needs to know the IP address associated with this name and ask the top-level
nameservers (.com) for the list of name servers in charge of enterprise.com. Then, it asks these name server (one after each other in case of failure) for the name servers in charge of mycluster.enterprise.com, and finally, it asks these name servers (one after each other in case of failure) for
the IP of node1.mycluster.enterprise.com. At the end, it connects to this IP address. All this process is transparent for the application and is done by the resolver, a system library.
Your name servers are in charge of enterprise.com. So, they are able to give the name servers in charge of your cluster. RLEC embeds a name server in each node. the nodes are in charge of the cluster zone resolution and are able to give the IP address of any node in the cluster. When everything is
working, whichever is the top-level nameserver asked, it gives the list of name servers for your enterprise domain, then whichever enterprise name server is asked, it gives the list of cluster name servers (the cluster nodes), and whichever is the node asked, it returns the IP address of the requested
node name.
If the cluster nameserver (node) asked is down, given the resolution process, the resolver will try to ask another name server (node) from the list and will get the requested IP address. That’s the standard DNS resolution behavior,in few words.
Now, when a cluster node dies, whatever the reason is. The other nodes can not reach it anymore and will replace the IP address associated with his name by the IP address of another node in the cluster’s name servers. It means that the failed over IP address will never be returned anymore by the name servers to any requested FQDN, and that two of the FQDN will have the same IP address. Basically, it means that whichever node FQDN your application is asking to resolve, it will always get the IP address of one node in the cluster that is healthy, up and running and the connection will succeed.
Configuration
After the theory, we can go through the hands-on steps to achieve this configuration with AWS’s Route53 DNS as your domain or sub-domain official name server.
Connection to AWS Route53
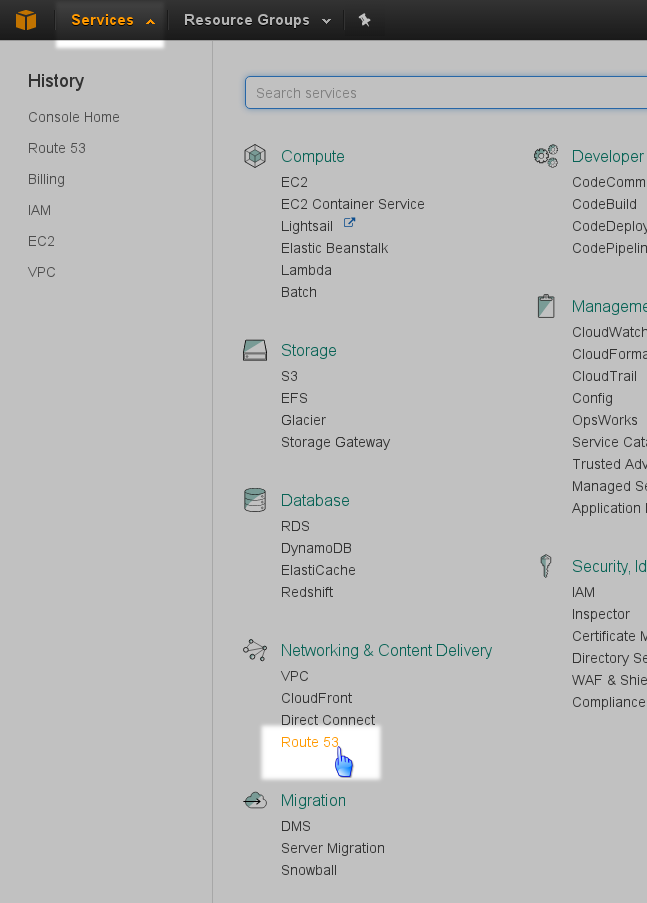
The first step is to connect your browser to AWS and to login into the administration interface. Then, you have to go in the Services menu at the top of the page and clic on the Route53 menu item :
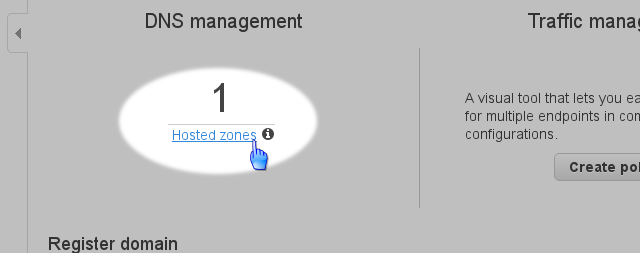
Then, I assume that you already have registered a domain, and that you defined Route53 as the primary/master name server for the whole domain or for one of its sub-domains. So, you should have at least one zone in Route53. Clic on the Hosted zones link to open it:
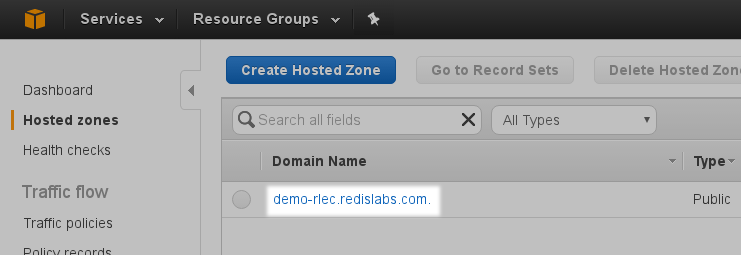
Route53 is now displaying the list of the zones that you defined. You need to clic on the zone in which you want to define your cluster, demo-rlec.redislabs.com in my case:
Nameserver records creation
The next step is to create the record that returns the IP address of your cluster’s name servers, ie one of your cluster’s nodes. To create the first name server IP address resolution record, you need to clic on the Create Record Set blue button at the top of the list:

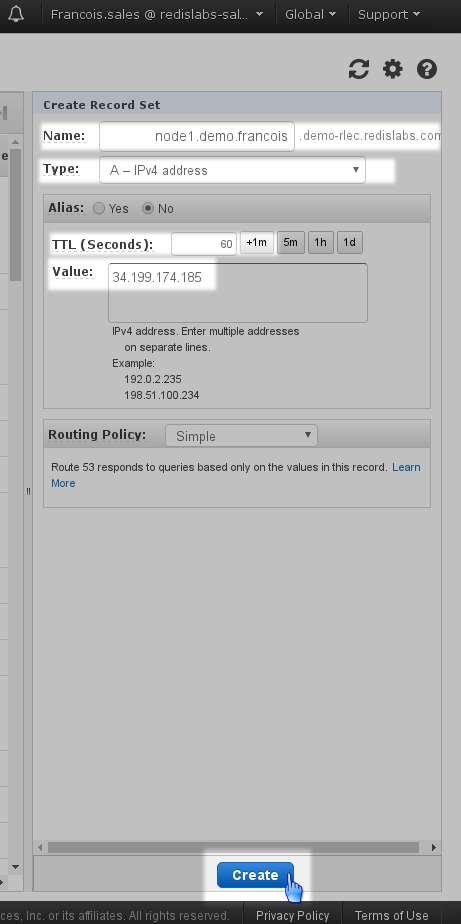
This record will only be used to resolve the IP address of the cluster name server to query, it is not used by the application to connect to the cluster. This kind of record is an A record type and associates an IP address to a name. To avoid the whole resolving process each time that a name is requested, the results are cached in the forwarding DNS and in the application’s resolver library. Given that the IP address associated with a node can change when the related hardware fails, the information needs to expire quickly, otherwise, the node fails, the name servers reflects the failover, but they are not queried again and the local resolver still returns the IP of the failed node. This is the Time To Live (TTL) field associated to the record.
So, you need to enter the name used as the name server’s name, despite that it could be different, I suggest that you use the node name. You need to enter its IP address, to set the TTL to something short, I’ll set it to one minute. This is the maximum amount of time that the record will be kept in cache of the resolver and of the forwarding DNS. If the node goes down, the resolver will still use this value until the record expires in his cache, but as the node will not answer, the resolver will try the next name server in the list (he has the A record because he needed to know the IP of the first name server, and if he needed this IP, he already had the name server list).
Finally submit the first name server’s A record to Route53, using the Create button at the bottom of the right panel:
You want (and need) to have all your cluster nodes acting asname servers, so you have to repeat these steps for all your nodes and you should get a list of A records in Route53 interface:

Now, the client-side resolver and the forwarding DNS can reach the cluster nmeservers by their IP address, if they know what are the names of the cluster’s name servers. That’s the next point.
Sub-zone’s nameserver list definition
Here, the idea is to provide the list of the cluster nameserver’s names to the resolvers and the forwarding DNS, so that they will be able to resolve the IP address of one of them and query it for node’s IP. To achieve that, we have to define a new record in Route53, an NS record for Name Server record. So, once again, we will clic on the button to Create [a] Record Set and we will enter the relevant informations in the right panel.
The name is the name of the cluster, if your cluster nodes are nodeX.mycluster.enterprise.com, then the cluster name is mycluster.enterprise.com. Remember, the resolver will ask “who are the name servers for zone
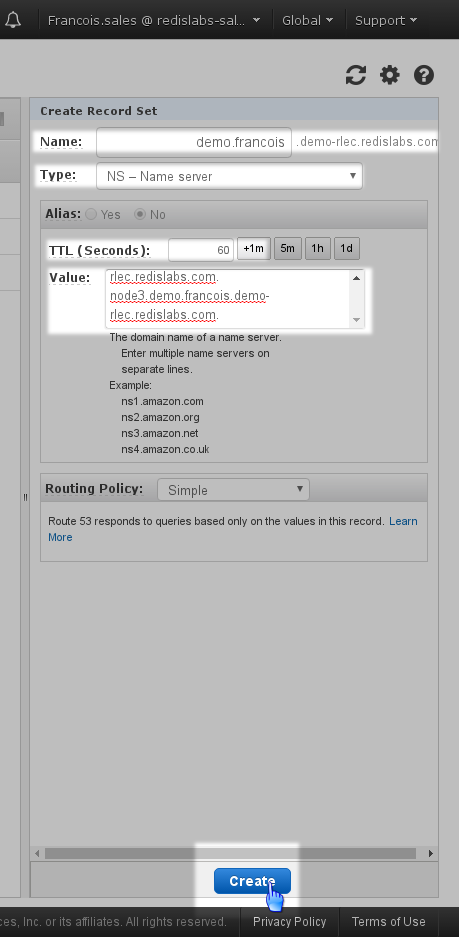
Congratulations, you completed the Route53 DNS configuration for your RLEC. Let’s check what you have.
Verification
You should end with several name server A record (one for each cluster node) to be able to reach any of them by its name. You should also have one record that lists the nameservers names for the zone (cluster):

If your cluster nodes are healthy, up and running, with DNS network ports unfiltered, you can test the configuration. Who are the nameservers in charge of the resolution in the cluster:
dig ns demo.francois.demo-rlec.redislabs.com

; <<>> DiG 9.9.5-9+deb8u9-Debian <<>> ns demo.francois.demo-rlec.redislabs.com
;; global options: +cmd
;; Got answer:
;; ->>HEADER<<- opcode: QUERY, status: NOERROR, id: 25061
;; flags: qr rd ra; QUERY: 1, ANSWER: 3, AUTHORITY: 0, ADDITIONAL: 1

;; OPT PSEUDOSECTION:
; EDNS: version: 0, flags:; udp: 4096
;; QUESTION SECTION:
;demo.francois.demo-rlec.redislabs.com. IN NS

;; ANSWER SECTION:
demo.francois.demo-rlec.redislabs.com. 3409 IN NS ns2.demo.francois.demo-rlec.redislabs.com.
demo.francois.demo-rlec.redislabs.com. 3409 IN NS ns1.demo.francois.demo-rlec.redislabs.com.
demo.francois.demo-rlec.redislabs.com. 3409 IN NS ns3.demo.francois.demo-rlec.redislabs.com.

;; Query time: 31 msec
;; SERVER: 192.168.1.254#53(192.168.1.254)
;; WHEN: Tue Feb 14 16:49:13 CET 2017
;; MSG SIZE  rcvd: 120
You can see that the name were changed to ns?. This answer does not come from Route53 but from the cluster nameservers themselves.
Now you can either install and configure your nodes, if not already made, or connect your client, using the cluster name (not the IP address).
Materials and Links
| Link | Description |
|---|---|
| Video | Demonstration screencast recording |
Footnotes
-
RedisLabs Enterprise Cluster ↩