<?xml version="1.0" encoding="utf-8"?><feed xmlns="http://www.w3.org/2005/Atom" xml:lang="fr"><generator uri="https://jekyllrb.com/" version="3.10.0">Jekyll</generator><link href="https://fcerbell.github.io//feed.xml" rel="self" type="application/atom+xml" /><link href="https://fcerbell.github.io//" rel="alternate" type="text/html" hreflang="fr" /><updated>2025-12-21T17:38:00+00:00</updated><id>https://fcerbell.github.io//feed.xml</id><title type="html">François Cerbelle</title><subtitle>Le blog qui raconte tout ! Des articles de blog, des vidéos et des  pages de tutoriels sur Debian GNU/Linux, les drones, la photo, la  vidéo, l&apos;audio, l&apos;électronique, </subtitle><author><name>François Cerbelle</name></author><entry xml:lang="en"><title type="html">Redis 12 - Managed Redis for Python Microservice in CloudRun</title><link href="https://fcerbell.github.io//ManagedRedisForPythonMicroserviceInCloudRun-en/" rel="alternate" type="text/html" title="Redis 12 - Managed Redis for Python Microservice in CloudRun" /><published>2024-02-23T00:00:00+00:00</published><updated>2024-02-23T00:00:00+00:00</updated><id>https://fcerbell.github.io//ManagedRedisForPythonMicroserviceInCloudRun-en</id><content type="html" xml:base="https://fcerbell.github.io//ManagedRedisForPythonMicroserviceInCloudRun-en/"><![CDATA[<p>I explain step by step how to implement a #Python FastAPI stateless microservice to serve data from a local dockerized Redis-stack, a local dockerized #Redis Enterprise and a managed DBaaS Redis Enterprise. I also explain how to dockerize the API, execute it locally, and make it run as a Google #CloudRun service. With source code and #RedisInsight developer companion client connection to the different databases.</p>

<p>You can find links to the related video recordings and printable materials at the <a href="#materials-and-links">end of this post</a>.</p>

<ul id="markdown-toc">
  <li><a href="#video" id="markdown-toc-video">Video</a></li>
  <li><a href="#python-and-fastapi-skeleton" id="markdown-toc-python-and-fastapi-skeleton">Python and FastAPI skeleton</a>    <ul>
      <li><a href="#environment-and-dependencies" id="markdown-toc-environment-and-dependencies">Environment and dependencies</a></li>
      <li><a href="#write-code" id="markdown-toc-write-code">Write code</a></li>
      <li><a href="#test-the-code" id="markdown-toc-test-the-code">Test the code</a></li>
    </ul>
  </li>
  <li><a href="#local-db-redis-stack" id="markdown-toc-local-db-redis-stack">Local DB: Redis-Stack</a>    <ul>
      <li><a href="#setup" id="markdown-toc-setup">Setup</a></li>
      <li><a href="#update-the-code" id="markdown-toc-update-the-code">Update the code</a></li>
      <li><a href="#test-the-code-1" id="markdown-toc-test-the-code-1">Test the code</a></li>
    </ul>
  </li>
  <li><a href="#local-dockerized-redis-enterprise" id="markdown-toc-local-dockerized-redis-enterprise">Local dockerized Redis Enterprise</a>    <ul>
      <li><a href="#provision-redis-enterprise" id="markdown-toc-provision-redis-enterprise">Provision Redis Enterprise</a></li>
      <li><a href="#create-a-cluster" id="markdown-toc-create-a-cluster">Create a cluster</a></li>
      <li><a href="#create-a-database-with-needed-modules" id="markdown-toc-create-a-database-with-needed-modules">Create a database with needed modules</a></li>
      <li><a href="#update-the-code-with-password-authentication" id="markdown-toc-update-the-code-with-password-authentication">Update the code with password authentication</a></li>
      <li><a href="#test-the-code-2" id="markdown-toc-test-the-code-2">Test the code</a></li>
    </ul>
  </li>
  <li><a href="#package-the-microservice" id="markdown-toc-package-the-microservice">Package the microservice</a>    <ul>
      <li><a href="#environment-and-dependencies-1" id="markdown-toc-environment-and-dependencies-1">Environment and dependencies</a></li>
      <li><a href="#build-the-docker-container" id="markdown-toc-build-the-docker-container">Build the docker container</a></li>
      <li><a href="#run-the-packaged-microservice" id="markdown-toc-run-the-packaged-microservice">Run the packaged microservice</a></li>
      <li><a href="#test-the-microservice" id="markdown-toc-test-the-microservice">Test the microservice</a></li>
    </ul>
  </li>
  <li><a href="#use-a-managed-redis-enterprise" id="markdown-toc-use-a-managed-redis-enterprise">Use a managed Redis Enterprise</a>    <ul>
      <li><a href="#create-a-redis-enterprise-database-in-gcp" id="markdown-toc-create-a-redis-enterprise-database-in-gcp">Create a Redis Enterprise database in GCP</a></li>
      <li><a href="#update-the-connection-details" id="markdown-toc-update-the-connection-details">Update the connection details</a></li>
      <li><a href="#test-the-packaged-microservice" id="markdown-toc-test-the-packaged-microservice">Test the packaged microservice</a></li>
    </ul>
  </li>
  <li><a href="#deploy-in-google-cloudrun" id="markdown-toc-deploy-in-google-cloudrun">Deploy in Google CloudRun</a>    <ul>
      <li><a href="#create-the-application" id="markdown-toc-create-the-application">Create the application</a></li>
      <li><a href="#test-the-application" id="markdown-toc-test-the-application">Test the application</a></li>
    </ul>
  </li>
  <li><a href="#materials-and-links" id="markdown-toc-materials-and-links">Materials and Links</a></li>
  <li><a href="#footnotes" id="markdown-toc-footnotes">Footnotes</a></li>
</ul>

<h1 id="video">Video</h1>

<center><iframe width="420" height="315" src="https://www.youtube.com/embed/CYSyy-DjfIU" frameborder="0" allowfullscreen=""></iframe></center>

<h1 id="python-and-fastapi-skeleton">Python and FastAPI skeleton</h1>

<h2 id="environment-and-dependencies">Environment and dependencies</h2>

<p>First, You need to create a folder to create and store the sources and a Python virtual environment :</p>
<div class="language-bash highlighter-rouge"><div class="highlight"><pre class="highlight"><code><span class="nb">mkdir </span>FastApiDemo
<span class="nb">cd </span>FastApiDemo
python3 <span class="nt">-m</span> venv venv
<span class="nb">source </span>venv/bin/activate
pip <span class="nb">install </span>fastapi
pip <span class="nb">install </span>uvicorn
</code></pre></div></div>

<h2 id="write-code">Write code</h2>

<p>Then, you can start with a very simple list of object stored in an array and two basic REST API endpoints implementing GET and PUT endpoints.</p>

<p><strong>main.py</strong> :</p>
<div class="language-python highlighter-rouge"><div class="highlight"><pre class="highlight"><code><span class="c1"># Data model
#
</span><span class="kn">from</span> <span class="nn">pydantic</span> <span class="kn">import</span> <span class="n">BaseModel</span>
<span class="kn">from</span> <span class="nn">typing</span> <span class="kn">import</span> <span class="n">Union</span>
<span class="k">class</span> <span class="nc">User</span><span class="p">(</span><span class="n">BaseModel</span><span class="p">):</span>
    <span class="n">name</span><span class="p">:</span> <span class="nb">str</span>
    <span class="n">email</span><span class="p">:</span> <span class="nb">str</span>
    <span class="n">age</span><span class="p">:</span> <span class="nb">int</span>
    <span class="n">city</span><span class="p">:</span> <span class="nb">str</span>
    <span class="n">height</span><span class="p">:</span> <span class="nb">float</span>
    <span class="n">weight</span><span class="p">:</span> <span class="nb">float</span>
    <span class="n">gender</span><span class="p">:</span> <span class="n">Union</span><span class="p">[</span><span class="nb">bool</span><span class="p">,</span> <span class="bp">None</span><span class="p">]</span> <span class="o">=</span> <span class="bp">None</span>

<span class="n">users</span> <span class="o">=</span> <span class="p">[]</span>

<span class="c1"># Expose data access with a REST API provided by FastAPI
#
</span><span class="kn">from</span> <span class="nn">fastapi</span> <span class="kn">import</span> <span class="n">FastAPI</span>
<span class="n">app</span> <span class="o">=</span> <span class="n">FastAPI</span><span class="p">()</span>

<span class="c1"># Read endpoint
#
</span><span class="o">@</span><span class="n">app</span><span class="p">.</span><span class="n">get</span><span class="p">(</span><span class="s">"/users/{user_id}"</span><span class="p">)</span>
<span class="k">def</span> <span class="nf">read_user</span><span class="p">(</span><span class="n">user_id</span><span class="p">:</span> <span class="nb">int</span><span class="p">):</span>
    <span class="k">return</span> <span class="n">users</span><span class="p">[</span><span class="n">user_id</span><span class="p">]</span>

<span class="c1"># Write endpoint
#
</span><span class="o">@</span><span class="n">app</span><span class="p">.</span><span class="n">put</span><span class="p">(</span><span class="s">"/users/{user_id}"</span><span class="p">)</span>
<span class="k">def</span> <span class="nf">update_user</span><span class="p">(</span><span class="n">user_id</span><span class="p">:</span> <span class="nb">int</span><span class="p">,</span> <span class="n">user</span><span class="p">:</span> <span class="n">User</span><span class="p">):</span>
    <span class="k">while</span> <span class="p">(</span><span class="nb">len</span><span class="p">(</span><span class="n">users</span><span class="p">)</span><span class="o">&lt;=</span><span class="n">user_id</span><span class="p">):</span>
        <span class="n">users</span><span class="p">.</span><span class="n">append</span><span class="p">(</span><span class="s">""</span><span class="p">);</span>
    <span class="n">users</span><span class="p">[</span><span class="n">user_id</span><span class="p">]</span><span class="o">=</span><span class="n">user</span>
    <span class="k">return</span> <span class="bp">True</span>
</code></pre></div></div>

<h2 id="test-the-code">Test the code</h2>

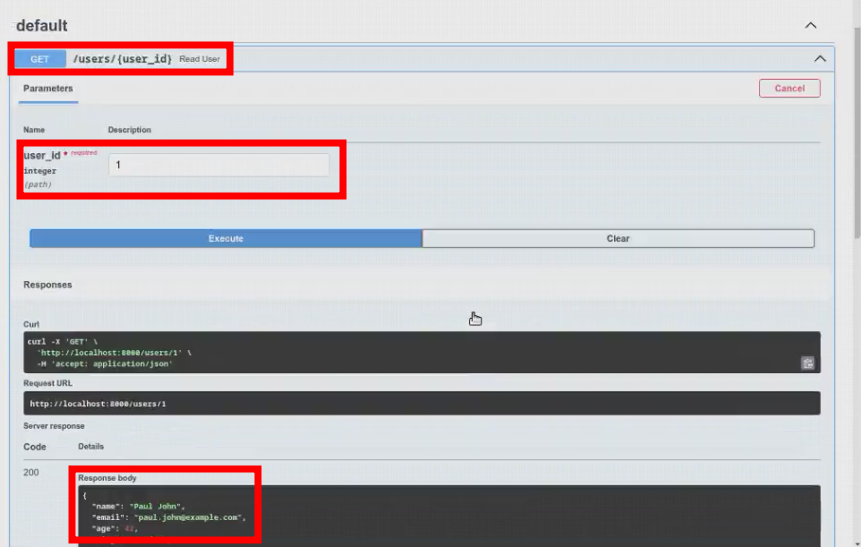
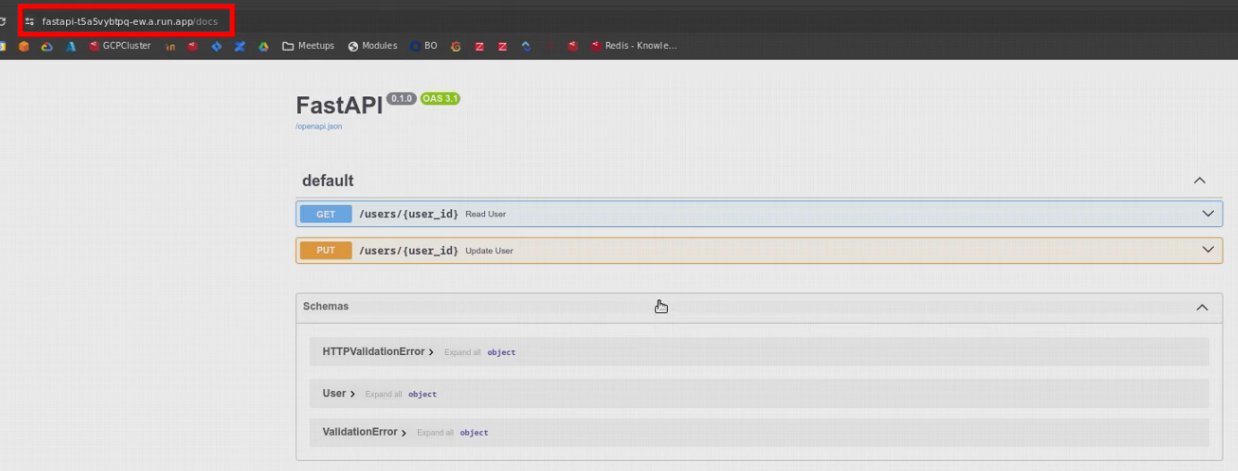
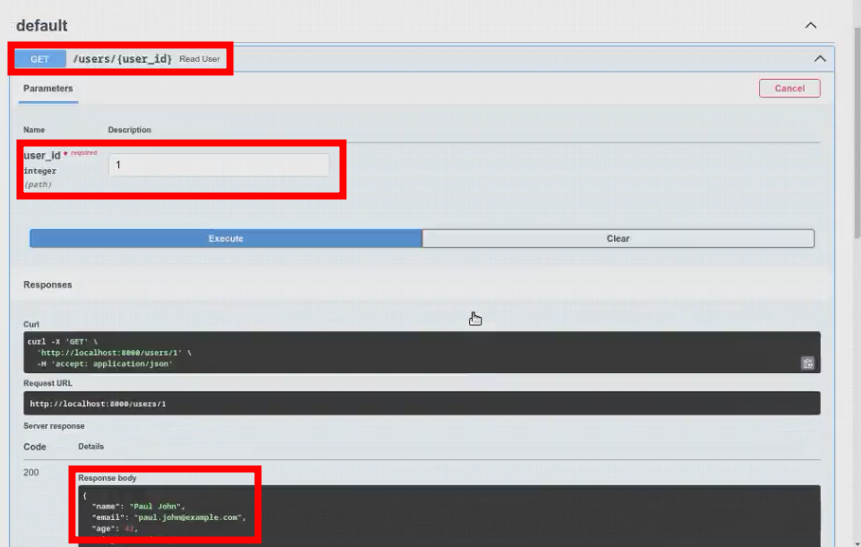
<p>Now, we can start the uvicorn server and test the GET/PUT endpoints both with <code class="language-plaintext highlighter-rouge">curl</code>  in command line and with the embedded Swagger Web user interface (http://localhost:8000/docs)</p>

<div class="language-bash highlighter-rouge"><div class="highlight"><pre class="highlight"><code>uvicorn main:app <span class="nt">--reload</span>
</code></pre></div></div>
<div class="language-bash highlighter-rouge"><div class="highlight"><pre class="highlight"><code>curl http://localhost:8000/users/1 <span class="nt">--request</span> GET <span class="nt">--header</span> <span class="s1">'content-type: application/json'</span>
curl <span class="nt">--request</span> PUT <span class="nt">--url</span> <span class="s2">"http://localhost:8000/users/1"</span> <span class="nt">--header</span> <span class="s1">'content-type: application/json'</span> <span class="nt">--data</span> <span class="s1">'{"name":"Paul John","email":"paul.john@example.com","age":42,"city":"London","height":0,"weight":0,"gender":"True"}'</span>
curl http://localhost:8000/users/1 <span class="nt">--request</span> GET <span class="nt">--header</span> <span class="s1">'content-type: application/json'</span>
xdg-open http://localhost:8000/docs
</code></pre></div></div>

<p><img src="..//assets/posts/en/ManagedRedisForPythonMicroserviceInCloudRun/372f09be9bbeea62c88ea95275f28e49.png" alt="372f09be9bbeea62c88ea95275f28e49.png" /></p>

<h1 id="local-db-redis-stack">Local DB: Redis-Stack</h1>

<p>Now, we want to use a Redis database to store the records instead of a simple object array. This will make our microservice completely stateless.</p>

<h2 id="setup">Setup</h2>

<p>First, we can start a dockerized image of Redis Open-source with all the official modules. It exposes the Redis database on the standard port <code class="language-plaintext highlighter-rouge">6379</code> and a RedisInsight client Web user interface on port <code class="language-plaintext highlighter-rouge">8001</code> :</p>
<div class="language-bash highlighter-rouge"><div class="highlight"><pre class="highlight"><code>docker run <span class="nt">-p</span> 6379:6379 <span class="nt">-p</span> 8001:8001 <span class="nt">--name</span> redis-stack redis/redis-stack
</code></pre></div></div>

<p>Then, you need to add the Redis Python client library to the development environment and use environment variables to store the database connection details :</p>
<div class="language-bash highlighter-rouge"><div class="highlight"><pre class="highlight"><code>pip <span class="nb">install</span> <span class="s2">"redis[hiredis]"</span>
<span class="nb">export </span><span class="nv">REDISHOST</span><span class="o">=</span>localhost
<span class="nb">export </span><span class="nv">REDISPORT</span><span class="o">=</span>6379
</code></pre></div></div>

<h2 id="update-the-code">Update the code</h2>

<p>Now, you can update the code :</p>
<ol>
  <li>remove the object array</li>
  <li>include the Redis Python client library</li>
  <li>open a connection to the database</li>
  <li>optionnaly prepopulate the database with some sample records</li>
  <li>update the GET endpoint to fetch data from Redis</li>
  <li>update the PUT endpoint to store data in Redis</li>
</ol>

<div class="language-python highlighter-rouge"><div class="highlight"><pre class="highlight"><code><span class="c1"># Data model
#
</span><span class="kn">from</span> <span class="nn">pydantic</span> <span class="kn">import</span> <span class="n">BaseModel</span>
<span class="kn">from</span> <span class="nn">typing</span> <span class="kn">import</span> <span class="n">Union</span>
<span class="k">class</span> <span class="nc">User</span><span class="p">(</span><span class="n">BaseModel</span><span class="p">):</span>
    <span class="n">name</span><span class="p">:</span> <span class="nb">str</span>
    <span class="n">email</span><span class="p">:</span> <span class="nb">str</span>
    <span class="n">age</span><span class="p">:</span> <span class="nb">int</span>
    <span class="n">city</span><span class="p">:</span> <span class="nb">str</span>
    <span class="n">height</span><span class="p">:</span> <span class="nb">float</span>
    <span class="n">weight</span><span class="p">:</span> <span class="nb">float</span>
    <span class="n">gender</span><span class="p">:</span> <span class="n">Union</span><span class="p">[</span><span class="nb">bool</span><span class="p">,</span> <span class="bp">None</span><span class="p">]</span> <span class="o">=</span> <span class="bp">None</span>

<span class="c1">#users = []
# Data storage in Redis
#
</span><span class="kn">import</span> <span class="nn">redis</span>
<span class="kn">import</span> <span class="nn">os</span>
<span class="n">r</span> <span class="o">=</span> <span class="n">redis</span><span class="p">.</span><span class="n">Redis</span><span class="p">(</span>
        <span class="n">host</span><span class="o">=</span><span class="n">os</span><span class="p">.</span><span class="n">environ</span><span class="p">.</span><span class="n">get</span><span class="p">(</span><span class="s">'REDISHOST'</span><span class="p">),</span>
        <span class="n">port</span><span class="o">=</span><span class="n">os</span><span class="p">.</span><span class="n">environ</span><span class="p">.</span><span class="n">get</span><span class="p">(</span><span class="s">'REDISPORT'</span><span class="p">),</span>
        <span class="p">)</span>

<span class="c1"># Prepopulate wih sample data
# JSON data stored in a Redis JSON datastructure
#
</span><span class="kn">from</span> <span class="nn">redis.commands.json.path</span> <span class="kn">import</span> <span class="n">Path</span>
<span class="n">r</span><span class="p">.</span><span class="n">json</span><span class="p">().</span><span class="nb">set</span><span class="p">(</span><span class="s">"user:1"</span><span class="p">,</span> <span class="n">Path</span><span class="p">.</span><span class="n">root_path</span><span class="p">(),</span> <span class="p">{</span> <span class="s">"name"</span><span class="p">:</span> <span class="s">"Paul John"</span><span class="p">,</span> <span class="s">"email"</span><span class="p">:</span> <span class="s">"paul.john@example.com"</span><span class="p">,</span> <span class="s">"age"</span><span class="p">:</span> <span class="mi">42</span><span class="p">,</span> <span class="s">"city"</span><span class="p">:</span> <span class="s">"London"</span> <span class="p">})</span>
<span class="n">r</span><span class="p">.</span><span class="n">json</span><span class="p">().</span><span class="nb">set</span><span class="p">(</span><span class="s">"user:2"</span><span class="p">,</span> <span class="n">Path</span><span class="p">.</span><span class="n">root_path</span><span class="p">(),</span> <span class="p">{</span> <span class="s">"name"</span><span class="p">:</span> <span class="s">"Eden Zamir"</span><span class="p">,</span> <span class="s">"email"</span><span class="p">:</span> <span class="s">"eden.zamir@example.com"</span><span class="p">,</span> <span class="s">"age"</span><span class="p">:</span> <span class="mi">29</span><span class="p">,</span> <span class="s">"city"</span><span class="p">:</span> <span class="s">"Tel Aviv"</span> <span class="p">})</span>
<span class="n">r</span><span class="p">.</span><span class="n">json</span><span class="p">().</span><span class="nb">set</span><span class="p">(</span><span class="s">"user:3"</span><span class="p">,</span> <span class="n">Path</span><span class="p">.</span><span class="n">root_path</span><span class="p">(),</span> <span class="p">{</span> <span class="s">"name"</span><span class="p">:</span> <span class="s">"Paul Zamir"</span><span class="p">,</span> <span class="s">"email"</span><span class="p">:</span> <span class="s">"paul.zamir@example.com"</span><span class="p">,</span> <span class="s">"age"</span><span class="p">:</span> <span class="mi">35</span><span class="p">,</span> <span class="s">"city"</span><span class="p">:</span> <span class="s">"Tel Aviv"</span> <span class="p">})</span>

<span class="c1"># Expose data access with a REST API provided by FastAPI
#
</span><span class="kn">from</span> <span class="nn">fastapi</span> <span class="kn">import</span> <span class="n">FastAPI</span>
<span class="n">app</span> <span class="o">=</span> <span class="n">FastAPI</span><span class="p">()</span>

<span class="c1"># Read endpoint
#
</span><span class="o">@</span><span class="n">app</span><span class="p">.</span><span class="n">get</span><span class="p">(</span><span class="s">"/users/{user_id}"</span><span class="p">)</span>
<span class="k">def</span> <span class="nf">read_user</span><span class="p">(</span><span class="n">user_id</span><span class="p">:</span> <span class="nb">int</span><span class="p">):</span>
    <span class="k">return</span> <span class="n">r</span><span class="p">.</span><span class="n">json</span><span class="p">().</span><span class="n">get</span><span class="p">(</span><span class="s">"user:"</span><span class="o">+</span><span class="nb">str</span><span class="p">(</span><span class="n">user_id</span><span class="p">))</span>

<span class="c1"># Write endpoint
#
</span><span class="o">@</span><span class="n">app</span><span class="p">.</span><span class="n">put</span><span class="p">(</span><span class="s">"/users/{user_id}"</span><span class="p">)</span>
<span class="k">def</span> <span class="nf">update_user</span><span class="p">(</span><span class="n">user_id</span><span class="p">:</span> <span class="nb">int</span><span class="p">,</span> <span class="n">user</span><span class="p">:</span> <span class="n">User</span><span class="p">):</span>
    <span class="k">return</span> <span class="n">r</span><span class="p">.</span><span class="n">json</span><span class="p">().</span><span class="nb">set</span><span class="p">(</span><span class="s">'user:'</span><span class="o">+</span><span class="nb">str</span><span class="p">(</span><span class="n">user_id</span><span class="p">),</span> <span class="n">Path</span><span class="p">.</span><span class="n">root_path</span><span class="p">(),</span>
        <span class="p">{</span> <span class="s">"name"</span><span class="p">:</span> <span class="n">user</span><span class="p">.</span><span class="n">name</span><span class="p">,</span> <span class="s">"email"</span><span class="p">:</span> <span class="n">user</span><span class="p">.</span><span class="n">email</span><span class="p">,</span> <span class="s">"age"</span><span class="p">:</span> <span class="n">user</span><span class="p">.</span><span class="n">age</span><span class="p">,</span> <span class="s">"city"</span><span class="p">:</span> <span class="n">user</span><span class="p">.</span><span class="n">city</span><span class="p">,</span> <span class="s">"height"</span><span class="p">:</span> <span class="n">user</span><span class="p">.</span><span class="n">height</span><span class="p">,</span> <span class="s">"weight"</span><span class="p">:</span> <span class="n">user</span><span class="p">.</span><span class="n">weight</span><span class="p">,</span> <span class="s">"gender"</span><span class="p">:</span> <span class="n">user</span><span class="p">.</span><span class="n">gender</span> <span class="p">})</span>
</code></pre></div></div>

<h2 id="test-the-code-1">Test the code</h2>

<p>Now, we can restart the local application server :</p>
<div class="language-bash highlighter-rouge"><div class="highlight"><pre class="highlight"><code>uvicorn main:app <span class="nt">--reload</span>
</code></pre></div></div>

<p>and try to get the 4 first records :</p>
<div class="language-bash highlighter-rouge"><div class="highlight"><pre class="highlight"><code><span class="k">for </span>i <span class="k">in </span>1 2 3 4<span class="p">;</span> <span class="k">do
  </span><span class="nb">printf</span> <span class="s2">"</span><span class="se">\n</span><span class="s2">%s: "</span> <span class="s2">"</span><span class="nv">$i</span><span class="s2">"</span>
  curl http://localhost:8000/users/<span class="nv">$i</span> <span class="nt">--request</span> GET <span class="nt">--header</span> <span class="s1">'content-type: application/json'</span>
<span class="k">done</span>
</code></pre></div></div>

<p><img src="..//assets/posts/en/ManagedRedisForPythonMicroserviceInCloudRun/315e0f9083bd7e02d1c533bc1da7990b.png" alt="315e0f9083bd7e02d1c533bc1da7990b.png" /></p>

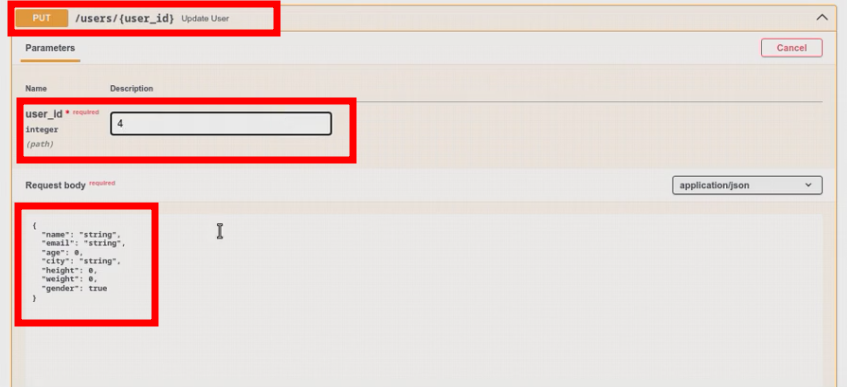
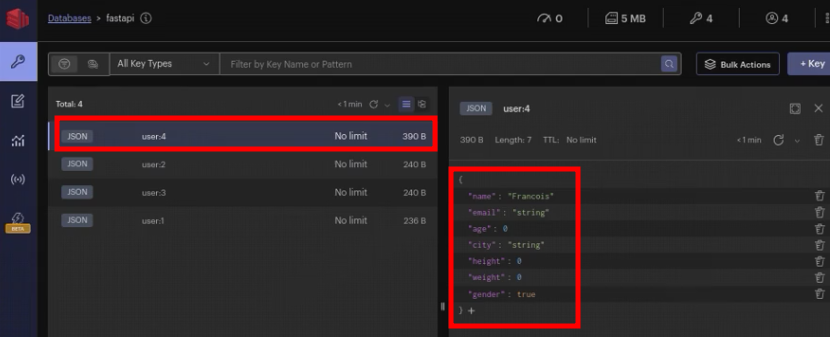
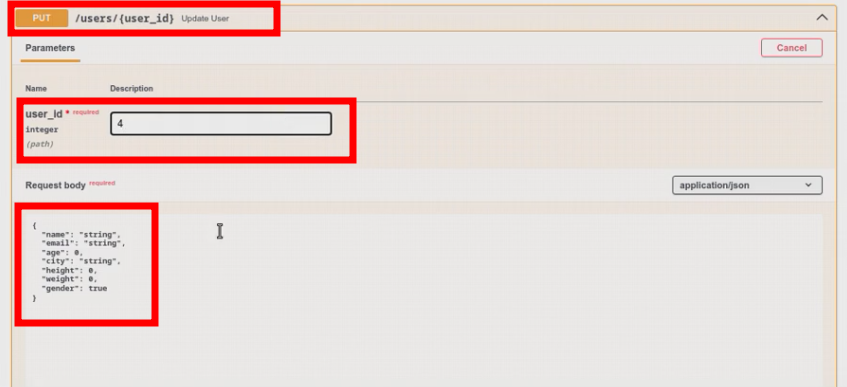
<p>The fourth one does not exist yet and should return <code class="language-plaintext highlighter-rouge">null</code>. Lets create it and check in the Swagger interface :</p>
<div class="language-bash highlighter-rouge"><div class="highlight"><pre class="highlight"><code>curl <span class="nt">--request</span> PUT <span class="nt">--url</span> <span class="s2">"http://localhost:8000/users/4"</span> <span class="nt">--header</span> <span class="s1">'content-type: application/json'</span> <span class="nt">--data</span> <span class="s1">'{"name":"Francois Cerbelle","email":"francois@redis.com","age":48,"city":"Paris","height":179,"weight":84,"gender":"True"}'</span>
xdg-open http://localhost:8000/docs
</code></pre></div></div>

<p><img src="..//assets/posts/en/ManagedRedisForPythonMicroserviceInCloudRun/0056b68bd7afe953885a69b1f28cfdf7.png" alt="0056b68bd7afe953885a69b1f28cfdf7.png" /></p>

<h1 id="local-dockerized-redis-enterprise">Local dockerized Redis Enterprise</h1>
<p>The goal is to use a development environment as close as possible to the final production environment. Thus, lets replace our local dockerized redis-stack by a local dockerized redis-enterprise database.</p>

<h2 id="provision-redis-enterprise">Provision Redis Enterprise</h2>
<p>First, we can start the redis-enterprise docker image. I expose the ports for both the web administration interface and the REST API :</p>
<div class="language-bash highlighter-rouge"><div class="highlight"><pre class="highlight"><code>docker run <span class="nt">-d</span> <span class="nt">--cap-add</span> sys_resource <span class="nt">--name</span> redisenterprise1 <span class="nt">-p</span> 8443:8443 <span class="nt">-p</span> 9443:9443 redislabs/redis
</code></pre></div></div>

<h2 id="create-a-cluster">Create a cluster</h2>
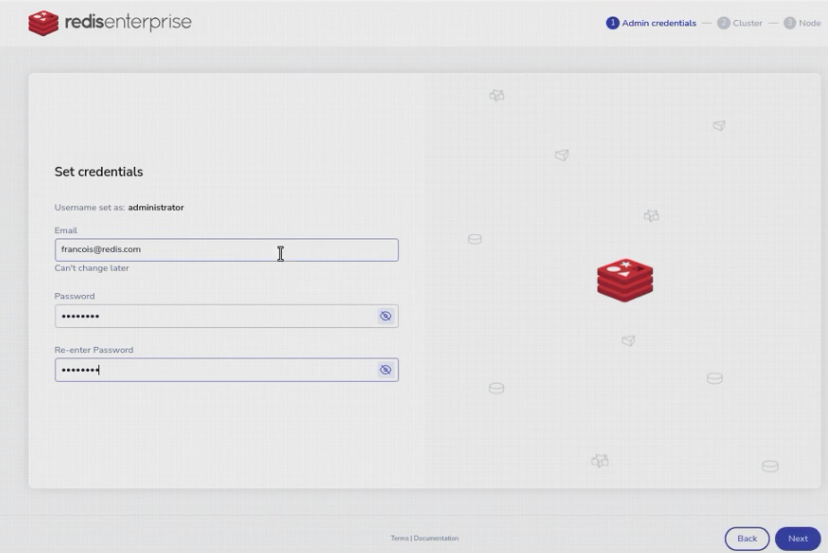
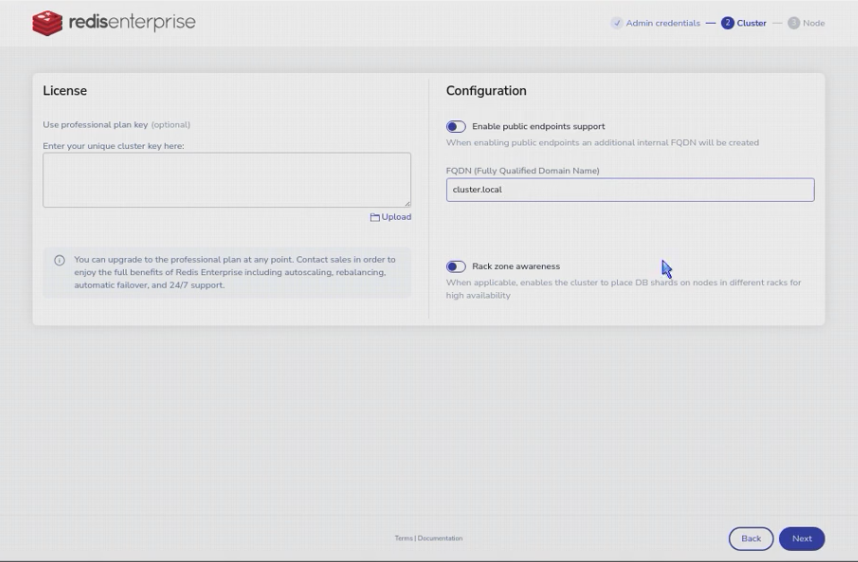
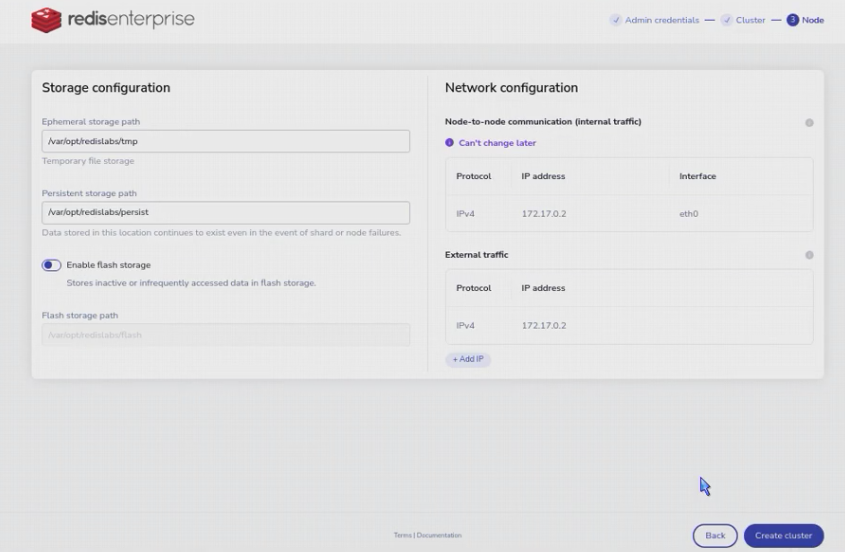
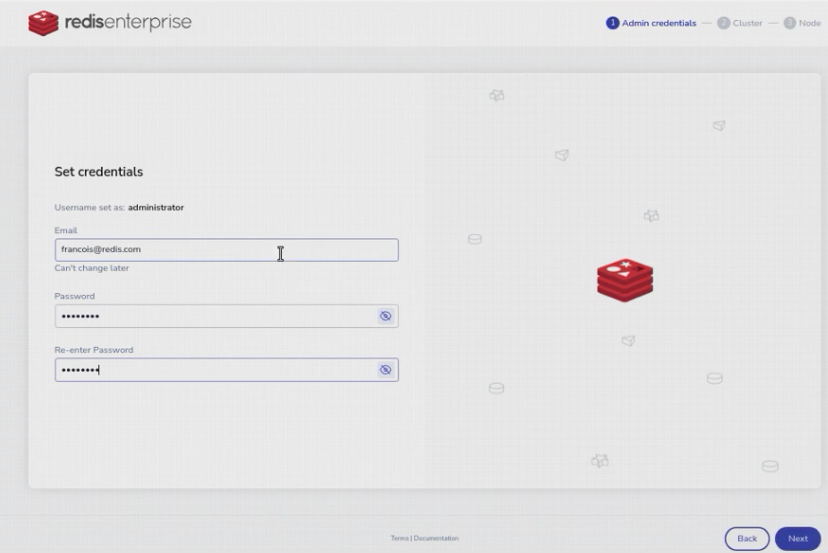
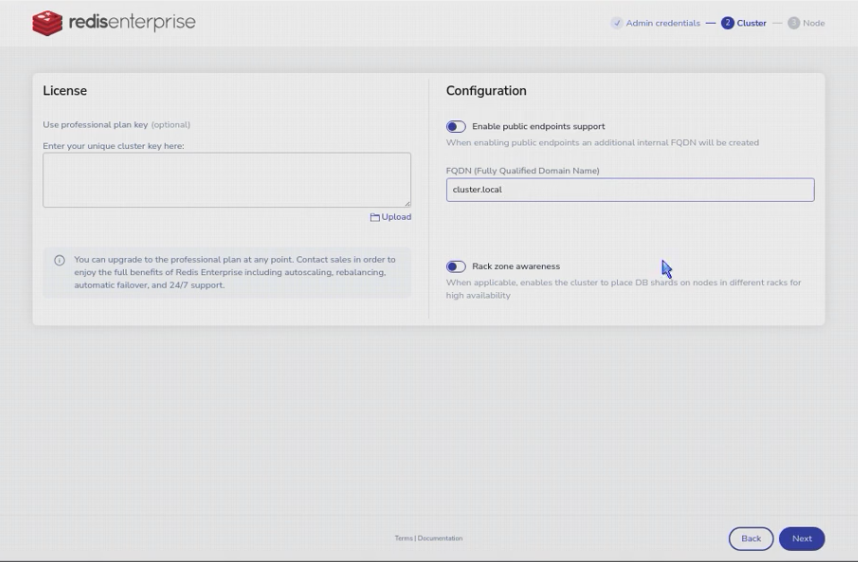
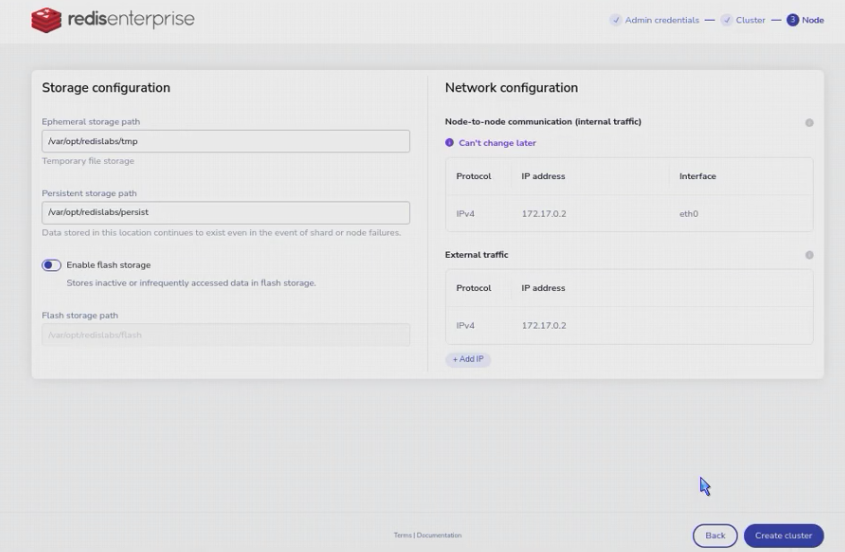
<p>First, we need to initialize the Redis-Enterprise cluster with a first, and only, node. We can use to web admin interface (https://localhost:8443) ;</p>
<div class="language-bash highlighter-rouge"><div class="highlight"><pre class="highlight"><code>xdg-open https://localhost:8443
</code></pre></div></div>

<p><img src="..//assets/posts/en/ManagedRedisForPythonMicroserviceInCloudRun/8678540f2a120d7cefc1fe562b1e6474.png" alt="8678540f2a120d7cefc1fe562b1e6474.png" /></p>

<p><img src="..//assets/posts/en/ManagedRedisForPythonMicroserviceInCloudRun/d6641ace1d45c9fcfc102e1093f2973d.png" alt="d6641ace1d45c9fcfc102e1093f2973d.png" /></p>

<p><img src="..//assets/posts/en/ManagedRedisForPythonMicroserviceInCloudRun/a7f377b90656d0660e84de6b73b34d40.png" alt="a7f377b90656d0660e84de6b73b34d40.png" /></p>

<p>or the REST API</p>
<div class="language-bash highlighter-rouge"><div class="highlight"><pre class="highlight"><code>curl <span class="s2">"https://127.0.0.1:9443/v1/bootstrap/create_cluster"</span> <span class="nt">--insecure</span> <span class="nt">-X</span> <span class="s2">"POST"</span> <span class="nt">-H</span> <span class="s2">"Accept:application/json"</span> <span class="nt">-H</span> <span class="s2">"Content-Type:application/json"</span> <span class="nt">-u</span> <span class="s2">"francois@redis.com:password"</span> <span class="nt">-d</span> <span class="s1">'{"action": "create_cluster","cluster": { "name": "cluster.local" },"node": {"paths": {"persistent_path": "/var/opt/redislabs/persist","ephemeral_path": "/var/opt/redislabs/tmp","bigredis_storage_path": "/var/opt/redislabs/flash"}},"license": "","credentials": {"username": "francois@redis.com","password": "password"}}'</span>
</code></pre></div></div>

<h2 id="create-a-database-with-needed-modules">Create a database with needed modules</h2>
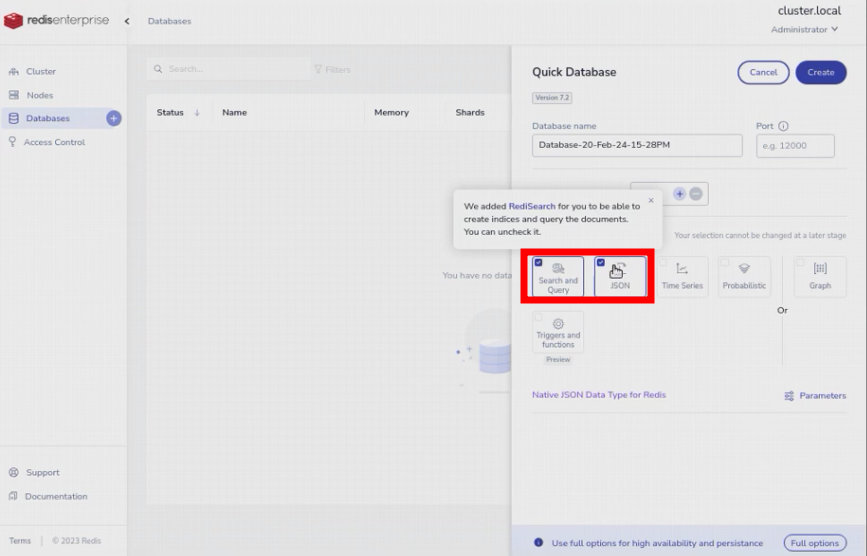
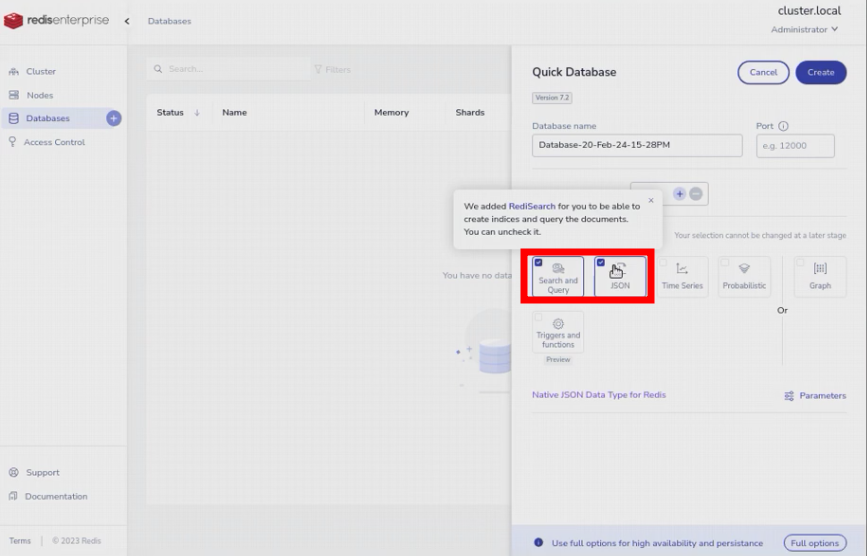
<p>Then, we can ask the Redis-cluster to create, monitor, maintain and expose a redis database with the required modules only (JSON and Search). We will use the web administration interface, but we could also use the REST API.</p>
<div class="language-bash highlighter-rouge"><div class="highlight"><pre class="highlight"><code>xdg-open https://localhost:8443
</code></pre></div></div>

<p><img src="..//assets/posts/en/ManagedRedisForPythonMicroserviceInCloudRun/c22f19ea3d6eb0c4b477af60d3f20bf2.png" alt="c22f19ea3d6eb0c4b477af60d3f20bf2.png" /></p>

<p><img src="..//assets/posts/en/ManagedRedisForPythonMicroserviceInCloudRun/30c3a601f7ca0da4dda027e40b877224.png" alt="30c3a601f7ca0da4dda027e40b877224.png" /></p>

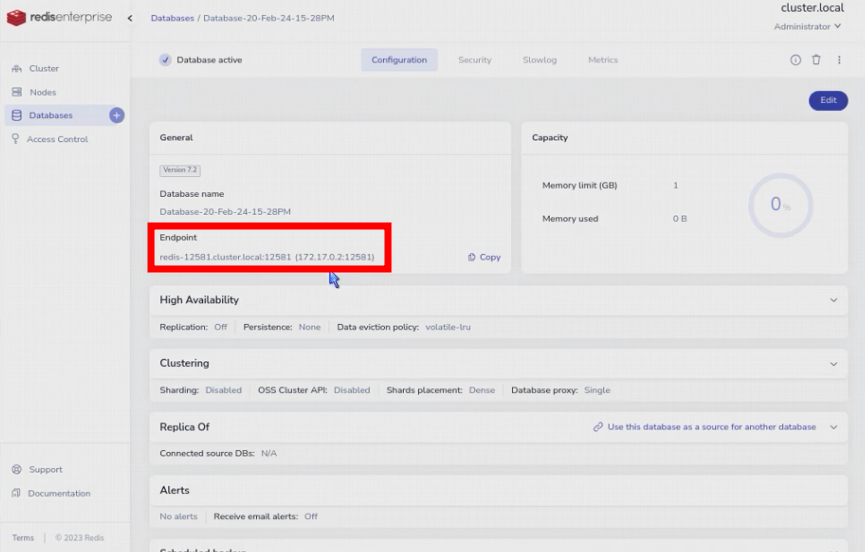
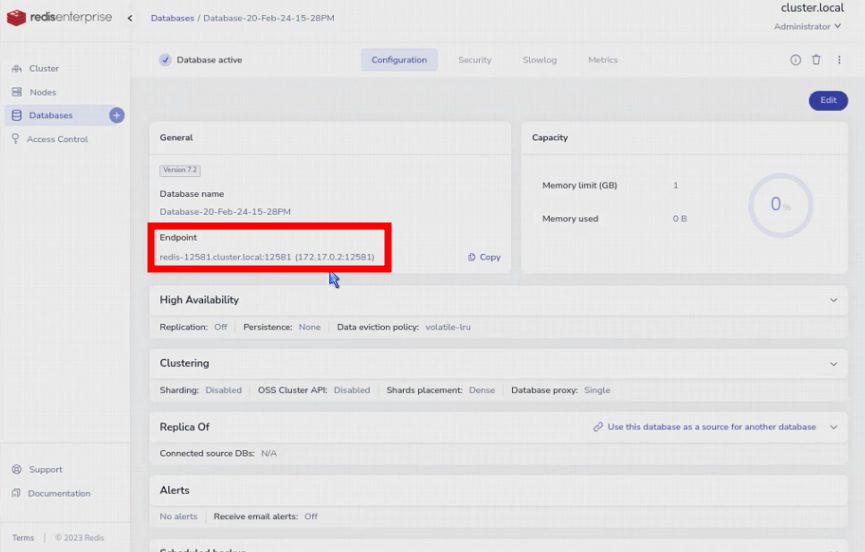
<p>We now have a redis database, lets define the connection details in the environment variables for our application. We will use the web administration interface to find them, but we could also use the REST API.</p>
<div class="language-bash highlighter-rouge"><div class="highlight"><pre class="highlight"><code><span class="nb">export </span><span class="nv">REDISHOST</span><span class="o">=</span>172.17.0.2
<span class="nb">export </span><span class="nv">REDISPORT</span><span class="o">=</span>12581
<span class="nb">export </span><span class="nv">REDISPASS</span><span class="o">=</span>xxx
</code></pre></div></div>

<h2 id="update-the-code-with-password-authentication">Update the code with password authentication</h2>
<p>Now, we have to update our source code to use the provided connection password.</p>
<div class="language-python highlighter-rouge"><div class="highlight"><pre class="highlight"><code><span class="c1"># Data model
#
</span><span class="kn">from</span> <span class="nn">pydantic</span> <span class="kn">import</span> <span class="n">BaseModel</span>
<span class="kn">from</span> <span class="nn">typing</span> <span class="kn">import</span> <span class="n">Union</span>
<span class="k">class</span> <span class="nc">User</span><span class="p">(</span><span class="n">BaseModel</span><span class="p">):</span>
    <span class="n">name</span><span class="p">:</span> <span class="nb">str</span>
    <span class="n">email</span><span class="p">:</span> <span class="nb">str</span>
    <span class="n">age</span><span class="p">:</span> <span class="nb">int</span>
    <span class="n">city</span><span class="p">:</span> <span class="nb">str</span>
    <span class="n">height</span><span class="p">:</span> <span class="nb">float</span>
    <span class="n">weight</span><span class="p">:</span> <span class="nb">float</span>
    <span class="n">gender</span><span class="p">:</span> <span class="n">Union</span><span class="p">[</span><span class="nb">bool</span><span class="p">,</span> <span class="bp">None</span><span class="p">]</span> <span class="o">=</span> <span class="bp">None</span>

<span class="c1">#users = []
# Data storage in Redis
#
</span><span class="kn">import</span> <span class="nn">redis</span>
<span class="kn">import</span> <span class="nn">os</span>
<span class="n">r</span> <span class="o">=</span> <span class="n">redis</span><span class="p">.</span><span class="n">Redis</span><span class="p">(</span>
        <span class="n">host</span><span class="o">=</span><span class="n">os</span><span class="p">.</span><span class="n">environ</span><span class="p">.</span><span class="n">get</span><span class="p">(</span><span class="s">'REDISHOST'</span><span class="p">),</span>
        <span class="n">port</span><span class="o">=</span><span class="n">os</span><span class="p">.</span><span class="n">environ</span><span class="p">.</span><span class="n">get</span><span class="p">(</span><span class="s">'REDISPORT'</span><span class="p">),</span>
        <span class="n">password</span><span class="o">=</span><span class="n">os</span><span class="p">.</span><span class="n">environ</span><span class="p">.</span><span class="n">get</span><span class="p">(</span><span class="s">'REDISPASS'</span><span class="p">),</span>
        <span class="p">)</span>

<span class="c1"># Prepopulate wih sample data
# JSON data stored in a Redis JSON datastructure
#
</span><span class="kn">from</span> <span class="nn">redis.commands.json.path</span> <span class="kn">import</span> <span class="n">Path</span>
<span class="n">r</span><span class="p">.</span><span class="n">json</span><span class="p">().</span><span class="nb">set</span><span class="p">(</span><span class="s">"user:1"</span><span class="p">,</span> <span class="n">Path</span><span class="p">.</span><span class="n">root_path</span><span class="p">(),</span> <span class="p">{</span> <span class="s">"name"</span><span class="p">:</span> <span class="s">"Paul John"</span><span class="p">,</span> <span class="s">"email"</span><span class="p">:</span> <span class="s">"paul.john@example.com"</span><span class="p">,</span> <span class="s">"age"</span><span class="p">:</span> <span class="mi">42</span><span class="p">,</span> <span class="s">"city"</span><span class="p">:</span> <span class="s">"London"</span> <span class="p">})</span>
<span class="n">r</span><span class="p">.</span><span class="n">json</span><span class="p">().</span><span class="nb">set</span><span class="p">(</span><span class="s">"user:2"</span><span class="p">,</span> <span class="n">Path</span><span class="p">.</span><span class="n">root_path</span><span class="p">(),</span> <span class="p">{</span> <span class="s">"name"</span><span class="p">:</span> <span class="s">"Eden Zamir"</span><span class="p">,</span> <span class="s">"email"</span><span class="p">:</span> <span class="s">"eden.zamir@example.com"</span><span class="p">,</span> <span class="s">"age"</span><span class="p">:</span> <span class="mi">29</span><span class="p">,</span> <span class="s">"city"</span><span class="p">:</span> <span class="s">"Tel Aviv"</span> <span class="p">})</span>
<span class="n">r</span><span class="p">.</span><span class="n">json</span><span class="p">().</span><span class="nb">set</span><span class="p">(</span><span class="s">"user:3"</span><span class="p">,</span> <span class="n">Path</span><span class="p">.</span><span class="n">root_path</span><span class="p">(),</span> <span class="p">{</span> <span class="s">"name"</span><span class="p">:</span> <span class="s">"Paul Zamir"</span><span class="p">,</span> <span class="s">"email"</span><span class="p">:</span> <span class="s">"paul.zamir@example.com"</span><span class="p">,</span> <span class="s">"age"</span><span class="p">:</span> <span class="mi">35</span><span class="p">,</span> <span class="s">"city"</span><span class="p">:</span> <span class="s">"Tel Aviv"</span> <span class="p">})</span>

<span class="c1"># Expose data access with a REST API provided by FastAPI
#
</span><span class="kn">from</span> <span class="nn">fastapi</span> <span class="kn">import</span> <span class="n">FastAPI</span>
<span class="n">app</span> <span class="o">=</span> <span class="n">FastAPI</span><span class="p">()</span>

<span class="c1"># Read endpoint
#
</span><span class="o">@</span><span class="n">app</span><span class="p">.</span><span class="n">get</span><span class="p">(</span><span class="s">"/users/{user_id}"</span><span class="p">)</span>
<span class="k">def</span> <span class="nf">read_user</span><span class="p">(</span><span class="n">user_id</span><span class="p">:</span> <span class="nb">int</span><span class="p">):</span>
    <span class="k">return</span> <span class="n">r</span><span class="p">.</span><span class="n">json</span><span class="p">().</span><span class="n">get</span><span class="p">(</span><span class="s">"user:"</span><span class="o">+</span><span class="nb">str</span><span class="p">(</span><span class="n">user_id</span><span class="p">))</span>

<span class="c1"># Write endpoint
#
</span><span class="o">@</span><span class="n">app</span><span class="p">.</span><span class="n">put</span><span class="p">(</span><span class="s">"/users/{user_id}"</span><span class="p">)</span>
<span class="k">def</span> <span class="nf">update_user</span><span class="p">(</span><span class="n">user_id</span><span class="p">:</span> <span class="nb">int</span><span class="p">,</span> <span class="n">user</span><span class="p">:</span> <span class="n">User</span><span class="p">):</span>
    <span class="k">return</span> <span class="n">r</span><span class="p">.</span><span class="n">json</span><span class="p">().</span><span class="nb">set</span><span class="p">(</span><span class="s">'user:'</span><span class="o">+</span><span class="nb">str</span><span class="p">(</span><span class="n">user_id</span><span class="p">),</span> <span class="n">Path</span><span class="p">.</span><span class="n">root_path</span><span class="p">(),</span>
        <span class="p">{</span> <span class="s">"name"</span><span class="p">:</span> <span class="n">user</span><span class="p">.</span><span class="n">name</span><span class="p">,</span> <span class="s">"email"</span><span class="p">:</span> <span class="n">user</span><span class="p">.</span><span class="n">email</span><span class="p">,</span> <span class="s">"age"</span><span class="p">:</span> <span class="n">user</span><span class="p">.</span><span class="n">age</span><span class="p">,</span> <span class="s">"city"</span><span class="p">:</span> <span class="n">user</span><span class="p">.</span><span class="n">city</span><span class="p">,</span> <span class="s">"height"</span><span class="p">:</span> <span class="n">user</span><span class="p">.</span><span class="n">height</span><span class="p">,</span> <span class="s">"weight"</span><span class="p">:</span> <span class="n">user</span><span class="p">.</span><span class="n">weight</span><span class="p">,</span> <span class="s">"gender"</span><span class="p">:</span> <span class="n">user</span><span class="p">.</span><span class="n">gender</span> <span class="p">})</span>
</code></pre></div></div>

<h2 id="test-the-code-2">Test the code</h2>

<p>We can test our microservice, you should be confortable, now. Restart the service</p>
<div class="language-bash highlighter-rouge"><div class="highlight"><pre class="highlight"><code>uvicorn main:app <span class="nt">--reload</span>
</code></pre></div></div>

<p>Use the same test scenario as previously</p>
<div class="language-bash highlighter-rouge"><div class="highlight"><pre class="highlight"><code><span class="k">for </span>i <span class="k">in </span>1 2 3 4<span class="p">;</span> <span class="k">do
  </span><span class="nb">printf</span> <span class="s2">"</span><span class="se">\n</span><span class="s2">%s: "</span> <span class="s2">"</span><span class="nv">$i</span><span class="s2">"</span>
  curl http://localhost:8000/users/<span class="nv">$i</span> <span class="nt">--request</span> GET <span class="nt">--header</span> <span class="s1">'content-type: application/json'</span>
<span class="k">done
</span>curl <span class="nt">--request</span> PUT <span class="nt">--url</span> <span class="s2">"http://localhost:8000/users/4"</span> <span class="nt">--header</span> <span class="s1">'content-type: application/json'</span> <span class="nt">--data</span> <span class="s1">'{"name":"Francois Cerbelle","email":"francois@redis.com","age":48,"city":"Paris","height":179,"weight":84,"gender":"True"}'</span>
xdg-open http://localhost:8000/docs
</code></pre></div></div>

<h1 id="package-the-microservice">Package the microservice</h1>

<h2 id="environment-and-dependencies-1">Environment and dependencies</h2>

<p><strong>requirements.txt</strong> :</p>
<div class="language-plaintext highlighter-rouge"><div class="highlight"><pre class="highlight"><code>typing
pydantic
fastapi
uvicorn
redis
</code></pre></div></div>

<p><strong>Dockerfile</strong> :</p>
<div class="language-dockerfile highlighter-rouge"><div class="highlight"><pre class="highlight"><code><span class="c"># From https://cloud.google.com/run/docs/quickstarts/build-and-deploy/python?hl=fr</span>

<span class="c"># Use the official lightweight Python image.</span>
<span class="c"># https://hub.docker.com/_/python</span>
<span class="k">FROM</span><span class="s"> python:3.10-slim</span>

<span class="c"># Allow statements and log messages to immediately appear in the Knative logs</span>
<span class="k">ENV</span><span class="s"> PYTHONUNBUFFERED True</span>

<span class="c"># Copy local code to the container image.</span>
<span class="k">ENV</span><span class="s"> APP_HOME /app</span>
<span class="k">WORKDIR</span><span class="s"> $APP_HOME</span>
<span class="k">COPY</span><span class="s"> . ./</span>

<span class="c"># Install production dependencies.</span>
<span class="k">RUN </span>pip <span class="nb">install</span> <span class="nt">--no-cache-dir</span> <span class="nt">-r</span> requirements.txt

<span class="c"># Run the web service on container startup. Here we use the gunicorn</span>
<span class="c"># webserver, with one worker process and 8 threads.</span>
<span class="c"># For environments with multiple CPU cores, increase the number of workers</span>
<span class="c"># to be equal to the cores available.</span>
<span class="c"># Timeout is set to 0 to disable the timeouts of the workers to allow Cloud Run to handle instance scaling.</span>
<span class="c">#CMD exec gunicorn --bind :$PORT --workers 1 --threads 8 --timeout 0 main:app</span>
<span class="k">CMD</span><span class="s"> exec uvicorn --host 0.0.0.0 --port $PORT main:app</span>
</code></pre></div></div>

<p><strong>.dockerignore</strong> :</p>
<div class="language-plaintext highlighter-rouge"><div class="highlight"><pre class="highlight"><code>Dockerfile
README.md
*.pyc
*.pyo
*.pyd
__pycache__
.pytest_cache
</code></pre></div></div>

<h2 id="build-the-docker-container">Build the docker container</h2>
<div class="language-bash highlighter-rouge"><div class="highlight"><pre class="highlight"><code>docker build <span class="nt">-t</span> fastapi <span class="nb">.</span>
</code></pre></div></div>

<h2 id="run-the-packaged-microservice">Run the packaged microservice</h2>
<div class="language-bash highlighter-rouge"><div class="highlight"><pre class="highlight"><code>docker run <span class="nt">--env</span> <span class="nv">PORT</span><span class="o">=</span>8000 <span class="nt">--env</span> <span class="nv">REDISHOST</span><span class="o">=</span><span class="nv">$REDISHOST</span> <span class="nt">--env</span> <span class="nv">REDISPORT</span><span class="o">=</span><span class="nv">$REDISPORT</span> <span class="nt">--env</span> <span class="nv">REDISPASS</span><span class="o">=</span><span class="nv">$REDISPASS</span> <span class="nt">-p</span> 8000:8000 <span class="nt">--rm</span> fastapi
</code></pre></div></div>

<h2 id="test-the-microservice">Test the microservice</h2>
<div class="language-bash highlighter-rouge"><div class="highlight"><pre class="highlight"><code><span class="k">for </span>i <span class="k">in </span>1 2 3 4<span class="p">;</span> <span class="k">do
  </span><span class="nb">printf</span> <span class="s2">"</span><span class="se">\n</span><span class="s2">%s: "</span> <span class="s2">"</span><span class="nv">$i</span><span class="s2">"</span>
  curl http://localhost:8000/users/<span class="nv">$i</span> <span class="nt">--request</span> GET <span class="nt">--header</span> <span class="s1">'content-type: application/json'</span>
<span class="k">done
</span>curl <span class="nt">--request</span> PUT <span class="nt">--url</span> <span class="s2">"http://localhost:8000/users/4"</span> <span class="nt">--header</span> <span class="s1">'content-type: application/json'</span> <span class="nt">--data</span> <span class="s1">'{"name":"Francois Cerbelle","email":"francois@redis.com","age":48,"city":"Paris","height":179,"weight":84,"gender":"True"}'</span>
xdg-open http://localhost:8000/docs
</code></pre></div></div>

<h1 id="use-a-managed-redis-enterprise">Use a managed Redis Enterprise</h1>
<p>Next step is to use a real Redis-Enterprise managed instance (DBaaS) in the cloud from our local dockerized microservice.</p>

<h2 id="create-a-redis-enterprise-database-in-gcp">Create a Redis Enterprise database in GCP</h2>
<p>You need to create an account and connect to the Redis Cloud portal (https://app.redislabs.com)</p>

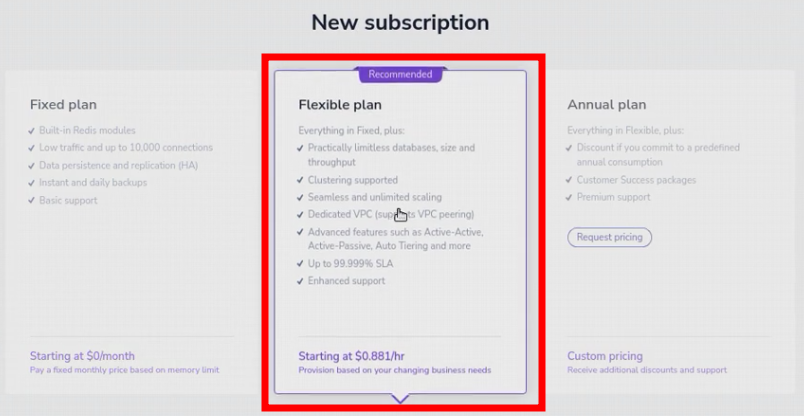
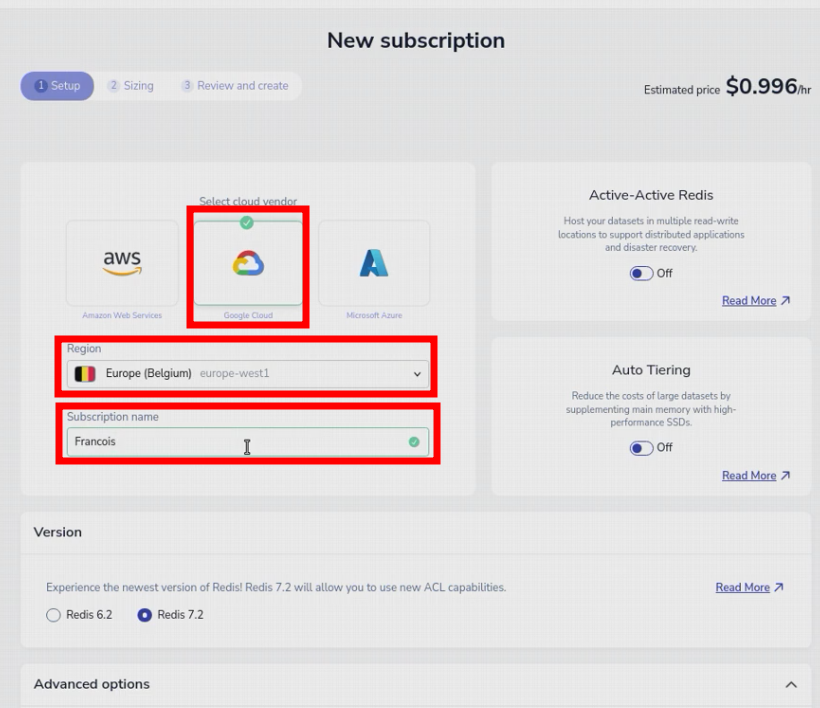
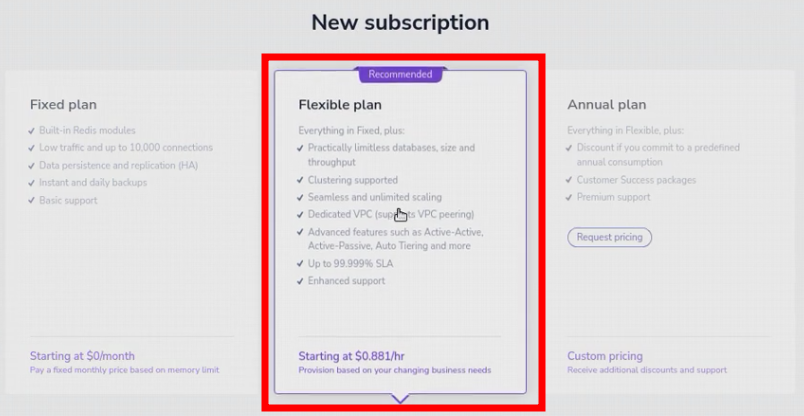
<p>Then, you need to create a new subscription (cluster).
You have to choose the Plan (flexible),</p>

<p><img src="..//assets/posts/en/ManagedRedisForPythonMicroserviceInCloudRun/aef637fc931802fe63f6d0467742b6ee.png" alt="aef637fc931802fe63f6d0467742b6ee.png" /></p>

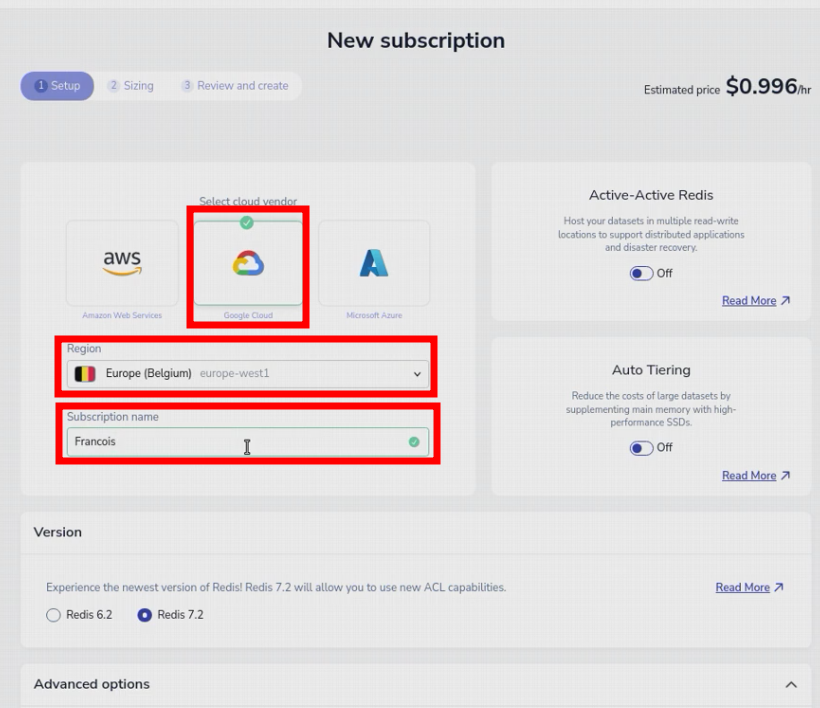
<p>the cloud provider (GCP), the region (europe-west1) and to give it a name.</p>

<p><img src="..//assets/posts/en/ManagedRedisForPythonMicroserviceInCloudRun/b6153e1e8d79e27aab6baa4171c9dbf2.png" alt="b6153e1e8d79e27aab6baa4171c9dbf2.png" /></p>

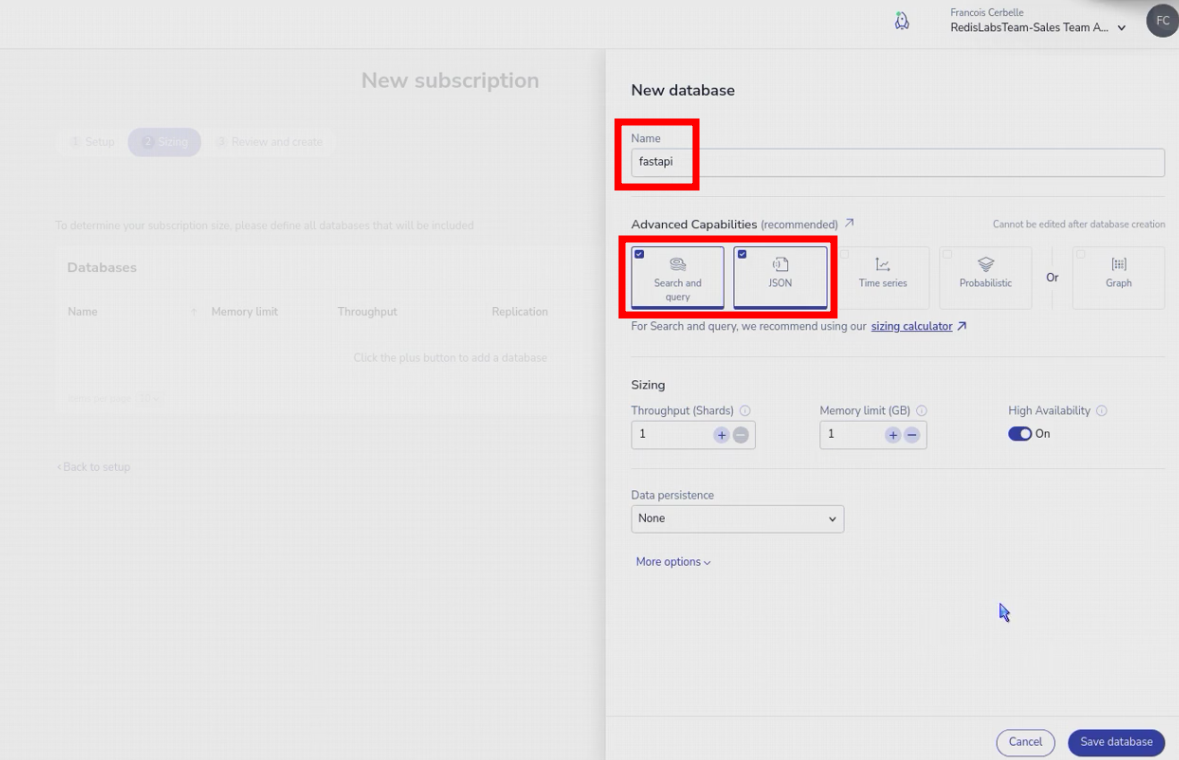
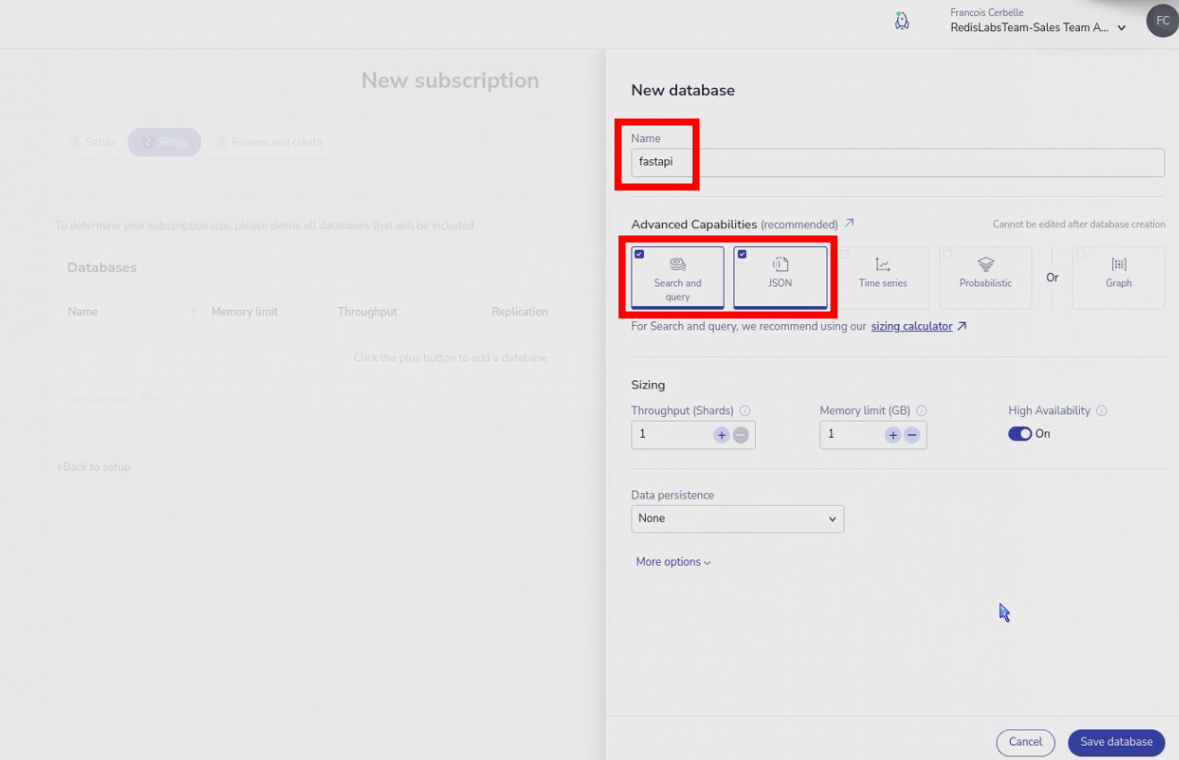
<p>Next, you have to list the database specifications : a name, optionnaly a port, the activated modules (only JSON and Search), the dataset size and throughput, the high-availability option and validate. We only need one database.</p>

<p><img src="..//assets/posts/en/ManagedRedisForPythonMicroserviceInCloudRun/46d405e8080d200e1999cf8ca3365f63.png" alt="46d405e8080d200e1999cf8ca3365f63.png" /></p>

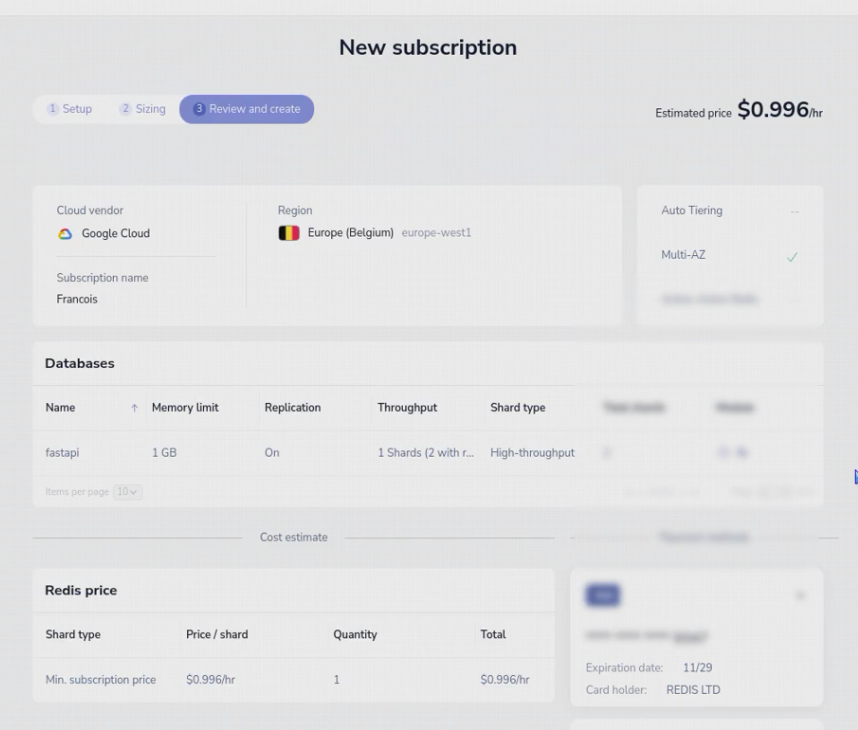
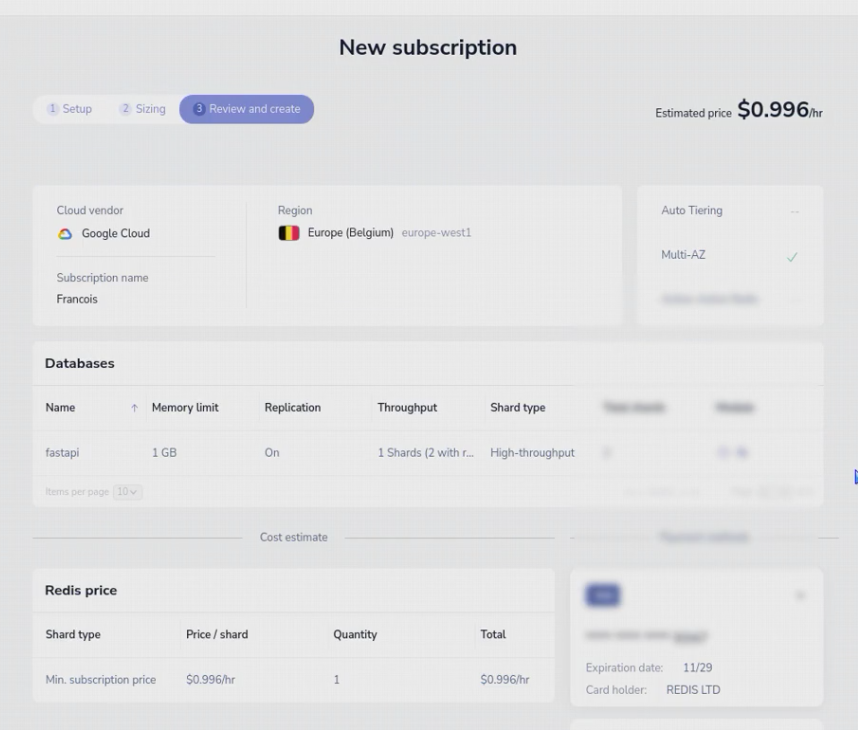
<p>Next screen lets you check all the details and enter your payment details. You can use free trial links from https://redis.com.</p>

<p><img src="..//assets/posts/en/ManagedRedisForPythonMicroserviceInCloudRun/00a538dc37aa6627aa722c294d92749a.png" alt="00a538dc37aa6627aa722c294d92749a.png" /></p>

<p>The cluster will be provisionned, the database created and it will be available approximately 15 minutes later.</p>

<p><img src="..//assets/posts/en/ManagedRedisForPythonMicroserviceInCloudRun/d044a257798350a2e4ae1f66276fd154.png" alt="d044a257798350a2e4ae1f66276fd154.png" /></p>

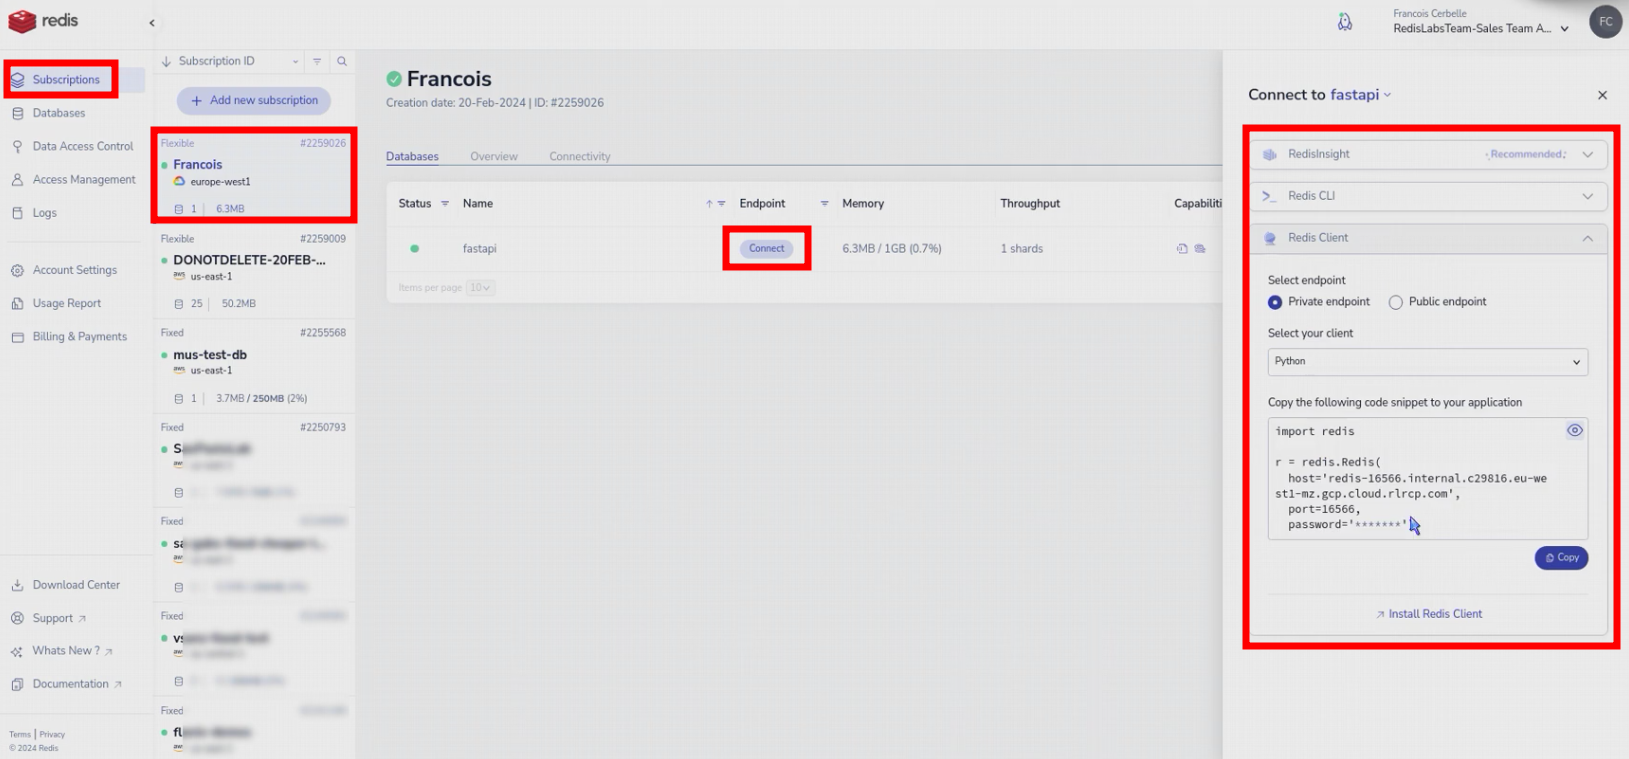
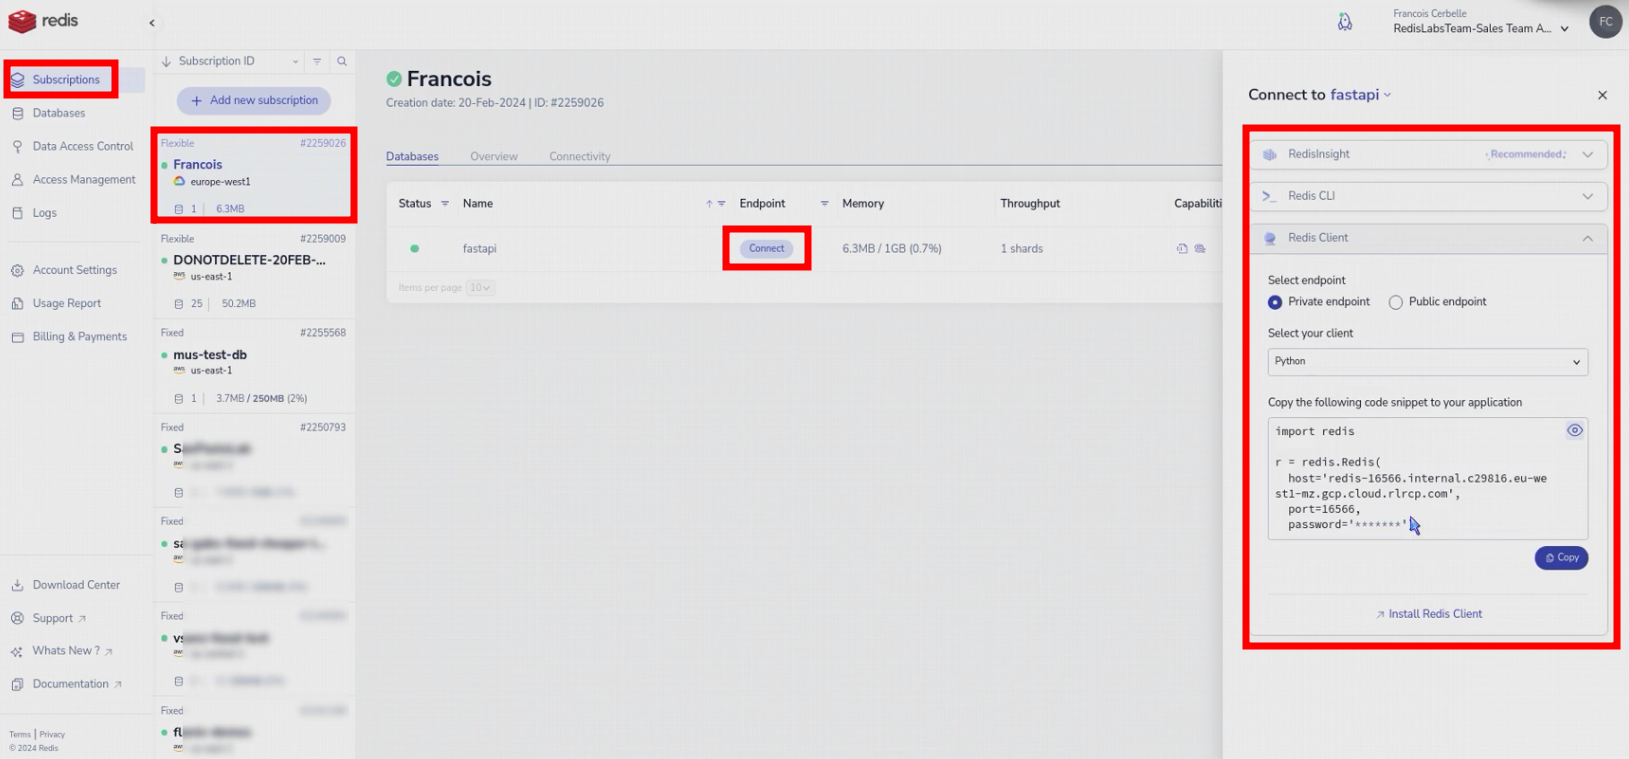
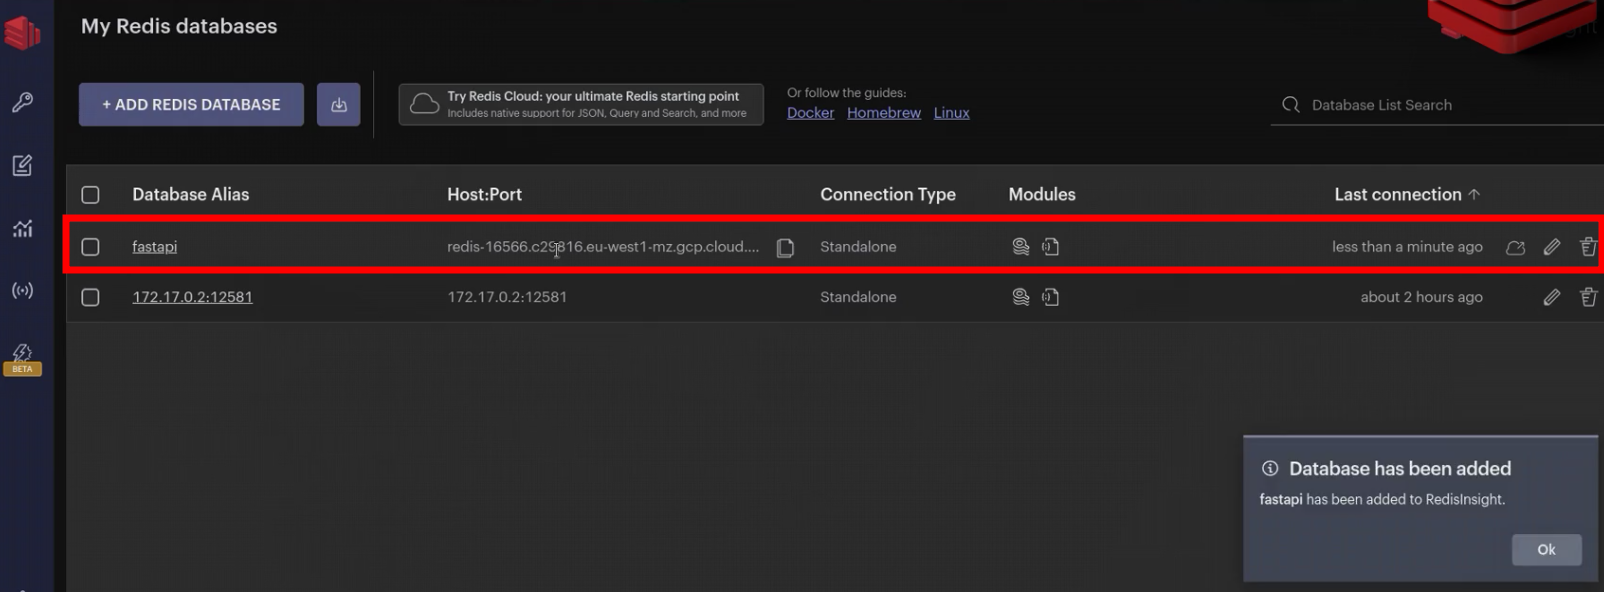
<p>You can connect RedisInsight, Redis Command Line or several source codes, using either a private endpoint (only reachable from GCP) or a public endpoint.</p>

<p><img src="..//assets/posts/en/ManagedRedisForPythonMicroserviceInCloudRun/6837ad596dcda035077b29503f4bf954.png" alt="6837ad596dcda035077b29503f4bf954.png" /></p>

<h2 id="update-the-connection-details">Update the connection details</h2>
<p>Use the connection details from the portal to update the connection environment variables.</p>
<div class="language-bash highlighter-rouge"><div class="highlight"><pre class="highlight"><code><span class="nb">export </span><span class="nv">REDISHOST</span><span class="o">=</span>redis-16566.c29816.eu-west1-mz.gcp.cloud.rlcp.com
<span class="nb">export </span><span class="nv">REDISPORT</span><span class="o">=</span>16566
<span class="nb">export </span><span class="nv">REDISPASS</span><span class="o">=</span>
</code></pre></div></div>

<h2 id="test-the-packaged-microservice">Test the packaged microservice</h2>
<div class="language-bash highlighter-rouge"><div class="highlight"><pre class="highlight"><code>docker run <span class="nt">--env</span> <span class="nv">PORT</span><span class="o">=</span>8000 <span class="nt">--env</span> <span class="nv">REDISHOST</span><span class="o">=</span><span class="nv">$REDISHOST</span> <span class="nt">--env</span> <span class="nv">REDISPORT</span><span class="o">=</span><span class="nv">$REDISPORT</span> <span class="nt">--env</span> <span class="nv">REDISPASS</span><span class="o">=</span><span class="nv">$REDISPASS</span> <span class="nt">-p</span> 8000:8000 <span class="nt">--rm</span> fastapi
</code></pre></div></div>
<div class="language-bash highlighter-rouge"><div class="highlight"><pre class="highlight"><code><span class="k">for </span>i <span class="k">in </span>1 2 3 4<span class="p">;</span> <span class="k">do
  </span><span class="nb">printf</span> <span class="s2">"</span><span class="se">\n</span><span class="s2">%s: "</span> <span class="s2">"</span><span class="nv">$i</span><span class="s2">"</span>
  curl http://localhost:8000/users/<span class="nv">$i</span> <span class="nt">--request</span> GET <span class="nt">--header</span> <span class="s1">'content-type: application/json'</span>
<span class="k">done
</span>curl <span class="nt">--request</span> PUT <span class="nt">--url</span> <span class="s2">"http://localhost:8000/users/4"</span> <span class="nt">--header</span> <span class="s1">'content-type: application/json'</span> <span class="nt">--data</span> <span class="s1">'{"name":"Francois Cerbelle","email":"francois@redis.com","age":48,"city":"Paris","height":179,"weight":84,"gender":"True"}'</span>
xdg-open http://localhost:8000/docs
</code></pre></div></div>

<p><img src="..//assets/posts/en/ManagedRedisForPythonMicroserviceInCloudRun/1d395c46e0f4640dd79225467afcf690.png" alt="1d395c46e0f4640dd79225467afcf690.png" /></p>

<p><img src="..//assets/posts/en/ManagedRedisForPythonMicroserviceInCloudRun/7b665fa9fc040413ad312156eb03fca7.png" alt="7b665fa9fc040413ad312156eb03fca7.png" /></p>

<h1 id="deploy-in-google-cloudrun">Deploy in Google CloudRun</h1>

<p>Finally, we have a containerizable microservice which can be run anywhere and which can connect to any Redis database. We have a managed Redis Enterprise database. Last step is to deploy the microservice in Google CloudRun and make it use our Redis database.</p>

<h2 id="create-the-application">Create the application</h2>

<p>Despite we could upload the docker image to the “Google Artefact Repository” and the choose it to be executed by the “Google CloudRun” service. In my case, for the demo, I use a single command line to send the current folder’s source code to Google, to ask Google to create the Docker image, to store the image in the “Artefact Repository” and to use it in a new “fastapi” CloudRun service with the Redis enterprise connection parameters :</p>

<div class="language-bash highlighter-rouge"><div class="highlight"><pre class="highlight"><code>gcloud run deploy <span class="nt">--source</span> <span class="nb">.</span> <span class="nt">--allow-unauthenticated</span> <span class="nt">--port</span><span class="o">=</span>8080 <span class="nt">--service-account</span><span class="o">=</span>319143195410-compute@developer.gserviceaccount.com <span class="nt">--min-instances</span><span class="o">=</span>1 <span class="nt">--set-env-vars</span><span class="o">=</span><span class="nv">REDISHOST</span><span class="o">=</span><span class="nv">$REDISHOST</span>,REDISPORT<span class="o">=</span><span class="nv">$REDISPORT</span>,REDISPASS<span class="o">=</span><span class="nv">$REDISPASS</span> <span class="nt">--cpu-boost</span> <span class="nt">--region</span><span class="o">=</span>europe-west1 <span class="nt">--project</span><span class="o">=</span>central-beach-194106
</code></pre></div></div>

<p><img src="..//assets/posts/en/ManagedRedisForPythonMicroserviceInCloudRun/63d06355771882c95d6a3ea3c173667f.png" alt="63d06355771882c95d6a3ea3c173667f.png" /></p>

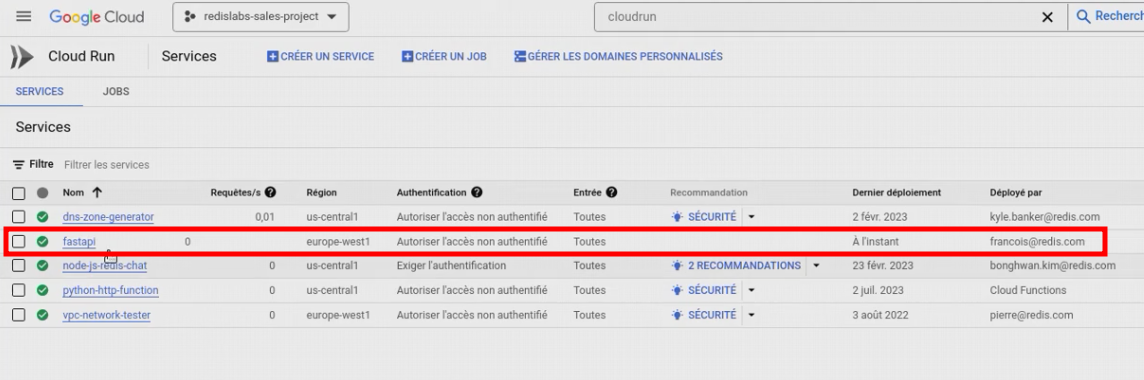
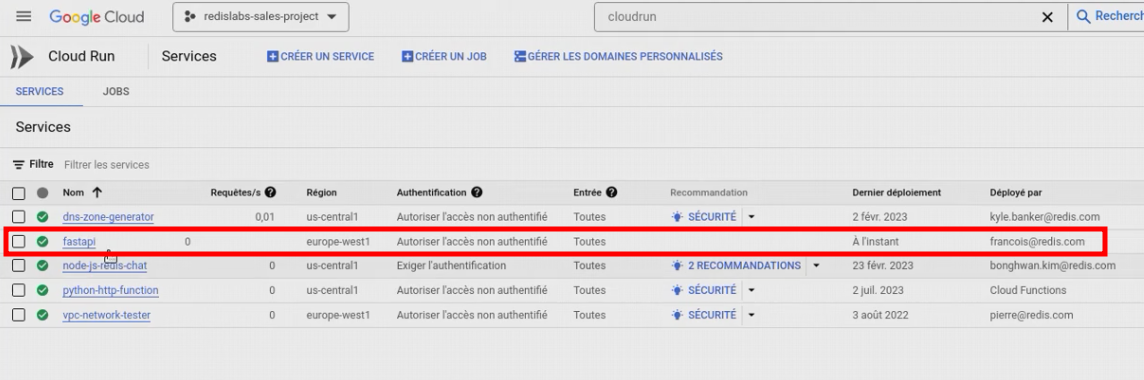
<p>It is deployed as a Google CloudRun service</p>

<p><img src="..//assets/posts/en/ManagedRedisForPythonMicroserviceInCloudRun/7820c653cec27efc7827e247f9cc312f.png" alt="7820c653cec27efc7827e247f9cc312f.png" /></p>

<h2 id="test-the-application">Test the application</h2>

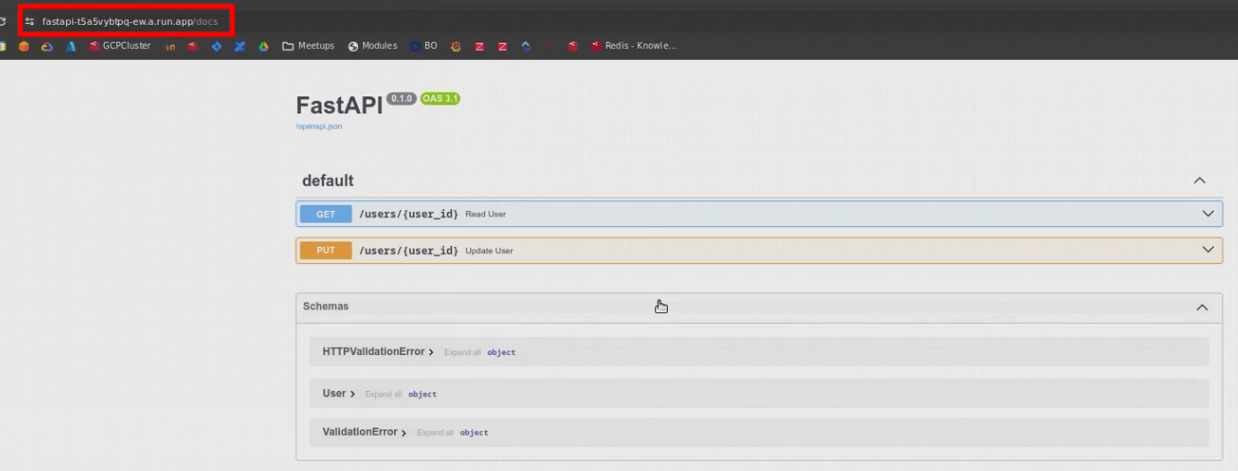
<p>It exposes the Swagger web user interface</p>

<p><img src="..//assets/posts/en/ManagedRedisForPythonMicroserviceInCloudRun/e9d4568c59bade96a1684bd232c9c8e8.png" alt="e9d4568c59bade96a1684bd232c9c8e8.png" /></p>

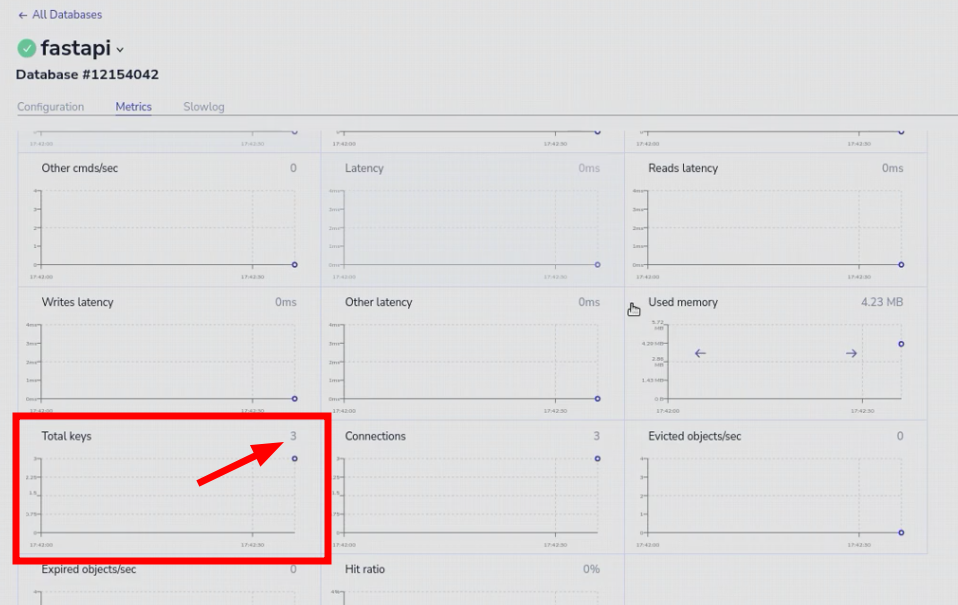
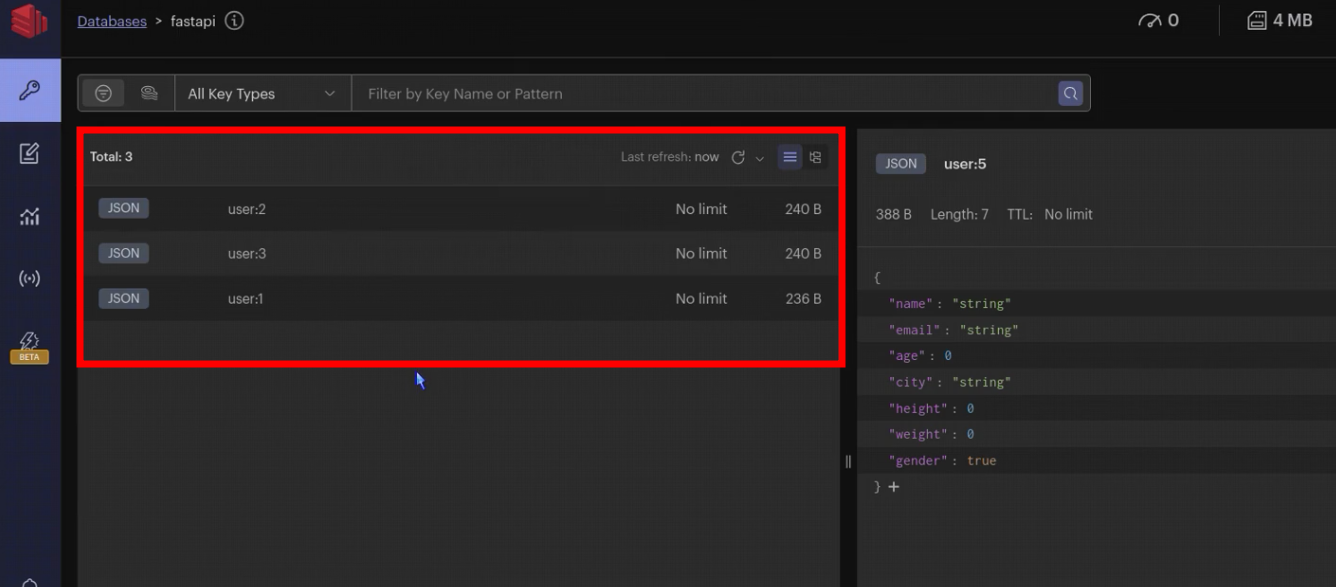
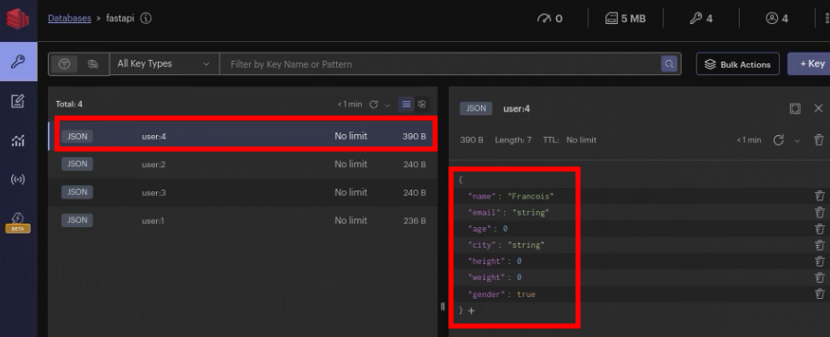
<p>New records are stored in Redis Enterprise Cloud (Managed) on GCP</p>

<p><img src="..//assets/posts/en/ManagedRedisForPythonMicroserviceInCloudRun/f8349a52a1e0ba9f7b33b9ebceac4277.png" alt="f8349a52a1e0ba9f7b33b9ebceac4277.png" /></p>

<h1 id="materials-and-links">Materials and Links</h1>

<ul>
  <li><a href="https://youtu.be/CYSyy-DjfIU" title="Demonstration video recording">Demo video</a> <sup id="fnref:1" role="doc-noteref"><a href="#fn:1" class="footnote" rel="footnote">1</a></sup></li>
</ul>

<h1 id="footnotes">Footnotes</h1>

<div class="footnotes" role="doc-endnotes">
  <ol>
    <li id="fn:1" role="doc-endnote">
      <p>[https://youtu.be/kK4GxAwJKD0] <a href="#fnref:1" class="reversefootnote" role="doc-backlink">&#8617;</a></p>
    </li>
  </ol>
</div>]]></content><author><name>François Cerbelle</name></author><category term="Redis in 5 minutes" /><category term="Redis" /><category term="Redis Enterprise" /><category term="Python" /><category term="Microservice" /><category term="FastAPI" /><category term="Docker" /><category term="Google" /><category term="GCP" /><category term="CloudRun" /><category term="PaaS" /><category term="DBaaS" /><category term="Managed Redis" /><category term="REST API" /><category term="Stateless" /><summary type="html"><![CDATA[I explain step by step how to implement a Python FastAPI stateless microservice to serve data from a local dockerized Redis-stack, a local dockerized Redis Enterprise and a managed DBaaS Redis Enterprise. I also explain how to dockerize the API, execute it locally, and make it run as a Google CloudRun service. With source code and RedisInsight developer companion client connection to the different databases.]]></summary></entry><entry xml:lang="fr"><title type="html">Redis 12 - Redis enterprise managé et microservice Python dans CloudRun</title><link href="https://fcerbell.github.io//ManagedRedisForPythonMicroserviceInCloudRun-fr/" rel="alternate" type="text/html" title="Redis 12 - Redis enterprise managé et microservice Python dans CloudRun" /><published>2024-02-23T00:00:00+00:00</published><updated>2024-02-23T00:00:00+00:00</updated><id>https://fcerbell.github.io//ManagedRedisForPythonMicroserviceInCloudRun-fr</id><content type="html" xml:base="https://fcerbell.github.io//ManagedRedisForPythonMicroserviceInCloudRun-fr/"><![CDATA[<p>J’explique pas à pas comment implémenter une API #Python FastAPI pour servir des données depuis un docker Redis-stack local, un docker #Redis Enterprise local et un Redis Enterprise managé DBaaS. J’explique aussi comment dockeriser l’API, l’exécuter locallement et la faire exécuter comme service Google #CloudRun. Avec les sources et la connexion depuis le client graphique #RedisInsight.</p>

<p>Vous pouvez trouver des liens vers les enregistrements vidéo et les supports imprimables associés à la
<a href="#supports-et-liens">fin de cet article</a>.</p>

<ul id="markdown-toc">
  <li><a href="#vidéo" id="markdown-toc-vidéo">Vidéo</a></li>
  <li><a href="#squelette-python-et-fastapi" id="markdown-toc-squelette-python-et-fastapi">Squelette Python et FastAPI</a>    <ul>
      <li><a href="#environement-de-dev" id="markdown-toc-environement-de-dev">Environement de dev</a></li>
      <li><a href="#code-de-lapi" id="markdown-toc-code-de-lapi">Code de l’API</a></li>
      <li><a href="#test-de-lapi" id="markdown-toc-test-de-lapi">Test de l’API</a></li>
    </ul>
  </li>
  <li><a href="#base-locale--redis-stack" id="markdown-toc-base-locale--redis-stack">Base locale : Redis-Stack</a>    <ul>
      <li><a href="#préparation" id="markdown-toc-préparation">Préparation</a></li>
      <li><a href="#utilisation-de-redis-dans-le-code" id="markdown-toc-utilisation-de-redis-dans-le-code">Utilisation de Redis dans le code</a></li>
      <li><a href="#test-de-lapi-1" id="markdown-toc-test-de-lapi-1">Test de l’API</a></li>
    </ul>
  </li>
  <li><a href="#base-locale--redis-enterprise" id="markdown-toc-base-locale--redis-enterprise">Base locale : Redis Enterprise</a>    <ul>
      <li><a href="#installation-rapide" id="markdown-toc-installation-rapide">Installation rapide</a></li>
      <li><a href="#initialisation-du-cluster" id="markdown-toc-initialisation-du-cluster">Initialisation du cluster</a></li>
      <li><a href="#création-de-la-base" id="markdown-toc-création-de-la-base">Création de la base</a></li>
      <li><a href="#authentification-depuis-le-code" id="markdown-toc-authentification-depuis-le-code">Authentification depuis le code</a></li>
      <li><a href="#test-du-microservice" id="markdown-toc-test-du-microservice">Test du microservice</a></li>
    </ul>
  </li>
  <li><a href="#dockerisation-du-microservice" id="markdown-toc-dockerisation-du-microservice">Dockerisation du microservice</a>    <ul>
      <li><a href="#préparation-1" id="markdown-toc-préparation-1">Préparation</a></li>
      <li><a href="#construction-du-conteneur" id="markdown-toc-construction-du-conteneur">Construction du conteneur</a></li>
      <li><a href="#exécution-du-microservice" id="markdown-toc-exécution-du-microservice">Exécution du microservice</a></li>
      <li><a href="#test-du-microservice-1" id="markdown-toc-test-du-microservice-1">Test du microservice</a></li>
    </ul>
  </li>
  <li><a href="#redis-enterprise-managé-dbaas" id="markdown-toc-redis-enterprise-managé-dbaas">Redis Enterprise managé DBaaS</a>    <ul>
      <li><a href="#création-dune-base-redis-enterprise-dans-le-cloud" id="markdown-toc-création-dune-base-redis-enterprise-dans-le-cloud">Création d’une base Redis enterprise dans le cloud</a></li>
      <li><a href="#mise-à-jour-des-informations-de-connexion" id="markdown-toc-mise-à-jour-des-informations-de-connexion">Mise à jour des informations de connexion</a></li>
      <li><a href="#test-hybride-du-microservice" id="markdown-toc-test-hybride-du-microservice">Test hybride du microservice</a></li>
      <li><a href="#supervision-cloud" id="markdown-toc-supervision-cloud">Supervision Cloud</a></li>
    </ul>
  </li>
  <li><a href="#déploiement-google-cloudrun" id="markdown-toc-déploiement-google-cloudrun">Déploiement Google CloudRun</a>    <ul>
      <li><a href="#création-du-service" id="markdown-toc-création-du-service">Création du service</a></li>
      <li><a href="#test-final" id="markdown-toc-test-final">Test final</a></li>
    </ul>
  </li>
  <li><a href="#supports-et-liens" id="markdown-toc-supports-et-liens">Supports et liens</a></li>
  <li><a href="#notes-de-bas-de-page" id="markdown-toc-notes-de-bas-de-page">Notes de bas de page</a></li>
</ul>

<h1 id="vidéo">Vidéo</h1>

<center><iframe width="420" height="315" src="https://www.youtube.com/embed/QONgF2J7qUE" frameborder="0" allowfullscreen=""></iframe></center>

<h1 id="squelette-python-et-fastapi">Squelette Python et FastAPI</h1>

<h2 id="environement-de-dev">Environement de dev</h2>

<p>D’abord, il faut créer un répertoire pour stocker les sources et un environnement de développement virtuel Python :</p>

<div class="language-bash highlighter-rouge"><div class="highlight"><pre class="highlight"><code><span class="nb">mkdir </span>FastApiDemo
<span class="nb">cd </span>FastApiDemo
python3 <span class="nt">-m</span> venv venv
<span class="nb">source </span>venv/bin/activate
pip <span class="nb">install </span>fastapi
pip <span class="nb">install </span>uvicorn
</code></pre></div></div>

<h2 id="code-de-lapi">Code de l’API</h2>

<p>Ensuite, on peut commencer avec une liste d’objets stockée en mémoire, dans un tebleau, et deux points de connexion REST pour implémenter les lectures (GET) et les écritures (PUT) :</p>

<p><strong>main.py</strong> :</p>
<div class="language-python highlighter-rouge"><div class="highlight"><pre class="highlight"><code><span class="c1"># Modèle de données
#
</span><span class="kn">from</span> <span class="nn">pydantic</span> <span class="kn">import</span> <span class="n">BaseModel</span>
<span class="kn">from</span> <span class="nn">typing</span> <span class="kn">import</span> <span class="n">Union</span>
<span class="k">class</span> <span class="nc">User</span><span class="p">(</span><span class="n">BaseModel</span><span class="p">):</span>
    <span class="n">name</span><span class="p">:</span> <span class="nb">str</span>
    <span class="n">email</span><span class="p">:</span> <span class="nb">str</span>
    <span class="n">age</span><span class="p">:</span> <span class="nb">int</span>
    <span class="n">city</span><span class="p">:</span> <span class="nb">str</span>
    <span class="n">height</span><span class="p">:</span> <span class="nb">float</span>
    <span class="n">weight</span><span class="p">:</span> <span class="nb">float</span>
    <span class="n">gender</span><span class="p">:</span> <span class="n">Union</span><span class="p">[</span><span class="nb">bool</span><span class="p">,</span> <span class="bp">None</span><span class="p">]</span> <span class="o">=</span> <span class="bp">None</span>

<span class="n">users</span> <span class="o">=</span> <span class="p">[]</span>

<span class="c1"># Expose data access with a REST API provided by FastAPI
#
</span><span class="kn">from</span> <span class="nn">fastapi</span> <span class="kn">import</span> <span class="n">FastAPI</span>
<span class="n">app</span> <span class="o">=</span> <span class="n">FastAPI</span><span class="p">()</span>

<span class="c1"># Interface de consultation
#
</span><span class="o">@</span><span class="n">app</span><span class="p">.</span><span class="n">get</span><span class="p">(</span><span class="s">"/users/{user_id}"</span><span class="p">)</span>
<span class="k">def</span> <span class="nf">read_user</span><span class="p">(</span><span class="n">user_id</span><span class="p">:</span> <span class="nb">int</span><span class="p">):</span>
    <span class="k">return</span> <span class="n">users</span><span class="p">[</span><span class="n">user_id</span><span class="p">]</span>

<span class="c1"># Interface de modification
#
</span><span class="o">@</span><span class="n">app</span><span class="p">.</span><span class="n">put</span><span class="p">(</span><span class="s">"/users/{user_id}"</span><span class="p">)</span>
<span class="k">def</span> <span class="nf">update_user</span><span class="p">(</span><span class="n">user_id</span><span class="p">:</span> <span class="nb">int</span><span class="p">,</span> <span class="n">user</span><span class="p">:</span> <span class="n">User</span><span class="p">):</span>
    <span class="k">while</span> <span class="p">(</span><span class="nb">len</span><span class="p">(</span><span class="n">users</span><span class="p">)</span><span class="o">&lt;=</span><span class="n">user_id</span><span class="p">):</span>
        <span class="n">users</span><span class="p">.</span><span class="n">append</span><span class="p">(</span><span class="s">""</span><span class="p">);</span>
    <span class="n">users</span><span class="p">[</span><span class="n">user_id</span><span class="p">]</span><span class="o">=</span><span class="n">user</span>
    <span class="k">return</span> <span class="bp">True</span>
</code></pre></div></div>

<h2 id="test-de-lapi">Test de l’API</h2>

<p>Nous pouvons désormais démarrer le serveur <code class="language-plaintext highlighter-rouge">uvicorn</code> pour exposer les points de connexion de l’API.</p>

<div class="language-bash highlighter-rouge"><div class="highlight"><pre class="highlight"><code>uvicorn main:app <span class="nt">--reload</span>
</code></pre></div></div>

<p>Puis les tester grâce à <code class="language-plaintext highlighter-rouge">curl</code> en ligne de commande,</p>

<div class="language-bash highlighter-rouge"><div class="highlight"><pre class="highlight"><code>curl http://localhost:8000/users/1 <span class="nt">--request</span> GET <span class="nt">--header</span> <span class="s1">'content-type: application/json'</span>
curl <span class="nt">--request</span> PUT <span class="nt">--url</span> <span class="s2">"http://localhost:8000/users/1"</span> <span class="nt">--header</span> <span class="s1">'content-type: application/json'</span> <span class="nt">--data</span> <span class="s1">'{"name":"Paul John","email":"paul.john@example.com","age":42,"city":"London","height":0,"weight":0,"gender":"True"}'</span>
curl http://localhost:8000/users/1 <span class="nt">--request</span> GET <span class="nt">--header</span> <span class="s1">'content-type: application/json'</span>
xdg-open http://localhost:8000/docs
</code></pre></div></div>

<p>puis grâce à l’interface wab de Swagger fournie par FastAPI sur l’URL http://localhost:8000/docs :</p>

<p><img src="..//assets/posts/fr/ManagedRedisForPythonMicroserviceInCloudRun/372f09be9bbeea62c88ea95275f28e49.png" alt="372f09be9bbeea62c88ea95275f28e49.png" /></p>

<h1 id="base-locale--redis-stack">Base locale : Redis-Stack</h1>

<p>Désormais, nous voulons utiliser une base Redis à la place du tableau d’objets en mémoire pour y stocker les enregistrements. Cela rendra notre microservice complètement « Stateless ».</p>

<h2 id="préparation">Préparation</h2>

<p>Nous commençons par démarrer une image dockerisée de Redis communautaire avec tous les modules officiels. Elle expose une base Redis sur le port standard $6379$ et un client graphique <em>RedisInsight</em> sur le port $8001$</p>

<div class="language-bash highlighter-rouge"><div class="highlight"><pre class="highlight"><code>docker run <span class="nt">-p</span> 6379:6379 <span class="nt">-p</span> 8001:8001 <span class="nt">--name</span> redis-stack redis/redis-stack
</code></pre></div></div>

<p>Il faut ensuite installer la bibliothèque cliente Redis pour Python dans l’environnement virtuel de développement et j’utilise des variables d’environnement pour transmettre les détails de connexion au microservice :</p>
<div class="language-bash highlighter-rouge"><div class="highlight"><pre class="highlight"><code>pip <span class="nb">install</span> <span class="s2">"redis[hiredis]"</span>
<span class="nb">export </span><span class="nv">REDISHOST</span><span class="o">=</span>localhost
<span class="nb">export </span><span class="nv">REDISPORT</span><span class="o">=</span>6379
</code></pre></div></div>

<h2 id="utilisation-de-redis-dans-le-code">Utilisation de Redis dans le code</h2>

<p>Nous pouvons enfin modifier le code pour qu’il utilise Redis :</p>
<ol>
  <li>Retirer le tableau en mémoire</li>
  <li>Inclure la bibliothèque cliente</li>
  <li>Ouvrir une connexion sur la base Redis</li>
  <li>Éventuellement pré-peupler la base avec des exemples</li>
  <li>Utiliser Redis comme source pour le point de connexion en lecture (GET)</li>
  <li>Utiliser Redis comme destination pour le point de connexion en écriture (PUT)</li>
</ol>

<div class="language-python highlighter-rouge"><div class="highlight"><pre class="highlight"><code><span class="c1"># Modèle de données
#
</span><span class="kn">from</span> <span class="nn">pydantic</span> <span class="kn">import</span> <span class="n">BaseModel</span>
<span class="kn">from</span> <span class="nn">typing</span> <span class="kn">import</span> <span class="n">Union</span>
<span class="k">class</span> <span class="nc">User</span><span class="p">(</span><span class="n">BaseModel</span><span class="p">):</span>
    <span class="n">name</span><span class="p">:</span> <span class="nb">str</span>
    <span class="n">email</span><span class="p">:</span> <span class="nb">str</span>
    <span class="n">age</span><span class="p">:</span> <span class="nb">int</span>
    <span class="n">city</span><span class="p">:</span> <span class="nb">str</span>
    <span class="n">height</span><span class="p">:</span> <span class="nb">float</span>
    <span class="n">weight</span><span class="p">:</span> <span class="nb">float</span>
    <span class="n">gender</span><span class="p">:</span> <span class="n">Union</span><span class="p">[</span><span class="nb">bool</span><span class="p">,</span> <span class="bp">None</span><span class="p">]</span> <span class="o">=</span> <span class="bp">None</span>

<span class="c1"># Bibliothèque cliente Redis et ouverture de la connexion
#
</span><span class="kn">import</span> <span class="nn">redis</span>
<span class="kn">import</span> <span class="nn">os</span>
<span class="n">r</span> <span class="o">=</span> <span class="n">redis</span><span class="p">.</span><span class="n">Redis</span><span class="p">(</span>
        <span class="n">host</span><span class="o">=</span><span class="n">os</span><span class="p">.</span><span class="n">environ</span><span class="p">.</span><span class="n">get</span><span class="p">(</span><span class="s">'REDISHOST'</span><span class="p">),</span>
        <span class="n">port</span><span class="o">=</span><span class="n">os</span><span class="p">.</span><span class="n">environ</span><span class="p">.</span><span class="n">get</span><span class="p">(</span><span class="s">'REDISPORT'</span><span class="p">),</span>
        <span class="p">)</span>

<span class="c1"># Insertion de quelques enregistrements d'exemple
# JSON en utilisant le module éponyme dans Redis
#
</span><span class="kn">from</span> <span class="nn">redis.commands.json.path</span> <span class="kn">import</span> <span class="n">Path</span>
<span class="n">r</span><span class="p">.</span><span class="n">json</span><span class="p">().</span><span class="nb">set</span><span class="p">(</span><span class="s">"user:1"</span><span class="p">,</span> <span class="n">Path</span><span class="p">.</span><span class="n">root_path</span><span class="p">(),</span> <span class="p">{</span> <span class="s">"name"</span><span class="p">:</span> <span class="s">"Paul John"</span><span class="p">,</span> <span class="s">"email"</span><span class="p">:</span> <span class="s">"paul.john@example.com"</span><span class="p">,</span> <span class="s">"age"</span><span class="p">:</span> <span class="mi">42</span><span class="p">,</span> <span class="s">"city"</span><span class="p">:</span> <span class="s">"London"</span> <span class="p">})</span>
<span class="n">r</span><span class="p">.</span><span class="n">json</span><span class="p">().</span><span class="nb">set</span><span class="p">(</span><span class="s">"user:2"</span><span class="p">,</span> <span class="n">Path</span><span class="p">.</span><span class="n">root_path</span><span class="p">(),</span> <span class="p">{</span> <span class="s">"name"</span><span class="p">:</span> <span class="s">"Eden Zamir"</span><span class="p">,</span> <span class="s">"email"</span><span class="p">:</span> <span class="s">"eden.zamir@example.com"</span><span class="p">,</span> <span class="s">"age"</span><span class="p">:</span> <span class="mi">29</span><span class="p">,</span> <span class="s">"city"</span><span class="p">:</span> <span class="s">"Tel Aviv"</span> <span class="p">})</span>
<span class="n">r</span><span class="p">.</span><span class="n">json</span><span class="p">().</span><span class="nb">set</span><span class="p">(</span><span class="s">"user:3"</span><span class="p">,</span> <span class="n">Path</span><span class="p">.</span><span class="n">root_path</span><span class="p">(),</span> <span class="p">{</span> <span class="s">"name"</span><span class="p">:</span> <span class="s">"Paul Zamir"</span><span class="p">,</span> <span class="s">"email"</span><span class="p">:</span> <span class="s">"paul.zamir@example.com"</span><span class="p">,</span> <span class="s">"age"</span><span class="p">:</span> <span class="mi">35</span><span class="p">,</span> <span class="s">"city"</span><span class="p">:</span> <span class="s">"Tel Aviv"</span> <span class="p">})</span>

<span class="c1"># Expose data access with a REST API provided by FastAPI
#
</span><span class="kn">from</span> <span class="nn">fastapi</span> <span class="kn">import</span> <span class="n">FastAPI</span>
<span class="n">app</span> <span class="o">=</span> <span class="n">FastAPI</span><span class="p">()</span>

<span class="c1"># Point de connexion en consultation
#
</span><span class="o">@</span><span class="n">app</span><span class="p">.</span><span class="n">get</span><span class="p">(</span><span class="s">"/users/{user_id}"</span><span class="p">)</span>
<span class="k">def</span> <span class="nf">read_user</span><span class="p">(</span><span class="n">user_id</span><span class="p">:</span> <span class="nb">int</span><span class="p">):</span>
    <span class="k">return</span> <span class="n">r</span><span class="p">.</span><span class="n">json</span><span class="p">().</span><span class="n">get</span><span class="p">(</span><span class="s">"user:"</span><span class="o">+</span><span class="nb">str</span><span class="p">(</span><span class="n">user_id</span><span class="p">))</span>

<span class="c1"># Point de connexion en modification
#
</span><span class="o">@</span><span class="n">app</span><span class="p">.</span><span class="n">put</span><span class="p">(</span><span class="s">"/users/{user_id}"</span><span class="p">)</span>
<span class="k">def</span> <span class="nf">update_user</span><span class="p">(</span><span class="n">user_id</span><span class="p">:</span> <span class="nb">int</span><span class="p">,</span> <span class="n">user</span><span class="p">:</span> <span class="n">User</span><span class="p">):</span>
    <span class="k">return</span> <span class="n">r</span><span class="p">.</span><span class="n">json</span><span class="p">().</span><span class="nb">set</span><span class="p">(</span><span class="s">'user:'</span><span class="o">+</span><span class="nb">str</span><span class="p">(</span><span class="n">user_id</span><span class="p">),</span> <span class="n">Path</span><span class="p">.</span><span class="n">root_path</span><span class="p">(),</span>
        <span class="p">{</span> <span class="s">"name"</span><span class="p">:</span> <span class="n">user</span><span class="p">.</span><span class="n">name</span><span class="p">,</span> <span class="s">"email"</span><span class="p">:</span> <span class="n">user</span><span class="p">.</span><span class="n">email</span><span class="p">,</span> <span class="s">"age"</span><span class="p">:</span> <span class="n">user</span><span class="p">.</span><span class="n">age</span><span class="p">,</span> <span class="s">"city"</span><span class="p">:</span> <span class="n">user</span><span class="p">.</span><span class="n">city</span><span class="p">,</span> <span class="s">"height"</span><span class="p">:</span> <span class="n">user</span><span class="p">.</span><span class="n">height</span><span class="p">,</span> <span class="s">"weight"</span><span class="p">:</span> <span class="n">user</span><span class="p">.</span><span class="n">weight</span><span class="p">,</span> <span class="s">"gender"</span><span class="p">:</span> <span class="n">user</span><span class="p">.</span><span class="n">gender</span> <span class="p">})</span>
</code></pre></div></div>

<h2 id="test-de-lapi-1">Test de l’API</h2>

<p>Nous pouvons redémarrer le serveur d’application local :</p>
<div class="language-bash highlighter-rouge"><div class="highlight"><pre class="highlight"><code>uvicorn main:app <span class="nt">--reload</span>
</code></pre></div></div>

<p>et tenter de consulter les quatre premiers enregistrements :</p>
<div class="language-bash highlighter-rouge"><div class="highlight"><pre class="highlight"><code><span class="k">for </span>i <span class="k">in </span>1 2 3 4<span class="p">;</span> <span class="k">do
  </span><span class="nb">printf</span> <span class="s2">"</span><span class="se">\n</span><span class="s2">%s: "</span> <span class="s2">"</span><span class="nv">$i</span><span class="s2">"</span>
  curl http://localhost:8000/users/<span class="nv">$i</span> <span class="nt">--request</span> GET <span class="nt">--header</span> <span class="s1">'content-type: application/json'</span>
<span class="k">done</span>
</code></pre></div></div>

<p>Il n’y en a que trois, le quatrième n’existe pas et renvoie <em>null</em></p>

<p><img src="..//assets/posts/fr/ManagedRedisForPythonMicroserviceInCloudRun/315e0f9083bd7e02d1c533bc1da7990b.png" alt="315e0f9083bd7e02d1c533bc1da7990b.png" /></p>

<p>Créons le en ligne de commande :</p>
<div class="language-bash highlighter-rouge"><div class="highlight"><pre class="highlight"><code>curl <span class="nt">--request</span> PUT <span class="nt">--url</span> <span class="s2">"http://localhost:8000/users/4"</span> <span class="nt">--header</span> <span class="s1">'content-type: application/json'</span> <span class="nt">--data</span> <span class="s1">'{"name":"Francois Cerbelle","email":"francois@redis.com","age":48,"city":"Paris","height":179,"weight":84,"gender":"True"}'</span>
</code></pre></div></div>

<p>Et vérifions dans l’interface de Swagger, par exemple :</p>

<p><img src="..//assets/posts/fr/ManagedRedisForPythonMicroserviceInCloudRun/0056b68bd7afe953885a69b1f28cfdf7.png" alt="0056b68bd7afe953885a69b1f28cfdf7.png" /></p>

<h1 id="base-locale--redis-enterprise">Base locale : Redis Enterprise</h1>

<p>Le but est d’utiliser un environnement de développement aussi proche que possible de l’environnement final de production. Remplaçons la base locale Redis communautaire par une base Redis Entreprise.</p>

<h2 id="installation-rapide">Installation rapide</h2>

<p>Tout d’abord, nous pouvons démarrer une image docker de Redis Enterprise. J’expose les ports réseau pour l’interface d’administration web et pour l’API REST :</p>
<div class="language-bash highlighter-rouge"><div class="highlight"><pre class="highlight"><code>docker run <span class="nt">-d</span> <span class="nt">--cap-add</span> sys_resource <span class="nt">--name</span> redisenterprise1 <span class="nt">-p</span> 8443:8443 <span class="nt">-p</span> 9443:9443 redislabs/redis
</code></pre></div></div>

<h2 id="initialisation-du-cluster">Initialisation du cluster</h2>

<p>Redis Entreprise fonctionne comme un orchestrateur et un gestionnaire de configuration pour des bases Redis, un peu comme Kubernetes pour des conteneurs. Nous devons donc commencer par initialiser le cluster Redis Enterprise avec un premier, et seul, nœud. Pour cela, il y a soit l’interface web : https://localhost:8443</p>
<div class="language-bash highlighter-rouge"><div class="highlight"><pre class="highlight"><code>xdg-open https://localhost:8443
</code></pre></div></div>

<p>Création du premier administrateur :</p>

<p><img src="..//assets/posts/fr/ManagedRedisForPythonMicroserviceInCloudRun/8678540f2a120d7cefc1fe562b1e6474.png" alt="8678540f2a120d7cefc1fe562b1e6474.png" /></p>

<p>Choix du nom de cluster :</p>

<p><img src="..//assets/posts/fr/ManagedRedisForPythonMicroserviceInCloudRun/d6641ace1d45c9fcfc102e1093f2973d.png" alt="d6641ace1d45c9fcfc102e1093f2973d.png" /></p>

<p>Configuration du nœud :</p>

<p><img src="..//assets/posts/fr/ManagedRedisForPythonMicroserviceInCloudRun/a7f377b90656d0660e84de6b73b34d40.png" alt="a7f377b90656d0660e84de6b73b34d40.png" /></p>

<p>soit l’API REST :</p>
<div class="language-bash highlighter-rouge"><div class="highlight"><pre class="highlight"><code>curl <span class="s2">"https://127.0.0.1:9443/v1/bootstrap/create_cluster"</span> <span class="nt">--insecure</span> <span class="nt">-X</span> <span class="s2">"POST"</span> <span class="nt">-H</span> <span class="s2">"Accept:application/json"</span> <span class="nt">-H</span> <span class="s2">"Content-Type:application/json"</span> <span class="nt">-u</span> <span class="s2">"francois@redis.com:password"</span> <span class="nt">-d</span> <span class="s1">'{"action": "create_cluster","cluster": { "name": "cluster.local" },"node": {"paths": {"persistent_path": "/var/opt/redislabs/persist","ephemeral_path": "/var/opt/redislabs/tmp","bigredis_storage_path": "/var/opt/redislabs/flash"}},"license": "","credentials": {"username": "francois@redis.com","password": "password"}}'</span>
</code></pre></div></div>

<h2 id="création-de-la-base">Création de la base</h2>

<p>Nous pouvons ensuite décrire à Redis Enterprise la base Redis que nous souhaitons lui voir créer, superviser, maintenir et exposer avec les modules nécessaires à notre projet (JSON et Search). Nous utiliserons l’interface web, mais nous pourrions également utiliser l’API REST.</p>

<div class="language-bash highlighter-rouge"><div class="highlight"><pre class="highlight"><code>xdg-open https://localhost:8443
</code></pre></div></div>

<p><img src="..//assets/posts/fr/ManagedRedisForPythonMicroserviceInCloudRun/c22f19ea3d6eb0c4b477af60d3f20bf2.png" alt="c22f19ea3d6eb0c4b477af60d3f20bf2.png" /></p>

<p>Nous pourrions utiliser l’API REST, mais nous utiliserons l’interface web pour récupérer les informations de connexion à la base, le nom ou l’IP, le port et éventuellement le mot de passe :</p>

<p><img src="..//assets/posts/fr/ManagedRedisForPythonMicroserviceInCloudRun/30c3a601f7ca0da4dda027e40b877224.png" alt="30c3a601f7ca0da4dda027e40b877224.png" /></p>

<p>Utilisons les informations receuillies pour valoriser les variables d’environnement de notre microservice.</p>

<div class="language-bash highlighter-rouge"><div class="highlight"><pre class="highlight"><code><span class="nb">export </span><span class="nv">REDISHOST</span><span class="o">=</span>172.17.0.2
<span class="nb">export </span><span class="nv">REDISPORT</span><span class="o">=</span>12581
<span class="nb">export </span><span class="nv">REDISPASS</span><span class="o">=</span>xxx
</code></pre></div></div>

<h2 id="authentification-depuis-le-code">Authentification depuis le code</h2>

<p>Nous devons éventuellement modifier le code pour utiliser le mot de passe fourni par la variable d’environnement lors de la connexion à la base Redis :</p>

<div class="language-python highlighter-rouge"><div class="highlight"><pre class="highlight"><code><span class="c1"># Modèle de données
#
</span><span class="kn">from</span> <span class="nn">pydantic</span> <span class="kn">import</span> <span class="n">BaseModel</span>
<span class="kn">from</span> <span class="nn">typing</span> <span class="kn">import</span> <span class="n">Union</span>
<span class="k">class</span> <span class="nc">User</span><span class="p">(</span><span class="n">BaseModel</span><span class="p">):</span>
    <span class="n">name</span><span class="p">:</span> <span class="nb">str</span>
    <span class="n">email</span><span class="p">:</span> <span class="nb">str</span>
    <span class="n">age</span><span class="p">:</span> <span class="nb">int</span>
    <span class="n">city</span><span class="p">:</span> <span class="nb">str</span>
    <span class="n">height</span><span class="p">:</span> <span class="nb">float</span>
    <span class="n">weight</span><span class="p">:</span> <span class="nb">float</span>
    <span class="n">gender</span><span class="p">:</span> <span class="n">Union</span><span class="p">[</span><span class="nb">bool</span><span class="p">,</span> <span class="bp">None</span><span class="p">]</span> <span class="o">=</span> <span class="bp">None</span>

<span class="c1"># Stockage des données dans Redis
#
</span><span class="kn">import</span> <span class="nn">redis</span>
<span class="kn">import</span> <span class="nn">os</span>
<span class="n">r</span> <span class="o">=</span> <span class="n">redis</span><span class="p">.</span><span class="n">Redis</span><span class="p">(</span>
        <span class="n">host</span><span class="o">=</span><span class="n">os</span><span class="p">.</span><span class="n">environ</span><span class="p">.</span><span class="n">get</span><span class="p">(</span><span class="s">'REDISHOST'</span><span class="p">),</span>
        <span class="n">port</span><span class="o">=</span><span class="n">os</span><span class="p">.</span><span class="n">environ</span><span class="p">.</span><span class="n">get</span><span class="p">(</span><span class="s">'REDISPORT'</span><span class="p">),</span>
        <span class="n">password</span><span class="o">=</span><span class="n">os</span><span class="p">.</span><span class="n">environ</span><span class="p">.</span><span class="n">get</span><span class="p">(</span><span class="s">'REDISPASS'</span><span class="p">),</span>
        <span class="p">)</span>

<span class="c1"># Prépopulation de la base avec des enregistrements d'exemple
# en JSON
#
</span><span class="kn">from</span> <span class="nn">redis.commands.json.path</span> <span class="kn">import</span> <span class="n">Path</span>
<span class="n">r</span><span class="p">.</span><span class="n">json</span><span class="p">().</span><span class="nb">set</span><span class="p">(</span><span class="s">"user:1"</span><span class="p">,</span> <span class="n">Path</span><span class="p">.</span><span class="n">root_path</span><span class="p">(),</span> <span class="p">{</span> <span class="s">"name"</span><span class="p">:</span> <span class="s">"Paul John"</span><span class="p">,</span> <span class="s">"email"</span><span class="p">:</span> <span class="s">"paul.john@example.com"</span><span class="p">,</span> <span class="s">"age"</span><span class="p">:</span> <span class="mi">42</span><span class="p">,</span> <span class="s">"city"</span><span class="p">:</span> <span class="s">"London"</span> <span class="p">})</span>
<span class="n">r</span><span class="p">.</span><span class="n">json</span><span class="p">().</span><span class="nb">set</span><span class="p">(</span><span class="s">"user:2"</span><span class="p">,</span> <span class="n">Path</span><span class="p">.</span><span class="n">root_path</span><span class="p">(),</span> <span class="p">{</span> <span class="s">"name"</span><span class="p">:</span> <span class="s">"Eden Zamir"</span><span class="p">,</span> <span class="s">"email"</span><span class="p">:</span> <span class="s">"eden.zamir@example.com"</span><span class="p">,</span> <span class="s">"age"</span><span class="p">:</span> <span class="mi">29</span><span class="p">,</span> <span class="s">"city"</span><span class="p">:</span> <span class="s">"Tel Aviv"</span> <span class="p">})</span>
<span class="n">r</span><span class="p">.</span><span class="n">json</span><span class="p">().</span><span class="nb">set</span><span class="p">(</span><span class="s">"user:3"</span><span class="p">,</span> <span class="n">Path</span><span class="p">.</span><span class="n">root_path</span><span class="p">(),</span> <span class="p">{</span> <span class="s">"name"</span><span class="p">:</span> <span class="s">"Paul Zamir"</span><span class="p">,</span> <span class="s">"email"</span><span class="p">:</span> <span class="s">"paul.zamir@example.com"</span><span class="p">,</span> <span class="s">"age"</span><span class="p">:</span> <span class="mi">35</span><span class="p">,</span> <span class="s">"city"</span><span class="p">:</span> <span class="s">"Tel Aviv"</span> <span class="p">})</span>

<span class="c1"># Expose data access with a REST API provided by FastAPI
#
</span><span class="kn">from</span> <span class="nn">fastapi</span> <span class="kn">import</span> <span class="n">FastAPI</span>
<span class="n">app</span> <span class="o">=</span> <span class="n">FastAPI</span><span class="p">()</span>

<span class="c1"># Point de connexion pour les consultations
#
</span><span class="o">@</span><span class="n">app</span><span class="p">.</span><span class="n">get</span><span class="p">(</span><span class="s">"/users/{user_id}"</span><span class="p">)</span>
<span class="k">def</span> <span class="nf">read_user</span><span class="p">(</span><span class="n">user_id</span><span class="p">:</span> <span class="nb">int</span><span class="p">):</span>
    <span class="k">return</span> <span class="n">r</span><span class="p">.</span><span class="n">json</span><span class="p">().</span><span class="n">get</span><span class="p">(</span><span class="s">"user:"</span><span class="o">+</span><span class="nb">str</span><span class="p">(</span><span class="n">user_id</span><span class="p">))</span>

<span class="c1"># Point de connexion pour les modifications
#
</span><span class="o">@</span><span class="n">app</span><span class="p">.</span><span class="n">put</span><span class="p">(</span><span class="s">"/users/{user_id}"</span><span class="p">)</span>
<span class="k">def</span> <span class="nf">update_user</span><span class="p">(</span><span class="n">user_id</span><span class="p">:</span> <span class="nb">int</span><span class="p">,</span> <span class="n">user</span><span class="p">:</span> <span class="n">User</span><span class="p">):</span>
    <span class="k">return</span> <span class="n">r</span><span class="p">.</span><span class="n">json</span><span class="p">().</span><span class="nb">set</span><span class="p">(</span><span class="s">'user:'</span><span class="o">+</span><span class="nb">str</span><span class="p">(</span><span class="n">user_id</span><span class="p">),</span> <span class="n">Path</span><span class="p">.</span><span class="n">root_path</span><span class="p">(),</span>
        <span class="p">{</span> <span class="s">"name"</span><span class="p">:</span> <span class="n">user</span><span class="p">.</span><span class="n">name</span><span class="p">,</span> <span class="s">"email"</span><span class="p">:</span> <span class="n">user</span><span class="p">.</span><span class="n">email</span><span class="p">,</span> <span class="s">"age"</span><span class="p">:</span> <span class="n">user</span><span class="p">.</span><span class="n">age</span><span class="p">,</span> <span class="s">"city"</span><span class="p">:</span> <span class="n">user</span><span class="p">.</span><span class="n">city</span><span class="p">,</span> <span class="s">"height"</span><span class="p">:</span> <span class="n">user</span><span class="p">.</span><span class="n">height</span><span class="p">,</span> <span class="s">"weight"</span><span class="p">:</span> <span class="n">user</span><span class="p">.</span><span class="n">weight</span><span class="p">,</span> <span class="s">"gender"</span><span class="p">:</span> <span class="n">user</span><span class="p">.</span><span class="n">gender</span> <span class="p">})</span>
</code></pre></div></div>

<h2 id="test-du-microservice">Test du microservice</h2>

<p>Voilà le moment de tester la connexion de notre microservice à la base Redis fournie par Redis Enterprise. Redémarrons-le :</p>

<div class="language-bash highlighter-rouge"><div class="highlight"><pre class="highlight"><code>uvicorn main:app <span class="nt">--reload</span>
</code></pre></div></div>

<p>Nous pouvons utiliser le même scénario que précédemment, je ne vais pas le détailler une seconde fois :</p>
<div class="language-bash highlighter-rouge"><div class="highlight"><pre class="highlight"><code><span class="k">for </span>i <span class="k">in </span>1 2 3 4<span class="p">;</span> <span class="k">do
  </span><span class="nb">printf</span> <span class="s2">"</span><span class="se">\n</span><span class="s2">%s: "</span> <span class="s2">"</span><span class="nv">$i</span><span class="s2">"</span>
  curl http://localhost:8000/users/<span class="nv">$i</span> <span class="nt">--request</span> GET <span class="nt">--header</span> <span class="s1">'content-type: application/json'</span>
<span class="k">done
</span>curl <span class="nt">--request</span> PUT <span class="nt">--url</span> <span class="s2">"http://localhost:8000/users/4"</span> <span class="nt">--header</span> <span class="s1">'content-type: application/json'</span> <span class="nt">--data</span> <span class="s1">'{"name":"Francois Cerbelle","email":"francois@redis.com","age":48,"city":"Paris","height":179,"weight":84,"gender":"True"}'</span>
xdg-open http://localhost:8000/docs
</code></pre></div></div>

<h1 id="dockerisation-du-microservice">Dockerisation du microservice</h1>

<h2 id="préparation-1">Préparation</h2>

<p>Listons les dépendences de notre microservice pour qu’elles soient disponibles dans le conteneur.</p>

<p><strong>requirements.txt</strong> :</p>
<div class="language-plaintext highlighter-rouge"><div class="highlight"><pre class="highlight"><code>typing
pydantic
fastapi
uvicorn
redis
</code></pre></div></div>

<p>Spécifions la manière de construire le conteneur. Je me suis basé sur l’exemple fourni par Google CloudRun que j’ai modifié pour utiliser <em>uvicorn</em> à la place de <em>gunicorn</em>.</p>

<p><strong>Dockerfile</strong> :</p>
<div class="language-dockerfile highlighter-rouge"><div class="highlight"><pre class="highlight"><code><span class="c"># From https://cloud.google.com/run/docs/quickstarts/build-and-deploy/python?hl=fr</span>

<span class="c"># Use the official lightweight Python image.</span>
<span class="c"># https://hub.docker.com/_/python</span>
<span class="k">FROM</span><span class="s"> python:3.10-slim</span>

<span class="c"># Allow statements and log messages to immediately appear in the Knative logs</span>
<span class="k">ENV</span><span class="s"> PYTHONUNBUFFERED True</span>

<span class="c"># Copy local code to the container image.</span>
<span class="k">ENV</span><span class="s"> APP_HOME /app</span>
<span class="k">WORKDIR</span><span class="s"> $APP_HOME</span>
<span class="k">COPY</span><span class="s"> . ./</span>

<span class="c"># Install production dependencies.</span>
<span class="k">RUN </span>pip <span class="nb">install</span> <span class="nt">--no-cache-dir</span> <span class="nt">-r</span> requirements.txt

<span class="c"># Run the web service on container startup. Here we use the gunicorn</span>
<span class="c"># webserver, with one worker process and 8 threads.</span>
<span class="c"># For environments with multiple CPU cores, increase the number of workers</span>
<span class="c"># to be equal to the cores available.</span>
<span class="c"># Timeout is set to 0 to disable the timeouts of the workers to allow Cloud Run to handle instance scaling.</span>
<span class="c">#CMD exec gunicorn --bind :$PORT --workers 1 --threads 8 --timeout 0 main:app</span>
<span class="k">CMD</span><span class="s"> exec uvicorn --host 0.0.0.0 --port $PORT main:app</span>
</code></pre></div></div>

<p>Il est inutile d’empaqueter certains fichiers temporaire ou de développement, listons les dans les exclusions.</p>

<p><strong>.dockerignore</strong> :</p>
<div class="language-plaintext highlighter-rouge"><div class="highlight"><pre class="highlight"><code>Dockerfile
README.md
*.pyc
*.pyo
*.pyd
__pycache__
.pytest_cache
</code></pre></div></div>

<h2 id="construction-du-conteneur">Construction du conteneur</h2>

<p>L’étape de construction doit être assez rapide, quelques secondes, vu la simplicité de notre microservice.</p>

<div class="language-bash highlighter-rouge"><div class="highlight"><pre class="highlight"><code>docker build <span class="nt">-t</span> fastapi <span class="nb">.</span>
</code></pre></div></div>

<h2 id="exécution-du-microservice">Exécution du microservice</h2>

<p>La ligne de commande démarre le conteneur docker du microservice en précisant le port à utiliser par le serveur <em>uvicorn</em>, et le port forwarding associé pour rendre le serveur accessible depuis l’extérieur. Il est important de prévoir ce paramétrage qui sera indispensable pour le déploiement dans <em>CloudRun</em> par la suite. Le processus dans docker n’ayant pas accès directement aux variables d’environnement à l’extérieur, nous les passons en paramètre.</p>

<div class="language-bash highlighter-rouge"><div class="highlight"><pre class="highlight"><code>docker run <span class="nt">--env</span> <span class="nv">PORT</span><span class="o">=</span>8000 <span class="nt">--env</span> <span class="nv">REDISHOST</span><span class="o">=</span><span class="nv">$REDISHOST</span> <span class="nt">--env</span> <span class="nv">REDISPORT</span><span class="o">=</span><span class="nv">$REDISPORT</span> <span class="nt">--env</span> <span class="nv">REDISPASS</span><span class="o">=</span><span class="nv">$REDISPASS</span> <span class="nt">-p</span> 8000:8000 <span class="nt">--rm</span> fastapi
</code></pre></div></div>

<h2 id="test-du-microservice-1">Test du microservice</h2>

<p>Le test de cette version dockerisée du microservice est strictement identique à celui de la version non dockerisée, c’est le but de ce tutoriel.</p>

<div class="language-bash highlighter-rouge"><div class="highlight"><pre class="highlight"><code><span class="k">for </span>i <span class="k">in </span>1 2 3 4<span class="p">;</span> <span class="k">do
  </span><span class="nb">printf</span> <span class="s2">"</span><span class="se">\n</span><span class="s2">%s: "</span> <span class="s2">"</span><span class="nv">$i</span><span class="s2">"</span>
  curl http://localhost:8000/users/<span class="nv">$i</span> <span class="nt">--request</span> GET <span class="nt">--header</span> <span class="s1">'content-type: application/json'</span>
<span class="k">done
</span>curl <span class="nt">--request</span> PUT <span class="nt">--url</span> <span class="s2">"http://localhost:8000/users/4"</span> <span class="nt">--header</span> <span class="s1">'content-type: application/json'</span> <span class="nt">--data</span> <span class="s1">'{"name":"Francois Cerbelle","email":"francois@redis.com","age":48,"city":"Paris","height":179,"weight":84,"gender":"True"}'</span>
xdg-open http://localhost:8000/docs
</code></pre></div></div>

<h1 id="redis-enterprise-managé-dbaas">Redis Enterprise managé DBaaS</h1>

<p>La prochaine étape consiste à utiliser une véritable instance managée de Redis Enterprise dans le cloud, à partir de notre microservice dockerisé, qu’il soit sur notre poste de développement ou déployé dans CloudRun.</p>

<h2 id="création-dune-base-redis-enterprise-dans-le-cloud">Création d’une base Redis enterprise dans le cloud</h2>
<p>Il faut commencer par créer un compte sur le portail https://app.redislabs.com et s’y connecter.</p>

<p>Il faut ensuite créer une souscription, correspondant à un cluster, en choissant un plan (Fixed correspond à des configuration partagées pré-établies, Flexible correspond à des configurations sur mesure et Annual correspond à des configurations sur mesure négociées). Dans notre cas, je choisi Flexible.</p>

<p><img src="..//assets/posts/fr/ManagedRedisForPythonMicroserviceInCloudRun/aef637fc931802fe63f6d0467742b6ee.png" alt="aef637fc931802fe63f6d0467742b6ee.png" /></p>

<p>Puis, il faut sélectionner le fournisseur Cloud dans lequel nous allons créer le service Redis. Notre microservice devant être déployé sur Google CloudRun, autant que le services Redis s’y trouve également. De même, choisissons la région la plus adaptée, (europe-west1 en ce qui me concerne). Enfin, nous devons lui donner un nom, ça pourrait être «Prod», «PreProd», par exemple.</p>

<p><img src="..//assets/posts/fr/ManagedRedisForPythonMicroserviceInCloudRun/b6153e1e8d79e27aab6baa4171c9dbf2.png" alt="b6153e1e8d79e27aab6baa4171c9dbf2.png" /></p>

<p>Nous devons ensuite lister les bases Redis que cette souscription doit nous fournir, avec un nom, éventuellement un port réseau, les modules à activer (JSON et Search), le dimensionnement (volumétrie et débit), la haute-disponibilité ou non…</p>

<p><img src="..//assets/posts/fr/ManagedRedisForPythonMicroserviceInCloudRun/46d405e8080d200e1999cf8ca3365f63.png" alt="46d405e8080d200e1999cf8ca3365f63.png" /></p>

<p>L’étape suivante permet de valider tous les détails avant de lancer la construction du service. Il est possible d’utiliser des crédits à travers les liens disponibles sur le site https://redis.com.</p>

<p><img src="..//assets/posts/fr/ManagedRedisForPythonMicroserviceInCloudRun/00a538dc37aa6627aa722c294d92749a.png" alt="00a538dc37aa6627aa722c294d92749a.png" /></p>

<p>Le premier service va prendre environ 15 minutes à se déployer lors de sa création.</p>

<p><img src="..//assets/posts/fr/ManagedRedisForPythonMicroserviceInCloudRun/d044a257798350a2e4ae1f66276fd154.png" alt="d044a257798350a2e4ae1f66276fd154.png" /></p>

<p>L’interface fournit des facilités pour se connecter à la base depuis l’intérieur (private) du fournisseur Cloud ou depuis l’extérieur (public), à l’aide d’exemples de code utilisant les bibliothèques clientes les plus communes, les outils en ligne de commande ou le client graphique <em>RedisInsight</em></p>

<p><img src="..//assets/posts/fr/ManagedRedisForPythonMicroserviceInCloudRun/6837ad596dcda035077b29503f4bf954.png" alt="6837ad596dcda035077b29503f4bf954.png" /></p>

<h2 id="mise-à-jour-des-informations-de-connexion">Mise à jour des informations de connexion</h2>

<p>Nous pouvons désormais utiliser les nouvelles informations de connexion disponibles sur l’interface web Cloud (ou par appel d’API REST) pour mettre à jour les variables d’environnement utilisées par le microservice pour se connecter.</p>

<div class="language-bash highlighter-rouge"><div class="highlight"><pre class="highlight"><code><span class="nb">export </span><span class="nv">REDISHOST</span><span class="o">=</span>redis-16566.c29816.eu-west1-mz.gcp.cloud.rlcp.com
<span class="nb">export </span><span class="nv">REDISPORT</span><span class="o">=</span>16566
<span class="nb">export </span><span class="nv">REDISPASS</span><span class="o">=</span>
</code></pre></div></div>

<h2 id="test-hybride-du-microservice">Test hybride du microservice</h2>
<div class="language-bash highlighter-rouge"><div class="highlight"><pre class="highlight"><code>docker run <span class="nt">--env</span> <span class="nv">PORT</span><span class="o">=</span>8000 <span class="nt">--env</span> <span class="nv">REDISHOST</span><span class="o">=</span><span class="nv">$REDISHOST</span> <span class="nt">--env</span> <span class="nv">REDISPORT</span><span class="o">=</span><span class="nv">$REDISPORT</span> <span class="nt">--env</span> <span class="nv">REDISPASS</span><span class="o">=</span><span class="nv">$REDISPASS</span> <span class="nt">-p</span> 8000:8000 <span class="nt">--rm</span> fastapi
</code></pre></div></div>

<p>Le test est presque devenu un automatisme et se répète exactement à l’identique, quelle que soit la configuration et l’architecture.</p>
<div class="language-bash highlighter-rouge"><div class="highlight"><pre class="highlight"><code><span class="k">for </span>i <span class="k">in </span>1 2 3 4<span class="p">;</span> <span class="k">do
  </span><span class="nb">printf</span> <span class="s2">"</span><span class="se">\n</span><span class="s2">%s: "</span> <span class="s2">"</span><span class="nv">$i</span><span class="s2">"</span>
  curl http://localhost:8000/users/<span class="nv">$i</span> <span class="nt">--request</span> GET <span class="nt">--header</span> <span class="s1">'content-type: application/json'</span>
<span class="k">done
</span>curl <span class="nt">--request</span> PUT <span class="nt">--url</span> <span class="s2">"http://localhost:8000/users/4"</span> <span class="nt">--header</span> <span class="s1">'content-type: application/json'</span> <span class="nt">--data</span> <span class="s1">'{"name":"Francois Cerbelle","email":"francois@redis.com","age":48,"city":"Paris","height":179,"weight":84,"gender":"True"}'</span>
xdg-open http://localhost:8000/docs
</code></pre></div></div>

<h2 id="supervision-cloud">Supervision Cloud</h2>

<p>On peut constater sur la console de supervision Cloud que les trois clés initiales ont bien été créées lors du démarrage du microservice.</p>

<p><img src="..//assets/posts/fr/ManagedRedisForPythonMicroserviceInCloudRun/1d395c46e0f4640dd79225467afcf690.png" alt="1d395c46e0f4640dd79225467afcf690.png" /></p>

<p>Ces clés sont bien visibles et consultables depuis <em>RedisInsight</em> en local connecté à la base DBaaS dans le Cloud.</p>

<p><img src="..//assets/posts/fr/ManagedRedisForPythonMicroserviceInCloudRun/7b665fa9fc040413ad312156eb03fca7.png" alt="7b665fa9fc040413ad312156eb03fca7.png" /></p>

<h1 id="déploiement-google-cloudrun">Déploiement Google CloudRun</h1>

<p>Enfin, nous disposons d’un service Redis managé dans le cloud (identique à un Redis local sur le poste de travail, identique à un Redis communautaire) et d’une API flexible conteneurisée pouvant être exécutée n’importe où pour se connecter à Redis. La dernière étape consiste à déployer le conteneur du microservice, à le faire exécuter et à l’exposer dans Google CloudRun.</p>

<h2 id="création-du-service">Création du service</h2>

<p>Bien que nous puissions créer une image docker et l’enregistrer dans le dépôt d’artefacts Google pour l’utiliser depuis un service CloudRun, dans mon cas, je vais pousser les sources de mon microservice vers Google pour que Google construise l’image docker tout seul la stocke dans l’ «artefact repository» et l’utilise pour démarrer un nouveau service CloudRun…. J’ai uniquement besoin de fournir les paramètres de connexion à Redis et le port que je souhaite exposer.</p>

<div class="language-bash highlighter-rouge"><div class="highlight"><pre class="highlight"><code>gcloud run deploy <span class="nt">--source</span> <span class="nb">.</span> <span class="nt">--allow-unauthenticated</span> <span class="nt">--port</span><span class="o">=</span>8080 <span class="nt">--service-account</span><span class="o">=</span>319143195410-compute@developer.gserviceaccount.com <span class="nt">--min-instances</span><span class="o">=</span>1 <span class="nt">--set-env-vars</span><span class="o">=</span><span class="nv">REDISHOST</span><span class="o">=</span><span class="nv">$REDISHOST</span>,REDISPORT<span class="o">=</span><span class="nv">$REDISPORT</span>,REDISPASS<span class="o">=</span><span class="nv">$REDISPASS</span> <span class="nt">--cpu-boost</span> <span class="nt">--region</span><span class="o">=</span>europe-west1 <span class="nt">--project</span><span class="o">=</span>central-beach-194106
</code></pre></div></div>

<p><img src="..//assets/posts/fr/ManagedRedisForPythonMicroserviceInCloudRun/63d06355771882c95d6a3ea3c173667f.png" alt="63d06355771882c95d6a3ea3c173667f.png" /></p>

<p>On peut constater au bout de quelques dizaines de secondes que le service a bien été déployé à partir d’une image construite à la volée par Google.</p>

<p><img src="..//assets/posts/fr/ManagedRedisForPythonMicroserviceInCloudRun/7820c653cec27efc7827e247f9cc312f.png" alt="7820c653cec27efc7827e247f9cc312f.png" /></p>

<h2 id="test-final">Test final</h2>

<p>On peut constater que l’interface Swagger est bien disponible sur l’url fournie par le service CloudRun.</p>

<p><img src="..//assets/posts/fr/ManagedRedisForPythonMicroserviceInCloudRun/e9d4568c59bade96a1684bd232c9c8e8.png" alt="e9d4568c59bade96a1684bd232c9c8e8.png" /></p>

<p>Les nouveau enregistrements se stockent bien dans la base Redis managée sur GCP.</p>

<p><img src="..//assets/posts/fr/ManagedRedisForPythonMicroserviceInCloudRun/f8349a52a1e0ba9f7b33b9ebceac4277.png" alt="f8349a52a1e0ba9f7b33b9ebceac4277.png" /></p>

<h1 id="supports-et-liens">Supports et liens</h1>

<ul>
  <li><a href="https://youtu.be/QONgF2J7qUE" title="Demonstration video recording">Demo video</a> <sup id="fnref:1" role="doc-noteref"><a href="#fn:1" class="footnote" rel="footnote">1</a></sup></li>
</ul>

<h1 id="notes-de-bas-de-page">Notes de bas de page</h1>

<div class="footnotes" role="doc-endnotes">
  <ol>
    <li id="fn:1" role="doc-endnote">
      <p>[https://youtu.be/QONgF2J7qUE] <a href="#fnref:1" class="reversefootnote" role="doc-backlink">&#8617;</a></p>
    </li>
  </ol>
</div>]]></content><author><name>François Cerbelle</name></author><category term="Redis en 5 minutes" /><category term="Redis" /><category term="Redis Enterprise" /><category term="Python" /><category term="Microservice" /><category term="FastAPI" /><category term="Docker" /><category term="Google" /><category term="GCP" /><category term="CloudRun" /><category term="PaaS" /><category term="DBaaS" /><category term="Managed Redis" /><category term="REST API" /><category term="Stateless" /><summary type="html"><![CDATA[J'explique pas à pas comment implémenter une API Python FastAPI pour servir des données depuis un docker Redis-stack local, un docker Redis Enterprise local et un Redis Enterprise managé DBaaS. J'explique aussi comment dockeriser l'API, l'exécuter locallement et la faire exécuter comme service Google CloudRun. Avec les sources et la connexion depuis le client graphique RedisInsight.]]></summary></entry><entry xml:lang="fr"><title type="html">Redis 11 - Comment déployer et superviser Redis Enterprise et une application avec l’opérateur dans AKS</title><link href="https://fcerbell.github.io//CommentdeployeretsuperviserRedisEnterpri-fr/" rel="alternate" type="text/html" title="Redis 11 - Comment déployer et superviser Redis Enterprise et une application avec l’opérateur dans AKS" /><published>2023-01-31T18:11:20+00:00</published><updated>2023-01-31T18:11:20+00:00</updated><id>https://fcerbell.github.io//CommentdeployeretsuperviserRedisEnterpri-fr</id><content type="html" xml:base="https://fcerbell.github.io//CommentdeployeretsuperviserRedisEnterpri-fr/"><![CDATA[<p>Nous allons voir comment déployer et superviser un cluster Redis Enterprise, des bases Redis et une application dans Azure Kubernetes Services (AKS), à l’aide de l’opérateur Redis pour Kubernetes (K8S), Prometheus et Grafana.</p>

<p>Vous pouvez trouver des liens vers les enregistrements vidéo et les supports imprimables associés à la
<a href="#supports-et-liens">fin de cet article</a>.</p>

<ul id="markdown-toc">
  <li><a href="#vidéo" id="markdown-toc-vidéo">Vidéo</a></li>
  <li><a href="#prérequis" id="markdown-toc-prérequis">Prérequis</a></li>
  <li><a href="#opérateur-redis-enterprise" id="markdown-toc-opérateur-redis-enterprise">Opérateur Redis Enterprise</a>    <ul>
      <li><a href="#récupération-des-fichiers-modèles" id="markdown-toc-récupération-des-fichiers-modèles">Récupération des fichiers modèles</a></li>
      <li><a href="#création-dun-espace-de-nommage" id="markdown-toc-création-dun-espace-de-nommage">Création d’un espace de nommage</a></li>
      <li><a href="#déploiement-de-lopérateur" id="markdown-toc-déploiement-de-lopérateur">Déploiement de l’opérateur</a></li>
      <li><a href="#activation-du-controleur-dadmission" id="markdown-toc-activation-du-controleur-dadmission">Activation du controleur d’admission</a></li>
    </ul>
  </li>
  <li><a href="#déploiement-de-redis-enterprise" id="markdown-toc-déploiement-de-redis-enterprise">Déploiement de Redis Enterprise</a>    <ul>
      <li><a href="#création-du-cluster" id="markdown-toc-création-du-cluster">Création du cluster</a></li>
      <li><a href="#création-dune-base-de-données" id="markdown-toc-création-dune-base-de-données">Création d’une base de données</a></li>
      <li><a href="#modification-dune-base" id="markdown-toc-modification-dune-base">Modification d’une base</a></li>
      <li><a href="#suppression-dune-base" id="markdown-toc-suppression-dune-base">Suppression d’une base</a></li>
      <li><a href="#démarrage-dun-pod-de-benchmark" id="markdown-toc-démarrage-dun-pod-de-benchmark">Démarrage d’un pod de benchmark</a></li>
    </ul>
  </li>
  <li><a href="#supervision" id="markdown-toc-supervision">Supervision</a>    <ul>
      <li><a href="#déploiement-et-intégration-de-prometheus" id="markdown-toc-déploiement-et-intégration-de-prometheus">Déploiement et intégration de Prometheus</a></li>
      <li><a href="#déploiement-et-intégration-de-grafana" id="markdown-toc-déploiement-et-intégration-de-grafana">Déploiement et intégration de Grafana</a></li>
    </ul>
  </li>
  <li><a href="#déploiement-dune-application" id="markdown-toc-déploiement-dune-application">Déploiement d’une application</a>    <ul>
      <li><a href="#redisbank" id="markdown-toc-redisbank">Redisbank</a></li>
    </ul>
  </li>
  <li><a href="#supports-et-liens" id="markdown-toc-supports-et-liens">Supports et liens</a></li>
  <li><a href="#notes-de-bas-de-page" id="markdown-toc-notes-de-bas-de-page">Notes de bas de page</a></li>
</ul>

<h1 id="vidéo">Vidéo</h1>

<center><iframe width="420" height="315" src="https://www.youtube.com/embed/vVeuxzlwsYA" frameborder="0" allowfullscreen=""></iframe></center>

<p>Les étapes sont inspirées de la <a href="https://docs.redis.com/latest/kubernetes/deployment/quick-start/" title="Documentation officielle Redis">documentation officielle</a><sup id="fnref:1" role="doc-noteref"><a href="#fn:1" class="footnote" rel="footnote">1</a></sup>, à la date du 27/01/2023.</p>

<h1 id="prérequis">Prérequis</h1>
<p>Il faut disposer d’un cluster Azure Kubernetes Services (AKS) dans Azure. La création de ce cluster est visible dans la vidéo accompagnant cet article.</p>

<h1 id="opérateur-redis-enterprise">Opérateur Redis Enterprise</h1>

<h2 id="récupération-des-fichiers-modèles">Récupération des fichiers modèles</h2>
<p>Commençons par récupérer les fichiers d’exemples depuis le <a href="https://github.com/RedisLabs/redis-enterprise-k8s-docs.git" title="Dépôt des modèles">dépôt GitHub</a><sup id="fnref:2" role="doc-noteref"><a href="#fn:2" class="footnote" rel="footnote">2</a></sup> pour éviter de devoir les resaisir.</p>
<div class="language-bash highlighter-rouge"><div class="highlight"><pre class="highlight"><code>git clone https://github.com/RedisLabs/redis-enterprise-k8s-docs.git
</code></pre></div></div>

<h2 id="création-dun-espace-de-nommage">Création d’un espace de nommage</h2>
<p>Nous allons déployer Redis Enterprise dans un espace de nommage. Cet espace peut être dédié exclusivement à un cluster Redis Enterprise ou bien être celui d’une application. Il ne peut y avoir qu’un seul cluster Redis Enterprise par namespace, en revanche, il peut y avoir plusieurs namespaces avec un cluster dans chacun. Enfin, les bases crées et hébergées dans un cluster, dans un namespace peuvent être exposées et accessibles depuis d’autres namespaces.</p>
<div class="language-bash highlighter-rouge"><div class="highlight"><pre class="highlight"><code>kubectl create namespace redisns
</code></pre></div></div>
<p>Comme nous allons principalement travailler dans ce namespace, nous le configurons comme namespace par défaut dans notre contexte.</p>
<div class="language-bash highlighter-rouge"><div class="highlight"><pre class="highlight"><code>kubectl config set-context <span class="nt">--current</span> <span class="nt">--namespace</span><span class="o">=</span>redisns
</code></pre></div></div>

<h2 id="déploiement-de-lopérateur">Déploiement de l’opérateur</h2>
<p>Tout d’abord, nous devons identifier la dernière version disponible afin de l’installer.</p>
<div class="language-bash highlighter-rouge"><div class="highlight"><pre class="highlight"><code><span class="nv">VERSION</span><span class="o">=</span><span class="sb">`</span>curl <span class="nt">--silent</span> https://api.github.com/repos/RedisLabs/redis-enterprise-k8s-docs/releases/latest | <span class="nb">grep </span>tag_name | <span class="nb">awk</span> <span class="nt">-F</span><span class="s1">'"'</span> <span class="s1">'{print $4}'</span><span class="sb">`</span>
</code></pre></div></div>
<p>Ensuite, nous pouvons demander à kubernetes d’installer cette version de l’opérateur directement depuis l’URL.</p>
<div class="language-bash highlighter-rouge"><div class="highlight"><pre class="highlight"><code>kubectl apply <span class="nt">-f</span> https://raw.githubusercontent.com/RedisLabs/redis-enterprise-k8s-docs/<span class="nv">$VERSION</span>/bundle.yaml
</code></pre></div></div>
<p>Enfin, nous pouvons vérifier le bon déroulement de l’installation.</p>
<div class="language-bash highlighter-rouge"><div class="highlight"><pre class="highlight"><code>kubectl get deployment redis-enterprise-operator
</code></pre></div></div>

<h2 id="activation-du-controleur-dadmission">Activation du controleur d’admission</h2>
<p>L’opérateur utilise les fichiers de description, les CRDs, comme configuration à mettre en place et à maintenir. Les fichiers CRD sont au format YAML et suivent une syntaxe stricte. Le controleur d’admission a pour tâche de vérifier la validité syntaxique de ces fichiers et leur cohérence par rapport au contexte actuel du cluster, pour refuser tout changement qui serait impossible à réaliser. Cela permet d’éviter de casser une configuration qui fonctionne. Il faut récupérer le certificat auto-signé généré à la création du cluster depuis un des secrets K8S  pour le faire prendre en compte par le pod d’admission grâce à un modèle de fichier YAML.</p>
<div class="language-bash highlighter-rouge"><div class="highlight"><pre class="highlight"><code>kubectl get secret admission-tls
<span class="nv">CERT</span><span class="o">=</span><span class="sb">`</span>kubectl get secret admission-tls <span class="nt">-o</span> <span class="nv">jsonpath</span><span class="o">=</span><span class="s1">'{.data.cert}'</span><span class="sb">`</span>
<span class="nb">sed</span> <span class="s1">'s/NAMESPACE_OF_SERVICE_ACCOUNT/redisns/g'</span> admission/webhook.yaml | kubectl create <span class="nt">-f</span> -
<span class="nb">cat</span> <span class="o">&gt;</span> modified-webhook.yaml <span class="o">&lt;&lt;</span><span class="no">EOF</span><span class="sh">
webhooks:
- name: redb.admission.redislabs
  clientConfig:
    caBundle: </span><span class="nv">$CERT</span><span class="sh">
  admissionReviewVersions: ["v1beta1"]
</span><span class="no">EOF
</span>kubectl patch ValidatingWebhookConfiguration redb-admission <span class="nt">--patch</span> <span class="s2">"</span><span class="si">$(</span><span class="nb">cat </span>modified-webhook.yaml<span class="si">)</span><span class="s2">"</span>
</code></pre></div></div>
<p>Par défaut, le controleur d’admission surveille les CRDs de tous les espaces de nommage. On peut le restreindre à certain espaces de nommage, mais je ne le ferai pas dans cet article.</p>

<h1 id="déploiement-de-redis-enterprise">Déploiement de Redis Enterprise</h1>
<p><img src="..//assets/posts/fr/BlogVlogApprendreRedisAvecFran%C3%A7ois5minutes11Commentd%C3%A9ployeretsuperviserRedisEnterpri/28cb449105d7557a02dbab829886e560.png" alt="28cb449105d7557a02dbab829886e560.png" /></p>

<h2 id="création-du-cluster">Création du cluster</h2>
<p>Nous allons demander à l’opérateur d’effectuer les opérations nécessaires pour atteindre et maintenir la configuration décrite dans un fichier CRD de description de cluster. Nous allons indiquer le nombre de nœuds du cluster, la quantité de RAM et de CPU souhaitée pour chaque nœud et donner un nom à ce cluster. Nous choisissons 3 nœuds, ce qui est le minimum pour avoir la haute-disponibilité et le minimum géré par l’opérateur. Nous indiquons que nous voulons que chaque nœud dispose de 10Go de RAM. Cette configuration est inférieure aux <a href="https://docs.redis.com/latest/rs/installing-upgrading/hardware-requirements/" title="Prerequis matériels">préconisations officielles</a> de production mais fera l’affaire pour la démonstration.</p>
<div class="language-bash highlighter-rouge"><div class="highlight"><pre class="highlight"><code><span class="nb">cat</span> <span class="o">&lt;&lt;</span><span class="no">EOF</span><span class="sh"> | kubectl apply -f -
apiVersion: "app.redislabs.com/v1"
kind: "RedisEnterpriseCluster"
metadata:
  name: my-rec
spec:
  nodes: 3
  redisEnterpriseNodeResources:
    limits:
      cpu: 2000m
      memory: 10Gi
    requests:
      cpu: 2000m
      memory: 10Gi
</span><span class="no">EOF
</span></code></pre></div></div>
<p>L’opérateur constate la présence d’un changement de configuration souhaitée dans le fichier CRD et va tenter de l’appliquer. Nous pouvons vérifier la configuration des clusters Redis Enterprise (REC, Redis Enterprise Clusters).</p>
<div class="language-bash highlighter-rouge"><div class="highlight"><pre class="highlight"><code>kubectl get rec
</code></pre></div></div>
<p>Ensuite, nous attendons que tous les pods soient créés, initialisés par un premier container et éxécutant un second container.</p>
<div class="language-bash highlighter-rouge"><div class="highlight"><pre class="highlight"><code>kubectl rollout status sts/my-rec
</code></pre></div></div>
<p>Finallement, il est possible de vérifier le déploiement complet :</p>
<div class="language-bash highlighter-rouge"><div class="highlight"><pre class="highlight"><code>kubectl get all
</code></pre></div></div>
<p>Le cluster Redis Enterprise dispose d’une interface web d’administration. Si nous n’avons pas défini d’informations de connexion (identifiant et mot de passe), l’opérateur en a créé pour nous dans des secrets Kubernetes. Nous allons donc les récupérer pour nous connecter à l’interface web :</p>
<div class="language-bash highlighter-rouge"><div class="highlight"><pre class="highlight"><code>kubectl get secret
kubectl get secret/my-rec <span class="nt">-o</span> <span class="nv">jsonpath</span><span class="o">=</span><span class="s1">'{.data.password}'</span> | <span class="nb">base64</span> <span class="nt">--decode</span>
kubectl get secret/my-rec <span class="nt">-o</span> <span class="nv">jsonpath</span><span class="o">=</span><span class="s1">'{.data.username}'</span> | <span class="nb">base64</span> <span class="nt">--decode</span>
kubectl port-forward service/my-rec-ui 8443:8443
</code></pre></div></div>
<p>La dernière commande permet d’exposer le service d’administration web depuis le cluster Kubernetes vers notre poste de travail pour nous y connecter avec un navigateur sur l’URL <a href="https://localhost:8443">https://localhost:8443</a>
<img src="..//assets/posts/fr/BlogVlogApprendreRedisAvecFran%C3%A7ois5minutes11Commentd%C3%A9ployeretsuperviserRedisEnterpri/99e1953b808ad1d1836d841f54397227.png" alt="99e1953b808ad1d1836d841f54397227.png" /></p>

<h2 id="création-dune-base-de-données">Création d’une base de données</h2>
<p>Nous pouvons ensuite décrire la base que nous souhaitons dans un fichier de description CRD. La plupart des options de configuration d’une base sont disponibles et disposent de valeurs par défaut. Je me contente d’indiquer :</p>
<ul>
  <li>le nom de la base</li>
  <li>l’occupation maximale de la base en RAM</li>
  <li>le mode de persistance</li>
  <li>le nombre de shards maitres</li>
  <li>la réplication pour la haute-disponibilité</li>
  <li>le nom du cluster dans lequel je souhaite disposer de la base
    <div class="language-bash highlighter-rouge"><div class="highlight"><pre class="highlight"><code><span class="nb">cat</span> <span class="o">&lt;&lt;</span> <span class="no">EOF</span><span class="sh"> | kubectl apply -f -
apiVersion: app.redislabs.com/v1alpha1
kind: RedisEnterpriseDatabase
metadata:
name: smalldb
spec:
memorySize: 100MB
persistence: "aofEverySecond"
shardCount: 2
replication: true
redisEnterpriseCluster:
  name: my-rec
</span><span class="no">EOF
</span></code></pre></div>    </div>
    <p>On peut utiliser la commande suivante pour vérifier la disponibilité de la base :</p>
    <div class="language-bash highlighter-rouge"><div class="highlight"><pre class="highlight"><code>kubectl get redb smalldb <span class="nt">-o</span> <span class="nv">jsonpath</span><span class="o">=</span><span class="s2">"{.status.status}"</span>
</code></pre></div>    </div>
    <p>Dès que la base est disponible, elle est visible dans l’interface web d’administration et l’opérateur créée automatiquement un service Kubernetes dans l’espace de nommage d’utilisation de la base, celui de l’application qui va l’utiliser (que je n’ai pas spécifié ici).</p>
    <div class="language-bash highlighter-rouge"><div class="highlight"><pre class="highlight"><code>kubectl get redb
kubectl get svc
</code></pre></div>    </div>
    <p>Si aucune information n’a été prérenseignée, l’opérateur créée automatiquement un nom interne, choisit un port au hasard, créée un mot de passe généré et un nom de service à exposer. Toutes ces informations peuvent facilement être retrouvées dans Kubernetes.</p>
    <div class="language-bash highlighter-rouge"><div class="highlight"><pre class="highlight"><code>kubectl get redb smalldb <span class="nt">-o</span> <span class="nv">jsonpath</span><span class="o">=</span><span class="s2">"{.spec.databaseSecretName}"</span>
kubectl get secret/redb-smalldb <span class="nt">-o</span> <span class="nv">jsonpath</span><span class="o">=</span><span class="s1">'{.data.password}'</span> | <span class="nb">base64</span> <span class="nt">--decode</span>
kubectl get secret/redb-smalldb <span class="nt">-o</span> <span class="nv">jsonpath</span><span class="o">=</span><span class="s1">'{.data.port}'</span> | <span class="nb">base64</span> <span class="nt">--decode</span>
kubectl get secret/redb-smalldb <span class="nt">-o</span> <span class="nv">jsonpath</span><span class="o">=</span><span class="s1">'{.data.service_name}'</span> | <span class="nb">base64</span> <span class="nt">--decode</span>
</code></pre></div>    </div>
  </li>
</ul>

<h2 id="modification-dune-base">Modification d’une base</h2>
<p>Maintenant que la base de données est créée, il est possible d’en changer la configuration. On peut le faire de différente manière :</p>
<ul>
  <li>Accéder à l’interface web et modifier la configuration : <strong>ne jamais faire comme ça</strong>, les modification ne seraient pas dans le fichier CRD de description et l’opérateur chercherait à revenir à la configuration décrite.</li>
  <li>Par <code class="language-plaintext highlighter-rouge">kubectl apply</code>, automatisable, sans interraction</li>
  <li>Par <code class="language-plaintext highlighter-rouge">kubectl edit</code>, interractive
Voici la commande interractive, à titre d’exemple. Je n’illustrerai pas plus la modification de la configuration des bases ici.
    <div class="language-bash highlighter-rouge"><div class="highlight"><pre class="highlight"><code>kubectl edit redb smalldb
</code></pre></div>    </div>
  </li>
</ul>

<h2 id="suppression-dune-base">Suppression d’une base</h2>
<p>Il est évidemment possible de supprimer une base de données à l’aide de la commande suivante. Je ne la supprime pas tout de suite car je vais en avoir besoin dans les étapes suivantes.</p>
<div class="language-bash highlighter-rouge"><div class="highlight"><pre class="highlight"><code>kubectl delete redb smalldb
</code></pre></div></div>

<h2 id="démarrage-dun-pod-de-benchmark">Démarrage d’un pod de benchmark</h2>
<p>Nous pouvons maintenant démarrer un nouveau pod avec un conteneur de benchmark, tel que <em>memtier_benchmark</em>. Nous aurons besoin des informations de connexion à la base pour les transmettre à l’outil. Nous verrons plus loin comment industrialiser cette récupération, mais pour ce premier exemple, je les récupère dans des variables d’environnement locales.
<img src="..//assets/posts/fr/BlogVlogApprendreRedisAvecFran%C3%A7ois5minutes11Commentd%C3%A9ployeretsuperviserRedisEnterpri/3654032330c8c0bbb63e0b8935f310a2.png" alt="3654032330c8c0bbb63e0b8935f310a2.png" /></p>
<div class="language-bash highlighter-rouge"><div class="highlight"><pre class="highlight"><code><span class="nv">DBNAME</span><span class="o">=</span><span class="s1">'smalldb'</span>
<span class="nv">DBSECNAME</span><span class="o">=</span><span class="sb">`</span>kubectl get redb <span class="s2">"</span><span class="k">${</span><span class="nv">DBNAME</span><span class="k">}</span><span class="s2">"</span> <span class="nt">-o</span> <span class="nv">jsonpath</span><span class="o">=</span><span class="s2">"{.spec.databaseSecretName}"</span><span class="sb">`</span>
<span class="nv">SVCNAME</span><span class="o">=</span><span class="sb">`</span>kubectl get secret/<span class="k">${</span><span class="nv">DBSECNAME</span><span class="k">}</span> <span class="nt">-o</span> <span class="nv">jsonpath</span><span class="o">=</span><span class="s1">'{.data.service_name}'</span> | <span class="nb">base64</span> <span class="nt">--decode</span><span class="sb">`</span>
<span class="nv">SVCPORT</span><span class="o">=</span><span class="sb">`</span>kubectl get secret/<span class="k">${</span><span class="nv">DBSECNAME</span><span class="k">}</span> <span class="nt">-o</span> <span class="nv">jsonpath</span><span class="o">=</span><span class="s1">'{.data.port}'</span> | <span class="nb">base64</span> <span class="nt">--decode</span><span class="sb">`</span>
<span class="nv">SVCPASS</span><span class="o">=</span><span class="sb">`</span>kubectl get secret/<span class="k">${</span><span class="nv">DBSECNAME</span><span class="k">}</span> <span class="nt">-o</span> <span class="nv">jsonpath</span><span class="o">=</span><span class="s1">'{.data.password}'</span> | <span class="nb">base64</span> <span class="nt">--decode</span><span class="sb">`</span>
</code></pre></div></div>
<p>et je les passe à l’application en ligne de commande. Il ne faut pas faire cela en production, car les informations apparaissent en clair si on affiche la liste des processus (<code class="language-plaintext highlighter-rouge">ps -aux</code>).</p>
<div class="language-bash highlighter-rouge"><div class="highlight"><pre class="highlight"><code><span class="nb">cat</span> <span class="o">&lt;&lt;</span> <span class="no">EOF</span><span class="sh"> | kubectl apply -f -
apiVersion: v1
kind: Pod
metadata:
  name: memtier
spec:
  containers:
  - name: memtier
    image: redislabs/memtier_benchmark:latest
    args: ["--key-prefix=a","--ratio=1:4","--test-time=120","-d","100","-t","2","-c","25","--pipeline=50","--key-pattern=S:S","--hide-histogram","-x","1000","-s","</span><span class="k">${</span><span class="nv">SVCNAME</span><span class="k">}</span><span class="sh">.redisns.svc","-p","</span><span class="k">${</span><span class="nv">SVCPORT</span><span class="k">}</span><span class="sh">","-a","</span><span class="k">${</span><span class="nv">SVCPASS</span><span class="k">}</span><span class="sh">"]
</span><span class="no">EOF

</span>kubectl logs memtier
</code></pre></div></div>

<h1 id="supervision">Supervision</h1>

<h2 id="déploiement-et-intégration-de-prometheus">Déploiement et intégration de Prometheus</h2>
<p>Redis-Enterprise expose de nombreuses métriques concernant le cluster, les nœuds, les bases et les shards sous la forme d’un exporteur au format Prometheus pour que ce dernier puisse les collecter, les stocker et les représenter ou les servir à Grafana. On peut aussi utiliser Prometheus-Alertmanager pour superviser et déclencher des alertes.
<img src="..//assets/posts/fr/BlogVlogApprendreRedisAvecFran%C3%A7ois5minutes11Commentd%C3%A9ployeretsuperviserRedisEnterpri/adfc921f05a6526cbad68271e504a39d.png" alt="adfc921f05a6526cbad68271e504a39d.png" /></p>

<p>Je ne vais pas couvrir un déploiement complet de prometheus, dans les règles de l’art ou avec son opérateur. On peut trouver de nombreux articles qui le font très bien, par exemple <a href="https://phoenixnap.com/kb/prometheus-kubernetes" title="PhoenixNap: Prometheus delpoyment in K8S">phoenixnap</a><sup id="fnref:4" role="doc-noteref"><a href="#fn:4" class="footnote" rel="footnote">3</a></sup> ou <a href="https://devopscube.com/setup-prometheus-monitoring-on-kubernetes/" title="DevopsCube: Prometheus deployment in K8S">devopscube</a><sup id="fnref:5" role="doc-noteref"><a href="#fn:5" class="footnote" rel="footnote">4</a></sup>.</p>

<p>L’opérateur a automatiquement créé des services Kubernetes pour exposer le point de connexion de l’exporteur au format Prometheus du cluster Redis Enterprise. Si vous n’avez pas installé de certificats personnalisés, l’opérateur a automatiquement créé des certificats auto-signés et ils faudra donc penser à l’option <code class="language-plaintext highlighter-rouge">tls_config</code> pour que prometheus puisse accéder à l’exporteur.</p>

<p>Prometheus dispose aussi d’un opérateur permettant la découverte et l’ajout automatique de sources à partir d’annotation ou de labels. Je ne couvre pas cette installation complète de Prometheus. Je ne fais qu’une installation basique pour illustrer la collecte des metriques du cluster, des nœuds, des bases et des shards Redis Enterprise.</p>

<p>Il faut inclure dans le fichier de configuration de prometheus une référence au nom du service prometheus du cluster. Ce nom est composé du nom du cluster postfixé par <code class="language-plaintext highlighter-rouge">-prom</code> :</p>
<div class="language-yaml highlighter-rouge"><div class="highlight"><pre class="highlight"><code>    <span class="na">scrape_configs</span><span class="pi">:</span>
      <span class="pi">-</span> <span class="na">job_name</span><span class="pi">:</span> <span class="s1">'</span><span class="s">myrec'</span>
        <span class="na">scheme</span><span class="pi">:</span> <span class="s">https</span>
        <span class="na">static_configs</span><span class="pi">:</span>
        <span class="pi">-</span> <span class="na">targets</span><span class="pi">:</span> <span class="pi">[</span><span class="s1">'</span><span class="s">my-rec-prom.redisns.svc:8070'</span><span class="pi">]</span>
        <span class="na">tls_config</span><span class="pi">:</span>
          <span class="na">insecure_skip_verify</span><span class="pi">:</span> <span class="no">true</span>
</code></pre></div></div>

<p>Commençons par créer un espace de nommage spécifique pour la supervision <em>monitoring</em>, dans lequel nous allons déployer Prometheus.</p>
<div class="language-bash highlighter-rouge"><div class="highlight"><pre class="highlight"><code>kubectl create namespace monitoring
</code></pre></div></div>

<p>Prometheus aurait théoriquement besoin de permissions pour accéder aux métriques exposées par Kubernetes. Bien que nous ne nous y intéressons pas, je vais quand même créer un compte de service, un role de cluster et une association entre ce compte et le role :</p>
<div class="language-bash highlighter-rouge"><div class="highlight"><pre class="highlight"><code><span class="nb">cat</span> <span class="o">&lt;&lt;</span> <span class="no">EOF</span><span class="sh"> | kubectl create -f -
apiVersion: rbac.authorization.k8s.io/v1
kind: ClusterRole
metadata:
  name: prometheus
rules:
- apiGroups: [""]
  resources:
  - nodes
  - services
  - endpoints
  - pods
  verbs: ["get", "list", "watch"]
- apiGroups:
  - extensions
  resources:
  - ingresses
  verbs: ["get", "list", "watch"]
</span><span class="no">EOF
</span></code></pre></div></div>
<div class="language-bash highlighter-rouge"><div class="highlight"><pre class="highlight"><code><span class="nb">cat</span> <span class="o">&lt;&lt;</span> <span class="no">EOF</span><span class="sh"> | kubectl create -f -
apiVersion: v1
kind: ServiceAccount
metadata:
  name: prometheus
  namespace: monitoring
</span><span class="no">EOF
</span></code></pre></div></div>
<div class="language-bash highlighter-rouge"><div class="highlight"><pre class="highlight"><code><span class="nb">cat</span> <span class="o">&lt;&lt;</span> <span class="no">EOF</span><span class="sh"> | kubectl create -f -
apiVersion: rbac.authorization.k8s.io/v1
kind: ClusterRoleBinding
metadata:
  name: prometheus
roleRef:
  apiGroup: rbac.authorization.k8s.io
  kind: ClusterRole
  name: prometheus
subjects:
- kind: ServiceAccount
  name: prometheus
  namespace: monitoring
</span><span class="no">EOF
</span></code></pre></div></div>

<p>Ensuite, j’externalise le fichier de configuration de Prometheus à l’extérieur de son pod, dans une <em>ConfigMap</em>. C’est dans ce fichier de configuration qu’il faut inclure la définition du service Redis-Prometheus.</p>
<div class="language-bash highlighter-rouge"><div class="highlight"><pre class="highlight"><code><span class="nb">cat</span> <span class="o">&lt;&lt;</span> <span class="no">EOF</span><span class="sh"> | kubectl create -f -
apiVersion: v1
kind: ConfigMap
metadata:
  name: prometheus-config
  namespace: monitoring
data:
  prometheus.yml: |
    global:
      scrape_interval:     15s
      evaluation_interval: 15s
    alerting:
      alertmanagers:
      - static_configs:
        - targets:
    rule_files:
      # - "example-file.yml"
    scrape_configs:
      - job_name: 'prometheus'
        static_configs:
        - targets: ['localhost:9090']
      - job_name: 'myrec'
        scheme: https
        static_configs:
        - targets: ['my-rec-prom.redisns.svc:8070']
        tls_config:
          insecure_skip_verify: true
</span><span class="no">EOF
</span></code></pre></div></div>

<p>Je déploie un pod Prometheus. Dans le cadre de ce tutoriel, je ne configure pas de volume persistent. <strong>Prometheus perdra donc sa base si le pod redémarre.</strong> Autrement, il faudrait inclure une demande de persistance dans la configuration :</p>
<div class="language-yaml highlighter-rouge"><div class="highlight"><pre class="highlight"><code>      <span class="pi">-</span> <span class="na">name</span><span class="pi">:</span> <span class="s">prometheus-storage-volume</span>
        <span class="na">persistentVolumeClaim</span><span class="pi">:</span>
            <span class="na">claimName</span><span class="pi">:</span> <span class="s">pvc-nfs-data</span>
</code></pre></div></div>

<div class="language-bash highlighter-rouge"><div class="highlight"><pre class="highlight"><code><span class="nb">cat</span> <span class="o">&lt;&lt;</span> <span class="no">EOF</span><span class="sh"> | kubectl apply -f -
apiVersion: apps/v1
kind: Deployment
metadata:
  name: prometheus
  namespace: monitoring
  labels:
    app: prometheus
spec:
  replicas: 1
  strategy:
    rollingUpdate:
      maxSurge: 1
      maxUnavailable: 1
    type: RollingUpdate
  selector:
    matchLabels:
      app: prometheus
  template:
    metadata:
      labels:
        app: prometheus
      annotations:
        prometheus.io/scrape: "true"
        prometheus.io/port: "9090"
    spec:
      containers:
      - name: prometheus
        image: prom/prometheus
        args:
          - '--storage.tsdb.retention=6h'
          - '--storage.tsdb.path=/prometheus'
          - '--config.file=/etc/prometheus/prometheus.yml'
        ports:
        - name: web
          containerPort: 9090
        volumeMounts:
        - name: prometheus-config-volume
          mountPath: /etc/prometheus
        - name: prometheus-storage-volume
          mountPath: /prometheus
      restartPolicy: Always
      volumes:
      - name: prometheus-config-volume
        configMap:
            defaultMode: 420
            name: prometheus-config
      - name: prometheus-storage-volume
        emptyDir: {}
</span><span class="no">EOF
</span></code></pre></div></div>

<p>Je termine en exposant prometheus sous la forme d’un service Kubernetes pour pouvoir le manipuler plus facilement ensuite. J’ai fait le choix d’un service <em>NodePort</em>, dans la pratique, en production, on préfère parfois un <em>LoadBalancer</em> mais je voulais limiter les dépendances à la configuration Kubernetes du fournisseur :</p>
<div class="language-bash highlighter-rouge"><div class="highlight"><pre class="highlight"><code><span class="nb">cat</span> <span class="o">&lt;&lt;</span> <span class="no">EOF</span><span class="sh"> | kubectl apply -f -
apiVersion: v1
kind: Service
metadata:
    name: prometheus-service
    namespace: monitoring
    annotations:
        prometheus.io/scrape: 'true'
        prometheus.io/port:   '9090'

spec:
    selector:
        app: prometheus
    type: NodePort
    ports:
    - port: 8080
      targetPort: 9090 
      nodePort: 30909
</span><span class="no">EOF
</span></code></pre></div></div>

<p>Enfin, je connecte le service Prometheus du cluster à un port sur mon poste de travail pour m’y connecter depuis mon navigateur local <a href="http://localhost:8080">http://localhost:8080</a> . Cette commande est blocante.</p>
<div class="language-bash highlighter-rouge"><div class="highlight"><pre class="highlight"><code>kubectl port-forward service/prometheus-service 9090:8080 <span class="nt">-n</span> monitoring
</code></pre></div></div>

<h2 id="déploiement-et-intégration-de-grafana">Déploiement et intégration de Grafana</h2>
<p>Redis fournit des tableaux de bord Grafana prêts à l’emploi pour représenter et exploiter les métriques stockées dans Prometheus.
<img src="..//assets/posts/fr/BlogVlogApprendreRedisAvecFran%C3%A7ois5minutes11Commentd%C3%A9ployeretsuperviserRedisEnterpri/e8e6cc951e91f1cbb99adf05e5c682a1.png" alt="e8e6cc951e91f1cbb99adf05e5c682a1.png" /></p>

<p>Tous comme pour Prometheus, mon but n’est pas de faire un tutoriel d’installation de Grafana sur Kubernetes dans les règles de l’art. Je me base donc sur l’article de blog de <a href="https://devopscube.com/setup-grafana-kubernetes/" title="DevopsCube: Grafana deployment in K8S">devopscube</a><sup id="fnref:6" role="doc-noteref"><a href="#fn:6" class="footnote" rel="footnote">5</a></sup>.</p>

<p>Dans le même esprit que pour Prometheus, j’externalise la configuration de Grafana dans une <em>ConfigMap</em> pour ne pas la maintenir à l’intérieur des pods Grafana :</p>
<div class="language-bash highlighter-rouge"><div class="highlight"><pre class="highlight"><code><span class="nb">cat</span> <span class="o">&lt;&lt;</span> <span class="no">EOF</span><span class="sh"> | kubectl create -f -
apiVersion: v1
kind: ConfigMap
metadata:
  name: grafana-datasources
  namespace: monitoring
data:
  prometheus.yaml: |-
    {
        "apiVersion": 1,
        "datasources": [
            {
               "access":"proxy",
                "editable": true,
                "name": "prometheus",
                "orgId": 1,
                "type": "prometheus",
                "url": "http://prometheus-service.monitoring.svc:8080",
                "version": 1
            }
        ]
    }
</span><span class="no">EOF
</span></code></pre></div></div>

<p>Tout comme pour Prometheus, je déploie Grafana, sans <em>PersistentVolume</em>, les pods perdent donc leurs données et les tableaux de bord configurés quand ils sont arrêtés :</p>
<div class="language-bash highlighter-rouge"><div class="highlight"><pre class="highlight"><code><span class="nb">cat</span> <span class="o">&lt;&lt;</span> <span class="no">EOF</span><span class="sh"> | kubectl create -f -
apiVersion: apps/v1
kind: Deployment
metadata:
  name: grafana
  namespace: monitoring
spec:
  replicas: 1
  selector:
    matchLabels:
      app: grafana
  template:
    metadata:
      name: grafana
      labels:
        app: grafana
    spec:
      containers:
      - name: grafana
        image: grafana/grafana:latest
        ports:
        - name: grafana
          containerPort: 3000
        resources:
          limits:
            memory: "1Gi"
            cpu: "1000m"
          requests: 
            memory: 500M
            cpu: "500m"
        volumeMounts:
          - mountPath: /var/lib/grafana
            name: grafana-storage
          - mountPath: /etc/grafana/provisioning/datasources
            name: grafana-datasources
            readOnly: false
      volumes:
        - name: grafana-storage
          emptyDir: {}
        - name: grafana-datasources
          configMap:
              defaultMode: 420
              name: grafana-datasources
</span><span class="no">EOF
</span></code></pre></div></div>

<p>J’expose Grafana en tant que <em>Service</em> Kubernetes pour le manipuler plus facilement :</p>
<div class="language-bash highlighter-rouge"><div class="highlight"><pre class="highlight"><code><span class="nb">cat</span> <span class="o">&lt;&lt;</span> <span class="no">EOF</span><span class="sh"> | kubectl create -f -
apiVersion: v1
kind: Service
metadata:
  name: grafana
  namespace: monitoring
  annotations:
      prometheus.io/scrape: 'true'
      prometheus.io/port:   '3000'
spec:
  selector: 
    app: grafana
  type: NodePort  
  ports:
    - port: 3000
      targetPort: 3000
      nodePort: 32000
</span><span class="no">EOF
</span></code></pre></div></div>
<p>Et, finalement, je connecte le service Grafana depuis le cluster Kubernetes vers mon poste de travail pour y connecter mon navigateur. Cette commande est blocante :</p>
<div class="language-bash highlighter-rouge"><div class="highlight"><pre class="highlight"><code>kubectl port-forward service/grafana 3000 <span class="nt">-n</span> monitoring
</code></pre></div></div>

<p>Je peux me connecter à Grafana par l’URL <a href="http://localhost:3000">http://localhost:3000</a> , l’identifiant par défaut est <code class="language-plaintext highlighter-rouge">admin</code>, le mot de passe aussi.
À partir de là, je peux copier-coller le code source des trois tableaux de bord Redis pour Grafana au format JSON, disponibles depuis la page <a href="https://docs.redis.com/latest/rs/clusters/monitoring/prometheus-integration/" title="Redis-Prometheus integration">Prometheus integration</a><sup id="fnref:7" role="doc-noteref"><a href="#fn:7" class="footnote" rel="footnote">6</a></sup></p>

<h1 id="déploiement-dune-application">Déploiement d’une application</h1>
<p>Nous avons créé une base de test et y avons connecté manuellement une application de benchmark. Nous allons maintenant voir comment créer une base à valeur ajoutée avec des modules et une application connectée automatiquement sans passer les informations en ligne de commande.</p>

<p>J’ai créé un compte (<em>fcerbell</em>) et un dépôt (repository <em>redisbank</em>) sur <a href="https://hub.docker.com/" title="Docker Hub">DockerHub</a><sup id="fnref:9" role="doc-noteref"><a href="#fn:9" class="footnote" rel="footnote">7</a></sup> pour y publier l’image compilée de l’application, le temps de ce tutoriel.</p>

<p>Commençons par supprimer la base de test, si elle existe toujours. Redis Enterprise est multi-tenant et peut héberger autant de base de données Redis que souhaité, dans la limite des ressources matérielles mises à sa disposition et de ce qu’autorise la licence déployée. La license Redis Enterprise d’évaluation n’inclue pas d’assez de shards pour disposer de ces deux bases simultanément avec leur dimensionnement.</p>
<div class="language-bash highlighter-rouge"><div class="highlight"><pre class="highlight"><code>kubectl delete redb smalldb
</code></pre></div></div>

<h2 id="redisbank">Redisbank</h2>
<p><img src="..//assets/posts/fr/BlogVlogApprendreRedisAvecFran%C3%A7ois5minutes11Commentd%C3%A9ployeretsuperviserRedisEnterpri/881f1840fc417dbdf01297af5cd322b9.png" alt="881f1840fc417dbdf01297af5cd322b9.png" /></p>

<p>J’ai choisi une application très simple. Il s’agit d’une application monolithique en Java, utilisant le framework Spring et Spring-Data-Redis. Je commence par récupérer le code source de l’application depuis <a href="https://github.com/fcerbell/redisbank" title="Application Redisbank">le dépôt GitHub</a><sup id="fnref:8" role="doc-noteref"><a href="#fn:8" class="footnote" rel="footnote">8</a></sup></p>
<div class="language-bash highlighter-rouge"><div class="highlight"><pre class="highlight"><code>git clone https://github.com/fcerbell/redisbank
<span class="nb">cd </span>redisbank/
</code></pre></div></div>

<p>Je compile l’image en l’étiquettant avec le nom de mon dépôt sur <a href="https://hub.docker.com/" title="Docker Hub">Docker Hub</a>, je me connecte au dépôt et j’y envoie l’image compilée pour qu’elle soit disponible en téléchargement libre depuis un dépôt d’images, pour Kubernetes :</p>
<div class="language-bash highlighter-rouge"><div class="highlight"><pre class="highlight"><code>docker build <span class="nt">-t</span> fcerbell/redisbank <span class="nb">.</span>
docker login
docker push fcerbell/redisbank:latest
</code></pre></div></div>

<p>Je peux créer une base pour l’application. Cette base est dimensionnée sur un seul shard, et n’utilisera qu’un cœur au plus, elle est répliquée, donc hautement disponible, elle utilisera un second shard de réplication. Elle n’occupera pas plus de 1Go de RAM, soit 500Mo pour les données et 500Mo pour le réplica. Mais sa véritable particularité est de charger deux modules d’extension utilisés par l’application. Avec Redis-Enterprise, il suffit de les spécifier, charge au cluster de les trouver, de les déployer sur les nœuds où tourneront les shards et de les faire charger par les shards.</p>
<ul>
  <li>RedisSearch est un moteur d’indexation automatique en temps réel et sans maintenance. Il permet de répondre à des requêtes de Full-Text Search (FTS), avec tokenisation, stemming, stop-words, langages, recherches floues ou approximatives, recherches phonetiques, scoring, … Mais aussi à des requêtes d’auto-complétion, des requêtes complexes avec agrégation, filtrage, ….</li>
  <li>Redis Timeseries permet de stocker des séries temporelles dans une structure adaptée, avec la possibilité de faire des agrégation automatique graduelles dans le temps.
```bash
cat « EOF | kubectl apply -f -
apiVersion: app.redislabs.com/v1alpha1
kind: RedisEnterpriseDatabase
metadata:
name: redis-enterprise-database
spec:
memorySize: 1G
shardCount: 1
replication: true
modulesList:
    <ul>
      <li>name: “search”
version: “2.4.16”</li>
      <li>name: “timeseries”
version: “1.6.17”
EOF
```</li>
    </ul>
  </li>
</ul>

<p>Une fois la base créée, je peux déployer l’application dans un petit pod. Cette application utilise SpringData-Redis pour se connecter à Redis. Ce framework utilise un fichier de configuration pour y trouver les informations de connexion : <em>application.yaml</em>.  En le consultant, on voit qu’il utilise des variables d’environnement pour initialiser ces informations, si elles sont disponibles :</p>
<div class="language-yaml highlighter-rouge"><div class="highlight"><pre class="highlight"><code><span class="c1"># Properties for running on localhost are the default</span>
<span class="c1"># Environment variables will be used when set</span>
<span class="c1"># Use these on your deployment environment of choice</span>
<span class="s">stomp.host=${STOMP_HOST:localhost}</span>
<span class="s">stomp.protocol=${STOMP_PROTOCOL:ws}</span>
<span class="s">stomp.port=${STOMP_PORT:8080}</span>
<span class="s">spring.redis.host=${REDIS_HOST:localhost}</span>
<span class="s">spring.redis.port=${REDIS_PORT:6379}</span>
<span class="s">spring.redis.password=${REDIS_PASSWORD:}</span>

<span class="c1"># Global properties</span>
<span class="s">stomp.endpoint=/websocket</span>
<span class="s">stomp.destinationPrefix=/topic</span>
<span class="s">stomp.transactionsTopic=/topic/transactions</span>
<span class="s">management.endpoints.web.exposure.include=env</span>
<span class="s">spring.session.store-type=redis</span>
<span class="s">spring.session.redis.namespace={lars:}spring:session</span>
</code></pre></div></div>

<p>Il suffit donc d’indiquer à Kubernetes de recopier les informations de connexion depuis le <em>Secret</em> dans des variables d’environnement de la session exécutant l’application dans le conteneur du pod. Non seulement ces information sensibles ne transitent pas par le réseau ou par mon poste de travail, elle n’apparaissent pas dans la liste des processus, mais en plus, cette configuration est portable à travers les environnements de déploiement (Dev, Recette, Intégration, PréProd, Prod…).</p>
<div class="language-bash highlighter-rouge"><div class="highlight"><pre class="highlight"><code><span class="nb">cat</span> <span class="o">&lt;&lt;</span> <span class="no">EOF</span><span class="sh"> | kubectl apply -f -
apiVersion: apps/v1
kind: Deployment
metadata:
  name: redisbank-deployment
spec:
  selector:
    matchLabels:
      app: redisbank
  replicas: 1
  template:
    metadata:
      labels:
        app: redisbank
    spec:
      containers:
      - name: redisbank
        image: fcerbell/redisbank:latest
        resources:
          requests:
            memory: "128Mi"
            cpu: "250m"
          limits:
            memory: "256Mi"
            cpu: "500m"
        ports:
        - name: redisbank
          containerPort: 8080
        env:                        ## Set app environment variables from REDB secrets
        - name: SPRING_REDIS_HOST
          valueFrom:
            secretKeyRef:
              name: redb-redis-enterprise-database
              key: service_name
        - name: SPRING_REDIS_PORT
          valueFrom:
            secretKeyRef:
              name: redb-redis-enterprise-database
              key: port
        - name: SPRING_REDIS_PASSWORD
          valueFrom:
            secretKeyRef:
              name: redb-redis-enterprise-database
              key: password
</span><span class="no">EOF
</span></code></pre></div></div>

<p>Comme d’habitude, je crée un service Kubernetes pour manipuler l’interface web de l’application</p>
<div class="language-bash highlighter-rouge"><div class="highlight"><pre class="highlight"><code><span class="nb">cat</span> <span class="o">&lt;&lt;</span> <span class="no">EOF</span><span class="sh"> | kubectl apply -f -
apiVersion: v1
kind: Service
metadata:
  name: redisbank
  labels:
    app: redisbank
spec:
  ports:
  - port: 8081
    targetPort: 8080
    nodePort: 30080
    name: redisbank
  selector:
    app: redisbank
  type: NodePort
</span><span class="no">EOF
</span></code></pre></div></div>

<p>Et je connecte ce service à un port de ma machine locale pour y connecter mon navigateur :</p>
<div class="language-bash highlighter-rouge"><div class="highlight"><pre class="highlight"><code>kubectl port-forward service/redisbank 8081
</code></pre></div></div>
<p><a href="http://localhost:8081">http://localhost:8081</a></p>

<h1 id="supports-et-liens">Supports et liens</h1>

<h1 id="notes-de-bas-de-page">Notes de bas de page</h1>
<div class="footnotes" role="doc-endnotes">
  <ol>
    <li id="fn:1" role="doc-endnote">
      <p><a href="https://docs.redis.com/latest/kubernetes/deployment/quick-start/" title="Documentation officielle Redis">https://docs.redis.com/latest/kubernetes/deployment/quick-start/ </a> <a href="#fnref:1" class="reversefootnote" role="doc-backlink">&#8617;</a></p>
    </li>
    <li id="fn:2" role="doc-endnote">
      <p><a href="https://github.com/RedisLabs/redis-enterprise-k8s-docs.git" title="Dépôt des modèles">https://github.com/RedisLabs/redis-enterprise-k8s-docs.git</a> <a href="#fnref:2" class="reversefootnote" role="doc-backlink">&#8617;</a></p>
    </li>
    <li id="fn:4" role="doc-endnote">
      <p><a href="https://phoenixnap.com/kb/prometheus-kubernetes" title="PhoenixNap: Prometheus delpoyment in K8S">https://phoenixnap.com/kb/prometheus-kubernetes</a> <a href="#fnref:4" class="reversefootnote" role="doc-backlink">&#8617;</a></p>
    </li>
    <li id="fn:5" role="doc-endnote">
      <p><a href="https://devopscube.com/setup-prometheus-monitoring-on-kubernetes/" title="DevopsCube: Prometheus deployment in K8S">https://devopscube.com/setup-prometheus-monitoring-on-kubernetes/</a> <a href="#fnref:5" class="reversefootnote" role="doc-backlink">&#8617;</a></p>
    </li>
    <li id="fn:6" role="doc-endnote">
      <p><a href="https://devopscube.com/setup-grafana-kubernetes/" title="DevopsCube: Grafana deployment in K8S">https://devopscube.com/setup-grafana-kubernetes/</a> <a href="#fnref:6" class="reversefootnote" role="doc-backlink">&#8617;</a></p>
    </li>
    <li id="fn:7" role="doc-endnote">
      <p><a href="https://docs.redis.com/latest/rs/clusters/monitoring/prometheus-integration/" title="Redis-Prometheus integration">https://docs.redis.com/latest/rs/clusters/monitoring/prometheus-integration/</a> <a href="#fnref:7" class="reversefootnote" role="doc-backlink">&#8617;</a></p>
    </li>
    <li id="fn:9" role="doc-endnote">
      <p><a href="https://hub.docker.com/" title="Docker Hub">https://hub.docker.com/</a> <a href="#fnref:9" class="reversefootnote" role="doc-backlink">&#8617;</a></p>
    </li>
    <li id="fn:8" role="doc-endnote">
      <p><a href="https://github.com/fcerbell/redisbank" title="Application Redisbank">https://github.com/fcerbell/redisbank</a> <a href="#fnref:8" class="reversefootnote" role="doc-backlink">&#8617;</a></p>
    </li>
  </ol>
</div>]]></content><author><name>François Cerbelle</name></author><category term="Redis en 5 minutes" /><category term="Redis" /><category term="Azure" /><category term="Azure Kubernetes Services" /><category term="AKS" /><category term="K8S" /><category term="Opérateur" /><category term="Prometheus" /><category term="Grafana" /><category term="Conteneur" /><category term="Docker" /><category term="DockerHub" /><category term="Superviser" /><summary type="html"><![CDATA[Nous allons voir comment déployer et superviser un cluster Redis Enterprise, des bases Redis et une application dans Azure Kubernetes Services (AKS), à l'aide de l'opérateur Redis pour Kubernetes (K8S), Prometheus et Grafana.]]></summary></entry><entry xml:lang="en"><title type="html">Redis 10 - How to manage RBAC security with ACL and Role</title><link href="https://fcerbell.github.io//HowtomanageRBACsecuritywithACLandRole/" rel="alternate" type="text/html" title="Redis 10 - How to manage RBAC security with ACL and Role" /><published>2022-05-28T14:07:52+00:00</published><updated>2022-05-28T14:07:52+00:00</updated><id>https://fcerbell.github.io//HowtomanageRBACsecuritywithACLandRole</id><content type="html" xml:base="https://fcerbell.github.io//HowtomanageRBACsecuritywithACLandRole/"><![CDATA[<p>How Redis Enterprise’s role based access control (RBAC) works and can be used to improve the security and industrialize Redis ACL for authentication and authorizations on data and commands at scale ?</p>

<p>You can find links to the related video recordings and printable materials at
the <a href="#materials-and-links">end of this post</a>.</p>

<ul id="markdown-toc">
  <li><a href="#explanation-and-demo-video" id="markdown-toc-explanation-and-demo-video">Explanation and demo video</a></li>
  <li><a href="#prepare-the-environment" id="markdown-toc-prepare-the-environment">Prepare the environment</a></li>
  <li><a href="#prerequisites" id="markdown-toc-prerequisites">Prerequisites</a></li>
  <li><a href="#a-security-and-compliance-issue" id="markdown-toc-a-security-and-compliance-issue">A security and compliance issue</a></li>
  <li><a href="#simple-redis-acls-limits" id="markdown-toc-simple-redis-acls-limits">Simple Redis ACLs limits</a></li>
  <li><a href="#implementing-roles-with-redis-enterprise" id="markdown-toc-implementing-roles-with-redis-enterprise">Implementing roles with Redis Enterprise</a>    <ul>
      <li><a href="#create-databases" id="markdown-toc-create-databases">Create databases</a></li>
      <li><a href="#create-the-accounts" id="markdown-toc-create-the-accounts">Create the accounts</a></li>
      <li><a href="#create-the-acl" id="markdown-toc-create-the-acl">Create the ACL</a></li>
      <li><a href="#create-the-roles" id="markdown-toc-create-the-roles">Create the roles</a></li>
      <li><a href="#map-acls-to-roles-in-each-database" id="markdown-toc-map-acls-to-roles-in-each-database">Map ACLs to roles in each database</a></li>
      <li><a href="#disable-default-anonymous-account" id="markdown-toc-disable-default-anonymous-account">Disable default anonymous account</a></li>
      <li><a href="#assign-a-roles-to-each-account" id="markdown-toc-assign-a-roles-to-each-account">Assign a roles to each account</a></li>
    </ul>
  </li>
  <li><a href="#permissions-tests" id="markdown-toc-permissions-tests">Permissions tests</a></li>
  <li><a href="#permissions-maintenance" id="markdown-toc-permissions-maintenance">Permissions maintenance</a>    <ul>
      <li><a href="#a-new-employee-joins" id="markdown-toc-a-new-employee-joins">A new employee joins</a></li>
      <li><a href="#a-developer-switches-to-another-team" id="markdown-toc-a-developer-switches-to-another-team">A developer switches to another team</a></li>
      <li><a href="#an-employee-leaves" id="markdown-toc-an-employee-leaves">An employee leaves</a></li>
      <li><a href="#access-to-new-structures" id="markdown-toc-access-to-new-structures">Access to new structures</a></li>
    </ul>
  </li>
  <li><a href="#wrap-up-and-ldap" id="markdown-toc-wrap-up-and-ldap">Wrap-up and LDAP</a></li>
  <li><a href="#materials-and-links" id="markdown-toc-materials-and-links">Materials and Links</a></li>
  <li><a href="#footnotes" id="markdown-toc-footnotes">Footnotes</a></li>
</ul>

<h1 id="explanation-and-demo-video">Explanation and demo video</h1>

<center><iframe width="420" height="315" src="https://www.youtube.com/embed/eeJu15azF2Y" frameborder="0" allowfullscreen=""></iframe></center>

<h1 id="prepare-the-environment">Prepare the environment</h1>
<p>You can use official Redis Enterprise docker containers from docker hub to
reproduce the demonstration or practice.</p>
<div class="language-bash highlighter-rouge"><div class="highlight"><pre class="highlight"><code><span class="c"># Start Redis Enterprise</span>
docker run <span class="nt">-d</span> <span class="nt">--cap-add</span> sys_resource <span class="nt">--name</span> redisenterprise <span class="nt">-p</span> 8443:8443 <span class="nt">-p</span> 9443:9443 <span class="nt">-p</span> 12000:12000 <span class="nt">-p</span> 12001:12001 <span class="nt">-p</span> 12002:12002 redislabs/redis
<span class="nb">sleep </span>20

<span class="c"># Initialize the Cluster</span>
docker <span class="nb">exec</span> <span class="nt">-d</span> <span class="nt">--privileged</span> redisenterprise <span class="s2">"/opt/redislabs/bin/rladmin"</span> cluster create name cluster.local username francois@redislabs.com password password
<span class="nb">sleep </span>15
</code></pre></div></div>

<h1 id="prerequisites">Prerequisites</h1>
<p>This contents assume that you already know what are Redis ACL. If you did you watch it previously, I recommend that you watch the <a href="/Howtomanagesecuritydataaccessandpermi-en/" title="ACL with Redis">How to manage security, data-access and permissions with Redis ACL</a> contents before this one. If you want to reproduce the following steps by yourself, you need to install <em>docker</em>, <em>curl</em> and <em>jq</em>. The commands are not purely POSIX shell compliant and need some <em>bash</em> extensions.</p>

<p><img src="..//assets/posts/en/BlogVlogApprendreRedisAvecFran%C3%A7ois5minutes10HowtomanageRBACsecuritywithACLandRole/2a2fa48640b942fe9774a5134706509b.png" alt="8a37ebdcb286aa6ce72cc6da0b92a6e3.png" /></p>

<h1 id="a-security-and-compliance-issue">A security and compliance issue</h1>
<p>Redis is used in nearly every company in the world. The data access control is critical to ensure the data security and to respect the compliance rules such as GDPR. Each incoming connection needs to be authenticated and potentially granted permissions on available databases, commands and data.</p>

<p>Lets imagine that you have three databases :</p>
<ul>
  <li>an <em>orders</em> database to store orders and order lines ;</li>
  <li>a <em>products</em> database to store the product catalog and the product availability in stocks ;</li>
  <li>a <em>messaging</em> database used as a message bus to communicate between all microservices with Redis PubSub.</li>
</ul>

<p>Two microservices, each with two endpoints :</p>
<ul>
  <li>One microservice to manage orders in the <em>orders</em> database, with : the <em>orders-update</em> endpoint to create and update orders (read-write), and the <em>orders-invoice</em> endpoint to generate invoices (read-only), they also need a read-write and read-only access to the messaging database.</li>
  <li>The other microservice to manage the product catalog with two endpoints, <em>products-update</em> to update products and <em>products-stocks</em> to check a product availability. They also need a read-write and a read-only access to the messaging database.</li>
</ul>

<p>There are also people :</p>
<ul>
  <li>one administrator, <em>Angélina</em> who should not access the data</li>
  <li>two project managers, <em>Paul</em> for the orders management, and <em>Pierre</em> for the product catalog. They need to access the logs, the database configuration, the monitoring and to change their projects data. They also need a read-write access to the message bus, the <em>messaging</em> database.</li>
  <li>one developer <em>David</em>, working on the <em>orders</em> project microservice only, and one developer <em>Denis</em>, working on the <em>products</em> project microservice only. Each of them need a limited access to the monitoring, a read-only access to their own database only and a subscribe-only (read-only) access to the messages in the <em>messaging</em> database.</li>
</ul>

<p>This is a fairly simple example compared to real enterprise needs. The permissions are easy to implement, but not to scale if you have several projects, several profiles such as developers, managers, architects, administrators, and several databases. Security with ACL administration quickly becomes a nightmare and needs to be industrialized and automated. Lets see how Redis Enterprise manage this example.</p>

<h1 id="simple-redis-acls-limits">Simple Redis ACLs limits</h1>
<p>Despite Redis is widely known and used by developers as a database, the security belongs to Ops who are not always aware of the security features. Since version 6, Redis includes authentication by username and data access authorizations with Access Control Lists (ACL).</p>

<p>Ok, lets have a look at their needed permissions, on the cluster and databases. We will potentially need to create the users in each database.</p>

<table>
  <thead>
    <tr>
      <th style="text-align: left">Account</th>
      <th style="text-align: left">Cluster</th>
      <th style="text-align: left">Orders DB</th>
      <th style="text-align: left">Products DB</th>
      <th style="text-align: left">Messaging DB</th>
    </tr>
  </thead>
  <tbody>
    <tr>
      <td style="text-align: left">orders-update</td>
      <td style="text-align: left">None</td>
      <td style="text-align: left">-@all +@hash +@list -@dangerous ~*</td>
      <td style="text-align: left">None</td>
      <td style="text-align: left">-@all +@publish +@subscribe -@dangerous ~*</td>
    </tr>
    <tr>
      <td style="text-align: left">orders-invoice</td>
      <td style="text-align: left">None</td>
      <td style="text-align: left">-@all +@hash +@list -@dangerous -@write ~*</td>
      <td style="text-align: left">None</td>
      <td style="text-align: left">-@all +@subscribe -@dangerous ~*</td>
    </tr>
    <tr>
      <td style="text-align: left">products-update</td>
      <td style="text-align: left">None</td>
      <td style="text-align: left">None</td>
      <td style="text-align: left">-@all +@hash +@list -@dangerous ~*</td>
      <td style="text-align: left">-@all +@publish +@subscribe -@dangerous ~*</td>
    </tr>
    <tr>
      <td style="text-align: left">products-stocks</td>
      <td style="text-align: left">None</td>
      <td style="text-align: left">None</td>
      <td style="text-align: left">-@all +@hash +@list -@dangerous -@write ~*</td>
      <td style="text-align: left">-@all +@subscribe -@dangerous ~*</td>
    </tr>
    <tr>
      <td style="text-align: left">Angélina</td>
      <td style="text-align: left">Full</td>
      <td style="text-align: left">-@all +@admin +@dangerous</td>
      <td style="text-align: left">-@all +@admin +@dangerous</td>
      <td style="text-align: left">-@all +@admin +@dangerous</td>
    </tr>
    <tr>
      <td style="text-align: left">Paul</td>
      <td style="text-align: left">Database</td>
      <td style="text-align: left">-@all +@hash +@list -@dangerous ~*</td>
      <td style="text-align: left">None</td>
      <td style="text-align: left">-@all +@publish +@subscribe -@dangerous ~*</td>
    </tr>
    <tr>
      <td style="text-align: left">Pierre</td>
      <td style="text-align: left">Database</td>
      <td style="text-align: left">None</td>
      <td style="text-align: left">-@all +@hash +@list -@dangerous ~*</td>
      <td style="text-align: left">-@all +@publish +@subscribe -@dangerous ~*</td>
    </tr>
    <tr>
      <td style="text-align: left">David</td>
      <td style="text-align: left">Monitor</td>
      <td style="text-align: left">-@all +@hash +@list -@dangerous -@write ~*</td>
      <td style="text-align: left">None</td>
      <td style="text-align: left">-@all +@subscribe -@dangerous ~*</td>
    </tr>
    <tr>
      <td style="text-align: left">Denis</td>
      <td style="text-align: left">Monitor</td>
      <td style="text-align: left">None</td>
      <td style="text-align: left">-@all +@hash +@list -@dangerous -@write ~*</td>
      <td style="text-align: left">-@all +@subscribe -@dangerous ~*</td>
    </tr>
  </tbody>
</table>

<p><img src="..//assets/posts/en/BlogVlogApprendreRedisAvecFran%C3%A7ois5minutes10HowtomanageRBACsecuritywithACLandRole/fc3c0eaa42084fcb8a56b7ff628e3cc0.png" alt="Slides - 11.png" /></p>

<p>You would have to connect to each database, create all the accounts with a password, then to create the ACLs individually. If a project has any change, it needs to change the ACL definitions for all the relevant users in each database, individually. What a pain to maintain when a new developer join or leave one or several projects, when new projects are created, when projects need access to different datastructures … Let’s try to factorize these.</p>

<h1 id="implementing-roles-with-redis-enterprise">Implementing roles with Redis Enterprise</h1>
<p>On top of ACLs, Redis Enterprise implemented TLS mutual authentication and Roles Based Access Control (RBAC) to make the ACL management more efficient and more scalable with multiple databases. What are the best practices on how to implement authentication, ACLs and roles in Redis Enterprise, and what can be easily achieved with them ?</p>

<p>Redis Enterprise Roles can be compared to groups or profiles. A role grants permissions globally on the Redis enterprise cluster administration and apply specific ACLs on each database. It automatically creates the accounts, configure the ACL and maintain everything up-to-date in each relevant database.</p>

<h2 id="create-databases">Create databases</h2>
<p>You can create them with the web admin interface</p>

<p><img src="..//assets/posts/en/BlogVlogApprendreRedisAvecFran%C3%A7ois5minutes10HowtomanageRBACsecuritywithACLandRole/99399910140d46b9967ec98f07929790.png" alt="63fda6e9a28eb76aa3b8e2cb10ee20cf.png" /></p>

<p>or with the REST API</p>

<div class="language-bash highlighter-rouge"><div class="highlight"><pre class="highlight"><code><span class="k">function </span>DBCreate <span class="o">{</span>
  <span class="nv">dbname</span><span class="o">=</span><span class="s1">'"name":"'</span><span class="s2">"</span><span class="nv">$1</span><span class="s2">"</span><span class="s1">'",'</span>
  <span class="nv">dbsize</span><span class="o">=</span><span class="s1">'"memory_size":'</span><span class="s2">"</span><span class="k">${</span><span class="nv">2</span><span class="k">:-</span><span class="nv">102400</span><span class="k">}</span><span class="s2">"</span><span class="s1">','</span>
  <span class="nv">dbcfg</span><span class="o">=</span><span class="s2">"</span><span class="nv">$3</span><span class="s2">"</span>
  curl <span class="nt">-k</span> <span class="nt">-u</span> <span class="s2">"francois@redislabs.com:password"</span> <span class="nt">--request</span> POST <span class="nt">--url</span> <span class="s2">"https://localhost:9443/v1/bdbs"</span> <span class="nt">--header</span> <span class="s1">'content-type: application/json'</span> <span class="nt">--data</span> <span class="s1">'{
    '</span><span class="k">${</span><span class="nv">dbname</span><span class="k">}</span><span class="s1">'
    '</span><span class="k">${</span><span class="nv">dbsize</span><span class="k">}</span><span class="s1">'
    '</span><span class="k">${</span><span class="nv">dbcfg</span><span class="k">}</span><span class="s1">'
  }'</span><span class="p">;</span>
<span class="o">}</span>
<span class="k">function </span>DBFindUidByName <span class="o">{</span>
  <span class="nv">dbname</span><span class="o">=</span><span class="s2">"</span><span class="nv">$1</span><span class="s2">"</span>
  <span class="c"># Find the DB UID by name</span>
  <span class="nv">dbid</span><span class="o">=</span><span class="sb">`</span>curl <span class="nt">-s</span> <span class="nt">-k</span> <span class="nt">-u</span> <span class="s2">"francois@redislabs.com:password"</span> <span class="nt">--request</span> GET <span class="nt">--url</span> <span class="s2">"https://localhost:9443/v1/bdbs"</span> <span class="nt">--header</span> <span class="s1">'content-type: application/json'</span> | jq <span class="s1">'.[]|select(.name=="'</span><span class="k">${</span><span class="nv">dbname</span><span class="k">}</span><span class="s1">'").uid'</span><span class="sb">`</span>
  <span class="nb">echo</span> <span class="nv">$dbid</span>
<span class="o">}</span>

<span class="k">function </span>DBUpdate <span class="o">{</span>
  <span class="nv">dbname</span><span class="o">=</span><span class="s2">"</span><span class="nv">$1</span><span class="s2">"</span>
  <span class="nv">config</span><span class="o">=</span><span class="s2">"</span><span class="nv">$2</span><span class="s2">"</span>
  <span class="nv">dbid</span><span class="o">=</span><span class="sb">`</span>DBFindUidByName <span class="s2">"</span><span class="k">${</span><span class="nv">dbname</span><span class="k">}</span><span class="s2">"</span><span class="sb">`</span>
  <span class="c"># Update the DB configuration</span>
  curl <span class="nt">-k</span> <span class="nt">-u</span> <span class="s2">"francois@redislabs.com:password"</span> <span class="nt">--request</span> PUT <span class="nt">--url</span> <span class="s2">"https://localhost:9443/v1/bdbs/</span><span class="k">${</span><span class="nv">dbid</span><span class="k">}</span><span class="s2">"</span> <span class="nt">--header</span> <span class="s1">'content-type: application/json'</span> <span class="nt">--data</span> <span class="s1">'{
    '</span><span class="s2">"</span><span class="k">${</span><span class="nv">config</span><span class="k">}</span><span class="s2">"</span><span class="s1">'
  }'</span><span class="p">;</span>
<span class="o">}</span>

<span class="k">function </span>DBDelete <span class="o">{</span>
  <span class="nv">dbname</span><span class="o">=</span><span class="s2">"</span><span class="nv">$1</span><span class="s2">"</span>
  <span class="nv">dbid</span><span class="o">=</span><span class="sb">`</span>DBFindUidByName <span class="s2">"</span><span class="k">${</span><span class="nv">dbname</span><span class="k">}</span><span class="s2">"</span><span class="sb">`</span>
  <span class="c"># Delete the database</span>
  curl <span class="nt">-k</span> <span class="nt">-u</span> <span class="s2">"francois@redislabs.com:password"</span> <span class="nt">--request</span> DELETE <span class="nt">--url</span> <span class="s2">"https://localhost:9443/v1/bdbs/</span><span class="k">${</span><span class="nv">dbid</span><span class="k">}</span><span class="s2">"</span> <span class="nt">--header</span> <span class="s1">'content-type: application/json'</span>
<span class="o">}</span>

DBCreate orders 102400 <span class="s1">'"port":12000'</span>
DBCreate products 102400 <span class="s1">'"port":12001'</span>
DBCreate messaging 102400 <span class="s1">'"port":12002'</span>
</code></pre></div></div>

<p><img src="..//assets/posts/en/BlogVlogApprendreRedisAvecFran%C3%A7ois5minutes10HowtomanageRBACsecuritywithACLandRole/699b2f4706a441f283e20a3acda0cc77.png" alt="0105ea156ea70f059d4b5fa1cdd1c09f.png" /></p>

<p>The final result is the same and all the databases are successfully created :</p>

<p><img src="..//assets/posts/en/BlogVlogApprendreRedisAvecFran%C3%A7ois5minutes10HowtomanageRBACsecuritywithACLandRole/deee53833c1e495298fc5b2f2573cc8d.png" alt="4a40e838816d27249fe710aafb86a5eb.png" /></p>

<h2 id="create-the-accounts">Create the accounts</h2>

<p>Then, we need to create all the accounts for the endpoints and for the users. We create them in the cluster and the cluster will automatically maintain a copy of them in the relevant databases.</p>

<p><img src="..//assets/posts/en/BlogVlogApprendreRedisAvecFran%C3%A7ois5minutes10HowtomanageRBACsecuritywithACLandRole/c4ccd935d0e34c77ba1a1724acb7da67.png" alt="Slides - 21.png" /></p>

<p>The accounts can be created with the web interface</p>

<p><img src="..//assets/posts/en/BlogVlogApprendreRedisAvecFran%C3%A7ois5minutes10HowtomanageRBACsecuritywithACLandRole/bf77c709def54075893f98fac7c9cb93.png" alt="042a8e64dd6614bb6e49cda533d47d3c.png" /></p>

<p>Or with the REST API, to industrialize the creation and automate it.</p>

<div class="language-bash highlighter-rouge"><div class="highlight"><pre class="highlight"><code><span class="k">function </span>UserCreate <span class="o">{</span>
  <span class="nv">username</span><span class="o">=</span><span class="s1">'"name":"'</span><span class="nv">$1</span><span class="s1">'",'</span>
  <span class="nv">useremail</span><span class="o">=</span><span class="s1">'"email":"'</span><span class="nv">$2</span><span class="s1">'",'</span>
  <span class="nv">userpass</span><span class="o">=</span><span class="s1">'"password":"'</span><span class="k">${</span><span class="nv">3</span><span class="k">:-</span><span class="nv">$1</span><span class="k">}</span><span class="s1">'",'</span>
  curl <span class="nt">-k</span> <span class="nt">-u</span> <span class="s2">"francois@redislabs.com:password"</span> <span class="nt">--request</span> POST <span class="nt">--url</span> <span class="s2">"https://localhost:9443/v1/users"</span> <span class="nt">--header</span> <span class="s1">'content-type: application/json'</span> <span class="nt">--data</span> <span class="s1">'{
     '</span><span class="k">${</span><span class="nv">username</span><span class="k">}</span><span class="s1">'
     '</span><span class="k">${</span><span class="nv">useremail</span><span class="k">}</span><span class="s1">'
     '</span><span class="k">${</span><span class="nv">userpass</span><span class="k">}</span><span class="s1">'
     "role": "none"
  }'</span>
<span class="o">}</span>

<span class="k">function </span>UserFindUidByName <span class="o">{</span>
  <span class="nv">username</span><span class="o">=</span><span class="s2">"</span><span class="nv">$1</span><span class="s2">"</span>
  <span class="c"># Find Account UID by name</span>
  <span class="nv">uuid</span><span class="o">=</span><span class="sb">`</span>curl <span class="nt">-s</span> <span class="nt">-k</span> <span class="nt">-u</span> <span class="s2">"francois@redislabs.com:password"</span> <span class="nt">--request</span> GET <span class="nt">--url</span> <span class="s2">"https://localhost:9443/v1/users"</span> <span class="nt">--header</span> <span class="s1">'content-type: application/json'</span> | jq <span class="s1">'.[]|select(.name=="'</span><span class="k">${</span><span class="nv">username</span><span class="k">}</span><span class="s1">'").uid'</span><span class="sb">`</span>
  <span class="nb">echo</span> <span class="k">${</span><span class="nv">uuid</span><span class="k">}</span>
<span class="o">}</span>

<span class="k">function </span>UserUpdate <span class="o">{</span>
  <span class="nv">username</span><span class="o">=</span><span class="s2">"</span><span class="nv">$1</span><span class="s2">"</span>
  <span class="nv">usercfg</span><span class="o">=</span><span class="s2">"</span><span class="nv">$2</span><span class="s2">"</span>
  <span class="nv">uuid</span><span class="o">=</span><span class="sb">`</span>UserFindUidByName <span class="s2">"</span><span class="k">${</span><span class="nv">username</span><span class="k">}</span><span class="s2">"</span><span class="sb">`</span>
  curl <span class="nt">-k</span> <span class="nt">-u</span> <span class="s2">"francois@redislabs.com:password"</span> <span class="nt">--request</span> PUT <span class="nt">--url</span> <span class="s2">"https://localhost:9443/v1/users/</span><span class="k">${</span><span class="nv">uuid</span><span class="k">}</span><span class="s2">"</span> <span class="nt">--header</span> <span class="s1">'content-type: application/json'</span> <span class="nt">--data</span> <span class="s1">'{'</span><span class="s2">"</span><span class="k">${</span><span class="nv">usercfg</span><span class="k">}</span><span class="s2">"</span><span class="s1">'}'</span>
<span class="o">}</span>

<span class="k">function </span>UserDelete <span class="o">{</span>
  <span class="nv">username</span><span class="o">=</span><span class="s2">"</span><span class="nv">$1</span><span class="s2">"</span>
  <span class="nv">uuid</span><span class="o">=</span><span class="sb">`</span>UserFindUidByName <span class="s2">"</span><span class="k">${</span><span class="nv">username</span><span class="k">}</span><span class="s2">"</span><span class="sb">`</span>
  curl <span class="nt">-k</span> <span class="nt">-u</span> <span class="s2">"francois@redislabs.com:password"</span> <span class="nt">--request</span> DELETE <span class="nt">--url</span> <span class="s2">"https://localhost:9443/v1/users/</span><span class="k">${</span><span class="nv">uuid</span><span class="k">}</span><span class="s2">"</span> <span class="nt">--header</span> <span class="s1">'content-type: application/json'</span>
<span class="o">}</span>


<span class="c"># Users</span>
<span class="k">for </span>u <span class="k">in </span>orders-update orders-invoice products-update products-stocks Angelina Paul Pierre David Denis<span class="p">;</span> <span class="k">do
  </span>UserCreate <span class="s2">"</span><span class="k">${</span><span class="nv">u</span><span class="k">}</span><span class="s2">"</span> <span class="s2">"</span><span class="k">${</span><span class="nv">u</span><span class="k">}</span><span class="s2">@example.org"</span> <span class="s2">"</span><span class="k">${</span><span class="nv">u</span><span class="k">}</span><span class="s2">"</span>
<span class="k">done</span>
</code></pre></div></div>

<p><img src="..//assets/posts/en/BlogVlogApprendreRedisAvecFran%C3%A7ois5minutes10HowtomanageRBACsecuritywithACLandRole/7f38a122aff04a848a4968501a6daf64.png" alt="35fd63152d9c443af3f9feea097d8774.png" /></p>

<p>At the end, the result is the same and all the accounts are created in the cluster :</p>

<p><img src="..//assets/posts/en/BlogVlogApprendreRedisAvecFran%C3%A7ois5minutes10HowtomanageRBACsecuritywithACLandRole/67e9b5f97c254476bdb0e756e082aa8c.png" alt="7c54e3641f547d765a48d8a78c43132f.png" /></p>

<h2 id="create-the-acl">Create the ACL</h2>
<p>We have to define these ACLs in the cluster. They will be some sort of ACL templates to apply tu users in specific databases, depending on the granted roles. So, we need to find all the possible ACL to apply and define them in the cluster.  We can easily identify five distinct ACL : read-write access or read-only access to data, publish-subscribe or subscribe-only access to channels, and database administration.</p>

<table>
  <thead>
    <tr>
      <th style="text-align: left">ACL Name</th>
      <th style="text-align: left">ACL definition</th>
    </tr>
  </thead>
  <tbody>
    <tr>
      <td style="text-align: left">DataRW</td>
      <td style="text-align: left">-@all +@hash +@list -@dangerous ~*</td>
    </tr>
    <tr>
      <td style="text-align: left">DataRO</td>
      <td style="text-align: left">-@all +@hash +@list -@dangerous -@write ~*</td>
    </tr>
    <tr>
      <td style="text-align: left">MsgRW</td>
      <td style="text-align: left">-@all +@publish +@subscribe -@dangerous ~*</td>
    </tr>
    <tr>
      <td style="text-align: left">MsgRO</td>
      <td style="text-align: left">-@all +@subscribe -@dangerous ~*</td>
    </tr>
    <tr>
      <td style="text-align: left">DBAdmin</td>
      <td style="text-align: left">-@all +@admin +@dangerous</td>
    </tr>
  </tbody>
</table>

<p><img src="..//assets/posts/en/BlogVlogApprendreRedisAvecFran%C3%A7ois5minutes10HowtomanageRBACsecuritywithACLandRole/81babc2465fb48d1b9377b28380a471a.png" alt="Slides - 27.png" /></p>

<p>The ACLs can be created with the web administration interface</p>

<p><img src="..//assets/posts/en/BlogVlogApprendreRedisAvecFran%C3%A7ois5minutes10HowtomanageRBACsecuritywithACLandRole/2e098537cbe0497e8477cb2f33feb662.png" alt="39a89571a7e5ffc26f5ada0a2930b723.png" /></p>

<p>or with REST API calls. I wrote a bash function helper to make them more friendly.</p>

<div class="language-bash highlighter-rouge"><div class="highlight"><pre class="highlight"><code><span class="k">function </span>ACLCreate <span class="o">{</span>
  <span class="nv">aclname</span><span class="o">=</span><span class="s2">"</span><span class="nv">$1</span><span class="s2">"</span>
  <span class="nv">acltext</span><span class="o">=</span><span class="s2">"</span><span class="nv">$2</span><span class="s2">"</span>
  curl <span class="nt">-k</span> <span class="nt">-u</span> <span class="s2">"francois@redislabs.com:password"</span> <span class="nt">--request</span> POST <span class="nt">--url</span> <span class="s2">"https://localhost:9443/v1/redis_acls"</span> <span class="nt">--header</span> <span class="s1">'content-type: application/json'</span> <span class="nt">--data</span> <span class="s1">'{"name": "'</span><span class="s2">"</span><span class="k">${</span><span class="nv">aclname</span><span class="k">}</span><span class="s2">"</span><span class="s1">'", "acl": "'</span><span class="s2">"</span><span class="k">${</span><span class="nv">acltext</span><span class="k">}</span><span class="s2">"</span><span class="s1">'" }'</span> 
<span class="o">}</span>

<span class="k">function </span>ACLFindUidByName <span class="o">{</span>
  <span class="nv">aclname</span><span class="o">=</span><span class="s2">"</span><span class="nv">$1</span><span class="s2">"</span>
  <span class="c"># Find ACL UID by name</span>
  <span class="nv">uuid</span><span class="o">=</span><span class="sb">`</span>curl <span class="nt">-s</span> <span class="nt">-k</span> <span class="nt">-u</span> <span class="s2">"francois@redislabs.com:password"</span> <span class="nt">--request</span> GET <span class="nt">--url</span> <span class="s2">"https://localhost:9443/v1/redis_acls"</span> <span class="nt">--header</span> <span class="s1">'content-type: application/json'</span> | jq <span class="s1">'.[]|select(.name=="'</span><span class="s2">"</span><span class="k">${</span><span class="nv">aclname</span><span class="k">}</span><span class="s2">"</span><span class="s1">'").uid'</span><span class="sb">`</span>
  <span class="nb">echo</span> <span class="k">${</span><span class="nv">uuid</span><span class="k">}</span>
<span class="o">}</span>

<span class="k">function </span>ACLUpdate <span class="o">{</span>
  <span class="nv">aclname</span><span class="o">=</span><span class="s2">"</span><span class="nv">$1</span><span class="s2">"</span>
  <span class="nv">acltext</span><span class="o">=</span><span class="s2">"</span><span class="nv">$2</span><span class="s2">"</span>
  <span class="nv">acluid</span><span class="o">=</span><span class="sb">`</span>ACLFindUidByName <span class="s2">"</span><span class="k">${</span><span class="nv">aclname</span><span class="k">}</span><span class="s2">"</span><span class="sb">`</span>
  curl <span class="nt">-k</span> <span class="nt">-u</span> <span class="s2">"francois@redislabs.com:password"</span> <span class="nt">--request</span> PUT <span class="nt">--url</span> <span class="s2">"https://localhost:9443/v1/redis_acls/</span><span class="k">${</span><span class="nv">acluid</span><span class="k">}</span><span class="s2">"</span> <span class="nt">--header</span> <span class="s1">'content-type: application/json'</span> <span class="nt">--data</span> <span class="s1">'{"acl":"'</span><span class="s2">"</span><span class="k">${</span><span class="nv">acltext</span><span class="k">}</span><span class="s2">"</span><span class="s1">'"}'</span>
<span class="o">}</span>

<span class="k">function </span>ACLDelete <span class="o">{</span>
  <span class="nv">aclname</span><span class="o">=</span><span class="s2">"</span><span class="nv">$1</span><span class="s2">"</span>
  <span class="nv">acluid</span><span class="o">=</span><span class="sb">`</span>ACLFindUidByName <span class="s2">"</span><span class="k">${</span><span class="nv">aclname</span><span class="k">}</span><span class="s2">"</span><span class="sb">`</span>
  curl <span class="nt">-k</span> <span class="nt">-u</span> <span class="s2">"francois@redislabs.com:password"</span> <span class="nt">--request</span> DELETE <span class="nt">--url</span> <span class="s2">"https://localhost:9443/v1/redis_acls/</span><span class="k">${</span><span class="nv">acluid</span><span class="k">}</span><span class="s2">"</span> <span class="nt">--header</span> <span class="s1">'content-type: application/json'</span>
<span class="o">}</span>

ACLCreate <span class="s2">"DataRW"</span>  <span class="s1">'-@all +@hash +@list -@dangerous ~*'</span>
ACLCreate <span class="s2">"DataRO"</span>  <span class="s1">'-@all +@hash +@list -@dangerous -@write ~*'</span>
ACLCreate <span class="s2">"MsgRW"</span>   <span class="s1">'-@all +publish +subscribe -@dangerous ~*'</span>
ACLCreate <span class="s2">"MsgRO"</span>   <span class="s1">'-@all +subscribe -@dangerous ~*'</span>
ACLCreate <span class="s2">"DBAdmin"</span> <span class="s1">'-@all +@admin +@dangerous'</span>
</code></pre></div></div>

<p><img src="..//assets/posts/en/BlogVlogApprendreRedisAvecFran%C3%A7ois5minutes10HowtomanageRBACsecuritywithACLandRole/42d10acfbf124e06951f4d51d4e8f1ce.png" alt="809e29ae93fb9b653e80015672449324.png" /></p>

<h2 id="create-the-roles">Create the roles</h2>
<p>With these definitions, we can more easily see patterns :</p>

<table>
  <thead>
    <tr>
      <th style="text-align: left">Account</th>
      <th style="text-align: left">Cluster</th>
      <th style="text-align: left">Orders DB</th>
      <th style="text-align: left">Products DB</th>
      <th style="text-align: left">Messaging DB</th>
    </tr>
  </thead>
  <tbody>
    <tr>
      <td style="text-align: left">orders-update</td>
      <td style="text-align: left">None</td>
      <td style="text-align: left">DataRW</td>
      <td style="text-align: left">None</td>
      <td style="text-align: left">MsgRW</td>
    </tr>
    <tr>
      <td style="text-align: left">orders-invoice</td>
      <td style="text-align: left">None</td>
      <td style="text-align: left">DataRO</td>
      <td style="text-align: left">None</td>
      <td style="text-align: left">MsgRO</td>
    </tr>
    <tr>
      <td style="text-align: left">products-update</td>
      <td style="text-align: left">None</td>
      <td style="text-align: left">None</td>
      <td style="text-align: left">DataRW</td>
      <td style="text-align: left">MsgRW</td>
    </tr>
    <tr>
      <td style="text-align: left">products-stocks</td>
      <td style="text-align: left">None</td>
      <td style="text-align: left">None</td>
      <td style="text-align: left">DataRO</td>
      <td style="text-align: left">MsgRO</td>
    </tr>
    <tr>
      <td style="text-align: left">Angélina</td>
      <td style="text-align: left">Full</td>
      <td style="text-align: left">DBAdmin</td>
      <td style="text-align: left">DBAdmin</td>
      <td style="text-align: left">DBAdmin</td>
    </tr>
    <tr>
      <td style="text-align: left">Paul</td>
      <td style="text-align: left">Database</td>
      <td style="text-align: left">DataRW</td>
      <td style="text-align: left">None</td>
      <td style="text-align: left">MsgRW</td>
    </tr>
    <tr>
      <td style="text-align: left">Pierre</td>
      <td style="text-align: left">Database</td>
      <td style="text-align: left">None</td>
      <td style="text-align: left">DataRW</td>
      <td style="text-align: left">MsgRW</td>
    </tr>
    <tr>
      <td style="text-align: left">David</td>
      <td style="text-align: left">Monitor</td>
      <td style="text-align: left">DataRO</td>
      <td style="text-align: left">None</td>
      <td style="text-align: left">MsgRO</td>
    </tr>
    <tr>
      <td style="text-align: left">Denis</td>
      <td style="text-align: left">Monitor</td>
      <td style="text-align: left">None</td>
      <td style="text-align: left">DataRO</td>
      <td style="text-align: left">MsgRO</td>
    </tr>
  </tbody>
</table>

<p>The Redis Enterprise cluster can grant cluster permissions to roles and each Redis Enterprise database can grant specific ACLs to a role. The idea is to create a distinct role per unique permission set, each unique line in the table. Thus, for our simple case, we need to create nine roles, one for each possible combination. A role is an account profile or an account group with the same permissions on the cluster and on the databases.</p>

<table>
  <thead>
    <tr>
      <th style="text-align: left">Roles</th>
      <th style="text-align: left">Cluster admin.</th>
      <th style="text-align: left">Orders DB</th>
      <th style="text-align: left">Products DB</th>
      <th style="text-align: left">Messaging DB</th>
    </tr>
  </thead>
  <tbody>
    <tr>
      <td style="text-align: left">Orders-RW</td>
      <td style="text-align: left">None</td>
      <td style="text-align: left">DataRW</td>
      <td style="text-align: left">None</td>
      <td style="text-align: left">MsgRW</td>
    </tr>
    <tr>
      <td style="text-align: left">Orders-RO</td>
      <td style="text-align: left">None</td>
      <td style="text-align: left">DataRO</td>
      <td style="text-align: left">None</td>
      <td style="text-align: left">MsgRO</td>
    </tr>
    <tr>
      <td style="text-align: left">Products-RW</td>
      <td style="text-align: left">None</td>
      <td style="text-align: left">None</td>
      <td style="text-align: left">DataRW</td>
      <td style="text-align: left">MsgRW</td>
    </tr>
    <tr>
      <td style="text-align: left">Products-RO</td>
      <td style="text-align: left">None</td>
      <td style="text-align: left">None</td>
      <td style="text-align: left">DataRO</td>
      <td style="text-align: left">MsgRO</td>
    </tr>
    <tr>
      <td style="text-align: left">Global-ADM</td>
      <td style="text-align: left">Admin</td>
      <td style="text-align: left">DBAdmin</td>
      <td style="text-align: left">DBAdmin</td>
      <td style="text-align: left">DBAdmin</td>
    </tr>
    <tr>
      <td style="text-align: left">Orders-PM</td>
      <td style="text-align: left">DB-Member</td>
      <td style="text-align: left">DataRW</td>
      <td style="text-align: left">None</td>
      <td style="text-align: left">MsgRW</td>
    </tr>
    <tr>
      <td style="text-align: left">Products-PM</td>
      <td style="text-align: left">DB-Member</td>
      <td style="text-align: left">None</td>
      <td style="text-align: left">DataRW</td>
      <td style="text-align: left">MsgRW</td>
    </tr>
    <tr>
      <td style="text-align: left">Orders-DEV</td>
      <td style="text-align: left">DB Viewer</td>
      <td style="text-align: left">DataRO</td>
      <td style="text-align: left">None</td>
      <td style="text-align: left">MsgRO</td>
    </tr>
    <tr>
      <td style="text-align: left">Products-DEV</td>
      <td style="text-align: left">DB-Viewer</td>
      <td style="text-align: left">None</td>
      <td style="text-align: left">DataRO</td>
      <td style="text-align: left">MsgRO</td>
    </tr>
  </tbody>
</table>

<p><img src="..//assets/posts/en/BlogVlogApprendreRedisAvecFran%C3%A7ois5minutes10HowtomanageRBACsecuritywithACLandRole/c8fcce7107544143aabe8961df5d81f2.png" alt="Slides - 37.png" /></p>

<p>The cluster permissions are directly and globally assigned to the role, let’s create them with the web administration interface first</p>

<p><img src="..//assets/posts/en/BlogVlogApprendreRedisAvecFran%C3%A7ois5minutes10HowtomanageRBACsecuritywithACLandRole/4bf886dcade44b0690827960315ed156.png" alt="8a955640a7a961d3711421362b961106.png" /></p>

<p>And then with the REST API and an helper function</p>

<div class="language-bash highlighter-rouge"><div class="highlight"><pre class="highlight"><code><span class="k">function </span>RoleCreate <span class="o">{</span>
  <span class="nv">rolename</span><span class="o">=</span><span class="s2">"</span><span class="nv">$1</span><span class="s2">"</span>
  <span class="nv">roleperm</span><span class="o">=</span><span class="s2">"</span><span class="nv">$2</span><span class="s2">"</span>
  curl <span class="nt">-k</span> <span class="nt">-u</span> <span class="s2">"francois@redislabs.com:password"</span> <span class="nt">--request</span> POST <span class="nt">--url</span> <span class="s2">"https://localhost:9443/v1/roles"</span> <span class="nt">--header</span> <span class="s1">'content-type: application/json'</span> <span class="nt">--data</span> <span class="s1">'{"name": "'</span><span class="s2">"</span><span class="k">${</span><span class="nv">rolename</span><span class="k">}</span><span class="s2">"</span><span class="s1">'", "management": "'</span><span class="s2">"</span><span class="k">${</span><span class="nv">roleperm</span><span class="k">}</span><span class="s2">"</span><span class="s1">'" }'</span>  
<span class="o">}</span>

<span class="k">function </span>RoleFindUidByName <span class="o">{</span>
  <span class="nv">rolename</span><span class="o">=</span><span class="s2">"</span><span class="nv">$1</span><span class="s2">"</span>
  <span class="c"># Find Role UID by name</span>
  <span class="nv">ruid</span><span class="o">=</span><span class="sb">`</span>curl <span class="nt">-s</span> <span class="nt">-k</span> <span class="nt">-u</span> <span class="s2">"francois@redislabs.com:password"</span> <span class="nt">--request</span> GET <span class="nt">--url</span> <span class="s2">"https://localhost:9443/v1/roles"</span> <span class="nt">--header</span> <span class="s1">'content-type: application/json'</span> | jq <span class="s1">'.[]|select(.name=="'</span><span class="s2">"</span><span class="k">${</span><span class="nv">rolename</span><span class="k">}</span><span class="s2">"</span><span class="s1">'").uid'</span><span class="sb">`</span>
  <span class="nb">echo</span> <span class="k">${</span><span class="nv">ruid</span><span class="k">}</span>
<span class="o">}</span>

<span class="k">function </span>RoleUpdate <span class="o">{</span>
  <span class="nv">rolename</span><span class="o">=</span><span class="s2">"</span><span class="nv">$1</span><span class="s2">"</span>
  <span class="nv">roleperm</span><span class="o">=</span><span class="s2">"</span><span class="nv">$2</span><span class="s2">"</span>
  <span class="nv">roleuid</span><span class="o">=</span><span class="sb">`</span>RoleFindUidByName <span class="s2">"</span><span class="k">${</span><span class="nv">rolename</span><span class="k">}</span><span class="s2">"</span><span class="sb">`</span>
  curl <span class="nt">-k</span> <span class="nt">-u</span> <span class="s2">"francois@redislabs.com:password"</span> <span class="nt">--request</span> PUT <span class="nt">--url</span> <span class="s2">"https://localhost:9443/v1/roles/</span><span class="k">${</span><span class="nv">roleuid</span><span class="k">}</span><span class="s2">"</span> <span class="nt">--header</span> <span class="s1">'content-type: application/json'</span> <span class="nt">--data</span> <span class="s1">'{"management":"'</span><span class="s2">"</span><span class="k">${</span><span class="nv">roleperm</span><span class="k">}</span><span class="s2">"</span><span class="s1">'"}'</span>
<span class="o">}</span>

<span class="k">function </span>RoleDelete <span class="o">{</span>
  <span class="nv">rolename</span><span class="o">=</span><span class="s2">"</span><span class="nv">$1</span><span class="s2">"</span>
  <span class="nv">roleuid</span><span class="o">=</span><span class="sb">`</span>RoleFindUidByName <span class="s2">"</span><span class="k">${</span><span class="nv">rolename</span><span class="k">}</span><span class="s2">"</span><span class="sb">`</span>
  curl <span class="nt">-k</span> <span class="nt">-u</span> <span class="s2">"francois@redislabs.com:password"</span> <span class="nt">--request</span> DELETE <span class="nt">--url</span> <span class="s2">"https://localhost:9443/v1/roles/</span><span class="k">${</span><span class="nv">roleuid</span><span class="k">}</span><span class="s2">"</span> <span class="nt">--header</span> <span class="s1">'content-type: application/json'</span>
<span class="o">}</span>

RoleCreate <span class="s2">"Orders-RW"</span>    <span class="s2">"none"</span>
RoleCreate <span class="s2">"Orders-RO"</span>    <span class="s2">"none"</span>
RoleCreate <span class="s2">"Products-RW"</span>  <span class="s2">"none"</span>
RoleCreate <span class="s2">"Products-RO"</span>  <span class="s2">"none"</span>
RoleCreate <span class="s2">"Global-ADM"</span>   <span class="s2">"admin"</span>
RoleCreate <span class="s2">"Orders-PM"</span>    <span class="s2">"db_member"</span>
RoleCreate <span class="s2">"Products-PM"</span>  <span class="s2">"db_member"</span>
RoleCreate <span class="s2">"Orders-DEV"</span>   <span class="s2">"db_viewer"</span>
RoleCreate <span class="s2">"Products-DEV"</span> <span class="s2">"db_viewer"</span>
</code></pre></div></div>

<p><img src="..//assets/posts/en/BlogVlogApprendreRedisAvecFran%C3%A7ois5minutes10HowtomanageRBACsecuritywithACLandRole/f8712f703f364c818d541bc2085b738d.png" alt="f6d0f8606349c0d0dae28e813f326d53.png" /></p>

<h2 id="map-acls-to-roles-in-each-database">Map ACLs to roles in each database</h2>
<p>Then, in each database, we have to define if a specific ACL template should be
applied to the members of specific roles. Let’s start with the <em>orders</em>
database.</p>

<p><img src="..//assets/posts/en/BlogVlogApprendreRedisAvecFran%C3%A7ois5minutes10HowtomanageRBACsecuritywithACLandRole/c803f2fbde2048a4bf8580475bb6d083.png" alt="Slides - 46.png" /></p>

<p>The Web administration interface makes some convenience abstractions to map ACLs to Roles for each database under the unified <em>roles</em> page.</p>

<p><img src="..//assets/posts/en/BlogVlogApprendreRedisAvecFran%C3%A7ois5minutes10HowtomanageRBACsecuritywithACLandRole/7a0ab21853824a3aa94ac1fc5379a3eb.png" alt="a45c4d53a879039697f0c106217e962a.png" /></p>

<p>The REST API is operating at a lower level, directly manipulating the role-acl mapping in the database definitions. Let’s create the mapping for the <em>orders</em> database.</p>

<table>
  <thead>
    <tr>
      <th style="text-align: left">Roles</th>
      <th style="text-align: left">Orders DB</th>
    </tr>
  </thead>
  <tbody>
    <tr>
      <td style="text-align: left">Orders-RW</td>
      <td style="text-align: left">DataRW</td>
    </tr>
    <tr>
      <td style="text-align: left">Orders-RO</td>
      <td style="text-align: left">DataRO</td>
    </tr>
    <tr>
      <td style="text-align: left">Global-ADM</td>
      <td style="text-align: left">DBAdmin</td>
    </tr>
    <tr>
      <td style="text-align: left">Orders-PM</td>
      <td style="text-align: left">DataRW</td>
    </tr>
    <tr>
      <td style="text-align: left">Orders-DEV</td>
      <td style="text-align: left">DataRO</td>
    </tr>
  </tbody>
</table>

<p>I define a first bash helper function, to lookup roles and ACLs uid and build the mapping JSON objects, and a second one to apply a configuration change to a database.</p>

<div class="language-bash highlighter-rouge"><div class="highlight"><pre class="highlight"><code><span class="k">function </span>RoleACLMap <span class="o">{</span>
  <span class="nv">rolename</span><span class="o">=</span><span class="nv">$1</span>
  <span class="nv">aclname</span><span class="o">=</span><span class="nv">$2</span>
  <span class="nv">roleuid</span><span class="o">=</span><span class="sb">`</span>RoleFindUidByName <span class="s2">"</span><span class="k">${</span><span class="nv">rolename</span><span class="k">}</span><span class="s2">"</span><span class="sb">`</span>
  <span class="nv">acluid</span><span class="o">=</span><span class="sb">`</span>ACLFindUidByName <span class="s2">"</span><span class="k">${</span><span class="nv">aclname</span><span class="k">}</span><span class="s2">"</span><span class="sb">`</span>
  <span class="c"># Build the JSON object to map the ACL to the role</span>
  <span class="nb">echo</span> <span class="s1">'{"redis_acl_uid": '</span><span class="k">${</span><span class="nv">acluid</span><span class="k">}</span><span class="s1">',"role_uid": '</span><span class="k">${</span><span class="nv">roleuid</span><span class="k">}</span><span class="s1">'}'</span>
<span class="o">}</span>

<span class="nv">mapping</span><span class="o">=</span><span class="s2">"</span><span class="sb">`</span>RoleACLMap Orders-RW DataRW<span class="sb">`</span><span class="s2">"</span>
<span class="nv">mapping</span><span class="o">=</span><span class="s2">"</span><span class="k">${</span><span class="nv">mapping</span><span class="k">}</span><span class="s2">,</span><span class="sb">`</span>RoleACLMap Orders-RO DataRO<span class="sb">`</span><span class="s2">"</span>
<span class="nv">mapping</span><span class="o">=</span><span class="s2">"</span><span class="k">${</span><span class="nv">mapping</span><span class="k">}</span><span class="s2">,</span><span class="sb">`</span>RoleACLMap Global-ADM DBAdmin<span class="sb">`</span><span class="s2">"</span>
<span class="nv">mapping</span><span class="o">=</span><span class="s2">"</span><span class="k">${</span><span class="nv">mapping</span><span class="k">}</span><span class="s2">,</span><span class="sb">`</span>RoleACLMap Orders-PM DataRW<span class="sb">`</span><span class="s2">"</span>
<span class="nv">mapping</span><span class="o">=</span><span class="s2">"</span><span class="k">${</span><span class="nv">mapping</span><span class="k">}</span><span class="s2">,</span><span class="sb">`</span>RoleACLMap Orders-DEV DataRO<span class="sb">`</span><span class="s2">"</span>
DBUpdate <span class="s2">"orders"</span> <span class="s1">'"roles_permissions":['</span><span class="s2">"</span><span class="nv">$mapping</span><span class="s2">"</span><span class="s1">']'</span>
</code></pre></div></div>

<p>We can check the result in the web interface.</p>

<p><img src="..//assets/posts/en/BlogVlogApprendreRedisAvecFran%C3%A7ois5minutes10HowtomanageRBACsecuritywithACLandRole/c19061884ba64f80a2f5ac1e71762578.png" alt="0a05afe4012f0d9b0fdcfcdf1da7ff95.png" /></p>

<p>Let’s create the mapping for the <em>products</em> database.</p>

<table>
  <thead>
    <tr>
      <th style="text-align: left">Roles</th>
      <th style="text-align: left">Products DB</th>
    </tr>
  </thead>
  <tbody>
    <tr>
      <td style="text-align: left">Products-RW</td>
      <td style="text-align: left">DataRW</td>
    </tr>
    <tr>
      <td style="text-align: left">Products-RO</td>
      <td style="text-align: left">DataRO</td>
    </tr>
    <tr>
      <td style="text-align: left">Global-ADM</td>
      <td style="text-align: left">DBAdmin</td>
    </tr>
    <tr>
      <td style="text-align: left">Products-PM</td>
      <td style="text-align: left">DataRW</td>
    </tr>
    <tr>
      <td style="text-align: left">Products-DEV</td>
      <td style="text-align: left">DataRO</td>
    </tr>
  </tbody>
</table>

<div class="language-bash highlighter-rouge"><div class="highlight"><pre class="highlight"><code><span class="nv">mapping</span><span class="o">=</span><span class="s2">"</span><span class="sb">`</span>RoleACLMap Products-RW DataRW<span class="sb">`</span><span class="s2">"</span>
<span class="nv">mapping</span><span class="o">=</span><span class="s2">"</span><span class="k">${</span><span class="nv">mapping</span><span class="k">}</span><span class="s2">,</span><span class="sb">`</span>RoleACLMap Products-RO DataRO<span class="sb">`</span><span class="s2">"</span>
<span class="nv">mapping</span><span class="o">=</span><span class="s2">"</span><span class="k">${</span><span class="nv">mapping</span><span class="k">}</span><span class="s2">,</span><span class="sb">`</span>RoleACLMap Global-ADM DBAdmin<span class="sb">`</span><span class="s2">"</span>
<span class="nv">mapping</span><span class="o">=</span><span class="s2">"</span><span class="k">${</span><span class="nv">mapping</span><span class="k">}</span><span class="s2">,</span><span class="sb">`</span>RoleACLMap Products-PM DataRW<span class="sb">`</span><span class="s2">"</span>
<span class="nv">mapping</span><span class="o">=</span><span class="s2">"</span><span class="k">${</span><span class="nv">mapping</span><span class="k">}</span><span class="s2">,</span><span class="sb">`</span>RoleACLMap Products-DEV DataRO<span class="sb">`</span><span class="s2">"</span>
DBUpdate <span class="s2">"products"</span> <span class="s1">'"roles_permissions":['</span><span class="s2">"</span><span class="nv">$mapping</span><span class="s2">"</span><span class="s1">']'</span>
</code></pre></div></div>

<p><img src="..//assets/posts/en/BlogVlogApprendreRedisAvecFran%C3%A7ois5minutes10HowtomanageRBACsecuritywithACLandRole/f6da6dc537a449ad805d3bcefcf60214.png" alt="9d9fb4315c0981f9e33f0f499c3ed6db.png" /></p>

<p>And finally, define the mappings for the messaging database.</p>

<table>
  <thead>
    <tr>
      <th style="text-align: left">Roles</th>
      <th style="text-align: left">Messaging DB</th>
    </tr>
  </thead>
  <tbody>
    <tr>
      <td style="text-align: left">Orders-RW</td>
      <td style="text-align: left">MsgRW</td>
    </tr>
    <tr>
      <td style="text-align: left">Orders-RO</td>
      <td style="text-align: left">MsgRO</td>
    </tr>
    <tr>
      <td style="text-align: left">Products-RW</td>
      <td style="text-align: left">MsgRW</td>
    </tr>
    <tr>
      <td style="text-align: left">Products-RO</td>
      <td style="text-align: left">MsgRO</td>
    </tr>
    <tr>
      <td style="text-align: left">Global-ADM</td>
      <td style="text-align: left">DBAdmin</td>
    </tr>
    <tr>
      <td style="text-align: left">Orders-PM</td>
      <td style="text-align: left">MsgRW</td>
    </tr>
    <tr>
      <td style="text-align: left">Products-PM</td>
      <td style="text-align: left">MsgRW</td>
    </tr>
    <tr>
      <td style="text-align: left">Orders-DEV</td>
      <td style="text-align: left">MsgRO</td>
    </tr>
    <tr>
      <td style="text-align: left">Products-DEV</td>
      <td style="text-align: left">MsgRO</td>
    </tr>
  </tbody>
</table>

<div class="language-bash highlighter-rouge"><div class="highlight"><pre class="highlight"><code><span class="nv">mapping</span><span class="o">=</span><span class="s2">"</span><span class="sb">`</span>RoleACLMap Orders-RW MsgRW<span class="sb">`</span><span class="s2">"</span>
<span class="nv">mapping</span><span class="o">=</span><span class="s2">"</span><span class="k">${</span><span class="nv">mapping</span><span class="k">}</span><span class="s2">,</span><span class="sb">`</span>RoleACLMap Orders-RO MsgRO<span class="sb">`</span><span class="s2">"</span>
<span class="nv">mapping</span><span class="o">=</span><span class="s2">"</span><span class="k">${</span><span class="nv">mapping</span><span class="k">}</span><span class="s2">,</span><span class="sb">`</span>RoleACLMap Products-RW MsgRW<span class="sb">`</span><span class="s2">"</span>
<span class="nv">mapping</span><span class="o">=</span><span class="s2">"</span><span class="k">${</span><span class="nv">mapping</span><span class="k">}</span><span class="s2">,</span><span class="sb">`</span>RoleACLMap Products-RO MsgRO<span class="sb">`</span><span class="s2">"</span>
<span class="nv">mapping</span><span class="o">=</span><span class="s2">"</span><span class="k">${</span><span class="nv">mapping</span><span class="k">}</span><span class="s2">,</span><span class="sb">`</span>RoleACLMap Global-ADM DBAdmin<span class="sb">`</span><span class="s2">"</span>
<span class="nv">mapping</span><span class="o">=</span><span class="s2">"</span><span class="k">${</span><span class="nv">mapping</span><span class="k">}</span><span class="s2">,</span><span class="sb">`</span>RoleACLMap Orders-PM MsgRW<span class="sb">`</span><span class="s2">"</span>
<span class="nv">mapping</span><span class="o">=</span><span class="s2">"</span><span class="k">${</span><span class="nv">mapping</span><span class="k">}</span><span class="s2">,</span><span class="sb">`</span>RoleACLMap Products-PM MsgRW<span class="sb">`</span><span class="s2">"</span>
<span class="nv">mapping</span><span class="o">=</span><span class="s2">"</span><span class="k">${</span><span class="nv">mapping</span><span class="k">}</span><span class="s2">,</span><span class="sb">`</span>RoleACLMap Orders-DEV MsgRO<span class="sb">`</span><span class="s2">"</span>
<span class="nv">mapping</span><span class="o">=</span><span class="s2">"</span><span class="k">${</span><span class="nv">mapping</span><span class="k">}</span><span class="s2">,</span><span class="sb">`</span>RoleACLMap Products-DEV MsgRO<span class="sb">`</span><span class="s2">"</span>
DBUpdate <span class="s2">"messaging"</span> <span class="s1">'"roles_permissions":['</span><span class="s2">"</span><span class="nv">$mapping</span><span class="s2">"</span><span class="s1">']'</span>
</code></pre></div></div>

<p><img src="..//assets/posts/en/BlogVlogApprendreRedisAvecFran%C3%A7ois5minutes10HowtomanageRBACsecuritywithACLandRole/6fb6ef7283ba425d9a763c942b97fbc0.png" alt="5f0c5224dd81579a23eac4c0e52d7622.png" /></p>

<h2 id="disable-default-anonymous-account">Disable default anonymous account</h2>
<p>By default, if an authentication idid not occur or fails, because the password
is wrong or because the account does not exist in the database, the connexion is
assigned to the default anonymous user, with default <em>allcommands</em> on <em>allkeys</em>
permissions. We do not want that. we defined restricted permissions, we need to
disable the default anonymous account in each database.</p>

<p>Either from the web administration interface :</p>

<p><img src="..//assets/posts/en/BlogVlogApprendreRedisAvecFran%C3%A7ois5minutes10HowtomanageRBACsecuritywithACLandRole/6ed55c8bb42e47029c419b3979889745.png" alt="395f482c6dcde00f8a59558589dea532.png" /></p>

<p>Or with the REST API.</p>

<div class="language-bash highlighter-rouge"><div class="highlight"><pre class="highlight"><code>DBUpdate <span class="s2">"orders"</span> <span class="s1">'"default_user": false'</span>
DBUpdate <span class="s2">"products"</span> <span class="s1">'"default_user": false'</span>
DBUpdate <span class="s2">"messaging"</span> <span class="s1">'"default_user": false'</span>
</code></pre></div></div>

<h2 id="assign-a-roles-to-each-account">Assign a roles to each account</h2>
<p>So, for each project, we defined</p>
<ul>
  <li>a read-only application role,</li>
  <li>a read-write application role,</li>
  <li>a read-ony with limited admin permission developer role,</li>
  <li>a read-write product manager role
on the needed database for each microservice and a global administrator only role.</li>
</ul>

<p>Lets assign roles to the accounts :</p>

<table>
  <thead>
    <tr>
      <th style="text-align: left">Account</th>
      <th style="text-align: left">Role</th>
    </tr>
  </thead>
  <tbody>
    <tr>
      <td style="text-align: left">orders-update</td>
      <td style="text-align: left">Orders-RW</td>
    </tr>
    <tr>
      <td style="text-align: left">orders-invoice</td>
      <td style="text-align: left">Orders-RO</td>
    </tr>
    <tr>
      <td style="text-align: left">products-update</td>
      <td style="text-align: left">Products-RW</td>
    </tr>
    <tr>
      <td style="text-align: left">products-stocks</td>
      <td style="text-align: left">Products-RO</td>
    </tr>
    <tr>
      <td style="text-align: left">Angélina</td>
      <td style="text-align: left">Global-ADM</td>
    </tr>
    <tr>
      <td style="text-align: left">Paul</td>
      <td style="text-align: left">Orders-PM</td>
    </tr>
    <tr>
      <td style="text-align: left">Pierre</td>
      <td style="text-align: left">Products-PM</td>
    </tr>
    <tr>
      <td style="text-align: left">David</td>
      <td style="text-align: left">Orders-DEV</td>
    </tr>
    <tr>
      <td style="text-align: left">Denis</td>
      <td style="text-align: left">Products-DEV</td>
    </tr>
  </tbody>
</table>

<p><img src="..//assets/posts/en/BlogVlogApprendreRedisAvecFran%C3%A7ois5minutes10HowtomanageRBACsecuritywithACLandRole/1c8e390d70884e1fb797ba3da16d5b34.png" alt="Slides - 55.png" /></p>

<p>Once again, either from the web administration interface :</p>

<p><img src="..//assets/posts/en/BlogVlogApprendreRedisAvecFran%C3%A7ois5minutes10HowtomanageRBACsecuritywithACLandRole/d92d6d91f6ee430bbdc64741e5741064.png" alt="077ef01dcf688381e38dafbb78d57c96.png" /></p>

<p>Or with the REST API :</p>

<div class="language-bash highlighter-rouge"><div class="highlight"><pre class="highlight"><code><span class="k">function </span>UserSetRole <span class="o">{</span>
  <span class="nv">username</span><span class="o">=</span><span class="nv">$1</span>
  <span class="nv">rolename</span><span class="o">=</span><span class="nv">$2</span>
  <span class="nv">roleuid</span><span class="o">=</span><span class="sb">`</span>RoleFindUidByName <span class="s2">"</span><span class="k">${</span><span class="nv">rolename</span><span class="k">}</span><span class="s2">"</span><span class="sb">`</span>
  UserUpdate <span class="s2">"</span><span class="k">${</span><span class="nv">username</span><span class="k">}</span><span class="s2">"</span> <span class="s1">'"role_uids":['</span><span class="k">${</span><span class="nv">roleuid</span><span class="k">}</span><span class="s1">']'</span>
<span class="o">}</span>
UserSetRole <span class="s2">"orders-update"</span> <span class="s2">"Orders-RW"</span>
UserSetRole <span class="s2">"orders-invoice"</span> <span class="s2">"Orders-RO"</span>
UserSetRole <span class="s2">"products-update"</span> <span class="s2">"Products-RW"</span>
UserSetRole <span class="s2">"products-stocks"</span> <span class="s2">"Products-RO"</span>
UserSetRole <span class="s2">"Angelina"</span> <span class="s2">"Global-ADM"</span>
UserSetRole <span class="s2">"Paul"</span> <span class="s2">"Orders-PM"</span>
UserSetRole <span class="s2">"Pierre"</span> <span class="s2">"Products-PM"</span>
UserSetRole <span class="s2">"David"</span> <span class="s2">"Orders-DEV"</span>
UserSetRole <span class="s2">"Denis"</span> <span class="s2">"Products-DEV"</span>
</code></pre></div></div>

<p><img src="..//assets/posts/en/BlogVlogApprendreRedisAvecFran%C3%A7ois5minutes10HowtomanageRBACsecuritywithACLandRole/91b2ee3c797d4955ae1fea2d7a90fa32.png" alt="92f044d3fd65d8913a40db2ef937c635.png" /></p>

<p><img src="..//assets/posts/en/BlogVlogApprendreRedisAvecFran%C3%A7ois5minutes10HowtomanageRBACsecuritywithACLandRole/6ba50c6b5e4541689ecc0222c03c887b.png" alt="6e3439daadf1b1b4888ce041d164ca9d.png" /></p>

<h1 id="permissions-tests">Permissions tests</h1>
<p>I wrote a script to test a set of meaningful commands with each account on each database.</p>

<div class="language-bash highlighter-rouge"><div class="highlight"><pre class="highlight"><code><span class="nb">cat</span> <span class="o">&lt;&lt;</span> <span class="sh">"</span><span class="no">EOF</span><span class="sh">" &gt; RBAC-tests.sh
#!/bin/bash
R='</span><span class="se">\0</span><span class="sh">33[1;31m'
G='</span><span class="se">\0</span><span class="sh">33[1;32m'
Y='</span><span class="se">\0</span><span class="sh">33[1;33m'
B='</span><span class="se">\0</span><span class="sh">33[1;36m'
P='</span><span class="se">\0</span><span class="sh">33[1;35m'
LG='</span><span class="se">\0</span><span class="sh">33[0;37m'
N='</span><span class="se">\0</span><span class="sh">33[0m'

function CmdTest {
DBPORT=</span><span class="nv">$1</span><span class="sh">
DBUSER=</span><span class="nv">$2</span><span class="sh">
DBPASS=</span><span class="nv">$3</span><span class="sh">
DESC=</span><span class="nv">$4</span><span class="sh">
CMD="</span><span class="nv">$5</span><span class="sh">"
ERR=</span><span class="nv">$6</span><span class="sh">
echo -en " - </span><span class="k">${</span><span class="nv">DESC</span><span class="k">}</span><span class="sh"> (</span><span class="k">${</span><span class="nv">P</span><span class="k">}${</span><span class="nv">CMD</span><span class="k">}${</span><span class="nv">N</span><span class="k">}</span><span class="sh">): "
RES=`echo "</span><span class="k">${</span><span class="nv">CMD</span><span class="k">}</span><span class="sh">" | timeout 1 redis-cli --user </span><span class="k">${</span><span class="nv">DBUSER</span><span class="k">}</span><span class="sh"> --pass </span><span class="k">${</span><span class="nv">DBPASS</span><span class="k">}</span><span class="sh"> -p </span><span class="k">${</span><span class="nv">DBPORT</span><span class="k">}</span><span class="sh"> 2&gt; /dev/null | tr '</span><span class="se">\r</span><span class="sh">' ','`
echo "</span><span class="k">${</span><span class="nv">RES</span><span class="k">}</span><span class="sh">" | grep "</span><span class="k">${</span><span class="nv">ERR</span><span class="k">}</span><span class="sh">" &gt; /dev/null 2&gt;&amp;1
[ </span><span class="nv">$?</span><span class="sh"> -eq 0 ] &amp;&amp; echo -en </span><span class="k">${</span><span class="nv">R</span><span class="k">}</span><span class="sh"> || echo -en </span><span class="k">${</span><span class="nv">G</span><span class="k">}</span><span class="sh">
echo -e </span><span class="k">${</span><span class="nv">RES</span><span class="k">}${</span><span class="nv">N</span><span class="k">}</span><span class="sh">
}

function BatchTest {
DBUSER=</span><span class="nv">$1</span><span class="sh">
DBPASS=</span><span class="nv">$2</span><span class="sh">
DBNAME=</span><span class="nv">$3</span><span class="sh">
DBPORT=</span><span class="nv">$4</span><span class="sh">
echo
echo -e </span><span class="k">${</span><span class="nv">LG</span><span class="k">}</span><span class="sh">Database</span><span class="k">${</span><span class="nv">N</span><span class="k">}</span><span class="sh">: </span><span class="k">${</span><span class="nv">Y</span><span class="k">}${</span><span class="nv">DBNAME</span><span class="k">}${</span><span class="nv">N</span><span class="k">}</span><span class="se">\(</span><span class="k">${</span><span class="nv">Y</span><span class="k">}${</span><span class="nv">DBPORT</span><span class="k">}${</span><span class="nv">N</span><span class="k">}</span><span class="se">\)</span><span class="sh">, </span><span class="k">${</span><span class="nv">LG</span><span class="k">}</span><span class="sh">User</span><span class="k">${</span><span class="nv">N</span><span class="k">}</span><span class="sh">: </span><span class="k">${</span><span class="nv">B</span><span class="k">}${</span><span class="nv">DBUSER</span><span class="k">}${</span><span class="nv">N</span><span class="k">}</span><span class="sh">, </span><span class="k">${</span><span class="nv">LG</span><span class="k">}</span><span class="sh">Password</span><span class="k">${</span><span class="nv">N</span><span class="k">}</span><span class="sh">: </span><span class="k">${</span><span class="nv">B</span><span class="k">}${</span><span class="nv">DBPASS</span><span class="k">}${</span><span class="nv">N</span><span class="k">}</span><span class="sh">
CmdTest </span><span class="k">${</span><span class="nv">DBPORT</span><span class="k">}</span><span class="sh"> </span><span class="k">${</span><span class="nv">DBUSER</span><span class="k">}</span><span class="sh"> </span><span class="k">${</span><span class="nv">DBPASS</span><span class="k">}</span><span class="sh"> "STRING Write            " "SET key value" '</span><span class="se">\(</span><span class="sh">ERR</span><span class="se">\|</span><span class="sh">WRONGPASS</span><span class="se">\|</span><span class="sh">(error)</span><span class="se">\|</span><span class="sh">NOAUTH</span><span class="se">\|</span><span class="sh">NOPERM</span><span class="se">\)</span><span class="sh">'
CmdTest </span><span class="k">${</span><span class="nv">DBPORT</span><span class="k">}</span><span class="sh"> </span><span class="k">${</span><span class="nv">DBUSER</span><span class="k">}</span><span class="sh"> </span><span class="k">${</span><span class="nv">DBPASS</span><span class="k">}</span><span class="sh"> "STRING Read             " "GET key" '</span><span class="se">\(</span><span class="sh">ERR</span><span class="se">\|</span><span class="sh">WRONGPASS</span><span class="se">\|</span><span class="sh">(error)</span><span class="se">\|</span><span class="sh">NOAUTH</span><span class="se">\|</span><span class="sh">NOPERM</span><span class="se">\)</span><span class="sh">'
CmdTest </span><span class="k">${</span><span class="nv">DBPORT</span><span class="k">}</span><span class="sh"> </span><span class="k">${</span><span class="nv">DBUSER</span><span class="k">}</span><span class="sh"> </span><span class="k">${</span><span class="nv">DBPASS</span><span class="k">}</span><span class="sh"> "HASH Write              " "HSET order:key field1 value1 field2 value2" '</span><span class="se">\(</span><span class="sh">ERR</span><span class="se">\|</span><span class="sh">WRONGPASS</span><span class="se">\|</span><span class="sh">(error)</span><span class="se">\|</span><span class="sh">NOAUTH</span><span class="se">\|</span><span class="sh">NOPERM</span><span class="se">\)</span><span class="sh">'
CmdTest </span><span class="k">${</span><span class="nv">DBPORT</span><span class="k">}</span><span class="sh"> </span><span class="k">${</span><span class="nv">DBUSER</span><span class="k">}</span><span class="sh"> </span><span class="k">${</span><span class="nv">DBPASS</span><span class="k">}</span><span class="sh"> "HASH Read               " "HGETALL order:key" '</span><span class="se">\(</span><span class="sh">ERR</span><span class="se">\|</span><span class="sh">WRONGPASS</span><span class="se">\|</span><span class="sh">(error)</span><span class="se">\|</span><span class="sh">NOAUTH</span><span class="se">\|</span><span class="sh">NOPERM</span><span class="se">\)</span><span class="sh">'
CmdTest </span><span class="k">${</span><span class="nv">DBPORT</span><span class="k">}</span><span class="sh"> </span><span class="k">${</span><span class="nv">DBUSER</span><span class="k">}</span><span class="sh"> </span><span class="k">${</span><span class="nv">DBPASS</span><span class="k">}</span><span class="sh"> "LIST Write              " "LPUSH order:key:sub value1" '</span><span class="se">\(</span><span class="sh">ERR</span><span class="se">\|</span><span class="sh">WRONGPASS</span><span class="se">\|</span><span class="sh">(error)</span><span class="se">\|</span><span class="sh">NOAUTH</span><span class="se">\|</span><span class="sh">NOPERM</span><span class="se">\)</span><span class="sh">'
CmdTest </span><span class="k">${</span><span class="nv">DBPORT</span><span class="k">}</span><span class="sh"> </span><span class="k">${</span><span class="nv">DBUSER</span><span class="k">}</span><span class="sh"> </span><span class="k">${</span><span class="nv">DBPASS</span><span class="k">}</span><span class="sh"> "LIST Write              " "LPUSH order:key:sub value2" '</span><span class="se">\(</span><span class="sh">ERR</span><span class="se">\|</span><span class="sh">WRONGPASS</span><span class="se">\|</span><span class="sh">(error)</span><span class="se">\|</span><span class="sh">NOAUTH</span><span class="se">\|</span><span class="sh">NOPERM</span><span class="se">\)</span><span class="sh">'
CmdTest </span><span class="k">${</span><span class="nv">DBPORT</span><span class="k">}</span><span class="sh"> </span><span class="k">${</span><span class="nv">DBUSER</span><span class="k">}</span><span class="sh"> </span><span class="k">${</span><span class="nv">DBPASS</span><span class="k">}</span><span class="sh"> "LIST Read               " "LLEN order:key:sub" '</span><span class="se">\(</span><span class="sh">ERR</span><span class="se">\|</span><span class="sh">WRONGPASS</span><span class="se">\|</span><span class="sh">(error)</span><span class="se">\|</span><span class="sh">NOAUTH</span><span class="se">\|</span><span class="sh">NOPERM</span><span class="se">\)</span><span class="sh">'
CmdTest </span><span class="k">${</span><span class="nv">DBPORT</span><span class="k">}</span><span class="sh"> </span><span class="k">${</span><span class="nv">DBUSER</span><span class="k">}</span><span class="sh"> </span><span class="k">${</span><span class="nv">DBPASS</span><span class="k">}</span><span class="sh"> "LIST Read+Write         " "LPOP order:key:sub" '</span><span class="se">\(</span><span class="sh">ERR</span><span class="se">\|</span><span class="sh">WRONGPASS</span><span class="se">\|</span><span class="sh">(error)</span><span class="se">\|</span><span class="sh">NOAUTH</span><span class="se">\|</span><span class="sh">NOPERM</span><span class="se">\)</span><span class="sh">'
CmdTest </span><span class="k">${</span><span class="nv">DBPORT</span><span class="k">}</span><span class="sh"> </span><span class="k">${</span><span class="nv">DBUSER</span><span class="k">}</span><span class="sh"> </span><span class="k">${</span><span class="nv">DBPASS</span><span class="k">}</span><span class="sh"> "PUBSUB Write            " "PUBLISH channel msg" '</span><span class="se">\(</span><span class="sh">ERR</span><span class="se">\|</span><span class="sh">WRONGPASS</span><span class="se">\|</span><span class="sh">(error)</span><span class="se">\|</span><span class="sh">NOAUTH</span><span class="se">\|</span><span class="sh">NOPERM</span><span class="se">\)</span><span class="sh">'
CmdTest </span><span class="k">${</span><span class="nv">DBPORT</span><span class="k">}</span><span class="sh"> </span><span class="k">${</span><span class="nv">DBUSER</span><span class="k">}</span><span class="sh"> </span><span class="k">${</span><span class="nv">DBPASS</span><span class="k">}</span><span class="sh"> "PUBSUB Read             " "SUBSCRIBE channel" '</span><span class="se">\(</span><span class="sh">ERR</span><span class="se">\|</span><span class="sh">WRONGPASS</span><span class="se">\|</span><span class="sh">(error)</span><span class="se">\|</span><span class="sh">NOAUTH</span><span class="se">\|</span><span class="sh">NOPERM</span><span class="se">\)</span><span class="sh">'
CmdTest </span><span class="k">${</span><span class="nv">DBPORT</span><span class="k">}</span><span class="sh"> </span><span class="k">${</span><span class="nv">DBUSER</span><span class="k">}</span><span class="sh"> </span><span class="k">${</span><span class="nv">DBPASS</span><span class="k">}</span><span class="sh"> "STREAM Write            " 'XADD mystream * item 1' '</span><span class="se">\(</span><span class="sh">ERR</span><span class="se">\|</span><span class="sh">WRONGPASS</span><span class="se">\|</span><span class="sh">(error)</span><span class="se">\|</span><span class="sh">NOAUTH</span><span class="se">\|</span><span class="sh">NOPERM</span><span class="se">\)</span><span class="sh">'
CmdTest </span><span class="k">${</span><span class="nv">DBPORT</span><span class="k">}</span><span class="sh"> </span><span class="k">${</span><span class="nv">DBUSER</span><span class="k">}</span><span class="sh"> </span><span class="k">${</span><span class="nv">DBPASS</span><span class="k">}</span><span class="sh"> "STREAM Read             " "XLEN mystream" '</span><span class="se">\(</span><span class="sh">ERR</span><span class="se">\|</span><span class="sh">WRONGPASS</span><span class="se">\|</span><span class="sh">(error)</span><span class="se">\|</span><span class="sh">NOAUTH</span><span class="se">\|</span><span class="sh">NOPERM</span><span class="se">\)</span><span class="sh">'
CmdTest </span><span class="k">${</span><span class="nv">DBPORT</span><span class="k">}</span><span class="sh"> </span><span class="k">${</span><span class="nv">DBUSER</span><span class="k">}</span><span class="sh"> </span><span class="k">${</span><span class="nv">DBPASS</span><span class="k">}</span><span class="sh"> "Generic commands        " "INFO KEYSPACE" '</span><span class="se">\(</span><span class="sh">ERR</span><span class="se">\|</span><span class="sh">WRONGPASS</span><span class="se">\|</span><span class="sh">(error)</span><span class="se">\|</span><span class="sh">NOAUTH</span><span class="se">\|</span><span class="sh">NOPERM</span><span class="se">\)</span><span class="sh">'
CmdTest </span><span class="k">${</span><span class="nv">DBPORT</span><span class="k">}</span><span class="sh"> </span><span class="k">${</span><span class="nv">DBUSER</span><span class="k">}</span><span class="sh"> </span><span class="k">${</span><span class="nv">DBPASS</span><span class="k">}</span><span class="sh"> "DANGEROUS ADMIN commands" "FLUSHALL" '</span><span class="se">\(</span><span class="sh">ERR</span><span class="se">\|</span><span class="sh">WRONGPASS</span><span class="se">\|</span><span class="sh">(error)</span><span class="se">\|</span><span class="sh">NOAUTH</span><span class="se">\|</span><span class="sh">NOPERM</span><span class="se">\)</span><span class="sh">'
}

for account in orders-update orders-invoice products-update products-stocks Angelina Paul Pierre David Denis Didier; do
clear
BatchTest </span><span class="k">${</span><span class="nv">account</span><span class="k">}</span><span class="sh"> </span><span class="k">${</span><span class="nv">account</span><span class="k">}</span><span class="sh"> orders 12000
BatchTest </span><span class="k">${</span><span class="nv">account</span><span class="k">}</span><span class="sh"> </span><span class="k">${</span><span class="nv">account</span><span class="k">}</span><span class="sh"> products 12001
BatchTest </span><span class="k">${</span><span class="nv">account</span><span class="k">}</span><span class="sh"> </span><span class="k">${</span><span class="nv">account</span><span class="k">}</span><span class="sh"> messaging 12002
read
done
</span><span class="no">EOF
</span><span class="nb">chmod</span> +x RBAC-tests.sh
./RBAC-tests.sh
</code></pre></div></div>

<p>For <em>orders-update</em></p>

<p><img src="..//assets/posts/en/BlogVlogApprendreRedisAvecFran%C3%A7ois5minutes10HowtomanageRBACsecuritywithACLandRole/6c237af6bc414f9fae13cea181372a4e.png" alt="66ed1a36882f850e4769c9c66f1e54b8.png" /></p>

<p>For <em>orders-invoice</em></p>

<p><img src="..//assets/posts/en/BlogVlogApprendreRedisAvecFran%C3%A7ois5minutes10HowtomanageRBACsecuritywithACLandRole/66581cbe080044fda397887dc1e5ecd9.png" alt="b16b1b38b04b311c2a79eb3b385181e8.png" /></p>

<p>and so on, you can execute it yourself with the code available in my blog or zoom on my results in the <a href="https://youtu.be/eeJu15azF2Y" title="Video with explanation and demo">Video</a>.</p>

<h1 id="permissions-maintenance">Permissions maintenance</h1>
<p>We initialized the projects, but things can change over the time.</p>

<h2 id="a-new-employee-joins">A new employee joins</h2>
<p>A new developer, Didier, joins the orders team.</p>

<p><img src="..//assets/posts/en/BlogVlogApprendreRedisAvecFran%C3%A7ois5minutes10HowtomanageRBACsecuritywithACLandRole/702e407f3f71433a8ecaf303049c4c0a.png" alt="Slides - 56.png" /></p>

<p>We only have to give him the <em>Orders-DEV</em> role and he will have the appropriate permissions on the cluster and the data.</p>

<div class="language-bash highlighter-rouge"><div class="highlight"><pre class="highlight"><code>UserCreate <span class="s2">"Didier"</span> <span class="s2">"Didier@example.org"</span> <span class="s2">"Didier"</span>
UserSetRole <span class="s2">"Didier"</span> <span class="s2">"Orders-DEV"</span>
</code></pre></div></div>

<h2 id="a-developer-switches-to-another-team">A developer switches to another team</h2>
<p>The existing developer, David, moves to the products team.</p>

<p><img src="..//assets/posts/en/BlogVlogApprendreRedisAvecFran%C3%A7ois5minutes10HowtomanageRBACsecuritywithACLandRole/e7d208a5788c450eb16255d53b9b8cab.png" alt="Slides - 57.png" /></p>

<p>We only have to change his role, and he will no longer have his previous permissions, but only the new permissions.</p>

<div class="language-bash highlighter-rouge"><div class="highlight"><pre class="highlight"><code>UserSetRole <span class="s2">"David"</span> <span class="s2">"Products-DEV"</span>
</code></pre></div></div>

<h2 id="an-employee-leaves">An employee leaves</h2>
<p>A developer, Denis, leaves the company.</p>

<p><img src="..//assets/posts/en/BlogVlogApprendreRedisAvecFran%C3%A7ois5minutes10HowtomanageRBACsecuritywithACLandRole/33de59415b6c47fabb3f57644c4eea0b.png" alt="Slides - 58.png" /></p>

<p>We only have to delete or disable this accounts.</p>
<div class="language-bash highlighter-rouge"><div class="highlight"><pre class="highlight"><code>UserDelete <span class="s2">"Denis"</span>
</code></pre></div></div>

<h2 id="access-to-new-structures">Access to new structures</h2>
<p>Streams usage needed in messaging DB.</p>

<p><img src="..//assets/posts/en/BlogVlogApprendreRedisAvecFran%C3%A7ois5minutes10HowtomanageRBACsecuritywithACLandRole/3bf90d9456944ecf9bb8c69ff939eabc.png" alt="Slides - 59.png" /></p>

<p>The messaging features need to use <em>streams</em> commands, from now, we only have to update the <em>Msg-RO</em> and <em>Msg-RW</em> ACLs.</p>

<div class="language-bash highlighter-rouge"><div class="highlight"><pre class="highlight"><code>ACLUpdate <span class="s2">"MsgRW"</span>   <span class="s1">'-@all +publish +subscribe +@stream -@dangerous ~*'</span>
ACLUpdate <span class="s2">"MsgRO"</span>   <span class="s1">'-@all +subscribe +@stream -@write -@dangerous ~*'</span>
</code></pre></div></div>

<h1 id="wrap-up-and-ldap">Wrap-up and LDAP</h1>

<p>Applications, developers, project managers and admins are uniquely identified with their own authentication and have specific permissions on the cluster and on the data. My next contents will talk about LDAP to roles mapping, because it is a pain to maintain when new people are hired, when people leave, when people move from one project to another, when people work on several projects…  whereas all these information are already available and maintained up-to-date in the Enterprise LDAP.</p>

<h1 id="materials-and-links">Materials and Links</h1>

<table>
  <thead>
    <tr>
      <th>Link</th>
      <th>Description</th>
    </tr>
  </thead>
  <tbody>
    <tr>
      <td><a href="https://youtu.be/eeJu15azF2Y" title="Video with explanation and demo">Video</a></td>
      <td>Video with explanation and demo</td>
    </tr>
  </tbody>
</table>

<h1 id="footnotes">Footnotes</h1>]]></content><author><name>François Cerbelle</name></author><category term="Redis in 5 minutes" /><category term="Redis" /><category term="Authentication" /><category term="Authorizations" /><category term="Permissions" /><category term="Roles" /><category term="ACL" /><category term="RBAC" /><category term="Access Control" /><category term="Security" /><category term="Administration" /><category term="Security groups" /><category term="Groups" /><category term="REST API" /><category term="REST" /><category term="API" /><summary type="html"><![CDATA[How Redis Enterprise's role based access control (RBAC) works and can be used to improve the security and industrialize Redis ACL for authentication and authorizations on data and commands at scale ?]]></summary></entry><entry xml:lang="fr"><title type="html">Redis 10 - Comment gérer la sécurité RBAC avec les ACLs et rôles</title><link href="https://fcerbell.github.io//CommentGererLaSecuriteRBACAvecLesACLsEtRoles/" rel="alternate" type="text/html" title="Redis 10 - Comment gérer la sécurité RBAC avec les ACLs et rôles" /><published>2022-05-28T14:07:52+00:00</published><updated>2022-05-28T14:07:52+00:00</updated><id>https://fcerbell.github.io//CommentGererLaSecuriteRBACAvecLesACLsEtRoles</id><content type="html" xml:base="https://fcerbell.github.io//CommentGererLaSecuriteRBACAvecLesACLsEtRoles/"><![CDATA[<p>Les ACL Redis peuvent authentifier un compte et accorder des permissions sur les données et les commandes dans une base Redis. Comment utiliser le contrôle d’accès basé sur les roles (RBAC) pour gérer des groupes avec des permissions similaires sur différentes bases. Démo incluse.</p>

<p>Vous pouvez trouver des liens vers les enregistrements vidéo et les supports imprimables associés à la <a href="#supports-et-liens">fin de cet article</a>.</p>

<ul id="markdown-toc">
  <li><a href="#vidéo-dexplication-et-de-démo" id="markdown-toc-vidéo-dexplication-et-de-démo">Vidéo d’explication et de démo</a></li>
  <li><a href="#préparation-de-lenvironnement" id="markdown-toc-préparation-de-lenvironnement">Préparation de l’environnement</a></li>
  <li><a href="#prérequis" id="markdown-toc-prérequis">Prérequis</a></li>
  <li><a href="#un-problème-de-sécurité-et-de-conformité" id="markdown-toc-un-problème-de-sécurité-et-de-conformité">Un problème de sécurité et de conformité</a></li>
  <li><a href="#limites-des-acl-redis" id="markdown-toc-limites-des-acl-redis">Limites des ACL Redis</a></li>
  <li><a href="#mise-en-place" id="markdown-toc-mise-en-place">Mise en place</a>    <ul>
      <li><a href="#création-des-bases" id="markdown-toc-création-des-bases">Création des bases</a></li>
      <li><a href="#création-des-comptes" id="markdown-toc-création-des-comptes">Création des comptes</a></li>
      <li><a href="#création-des-acls" id="markdown-toc-création-des-acls">Création des ACLs</a></li>
      <li><a href="#création-des-rôles" id="markdown-toc-création-des-rôles">Création des rôles</a></li>
      <li><a href="#relations-rôle-acl-dans-les-bases" id="markdown-toc-relations-rôle-acl-dans-les-bases">Relations Rôle-ACL dans les bases</a></li>
      <li><a href="#invalidation-du-compte-anonyme-par-défaut" id="markdown-toc-invalidation-du-compte-anonyme-par-défaut">Invalidation du compte anonyme par défaut</a></li>
      <li><a href="#affectation-des-rôles-aux-comptes" id="markdown-toc-affectation-des-rôles-aux-comptes">Affectation des rôles aux comptes</a></li>
    </ul>
  </li>
  <li><a href="#test-des-permissions" id="markdown-toc-test-des-permissions">Test des permissions</a></li>
  <li><a href="#maintenance-des-permissions" id="markdown-toc-maintenance-des-permissions">Maintenance des permissions</a>    <ul>
      <li><a href="#arrivée-dun-développeur" id="markdown-toc-arrivée-dun-développeur">Arrivée d’un développeur</a></li>
      <li><a href="#changement-de-projet" id="markdown-toc-changement-de-projet">Changement de projet</a></li>
      <li><a href="#départ-dun-développeur" id="markdown-toc-départ-dun-développeur">Départ d’un développeur</a></li>
      <li><a href="#modification-dun-projet" id="markdown-toc-modification-dun-projet">Modification d’un projet</a></li>
    </ul>
  </li>
  <li><a href="#conclusion-et-ldap" id="markdown-toc-conclusion-et-ldap">Conclusion et LDAP</a></li>
  <li><a href="#supports-et-liens" id="markdown-toc-supports-et-liens">Supports et liens</a></li>
  <li><a href="#notes-de-bas-de-page" id="markdown-toc-notes-de-bas-de-page">Notes de bas de page</a></li>
</ul>

<h1 id="vidéo-dexplication-et-de-démo">Vidéo d’explication et de démo</h1>

<center><iframe width="420" height="315" src="https://www.youtube.com/embed/hFKZHZrpusM" frameborder="0" allowfullscreen=""></iframe></center>

<h1 id="préparation-de-lenvironnement">Préparation de l’environnement</h1>

<div class="language-bash highlighter-rouge"><div class="highlight"><pre class="highlight"><code><span class="c"># Démarrage de Redis Enterprise</span>
docker run <span class="nt">-d</span> <span class="nt">--cap-add</span> sys_resource <span class="nt">--name</span> redisenterprise <span class="nt">-p</span> 8443:8443 <span class="nt">-p</span> 9443:9443 <span class="nt">-p</span> 12000:12000 <span class="nt">-p</span> 12001:12001 <span class="nt">-p</span> 12002:12002 redislabs/redis
<span class="nb">sleep </span>20

<span class="c"># Initialisation du cluster</span>
docker <span class="nb">exec</span> <span class="nt">-d</span> <span class="nt">--privileged</span> redisenterprise <span class="s2">"/opt/redislabs/bin/rladmin"</span> cluster create name cluster.local username francois@redislabs.com password password
<span class="nb">sleep </span>15
</code></pre></div></div>

<h1 id="prérequis">Prérequis</h1>
<p>Ce contenu suppose que vous connaissez déjà les ACLs Redis. Si vous ne l’avez pas déjà vu, je vous recommende de regarder le contenu sur <a href="/CommentGererSecuriteAccesAuxDonneesEtPermissionsAvecLesACLRedis-fr/" title="ACL avec Redis">Comment gérer sécurité, accès aux données et permissions avec les ACL de Redis</a> avant celui-ci. Si vous voulez reproduire la démonstration, vous aurez besoin de <em>docker</em>, <em>curl</em> et <em>jq</em>. Les commandes ne sont pas en pur shell POSIX mais font aussi appel à des extensions <em>bash</em>.
<img src="..//assets/posts/en/BlogVlogApprendreRedisAvecFran%C3%A7ois5minutes10HowtomanageRBACsecuritywithACLandRole/2022-05-28_20-23.png" alt="2022-05-28_20-23.png" /></p>

<h1 id="un-problème-de-sécurité-et-de-conformité">Un problème de sécurité et de conformité</h1>
<p>Redis est utilisé dans presque toutes les entreprises dans le monde. Le contrôle d’accès aux données est critique pour assurer la sécurité des données et pour respecter la conformité aux règles comme RGPD (GDPR). Chaque connexion entrante doit être authentifiée et doit potentiellement reçevoir des permissions ou privilèges sur les bases disponibles, les commandes à exécuter et les données.</p>

<p>Imaginons que nous disposions de trois bases :</p>
<ul>
  <li>une base <em>orders</em> pour y enregistrer les commandes et les lignes de commandes ;</li>
  <li>une base <em>products</em> pour enregistrer le catalogue des produits et leur
quantité restante en stocks ;</li>
  <li>une base <em>messaging</em> servant de bus de communication entre les microservices à
l’aide des fonctionalités PubSub de Redis.</li>
</ul>

<p>Ajoutons à cela deux microservices, chacun ayant deux points de connexion
(endpoints) :</p>
<ul>
  <li>un microservice pour gérer les commandes dans la base <em>orders</em>, avec deux
points de connexion : <em>orders-update</em> pour créer et modifier les commandes,
nécessitant des permissions de lecture et d’écriture, et <em>orders-invoice</em>,
pour générer les factures, avec des permissions en lecture seule. Ils doivent
aussi accéder à la base servant de bus de communication respectivement en
lecture-écriture et en lecture-seule ;</li>
  <li>l’autre microservice se charge de la gestion du catalogue produit et des
stocks, avec deux points de connexion : <em>products-update</em> pour mettre le
catalogue et les quantités à jour, et <em>products-stocks</em> pour vérifier la
disponibilité d’un produit. Ils doivent aussi accéder à la base servant de bus
de communication respectivement en lecture-écriture et en lecture-seule.</li>
</ul>

<p>Puis, il y a les personnes :</p>
<ul>
  <li>un administrateur, <em>Angélina</em>, qui n’a pas besoin d’accéder aux données ;</li>
  <li>deux chefs de projet, <em>Paul</em> pour le projet <em>orders</em> et <em>Pierre</em>, pour le
projet <em>products</em>. Ils doivent pouvoir accéder aux données de leur projet en
lecture et écriture pour les modifier, ainsi qu’au bus de messages. Ils
doivent accéder aux journaux, à la configuration des bases et à la supervision
;</li>
  <li>deux développeurs, <em>David</em>, travaillant sur le projet <em>orders</em> avec un accès
en lecture seule sur les données, et <em>Denis</em>, travaillant sur le projet
<em>products</em>.  Ils doivent aussi avoir un accès en lecture seule sur le bus de
communication PubSub Redis. Ils doivent avoir accès à la supervision des
bases.</li>
</ul>

<p>C’est un exemple relativement simple, comparé aux besoins des entreprises dans
la vraie vie. Les permissions sont simples à mettre en place, mais pas à
maintenir ou à faire passer à l’échelle si vous avez plusieurs projets, profiles
(développeurs, managers, chefs de projets, architectes, administrateurs) et
bases de données. L’administration de la sécurité avec les ACL Redis peut
rapidement devenir un cauchemard et doit être industrialisée et automatisée.
Voyons comment Redis Entreprise peut gérer cet exemple.</p>

<h1 id="limites-des-acl-redis">Limites des ACL Redis</h1>
<p>Bien que Redis soit largement connu et utilisé par les développeurs comme base
de données, la gestion de la sécurité dépend des ops qui ne sont pas toujours au
courant des fonctionnalités de sécurité de Redis. Depuis la version 6, Redis
inclut l’authentification par identifiant et la gestion des autorisations 
d’accès aux données par des ACL, Access Control Lists, listes de contrôle
d’accès.</p>

<p>Regardons quelles sont les permissions nécessaires, tant sur le cluster que sur
les bases. Il faudra potentiellement créer manuellement les utilisateurs dans
chaque base de données.</p>

<table>
  <thead>
    <tr>
      <th style="text-align: left">Compte</th>
      <th style="text-align: left">Cluster</th>
      <th style="text-align: left">Base “orders”</th>
      <th style="text-align: left">Base “products”</th>
      <th style="text-align: left">Base “messaging”</th>
    </tr>
  </thead>
  <tbody>
    <tr>
      <td style="text-align: left">orders-update</td>
      <td style="text-align: left">Aucune</td>
      <td style="text-align: left">-@all +@hash +@list -@dangerous ~*</td>
      <td style="text-align: left">Aucune</td>
      <td style="text-align: left">-@all +@publish +@subscribe -@dangerous ~*</td>
    </tr>
    <tr>
      <td style="text-align: left">orders-invoice</td>
      <td style="text-align: left">Aucune</td>
      <td style="text-align: left">-@all +@hash +@list -@dangerous -@write ~*</td>
      <td style="text-align: left">Aucune</td>
      <td style="text-align: left">-@all +@subscribe -@dangerous ~*</td>
    </tr>
    <tr>
      <td style="text-align: left">products-update</td>
      <td style="text-align: left">Aucune</td>
      <td style="text-align: left">Aucune</td>
      <td style="text-align: left">-@all +@hash +@list -@dangerous ~*</td>
      <td style="text-align: left">-@all +@publish +@subscribe -@dangerous ~*</td>
    </tr>
    <tr>
      <td style="text-align: left">products-stocks</td>
      <td style="text-align: left">Aucune</td>
      <td style="text-align: left">Aucune</td>
      <td style="text-align: left">-@all +@hash +@list -@dangerous -@write ~*</td>
      <td style="text-align: left">-@all +@subscribe -@dangerous ~*</td>
    </tr>
    <tr>
      <td style="text-align: left">Angélina</td>
      <td style="text-align: left">Totale</td>
      <td style="text-align: left">-@all +@admin +@dangerous</td>
      <td style="text-align: left">-@all +@admin +@dangerous</td>
      <td style="text-align: left">-@all +@admin +@dangerous</td>
    </tr>
    <tr>
      <td style="text-align: left">Paul</td>
      <td style="text-align: left">Base</td>
      <td style="text-align: left">-@all +@hash +@list -@dangerous ~*</td>
      <td style="text-align: left">Aucune</td>
      <td style="text-align: left">-@all +@publish +@subscribe -@dangerous ~*</td>
    </tr>
    <tr>
      <td style="text-align: left">Pierre</td>
      <td style="text-align: left">Base</td>
      <td style="text-align: left">Aucune</td>
      <td style="text-align: left">-@all +@hash +@list -@dangerous ~*</td>
      <td style="text-align: left">-@all +@publish +@subscribe -@dangerous ~*</td>
    </tr>
    <tr>
      <td style="text-align: left">David</td>
      <td style="text-align: left">Superv.</td>
      <td style="text-align: left">-@all +@hash +@list -@dangerous -@write ~*</td>
      <td style="text-align: left">Aucune</td>
      <td style="text-align: left">-@all +@subscribe -@dangerous ~*</td>
    </tr>
    <tr>
      <td style="text-align: left">Denis</td>
      <td style="text-align: left">Superv.</td>
      <td style="text-align: left">Aucune</td>
      <td style="text-align: left">-@all +@hash +@list -@dangerous -@write ~*</td>
      <td style="text-align: left">-@all +@subscribe -@dangerous ~*</td>
    </tr>
  </tbody>
</table>

<p><img src="..//assets/posts/en/BlogVlogApprendreRedisAvecFran%C3%A7ois5minutes10HowtomanageRBACsecuritywithACLandRole/fc3c0eaa42084fcb8a56b7ff628e3cc0.png" alt="Slides - 11.png" /></p>

<p>Avec les ACL Redis, sans les rôles, il faut créer chaque compte dans chaque base
de donnée, avec un mot de passe, puis créer les ACLs individuellement. Si un
projet doit changer de permissions, elles doivent être mises à jour
individuellement dans chaque compte de chaque base. Quelle complexité lorsque
les les projets changent les structures de données auxquelles ils doivent
accéder. Essayons de factoriser tout cela.</p>

<h1 id="mise-en-place">Mise en place</h1>
<p>Au-delà des ACLs, Redis Enterprise implémente une authentification mutuelle par
TLS et un contrôle d’accès par role (RBAC) pour rendre la gestion des ACLs plus
efficace et plus scalable au moment de gérer plusieurs projets avec de
nombreuses personnes et plusieurs bases. Quelles sont les meilleurs pratiques
pour implémenter l’authentification, les ACLs et les rôles dans Redis Enterprise
? Que peut on attendre de Redis Enterprise ?</p>

<p>Les rôles de Redis Enterprise peuvent être comparés à des groupes ou des
profiles. Un rôle accorde des permissions globalement sur le cluster Redis
Enterprise et des ACLs ciblées sur chacune des bases. Il créée et configure des
comptes et des ACLs automatiquement dans chaque base.</p>

<p>Dans chaque base, on peut définir les ACLs à appliquer aux comptes en fonction
de leur rôle.</p>

<h2 id="création-des-bases">Création des bases</h2>
<p>On peut créer des bases manuellement dans l’interface web
<img src="..//assets/posts/en/BlogVlogApprendreRedisAvecFran%C3%A7ois5minutes10HowtomanageRBACsecuritywithACLandRole/99399910140d46b9967ec98f07929790.png" alt="63fda6e9a28eb76aa3b8e2cb10ee20cf.png" /></p>

<p>ou automatiquement, par script, grâce à l’API REST.</p>

<div class="language-bash highlighter-rouge"><div class="highlight"><pre class="highlight"><code><span class="k">function </span>DBCreate <span class="o">{</span>
  <span class="nv">dbname</span><span class="o">=</span><span class="s1">'"name":"'</span><span class="s2">"</span><span class="nv">$1</span><span class="s2">"</span><span class="s1">'",'</span>
  <span class="nv">dbsize</span><span class="o">=</span><span class="s1">'"memory_size":'</span><span class="s2">"</span><span class="k">${</span><span class="nv">2</span><span class="k">:-</span><span class="nv">102400</span><span class="k">}</span><span class="s2">"</span><span class="s1">','</span>
  <span class="nv">dbcfg</span><span class="o">=</span><span class="s2">"</span><span class="nv">$3</span><span class="s2">"</span>
  curl <span class="nt">-k</span> <span class="nt">-u</span> <span class="s2">"francois@redislabs.com:password"</span> <span class="nt">--request</span> POST <span class="nt">--url</span> <span class="s2">"https://localhost:9443/v1/bdbs"</span> <span class="nt">--header</span> <span class="s1">'content-type: application/json'</span> <span class="nt">--data</span> <span class="s1">'{
    '</span><span class="k">${</span><span class="nv">dbname</span><span class="k">}</span><span class="s1">'
    '</span><span class="k">${</span><span class="nv">dbsize</span><span class="k">}</span><span class="s1">'
    '</span><span class="k">${</span><span class="nv">dbcfg</span><span class="k">}</span><span class="s1">'
  }'</span><span class="p">;</span>
<span class="o">}</span>
<span class="k">function </span>DBFindUidByName <span class="o">{</span>
  <span class="nv">dbname</span><span class="o">=</span><span class="s2">"</span><span class="nv">$1</span><span class="s2">"</span>
  <span class="c"># Find the DB UID by name</span>
  <span class="nv">dbid</span><span class="o">=</span><span class="sb">`</span>curl <span class="nt">-s</span> <span class="nt">-k</span> <span class="nt">-u</span> <span class="s2">"francois@redislabs.com:password"</span> <span class="nt">--request</span> GET <span class="nt">--url</span> <span class="s2">"https://localhost:9443/v1/bdbs"</span> <span class="nt">--header</span> <span class="s1">'content-type: application/json'</span> | jq <span class="s1">'.[]|select(.name=="'</span><span class="k">${</span><span class="nv">dbname</span><span class="k">}</span><span class="s1">'").uid'</span><span class="sb">`</span>
  <span class="nb">echo</span> <span class="nv">$dbid</span>
<span class="o">}</span>

<span class="k">function </span>DBUpdate <span class="o">{</span>
  <span class="nv">dbname</span><span class="o">=</span><span class="s2">"</span><span class="nv">$1</span><span class="s2">"</span>
  <span class="nv">config</span><span class="o">=</span><span class="s2">"</span><span class="nv">$2</span><span class="s2">"</span>
  <span class="nv">dbid</span><span class="o">=</span><span class="sb">`</span>DBFindUidByName <span class="s2">"</span><span class="k">${</span><span class="nv">dbname</span><span class="k">}</span><span class="s2">"</span><span class="sb">`</span>
  <span class="c"># Update the DB configuration</span>
  curl <span class="nt">-k</span> <span class="nt">-u</span> <span class="s2">"francois@redislabs.com:password"</span> <span class="nt">--request</span> PUT <span class="nt">--url</span> <span class="s2">"https://localhost:9443/v1/bdbs/</span><span class="k">${</span><span class="nv">dbid</span><span class="k">}</span><span class="s2">"</span> <span class="nt">--header</span> <span class="s1">'content-type: application/json'</span> <span class="nt">--data</span> <span class="s1">'{
    '</span><span class="s2">"</span><span class="k">${</span><span class="nv">config</span><span class="k">}</span><span class="s2">"</span><span class="s1">'
  }'</span><span class="p">;</span>
<span class="o">}</span>

<span class="k">function </span>DBDelete <span class="o">{</span>
  <span class="nv">dbname</span><span class="o">=</span><span class="s2">"</span><span class="nv">$1</span><span class="s2">"</span>
  <span class="nv">dbid</span><span class="o">=</span><span class="sb">`</span>DBFindUidByName <span class="s2">"</span><span class="k">${</span><span class="nv">dbname</span><span class="k">}</span><span class="s2">"</span><span class="sb">`</span>
  <span class="c"># Delete the database</span>
  curl <span class="nt">-k</span> <span class="nt">-u</span> <span class="s2">"francois@redislabs.com:password"</span> <span class="nt">--request</span> DELETE <span class="nt">--url</span> <span class="s2">"https://localhost:9443/v1/bdbs/</span><span class="k">${</span><span class="nv">dbid</span><span class="k">}</span><span class="s2">"</span> <span class="nt">--header</span> <span class="s1">'content-type: application/json'</span>
<span class="o">}</span>

DBCreate orders 102400 <span class="s1">'"port":12000'</span>
DBCreate products 102400 <span class="s1">'"port":12001'</span>
DBCreate messaging 102400 <span class="s1">'"port":12002'</span>
</code></pre></div></div>
<p><img src="..//assets/posts/en/BlogVlogApprendreRedisAvecFran%C3%A7ois5minutes10HowtomanageRBACsecuritywithACLandRole/699b2f4706a441f283e20a3acda0cc77.png" alt="0105ea156ea70f059d4b5fa1cdd1c09f.png" /></p>

<p><img src="..//assets/posts/en/BlogVlogApprendreRedisAvecFran%C3%A7ois5minutes10HowtomanageRBACsecuritywithACLandRole/deee53833c1e495298fc5b2f2573cc8d.png" alt="4a40e838816d27249fe710aafb86a5eb.png" /></p>

<h2 id="création-des-comptes">Création des comptes</h2>

<p><img src="..//assets/posts/en/BlogVlogApprendreRedisAvecFran%C3%A7ois5minutes10HowtomanageRBACsecuritywithACLandRole/c4ccd935d0e34c77ba1a1724acb7da67.png" alt="Slides - 21.png" /></p>

<p>Encore une fois, les comptes peuvent être créés manuellement dans l’interface
web d’administration :</p>

<p><img src="..//assets/posts/en/BlogVlogApprendreRedisAvecFran%C3%A7ois5minutes10HowtomanageRBACsecuritywithACLandRole/bf77c709def54075893f98fac7c9cb93.png" alt="042a8e64dd6614bb6e49cda533d47d3c.png" /></p>

<p>ou de manière automatisée, grâce à l’API REST de gestion du cluster.</p>

<div class="language-bash highlighter-rouge"><div class="highlight"><pre class="highlight"><code><span class="k">function </span>UserCreate <span class="o">{</span>
  <span class="nv">username</span><span class="o">=</span><span class="s1">'"name":"'</span><span class="nv">$1</span><span class="s1">'",'</span>
  <span class="nv">useremail</span><span class="o">=</span><span class="s1">'"email":"'</span><span class="nv">$2</span><span class="s1">'",'</span>
  <span class="nv">userpass</span><span class="o">=</span><span class="s1">'"password":"'</span><span class="k">${</span><span class="nv">3</span><span class="k">:-</span><span class="nv">$1</span><span class="k">}</span><span class="s1">'",'</span>
  curl <span class="nt">-k</span> <span class="nt">-u</span> <span class="s2">"francois@redislabs.com:password"</span> <span class="nt">--request</span> POST <span class="nt">--url</span> <span class="s2">"https://localhost:9443/v1/users"</span> <span class="nt">--header</span> <span class="s1">'content-type: application/json'</span> <span class="nt">--data</span> <span class="s1">'{
     '</span><span class="k">${</span><span class="nv">username</span><span class="k">}</span><span class="s1">'
     '</span><span class="k">${</span><span class="nv">useremail</span><span class="k">}</span><span class="s1">'
     '</span><span class="k">${</span><span class="nv">userpass</span><span class="k">}</span><span class="s1">'
     "role": "none"
  }'</span>
<span class="o">}</span>

<span class="k">function </span>UserFindUidByName <span class="o">{</span>
  <span class="nv">username</span><span class="o">=</span><span class="s2">"</span><span class="nv">$1</span><span class="s2">"</span>
  <span class="c"># Find Account UID by name</span>
  <span class="nv">uuid</span><span class="o">=</span><span class="sb">`</span>curl <span class="nt">-s</span> <span class="nt">-k</span> <span class="nt">-u</span> <span class="s2">"francois@redislabs.com:password"</span> <span class="nt">--request</span> GET <span class="nt">--url</span> <span class="s2">"https://localhost:9443/v1/users"</span> <span class="nt">--header</span> <span class="s1">'content-type: application/json'</span> | jq <span class="s1">'.[]|select(.name=="'</span><span class="k">${</span><span class="nv">username</span><span class="k">}</span><span class="s1">'").uid'</span><span class="sb">`</span>
  <span class="nb">echo</span> <span class="k">${</span><span class="nv">uuid</span><span class="k">}</span>
<span class="o">}</span>

<span class="k">function </span>UserUpdate <span class="o">{</span>
  <span class="nv">username</span><span class="o">=</span><span class="s2">"</span><span class="nv">$1</span><span class="s2">"</span>
  <span class="nv">usercfg</span><span class="o">=</span><span class="s2">"</span><span class="nv">$2</span><span class="s2">"</span>
  <span class="nv">uuid</span><span class="o">=</span><span class="sb">`</span>UserFindUidByName <span class="s2">"</span><span class="k">${</span><span class="nv">username</span><span class="k">}</span><span class="s2">"</span><span class="sb">`</span>
  curl <span class="nt">-k</span> <span class="nt">-u</span> <span class="s2">"francois@redislabs.com:password"</span> <span class="nt">--request</span> PUT <span class="nt">--url</span> <span class="s2">"https://localhost:9443/v1/users/</span><span class="k">${</span><span class="nv">uuid</span><span class="k">}</span><span class="s2">"</span> <span class="nt">--header</span> <span class="s1">'content-type: application/json'</span> <span class="nt">--data</span> <span class="s1">'{'</span><span class="s2">"</span><span class="k">${</span><span class="nv">usercfg</span><span class="k">}</span><span class="s2">"</span><span class="s1">'}'</span>
<span class="o">}</span>

<span class="k">function </span>UserDelete <span class="o">{</span>
  <span class="nv">username</span><span class="o">=</span><span class="s2">"</span><span class="nv">$1</span><span class="s2">"</span>
  <span class="nv">uuid</span><span class="o">=</span><span class="sb">`</span>UserFindUidByName <span class="s2">"</span><span class="k">${</span><span class="nv">username</span><span class="k">}</span><span class="s2">"</span><span class="sb">`</span>
  curl <span class="nt">-k</span> <span class="nt">-u</span> <span class="s2">"francois@redislabs.com:password"</span> <span class="nt">--request</span> DELETE <span class="nt">--url</span> <span class="s2">"https://localhost:9443/v1/users/</span><span class="k">${</span><span class="nv">uuid</span><span class="k">}</span><span class="s2">"</span> <span class="nt">--header</span> <span class="s1">'content-type: application/json'</span>
<span class="o">}</span>


<span class="c"># Comptes</span>
<span class="k">for </span>u <span class="k">in </span>orders-update orders-invoice products-update products-stocks Angelina Paul Pierre David Denis<span class="p">;</span> <span class="k">do
  </span>UserCreate <span class="s2">"</span><span class="k">${</span><span class="nv">u</span><span class="k">}</span><span class="s2">"</span> <span class="s2">"</span><span class="k">${</span><span class="nv">u</span><span class="k">}</span><span class="s2">@example.org"</span> <span class="s2">"</span><span class="k">${</span><span class="nv">u</span><span class="k">}</span><span class="s2">"</span>
<span class="k">done</span>
</code></pre></div></div>

<p><img src="..//assets/posts/en/BlogVlogApprendreRedisAvecFran%C3%A7ois5minutes10HowtomanageRBACsecuritywithACLandRole/7f38a122aff04a848a4968501a6daf64.png" alt="35fd63152d9c443af3f9feea097d8774.png" /></p>

<p>Au final, le résultat est identique :</p>

<p><img src="..//assets/posts/en/BlogVlogApprendreRedisAvecFran%C3%A7ois5minutes10HowtomanageRBACsecuritywithACLandRole/67e9b5f97c254476bdb0e756e082aa8c.png" alt="7c54e3641f547d765a48d8a78c43132f.png" /></p>

<h2 id="création-des-acls">Création des ACLs</h2>
<p>On peut facilement identifier cinq ACLs distinctes :</p>
<ul>
  <li>Accès en lecture-écriture sur les données ;</li>
  <li>Accès en lecture seule sur les données ;</li>
  <li>Accès en consultation-publication sur des channels de communication ;</li>
  <li>Accès en consultation seule sur les channels de communication ;</li>
  <li>Accès aux commandes d’administration de la base.</li>
</ul>

<p><img src="..//assets/posts/en/BlogVlogApprendreRedisAvecFran%C3%A7ois5minutes10HowtomanageRBACsecuritywithACLandRole/81babc2465fb48d1b9377b28380a471a.png" alt="Slides - 27.png" /></p>

<table>
  <thead>
    <tr>
      <th style="text-align: left">Nom ACL</th>
      <th style="text-align: left">Définition ACL</th>
    </tr>
  </thead>
  <tbody>
    <tr>
      <td style="text-align: left">DataRW</td>
      <td style="text-align: left">-@all +@hash +@list -@dangerous ~*</td>
    </tr>
    <tr>
      <td style="text-align: left">DataRO</td>
      <td style="text-align: left">-@all +@hash +@list -@dangerous -@write ~*</td>
    </tr>
    <tr>
      <td style="text-align: left">MsgRW</td>
      <td style="text-align: left">-@all +@publish +@subscribe -@dangerous ~*</td>
    </tr>
    <tr>
      <td style="text-align: left">MsgRO</td>
      <td style="text-align: left">-@all +@subscribe -@dangerous ~*</td>
    </tr>
    <tr>
      <td style="text-align: left">DBAdmin</td>
      <td style="text-align: left">-@all +@admin +@dangerous</td>
    </tr>
  </tbody>
</table>

<p>Ces ACLs peuvent être créées manuellement depuis l’interface web
d’administration :</p>

<p><img src="..//assets/posts/en/BlogVlogApprendreRedisAvecFran%C3%A7ois5minutes10HowtomanageRBACsecuritywithACLandRole/2e098537cbe0497e8477cb2f33feb662.png" alt="39a89571a7e5ffc26f5ada0a2930b723.png" /></p>

<p>Ou depuis l’API REST pour automatiser et industrialiser leur gestion :</p>

<div class="language-bash highlighter-rouge"><div class="highlight"><pre class="highlight"><code><span class="k">function </span>ACLCreate <span class="o">{</span>
  <span class="nv">aclname</span><span class="o">=</span><span class="s2">"</span><span class="nv">$1</span><span class="s2">"</span>
  <span class="nv">acltext</span><span class="o">=</span><span class="s2">"</span><span class="nv">$2</span><span class="s2">"</span>
  curl <span class="nt">-k</span> <span class="nt">-u</span> <span class="s2">"francois@redislabs.com:password"</span> <span class="nt">--request</span> POST <span class="nt">--url</span> <span class="s2">"https://localhost:9443/v1/redis_acls"</span> <span class="nt">--header</span> <span class="s1">'content-type: application/json'</span> <span class="nt">--data</span> <span class="s1">'{"name": "'</span><span class="s2">"</span><span class="k">${</span><span class="nv">aclname</span><span class="k">}</span><span class="s2">"</span><span class="s1">'", "acl": "'</span><span class="s2">"</span><span class="k">${</span><span class="nv">acltext</span><span class="k">}</span><span class="s2">"</span><span class="s1">'" }'</span> 
<span class="o">}</span>

<span class="k">function </span>ACLFindUidByName <span class="o">{</span>
  <span class="nv">aclname</span><span class="o">=</span><span class="s2">"</span><span class="nv">$1</span><span class="s2">"</span>
  <span class="c"># Find ACL UID by name</span>
  <span class="nv">uuid</span><span class="o">=</span><span class="sb">`</span>curl <span class="nt">-s</span> <span class="nt">-k</span> <span class="nt">-u</span> <span class="s2">"francois@redislabs.com:password"</span> <span class="nt">--request</span> GET <span class="nt">--url</span> <span class="s2">"https://localhost:9443/v1/redis_acls"</span> <span class="nt">--header</span> <span class="s1">'content-type: application/json'</span> | jq <span class="s1">'.[]|select(.name=="'</span><span class="s2">"</span><span class="k">${</span><span class="nv">aclname</span><span class="k">}</span><span class="s2">"</span><span class="s1">'").uid'</span><span class="sb">`</span>
  <span class="nb">echo</span> <span class="k">${</span><span class="nv">uuid</span><span class="k">}</span>
<span class="o">}</span>

<span class="k">function </span>ACLUpdate <span class="o">{</span>
  <span class="nv">aclname</span><span class="o">=</span><span class="s2">"</span><span class="nv">$1</span><span class="s2">"</span>
  <span class="nv">acltext</span><span class="o">=</span><span class="s2">"</span><span class="nv">$2</span><span class="s2">"</span>
  <span class="nv">acluid</span><span class="o">=</span><span class="sb">`</span>ACLFindUidByName <span class="s2">"</span><span class="k">${</span><span class="nv">aclname</span><span class="k">}</span><span class="s2">"</span><span class="sb">`</span>
  curl <span class="nt">-k</span> <span class="nt">-u</span> <span class="s2">"francois@redislabs.com:password"</span> <span class="nt">--request</span> PUT <span class="nt">--url</span> <span class="s2">"https://localhost:9443/v1/redis_acls/</span><span class="k">${</span><span class="nv">acluid</span><span class="k">}</span><span class="s2">"</span> <span class="nt">--header</span> <span class="s1">'content-type: application/json'</span> <span class="nt">--data</span> <span class="s1">'{"acl":"'</span><span class="s2">"</span><span class="k">${</span><span class="nv">acltext</span><span class="k">}</span><span class="s2">"</span><span class="s1">'"}'</span>
<span class="o">}</span>

<span class="k">function </span>ACLDelete <span class="o">{</span>
  <span class="nv">aclname</span><span class="o">=</span><span class="s2">"</span><span class="nv">$1</span><span class="s2">"</span>
  <span class="nv">acluid</span><span class="o">=</span><span class="sb">`</span>ACLFindUidByName <span class="s2">"</span><span class="k">${</span><span class="nv">aclname</span><span class="k">}</span><span class="s2">"</span><span class="sb">`</span>
  curl <span class="nt">-k</span> <span class="nt">-u</span> <span class="s2">"francois@redislabs.com:password"</span> <span class="nt">--request</span> DELETE <span class="nt">--url</span> <span class="s2">"https://localhost:9443/v1/redis_acls/</span><span class="k">${</span><span class="nv">acluid</span><span class="k">}</span><span class="s2">"</span> <span class="nt">--header</span> <span class="s1">'content-type: application/json'</span>
<span class="o">}</span>

ACLCreate <span class="s2">"DataRW"</span>  <span class="s1">'-@all +@hash +@list -@dangerous ~*'</span>
ACLCreate <span class="s2">"DataRO"</span>  <span class="s1">'-@all +@hash +@list -@dangerous -@write ~*'</span>
ACLCreate <span class="s2">"MsgRW"</span>   <span class="s1">'-@all +publish +subscribe -@dangerous ~*'</span>
ACLCreate <span class="s2">"MsgRO"</span>   <span class="s1">'-@all +subscribe -@dangerous ~*'</span>
ACLCreate <span class="s2">"DBAdmin"</span> <span class="s1">'-@all +@admin +@dangerous'</span>
</code></pre></div></div>

<p>Dans les deux cas, le résultat est le même et les ACLs sont créées :</p>

<p><img src="..//assets/posts/en/BlogVlogApprendreRedisAvecFran%C3%A7ois5minutes10HowtomanageRBACsecuritywithACLandRole/42d10acfbf124e06951f4d51d4e8f1ce.png" alt="809e29ae93fb9b653e80015672449324.png" /></p>

<h2 id="création-des-rôles">Création des rôles</h2>
<p>Il faut maintenant disposer de rôles pour choisir quelle ACL appliquer à quel
compte sur quelle base. On peut facilement identifier des motifs :</p>

<table>
  <thead>
    <tr>
      <th style="text-align: left">Comptes</th>
      <th style="text-align: left">Cluster</th>
      <th style="text-align: left">Orders</th>
      <th style="text-align: left">Products</th>
      <th style="text-align: left">Messaging</th>
    </tr>
  </thead>
  <tbody>
    <tr>
      <td style="text-align: left">orders-update</td>
      <td style="text-align: left">Aucune</td>
      <td style="text-align: left">DataRW</td>
      <td style="text-align: left">Aucune</td>
      <td style="text-align: left">MsgRW</td>
    </tr>
    <tr>
      <td style="text-align: left">orders-invoice</td>
      <td style="text-align: left">Aucune</td>
      <td style="text-align: left">DataRO</td>
      <td style="text-align: left">Aucune</td>
      <td style="text-align: left">MsgRO</td>
    </tr>
    <tr>
      <td style="text-align: left">products-update</td>
      <td style="text-align: left">Aucune</td>
      <td style="text-align: left">Aucune</td>
      <td style="text-align: left">DataRW</td>
      <td style="text-align: left">MsgRW</td>
    </tr>
    <tr>
      <td style="text-align: left">products-stocks</td>
      <td style="text-align: left">Aucune</td>
      <td style="text-align: left">Aucune</td>
      <td style="text-align: left">DataRO</td>
      <td style="text-align: left">MsgRO</td>
    </tr>
    <tr>
      <td style="text-align: left">Angélina</td>
      <td style="text-align: left">Totale</td>
      <td style="text-align: left">DBAdmin</td>
      <td style="text-align: left">DBAdmin</td>
      <td style="text-align: left">DBAdmin</td>
    </tr>
    <tr>
      <td style="text-align: left">Paul</td>
      <td style="text-align: left">Base</td>
      <td style="text-align: left">DataRW</td>
      <td style="text-align: left">Aucune</td>
      <td style="text-align: left">MsgRW</td>
    </tr>
    <tr>
      <td style="text-align: left">Pierre</td>
      <td style="text-align: left">Base</td>
      <td style="text-align: left">Aucune</td>
      <td style="text-align: left">DataRW</td>
      <td style="text-align: left">MsgRW</td>
    </tr>
    <tr>
      <td style="text-align: left">David</td>
      <td style="text-align: left">Superv.</td>
      <td style="text-align: left">DataRO</td>
      <td style="text-align: left">Aucune</td>
      <td style="text-align: left">MsgRO</td>
    </tr>
    <tr>
      <td style="text-align: left">Denis</td>
      <td style="text-align: left">Superv.</td>
      <td style="text-align: left">Aucune</td>
      <td style="text-align: left">DataRO</td>
      <td style="text-align: left">MsgRO</td>
    </tr>
  </tbody>
</table>

<p>Le cluster Redis Enterprise peut accorder des privilèges d’administration aux
rôles et chaque base du cluster peut accorder les permissions spécifiques d’ACL
prédéfinies à chaque rôle. L’idée est donc de créer un rôle distinct par jeu de
permission (cluster+bases) unique, par ligne distincte dans le tableau. Ainsi,
dans notre simple cas d’exemple, nous avons besoin de neuf rôles, un pour chaque
combinaison possible. Un rôle est un profile de compte ou un groupe de comptes
ayant les mêmes permissions et privilèges sur l’administration du cluster, sur
les bases, sur les commandes exécutables et sur les données accessibles.</p>

<table>
  <thead>
    <tr>
      <th style="text-align: left">Roles</th>
      <th style="text-align: left">Cluster admin.</th>
      <th style="text-align: left">Orders</th>
      <th style="text-align: left">Products</th>
      <th style="text-align: left">Messaging</th>
    </tr>
  </thead>
  <tbody>
    <tr>
      <td style="text-align: left">Orders-RW</td>
      <td style="text-align: left">Aucune</td>
      <td style="text-align: left">DataRW</td>
      <td style="text-align: left">Aucune</td>
      <td style="text-align: left">MsgRW</td>
    </tr>
    <tr>
      <td style="text-align: left">Orders-RO</td>
      <td style="text-align: left">Aucune</td>
      <td style="text-align: left">DataRO</td>
      <td style="text-align: left">Aucune</td>
      <td style="text-align: left">MsgRO</td>
    </tr>
    <tr>
      <td style="text-align: left">Products-RW</td>
      <td style="text-align: left">Aucune</td>
      <td style="text-align: left">Aucune</td>
      <td style="text-align: left">DataRW</td>
      <td style="text-align: left">MsgRW</td>
    </tr>
    <tr>
      <td style="text-align: left">Products-RO</td>
      <td style="text-align: left">Aucune</td>
      <td style="text-align: left">Aucune</td>
      <td style="text-align: left">DataRO</td>
      <td style="text-align: left">MsgRO</td>
    </tr>
    <tr>
      <td style="text-align: left">Global-ADM</td>
      <td style="text-align: left">Admin</td>
      <td style="text-align: left">DBAdmin</td>
      <td style="text-align: left">DBAdmin</td>
      <td style="text-align: left">DBAdmin</td>
    </tr>
    <tr>
      <td style="text-align: left">Orders-PM</td>
      <td style="text-align: left">DB-Member</td>
      <td style="text-align: left">DataRW</td>
      <td style="text-align: left">Aucune</td>
      <td style="text-align: left">MsgRW</td>
    </tr>
    <tr>
      <td style="text-align: left">Products-PM</td>
      <td style="text-align: left">DB-Member</td>
      <td style="text-align: left">Aucune</td>
      <td style="text-align: left">DataRW</td>
      <td style="text-align: left">MsgRW</td>
    </tr>
    <tr>
      <td style="text-align: left">Orders-DEV</td>
      <td style="text-align: left">DB Viewer</td>
      <td style="text-align: left">DataRO</td>
      <td style="text-align: left">Aucune</td>
      <td style="text-align: left">MsgRO</td>
    </tr>
    <tr>
      <td style="text-align: left">Products-DEV</td>
      <td style="text-align: left">DB-Viewer</td>
      <td style="text-align: left">Aucune</td>
      <td style="text-align: left">DataRO</td>
      <td style="text-align: left">MsgRO</td>
    </tr>
  </tbody>
</table>

<p>Les droits d’administration du cluster étant attachés globalement aux rôles, il
faut donc les y inclure lors de la conception des droits d’accès et lors de la
création des rôles.</p>

<p><img src="..//assets/posts/en/BlogVlogApprendreRedisAvecFran%C3%A7ois5minutes10HowtomanageRBACsecuritywithACLandRole/c8fcce7107544143aabe8961df5d81f2.png" alt="Slides - 37.png" /></p>

<p>Créons donc les rôles, soit dans l’interface web d’administration du cluster
Redis Enterprise…</p>

<p><img src="..//assets/posts/en/BlogVlogApprendreRedisAvecFran%C3%A7ois5minutes10HowtomanageRBACsecuritywithACLandRole/4bf886dcade44b0690827960315ed156.png" alt="8a955640a7a961d3711421362b961106.png" /></p>

<p>Soit grâce à des appels d’API REST pour automatiser leur création…</p>

<div class="language-bash highlighter-rouge"><div class="highlight"><pre class="highlight"><code><span class="k">function </span>RoleCreate <span class="o">{</span>
  <span class="nv">rolename</span><span class="o">=</span><span class="s2">"</span><span class="nv">$1</span><span class="s2">"</span>
  <span class="nv">roleperm</span><span class="o">=</span><span class="s2">"</span><span class="nv">$2</span><span class="s2">"</span>
  curl <span class="nt">-k</span> <span class="nt">-u</span> <span class="s2">"francois@redislabs.com:password"</span> <span class="nt">--request</span> POST <span class="nt">--url</span> <span class="s2">"https://localhost:9443/v1/roles"</span> <span class="nt">--header</span> <span class="s1">'content-type: application/json'</span> <span class="nt">--data</span> <span class="s1">'{"name": "'</span><span class="s2">"</span><span class="k">${</span><span class="nv">rolename</span><span class="k">}</span><span class="s2">"</span><span class="s1">'", "management": "'</span><span class="s2">"</span><span class="k">${</span><span class="nv">roleperm</span><span class="k">}</span><span class="s2">"</span><span class="s1">'" }'</span>  
<span class="o">}</span>

<span class="k">function </span>RoleFindUidByName <span class="o">{</span>
  <span class="nv">rolename</span><span class="o">=</span><span class="s2">"</span><span class="nv">$1</span><span class="s2">"</span>
  <span class="c"># Find Role UID by name</span>
  <span class="nv">ruid</span><span class="o">=</span><span class="sb">`</span>curl <span class="nt">-s</span> <span class="nt">-k</span> <span class="nt">-u</span> <span class="s2">"francois@redislabs.com:password"</span> <span class="nt">--request</span> GET <span class="nt">--url</span> <span class="s2">"https://localhost:9443/v1/roles"</span> <span class="nt">--header</span> <span class="s1">'content-type: application/json'</span> | jq <span class="s1">'.[]|select(.name=="'</span><span class="s2">"</span><span class="k">${</span><span class="nv">rolename</span><span class="k">}</span><span class="s2">"</span><span class="s1">'").uid'</span><span class="sb">`</span>
  <span class="nb">echo</span> <span class="k">${</span><span class="nv">ruid</span><span class="k">}</span>
<span class="o">}</span>

<span class="k">function </span>RoleUpdate <span class="o">{</span>
  <span class="nv">rolename</span><span class="o">=</span><span class="s2">"</span><span class="nv">$1</span><span class="s2">"</span>
  <span class="nv">roleperm</span><span class="o">=</span><span class="s2">"</span><span class="nv">$2</span><span class="s2">"</span>
  <span class="nv">roleuid</span><span class="o">=</span><span class="sb">`</span>RoleFindUidByName <span class="s2">"</span><span class="k">${</span><span class="nv">rolename</span><span class="k">}</span><span class="s2">"</span><span class="sb">`</span>
  curl <span class="nt">-k</span> <span class="nt">-u</span> <span class="s2">"francois@redislabs.com:password"</span> <span class="nt">--request</span> PUT <span class="nt">--url</span> <span class="s2">"https://localhost:9443/v1/roles/</span><span class="k">${</span><span class="nv">roleuid</span><span class="k">}</span><span class="s2">"</span> <span class="nt">--header</span> <span class="s1">'content-type: application/json'</span> <span class="nt">--data</span> <span class="s1">'{"management":"'</span><span class="s2">"</span><span class="k">${</span><span class="nv">roleperm</span><span class="k">}</span><span class="s2">"</span><span class="s1">'"}'</span>
<span class="o">}</span>

<span class="k">function </span>RoleDelete <span class="o">{</span>
  <span class="nv">rolename</span><span class="o">=</span><span class="s2">"</span><span class="nv">$1</span><span class="s2">"</span>
  <span class="nv">roleuid</span><span class="o">=</span><span class="sb">`</span>RoleFindUidByName <span class="s2">"</span><span class="k">${</span><span class="nv">rolename</span><span class="k">}</span><span class="s2">"</span><span class="sb">`</span>
  curl <span class="nt">-k</span> <span class="nt">-u</span> <span class="s2">"francois@redislabs.com:password"</span> <span class="nt">--request</span> DELETE <span class="nt">--url</span> <span class="s2">"https://localhost:9443/v1/roles/</span><span class="k">${</span><span class="nv">roleuid</span><span class="k">}</span><span class="s2">"</span> <span class="nt">--header</span> <span class="s1">'content-type: application/json'</span>
<span class="o">}</span>

RoleCreate <span class="s2">"Orders-RW"</span>    <span class="s2">"none"</span>
RoleCreate <span class="s2">"Orders-RO"</span>    <span class="s2">"none"</span>
RoleCreate <span class="s2">"Products-RW"</span>  <span class="s2">"none"</span>
RoleCreate <span class="s2">"Products-RO"</span>  <span class="s2">"none"</span>
RoleCreate <span class="s2">"Global-ADM"</span>   <span class="s2">"admin"</span>
RoleCreate <span class="s2">"Orders-PM"</span>    <span class="s2">"db_member"</span>
RoleCreate <span class="s2">"Products-PM"</span>  <span class="s2">"db_member"</span>
RoleCreate <span class="s2">"Orders-DEV"</span>   <span class="s2">"db_viewer"</span>
RoleCreate <span class="s2">"Products-DEV"</span> <span class="s2">"db_viewer"</span>
</code></pre></div></div>

<p>On aboutit finalement au même résultat :</p>

<p><img src="..//assets/posts/en/BlogVlogApprendreRedisAvecFran%C3%A7ois5minutes10HowtomanageRBACsecuritywithACLandRole/f8712f703f364c818d541bc2085b738d.png" alt="f6d0f8606349c0d0dae28e813f326d53.png" /></p>

<h2 id="relations-rôle-acl-dans-les-bases">Relations Rôle-ACL dans les bases</h2>

<p>Chaque base de données peut accorder les permissions correspondantes à une ACL
prédéfinie à chaque compte en fonction de son rôle. Un compte membre du groupe
<em>Products-DEV</em> se verra accorder l’ACL <em>Msg-RO</em> sur la base <em>messaging</em> et l’ACL
<em>Data-RO</em> sur la base <em>products</em>, mais aucune ACL, et donc pas de compte, sur la
base <em>orders</em> :</p>

<p><img src="..//assets/posts/en/BlogVlogApprendreRedisAvecFran%C3%A7ois5minutes10HowtomanageRBACsecuritywithACLandRole/c803f2fbde2048a4bf8580475bb6d083.png" alt="Slides - 46.png" /></p>

<p>L’interface d’administration web effectue une abstration de confort pour
associer les ACL à des rôles dans chaque base, à partir de la page d’édition des
rôles :</p>

<p><img src="..//assets/posts/en/BlogVlogApprendreRedisAvecFran%C3%A7ois5minutes10HowtomanageRBACsecuritywithACLandRole/7a0ab21853824a3aa94ac1fc5379a3eb.png" alt="a45c4d53a879039697f0c106217e962a.png" /></p>

<p>Cependant, l’API REST donne accès au véritable modèle de données interne, sans
abstraction, et manipule directement les associations Rôle-ACL dans la
définition des bases. Créons ces associations Rôle-ACL pour la base <em>orders</em> :</p>

<table>
  <thead>
    <tr>
      <th style="text-align: left">Roles</th>
      <th style="text-align: left">Orders ACL</th>
    </tr>
  </thead>
  <tbody>
    <tr>
      <td style="text-align: left">Orders-RW</td>
      <td style="text-align: left">DataRW</td>
    </tr>
    <tr>
      <td style="text-align: left">Orders-RO</td>
      <td style="text-align: left">DataRO</td>
    </tr>
    <tr>
      <td style="text-align: left">Global-ADM</td>
      <td style="text-align: left">DBAdmin</td>
    </tr>
    <tr>
      <td style="text-align: left">Orders-PM</td>
      <td style="text-align: left">DataRW</td>
    </tr>
    <tr>
      <td style="text-align: left">Orders-DEV</td>
      <td style="text-align: left">DataRO</td>
    </tr>
  </tbody>
</table>

<p>Un premier appel d’API REST permet de trouver l’identifiant interne d’un rôle,
un autre permet de trouver l’identifiant de l’ACL à y associer, pour construire
une association au format JSON. Ces associations sont concaténées dans un
tableau JSON et envoyées dans la configuration de la base par un ultime appel
d’API.</p>

<div class="language-bash highlighter-rouge"><div class="highlight"><pre class="highlight"><code><span class="k">function </span>RoleACLMap <span class="o">{</span>
  <span class="nv">rolename</span><span class="o">=</span><span class="nv">$1</span>
  <span class="nv">aclname</span><span class="o">=</span><span class="nv">$2</span>
  <span class="nv">roleuid</span><span class="o">=</span><span class="sb">`</span>RoleFindUidByName <span class="s2">"</span><span class="k">${</span><span class="nv">rolename</span><span class="k">}</span><span class="s2">"</span><span class="sb">`</span>
  <span class="nv">acluid</span><span class="o">=</span><span class="sb">`</span>ACLFindUidByName <span class="s2">"</span><span class="k">${</span><span class="nv">aclname</span><span class="k">}</span><span class="s2">"</span><span class="sb">`</span>
  <span class="c"># Build the JSON object to map the ACL to the role</span>
  <span class="nb">echo</span> <span class="s1">'{"redis_acl_uid": '</span><span class="k">${</span><span class="nv">acluid</span><span class="k">}</span><span class="s1">',"role_uid": '</span><span class="k">${</span><span class="nv">roleuid</span><span class="k">}</span><span class="s1">'}'</span>
<span class="o">}</span>

<span class="nv">mapping</span><span class="o">=</span><span class="s2">"</span><span class="sb">`</span>RoleACLMap Orders-RW DataRW<span class="sb">`</span><span class="s2">"</span>
<span class="nv">mapping</span><span class="o">=</span><span class="s2">"</span><span class="k">${</span><span class="nv">mapping</span><span class="k">}</span><span class="s2">,</span><span class="sb">`</span>RoleACLMap Orders-RO DataRO<span class="sb">`</span><span class="s2">"</span>
<span class="nv">mapping</span><span class="o">=</span><span class="s2">"</span><span class="k">${</span><span class="nv">mapping</span><span class="k">}</span><span class="s2">,</span><span class="sb">`</span>RoleACLMap Global-ADM DBAdmin<span class="sb">`</span><span class="s2">"</span>
<span class="nv">mapping</span><span class="o">=</span><span class="s2">"</span><span class="k">${</span><span class="nv">mapping</span><span class="k">}</span><span class="s2">,</span><span class="sb">`</span>RoleACLMap Orders-PM DataRW<span class="sb">`</span><span class="s2">"</span>
<span class="nv">mapping</span><span class="o">=</span><span class="s2">"</span><span class="k">${</span><span class="nv">mapping</span><span class="k">}</span><span class="s2">,</span><span class="sb">`</span>RoleACLMap Orders-DEV DataRO<span class="sb">`</span><span class="s2">"</span>
DBUpdate <span class="s2">"orders"</span> <span class="s1">'"roles_permissions":['</span><span class="s2">"</span><span class="nv">$mapping</span><span class="s2">"</span><span class="s1">']'</span>
</code></pre></div></div>

<p>On peut le constater dans l’interface web d’administration.</p>

<p><img src="..//assets/posts/en/BlogVlogApprendreRedisAvecFran%C3%A7ois5minutes10HowtomanageRBACsecuritywithACLandRole/c19061884ba64f80a2f5ac1e71762578.png" alt="0a05afe4012f0d9b0fdcfcdf1da7ff95.png" /></p>

<p>Configurons les associations Role-ACL pour la base <em>products</em> :</p>

<table>
  <thead>
    <tr>
      <th style="text-align: left">Roles</th>
      <th style="text-align: left">Products ACL</th>
    </tr>
  </thead>
  <tbody>
    <tr>
      <td style="text-align: left">Products-RW</td>
      <td style="text-align: left">DataRW</td>
    </tr>
    <tr>
      <td style="text-align: left">Products-RO</td>
      <td style="text-align: left">DataRO</td>
    </tr>
    <tr>
      <td style="text-align: left">Global-ADM</td>
      <td style="text-align: left">DBAdmin</td>
    </tr>
    <tr>
      <td style="text-align: left">Products-PM</td>
      <td style="text-align: left">DataRW</td>
    </tr>
    <tr>
      <td style="text-align: left">Products-DEV</td>
      <td style="text-align: left">DataRO</td>
    </tr>
  </tbody>
</table>

<div class="language-bash highlighter-rouge"><div class="highlight"><pre class="highlight"><code><span class="nv">mapping</span><span class="o">=</span><span class="s2">"</span><span class="sb">`</span>RoleACLMap Products-RW DataRW<span class="sb">`</span><span class="s2">"</span>
<span class="nv">mapping</span><span class="o">=</span><span class="s2">"</span><span class="k">${</span><span class="nv">mapping</span><span class="k">}</span><span class="s2">,</span><span class="sb">`</span>RoleACLMap Products-RO DataRO<span class="sb">`</span><span class="s2">"</span>
<span class="nv">mapping</span><span class="o">=</span><span class="s2">"</span><span class="k">${</span><span class="nv">mapping</span><span class="k">}</span><span class="s2">,</span><span class="sb">`</span>RoleACLMap Global-ADM DBAdmin<span class="sb">`</span><span class="s2">"</span>
<span class="nv">mapping</span><span class="o">=</span><span class="s2">"</span><span class="k">${</span><span class="nv">mapping</span><span class="k">}</span><span class="s2">,</span><span class="sb">`</span>RoleACLMap Products-PM DataRW<span class="sb">`</span><span class="s2">"</span>
<span class="nv">mapping</span><span class="o">=</span><span class="s2">"</span><span class="k">${</span><span class="nv">mapping</span><span class="k">}</span><span class="s2">,</span><span class="sb">`</span>RoleACLMap Products-DEV DataRO<span class="sb">`</span><span class="s2">"</span>
DBUpdate <span class="s2">"products"</span> <span class="s1">'"roles_permissions":['</span><span class="s2">"</span><span class="nv">$mapping</span><span class="s2">"</span><span class="s1">']'</span>
</code></pre></div></div>

<p><img src="..//assets/posts/en/BlogVlogApprendreRedisAvecFran%C3%A7ois5minutes10HowtomanageRBACsecuritywithACLandRole/f6da6dc537a449ad805d3bcefcf60214.png" alt="9d9fb4315c0981f9e33f0f499c3ed6db.png" /></p>

<p>Et finalement pour la base <em>messaging</em> :</p>

<table>
  <thead>
    <tr>
      <th style="text-align: left">Roles</th>
      <th style="text-align: left">Messaging ACL</th>
    </tr>
  </thead>
  <tbody>
    <tr>
      <td style="text-align: left">Orders-RW</td>
      <td style="text-align: left">MsgRW</td>
    </tr>
    <tr>
      <td style="text-align: left">Orders-RO</td>
      <td style="text-align: left">MsgRO</td>
    </tr>
    <tr>
      <td style="text-align: left">Products-RW</td>
      <td style="text-align: left">MsgRW</td>
    </tr>
    <tr>
      <td style="text-align: left">Products-RO</td>
      <td style="text-align: left">MsgRO</td>
    </tr>
    <tr>
      <td style="text-align: left">Global-ADM</td>
      <td style="text-align: left">DBAdmin</td>
    </tr>
    <tr>
      <td style="text-align: left">Orders-PM</td>
      <td style="text-align: left">MsgRW</td>
    </tr>
    <tr>
      <td style="text-align: left">Products-PM</td>
      <td style="text-align: left">MsgRW</td>
    </tr>
    <tr>
      <td style="text-align: left">Orders-DEV</td>
      <td style="text-align: left">MsgRO</td>
    </tr>
    <tr>
      <td style="text-align: left">Products-DEV</td>
      <td style="text-align: left">MsgRO</td>
    </tr>
  </tbody>
</table>

<div class="language-bash highlighter-rouge"><div class="highlight"><pre class="highlight"><code><span class="nv">mapping</span><span class="o">=</span><span class="s2">"</span><span class="sb">`</span>RoleACLMap Orders-RW MsgRW<span class="sb">`</span><span class="s2">"</span>
<span class="nv">mapping</span><span class="o">=</span><span class="s2">"</span><span class="k">${</span><span class="nv">mapping</span><span class="k">}</span><span class="s2">,</span><span class="sb">`</span>RoleACLMap Orders-RO MsgRO<span class="sb">`</span><span class="s2">"</span>
<span class="nv">mapping</span><span class="o">=</span><span class="s2">"</span><span class="k">${</span><span class="nv">mapping</span><span class="k">}</span><span class="s2">,</span><span class="sb">`</span>RoleACLMap Products-RW MsgRW<span class="sb">`</span><span class="s2">"</span>
<span class="nv">mapping</span><span class="o">=</span><span class="s2">"</span><span class="k">${</span><span class="nv">mapping</span><span class="k">}</span><span class="s2">,</span><span class="sb">`</span>RoleACLMap Products-RO MsgRO<span class="sb">`</span><span class="s2">"</span>
<span class="nv">mapping</span><span class="o">=</span><span class="s2">"</span><span class="k">${</span><span class="nv">mapping</span><span class="k">}</span><span class="s2">,</span><span class="sb">`</span>RoleACLMap Global-ADM DBAdmin<span class="sb">`</span><span class="s2">"</span>
<span class="nv">mapping</span><span class="o">=</span><span class="s2">"</span><span class="k">${</span><span class="nv">mapping</span><span class="k">}</span><span class="s2">,</span><span class="sb">`</span>RoleACLMap Orders-PM MsgRW<span class="sb">`</span><span class="s2">"</span>
<span class="nv">mapping</span><span class="o">=</span><span class="s2">"</span><span class="k">${</span><span class="nv">mapping</span><span class="k">}</span><span class="s2">,</span><span class="sb">`</span>RoleACLMap Products-PM MsgRW<span class="sb">`</span><span class="s2">"</span>
<span class="nv">mapping</span><span class="o">=</span><span class="s2">"</span><span class="k">${</span><span class="nv">mapping</span><span class="k">}</span><span class="s2">,</span><span class="sb">`</span>RoleACLMap Orders-DEV MsgRO<span class="sb">`</span><span class="s2">"</span>
<span class="nv">mapping</span><span class="o">=</span><span class="s2">"</span><span class="k">${</span><span class="nv">mapping</span><span class="k">}</span><span class="s2">,</span><span class="sb">`</span>RoleACLMap Products-DEV MsgRO<span class="sb">`</span><span class="s2">"</span>
DBUpdate <span class="s2">"messaging"</span> <span class="s1">'"roles_permissions":['</span><span class="s2">"</span><span class="nv">$mapping</span><span class="s2">"</span><span class="s1">']'</span>
</code></pre></div></div>

<p><img src="..//assets/posts/en/BlogVlogApprendreRedisAvecFran%C3%A7ois5minutes10HowtomanageRBACsecuritywithACLandRole/6fb6ef7283ba425d9a763c942b97fbc0.png" alt="5f0c5224dd81579a23eac4c0e52d7622.png" /></p>

<h2 id="invalidation-du-compte-anonyme-par-défaut">Invalidation du compte anonyme par défaut</h2>
<p>Ok, nous avons défini les ACLs et les rôles, nous avons accordé des permissions
(ACL) aux différents rôles dans chaque base, il faut éviter qu’un compte
n’appartenant pas à un rôle déclaré dans une base, un compte non créé dans la
base par le cluster Redis Enterprise, se voit accordé les permissions du compte
anonyme par défaut. Il faut donc désactiver ce compte anonyme dans chaque base,
soit à travers l’interface web :</p>

<p><img src="..//assets/posts/en/BlogVlogApprendreRedisAvecFran%C3%A7ois5minutes10HowtomanageRBACsecuritywithACLandRole/6ed55c8bb42e47029c419b3979889745.png" alt="395f482c6dcde00f8a59558589dea532.png" /></p>

<p>Soit par des appels d’API REST :</p>

<div class="language-bash highlighter-rouge"><div class="highlight"><pre class="highlight"><code>DBUpdate <span class="s2">"orders"</span> <span class="s1">'"default_user": false'</span>
DBUpdate <span class="s2">"products"</span> <span class="s1">'"default_user": false'</span>
DBUpdate <span class="s2">"messaging"</span> <span class="s1">'"default_user": false'</span>
</code></pre></div></div>

<h2 id="affectation-des-rôles-aux-comptes">Affectation des rôles aux comptes</h2>
<p>Nous avons donc défini des ACL, des rôles, les ACLs accordées aux comptes
appartenant aux rôles dans les bases, pour chaque cas d’utilisation possible.</p>

<p>Il nous reste à assigner un rôle à chaque compte, pour qu’il bénéficie des ACLs
accordées à son rôle dans chaque base :</p>

<table>
  <thead>
    <tr>
      <th style="text-align: left">Compte</th>
      <th style="text-align: left">Role</th>
    </tr>
  </thead>
  <tbody>
    <tr>
      <td style="text-align: left">orders-update</td>
      <td style="text-align: left">Orders-RW</td>
    </tr>
    <tr>
      <td style="text-align: left">orders-invoice</td>
      <td style="text-align: left">Orders-RO</td>
    </tr>
    <tr>
      <td style="text-align: left">products-update</td>
      <td style="text-align: left">Products-RW</td>
    </tr>
    <tr>
      <td style="text-align: left">products-stocks</td>
      <td style="text-align: left">Products-RO</td>
    </tr>
    <tr>
      <td style="text-align: left">Angélina</td>
      <td style="text-align: left">Global-ADM</td>
    </tr>
    <tr>
      <td style="text-align: left">Paul</td>
      <td style="text-align: left">Orders-PM</td>
    </tr>
    <tr>
      <td style="text-align: left">Pierre</td>
      <td style="text-align: left">Products-PM</td>
    </tr>
    <tr>
      <td style="text-align: left">David</td>
      <td style="text-align: left">Orders-DEV</td>
    </tr>
    <tr>
      <td style="text-align: left">Denis</td>
      <td style="text-align: left">Products-DEV</td>
    </tr>
  </tbody>
</table>

<p>Par exemple, le compte <em>Denis</em> dispose du rôle <em>Products-DEV</em> et aura donc l’ACL
<em>DataRO</em> sur la base <em>products</em> et l’ACL <em>Msg-RO</em> sur la base <em>messaging</em>, ce
qui correspond au besoin exprimé initialement.</p>

<p><img src="..//assets/posts/en/BlogVlogApprendreRedisAvecFran%C3%A7ois5minutes10HowtomanageRBACsecuritywithACLandRole/1c8e390d70884e1fb797ba3da16d5b34.png" alt="Slides - 55.png" /></p>

<p>On peut faire cette association compte-rôle dans l’interface web, bien sûr :</p>

<p><img src="..//assets/posts/en/BlogVlogApprendreRedisAvecFran%C3%A7ois5minutes10HowtomanageRBACsecuritywithACLandRole/d92d6d91f6ee430bbdc64741e5741064.png" alt="077ef01dcf688381e38dafbb78d57c96.png" /></p>

<p>Ou grâce à l’API REST, si on souhaite automatiser :</p>

<div class="language-bash highlighter-rouge"><div class="highlight"><pre class="highlight"><code><span class="k">function </span>UserSetRole <span class="o">{</span>
  <span class="nv">username</span><span class="o">=</span><span class="nv">$1</span>
  <span class="nv">rolename</span><span class="o">=</span><span class="nv">$2</span>
  <span class="nv">roleuid</span><span class="o">=</span><span class="sb">`</span>RoleFindUidByName <span class="s2">"</span><span class="k">${</span><span class="nv">rolename</span><span class="k">}</span><span class="s2">"</span><span class="sb">`</span>
  UserUpdate <span class="s2">"</span><span class="k">${</span><span class="nv">username</span><span class="k">}</span><span class="s2">"</span> <span class="s1">'"role_uids":['</span><span class="k">${</span><span class="nv">roleuid</span><span class="k">}</span><span class="s1">']'</span>
<span class="o">}</span>
UserSetRole <span class="s2">"orders-update"</span> <span class="s2">"Orders-RW"</span>
UserSetRole <span class="s2">"orders-invoice"</span> <span class="s2">"Orders-RO"</span>
UserSetRole <span class="s2">"products-update"</span> <span class="s2">"Products-RW"</span>
UserSetRole <span class="s2">"products-stocks"</span> <span class="s2">"Products-RO"</span>
UserSetRole <span class="s2">"Angelina"</span> <span class="s2">"Global-ADM"</span>
UserSetRole <span class="s2">"Paul"</span> <span class="s2">"Orders-PM"</span>
UserSetRole <span class="s2">"Pierre"</span> <span class="s2">"Products-PM"</span>
UserSetRole <span class="s2">"David"</span> <span class="s2">"Orders-DEV"</span>
UserSetRole <span class="s2">"Denis"</span> <span class="s2">"Products-DEV"</span>
</code></pre></div></div>

<p>Au final, le résultat sera identique :</p>

<p><img src="..//assets/posts/en/BlogVlogApprendreRedisAvecFran%C3%A7ois5minutes10HowtomanageRBACsecuritywithACLandRole/91b2ee3c797d4955ae1fea2d7a90fa32.png" alt="92f044d3fd65d8913a40db2ef937c635.png" /></p>

<p>Et les bases seront configurées correctement :</p>

<p><img src="..//assets/posts/en/BlogVlogApprendreRedisAvecFran%C3%A7ois5minutes10HowtomanageRBACsecuritywithACLandRole/6ba50c6b5e4541689ecc0222c03c887b.png" alt="6e3439daadf1b1b4888ce041d164ca9d.png" /></p>

<h1 id="test-des-permissions">Test des permissions</h1>
<p>J’ai écrit rapidement un script pour tester automatiquement les principales
commandes autorisables et celles supposées interdites, par chaque compte dans
chaque base.</p>

<div class="language-bash highlighter-rouge"><div class="highlight"><pre class="highlight"><code><span class="nb">cat</span> <span class="o">&lt;&lt;</span> <span class="sh">"</span><span class="no">EOF</span><span class="sh">" &gt; RBAC-tests.sh
#!/bin/bash
R='</span><span class="se">\0</span><span class="sh">33[1;31m'
G='</span><span class="se">\0</span><span class="sh">33[1;32m'
Y='</span><span class="se">\0</span><span class="sh">33[1;33m'
B='</span><span class="se">\0</span><span class="sh">33[1;36m'
P='</span><span class="se">\0</span><span class="sh">33[1;35m'
LG='</span><span class="se">\0</span><span class="sh">33[0;37m'
N='</span><span class="se">\0</span><span class="sh">33[0m'

function CmdTest {
DBPORT=</span><span class="nv">$1</span><span class="sh">
DBUSER=</span><span class="nv">$2</span><span class="sh">
DBPASS=</span><span class="nv">$3</span><span class="sh">
DESC=</span><span class="nv">$4</span><span class="sh">
CMD="</span><span class="nv">$5</span><span class="sh">"
ERR=</span><span class="nv">$6</span><span class="sh">
echo -en " - </span><span class="k">${</span><span class="nv">DESC</span><span class="k">}</span><span class="sh"> (</span><span class="k">${</span><span class="nv">P</span><span class="k">}${</span><span class="nv">CMD</span><span class="k">}${</span><span class="nv">N</span><span class="k">}</span><span class="sh">): "
RES=`echo "</span><span class="k">${</span><span class="nv">CMD</span><span class="k">}</span><span class="sh">" | timeout 1 redis-cli --user </span><span class="k">${</span><span class="nv">DBUSER</span><span class="k">}</span><span class="sh"> --pass </span><span class="k">${</span><span class="nv">DBPASS</span><span class="k">}</span><span class="sh"> -p </span><span class="k">${</span><span class="nv">DBPORT</span><span class="k">}</span><span class="sh"> 2&gt; /dev/null | tr '</span><span class="se">\r</span><span class="sh">' ','`
echo "</span><span class="k">${</span><span class="nv">RES</span><span class="k">}</span><span class="sh">" | grep "</span><span class="k">${</span><span class="nv">ERR</span><span class="k">}</span><span class="sh">" &gt; /dev/null 2&gt;&amp;1
[ </span><span class="nv">$?</span><span class="sh"> -eq 0 ] &amp;&amp; echo -en </span><span class="k">${</span><span class="nv">R</span><span class="k">}</span><span class="sh"> || echo -en </span><span class="k">${</span><span class="nv">G</span><span class="k">}</span><span class="sh">
echo -e </span><span class="k">${</span><span class="nv">RES</span><span class="k">}${</span><span class="nv">N</span><span class="k">}</span><span class="sh">
}

function BatchTest {
DBUSER=</span><span class="nv">$1</span><span class="sh">
DBPASS=</span><span class="nv">$2</span><span class="sh">
DBNAME=</span><span class="nv">$3</span><span class="sh">
DBPORT=</span><span class="nv">$4</span><span class="sh">
echo
echo -e </span><span class="k">${</span><span class="nv">LG</span><span class="k">}</span><span class="sh">Database</span><span class="k">${</span><span class="nv">N</span><span class="k">}</span><span class="sh">: </span><span class="k">${</span><span class="nv">Y</span><span class="k">}${</span><span class="nv">DBNAME</span><span class="k">}${</span><span class="nv">N</span><span class="k">}</span><span class="se">\(</span><span class="k">${</span><span class="nv">Y</span><span class="k">}${</span><span class="nv">DBPORT</span><span class="k">}${</span><span class="nv">N</span><span class="k">}</span><span class="se">\)</span><span class="sh">, </span><span class="k">${</span><span class="nv">LG</span><span class="k">}</span><span class="sh">User</span><span class="k">${</span><span class="nv">N</span><span class="k">}</span><span class="sh">: </span><span class="k">${</span><span class="nv">B</span><span class="k">}${</span><span class="nv">DBUSER</span><span class="k">}${</span><span class="nv">N</span><span class="k">}</span><span class="sh">, </span><span class="k">${</span><span class="nv">LG</span><span class="k">}</span><span class="sh">Password</span><span class="k">${</span><span class="nv">N</span><span class="k">}</span><span class="sh">: </span><span class="k">${</span><span class="nv">B</span><span class="k">}${</span><span class="nv">DBPASS</span><span class="k">}${</span><span class="nv">N</span><span class="k">}</span><span class="sh">
CmdTest </span><span class="k">${</span><span class="nv">DBPORT</span><span class="k">}</span><span class="sh"> </span><span class="k">${</span><span class="nv">DBUSER</span><span class="k">}</span><span class="sh"> </span><span class="k">${</span><span class="nv">DBPASS</span><span class="k">}</span><span class="sh"> "STRING Write            " "SET key value" '</span><span class="se">\(</span><span class="sh">ERR</span><span class="se">\|</span><span class="sh">WRONGPASS</span><span class="se">\|</span><span class="sh">(error)</span><span class="se">\|</span><span class="sh">NOAUTH</span><span class="se">\|</span><span class="sh">NOPERM</span><span class="se">\)</span><span class="sh">'
CmdTest </span><span class="k">${</span><span class="nv">DBPORT</span><span class="k">}</span><span class="sh"> </span><span class="k">${</span><span class="nv">DBUSER</span><span class="k">}</span><span class="sh"> </span><span class="k">${</span><span class="nv">DBPASS</span><span class="k">}</span><span class="sh"> "STRING Read             " "GET key" '</span><span class="se">\(</span><span class="sh">ERR</span><span class="se">\|</span><span class="sh">WRONGPASS</span><span class="se">\|</span><span class="sh">(error)</span><span class="se">\|</span><span class="sh">NOAUTH</span><span class="se">\|</span><span class="sh">NOPERM</span><span class="se">\)</span><span class="sh">'
CmdTest </span><span class="k">${</span><span class="nv">DBPORT</span><span class="k">}</span><span class="sh"> </span><span class="k">${</span><span class="nv">DBUSER</span><span class="k">}</span><span class="sh"> </span><span class="k">${</span><span class="nv">DBPASS</span><span class="k">}</span><span class="sh"> "HASH Write              " "HSET order:key field1 value1 field2 value2" '</span><span class="se">\(</span><span class="sh">ERR</span><span class="se">\|</span><span class="sh">WRONGPASS</span><span class="se">\|</span><span class="sh">(error)</span><span class="se">\|</span><span class="sh">NOAUTH</span><span class="se">\|</span><span class="sh">NOPERM</span><span class="se">\)</span><span class="sh">'
CmdTest </span><span class="k">${</span><span class="nv">DBPORT</span><span class="k">}</span><span class="sh"> </span><span class="k">${</span><span class="nv">DBUSER</span><span class="k">}</span><span class="sh"> </span><span class="k">${</span><span class="nv">DBPASS</span><span class="k">}</span><span class="sh"> "HASH Read               " "HGETALL order:key" '</span><span class="se">\(</span><span class="sh">ERR</span><span class="se">\|</span><span class="sh">WRONGPASS</span><span class="se">\|</span><span class="sh">(error)</span><span class="se">\|</span><span class="sh">NOAUTH</span><span class="se">\|</span><span class="sh">NOPERM</span><span class="se">\)</span><span class="sh">'
CmdTest </span><span class="k">${</span><span class="nv">DBPORT</span><span class="k">}</span><span class="sh"> </span><span class="k">${</span><span class="nv">DBUSER</span><span class="k">}</span><span class="sh"> </span><span class="k">${</span><span class="nv">DBPASS</span><span class="k">}</span><span class="sh"> "LIST Write              " "LPUSH order:key:sub value1" '</span><span class="se">\(</span><span class="sh">ERR</span><span class="se">\|</span><span class="sh">WRONGPASS</span><span class="se">\|</span><span class="sh">(error)</span><span class="se">\|</span><span class="sh">NOAUTH</span><span class="se">\|</span><span class="sh">NOPERM</span><span class="se">\)</span><span class="sh">'
CmdTest </span><span class="k">${</span><span class="nv">DBPORT</span><span class="k">}</span><span class="sh"> </span><span class="k">${</span><span class="nv">DBUSER</span><span class="k">}</span><span class="sh"> </span><span class="k">${</span><span class="nv">DBPASS</span><span class="k">}</span><span class="sh"> "LIST Write              " "LPUSH order:key:sub value2" '</span><span class="se">\(</span><span class="sh">ERR</span><span class="se">\|</span><span class="sh">WRONGPASS</span><span class="se">\|</span><span class="sh">(error)</span><span class="se">\|</span><span class="sh">NOAUTH</span><span class="se">\|</span><span class="sh">NOPERM</span><span class="se">\)</span><span class="sh">'
CmdTest </span><span class="k">${</span><span class="nv">DBPORT</span><span class="k">}</span><span class="sh"> </span><span class="k">${</span><span class="nv">DBUSER</span><span class="k">}</span><span class="sh"> </span><span class="k">${</span><span class="nv">DBPASS</span><span class="k">}</span><span class="sh"> "LIST Read               " "LLEN order:key:sub" '</span><span class="se">\(</span><span class="sh">ERR</span><span class="se">\|</span><span class="sh">WRONGPASS</span><span class="se">\|</span><span class="sh">(error)</span><span class="se">\|</span><span class="sh">NOAUTH</span><span class="se">\|</span><span class="sh">NOPERM</span><span class="se">\)</span><span class="sh">'
CmdTest </span><span class="k">${</span><span class="nv">DBPORT</span><span class="k">}</span><span class="sh"> </span><span class="k">${</span><span class="nv">DBUSER</span><span class="k">}</span><span class="sh"> </span><span class="k">${</span><span class="nv">DBPASS</span><span class="k">}</span><span class="sh"> "LIST Read+Write         " "LPOP order:key:sub" '</span><span class="se">\(</span><span class="sh">ERR</span><span class="se">\|</span><span class="sh">WRONGPASS</span><span class="se">\|</span><span class="sh">(error)</span><span class="se">\|</span><span class="sh">NOAUTH</span><span class="se">\|</span><span class="sh">NOPERM</span><span class="se">\)</span><span class="sh">'
CmdTest </span><span class="k">${</span><span class="nv">DBPORT</span><span class="k">}</span><span class="sh"> </span><span class="k">${</span><span class="nv">DBUSER</span><span class="k">}</span><span class="sh"> </span><span class="k">${</span><span class="nv">DBPASS</span><span class="k">}</span><span class="sh"> "PUBSUB Write            " "PUBLISH channel msg" '</span><span class="se">\(</span><span class="sh">ERR</span><span class="se">\|</span><span class="sh">WRONGPASS</span><span class="se">\|</span><span class="sh">(error)</span><span class="se">\|</span><span class="sh">NOAUTH</span><span class="se">\|</span><span class="sh">NOPERM</span><span class="se">\)</span><span class="sh">'
CmdTest </span><span class="k">${</span><span class="nv">DBPORT</span><span class="k">}</span><span class="sh"> </span><span class="k">${</span><span class="nv">DBUSER</span><span class="k">}</span><span class="sh"> </span><span class="k">${</span><span class="nv">DBPASS</span><span class="k">}</span><span class="sh"> "PUBSUB Read             " "SUBSCRIBE channel" '</span><span class="se">\(</span><span class="sh">ERR</span><span class="se">\|</span><span class="sh">WRONGPASS</span><span class="se">\|</span><span class="sh">(error)</span><span class="se">\|</span><span class="sh">NOAUTH</span><span class="se">\|</span><span class="sh">NOPERM</span><span class="se">\)</span><span class="sh">'
CmdTest </span><span class="k">${</span><span class="nv">DBPORT</span><span class="k">}</span><span class="sh"> </span><span class="k">${</span><span class="nv">DBUSER</span><span class="k">}</span><span class="sh"> </span><span class="k">${</span><span class="nv">DBPASS</span><span class="k">}</span><span class="sh"> "STREAM Write            " 'XADD mystream * item 1' '</span><span class="se">\(</span><span class="sh">ERR</span><span class="se">\|</span><span class="sh">WRONGPASS</span><span class="se">\|</span><span class="sh">(error)</span><span class="se">\|</span><span class="sh">NOAUTH</span><span class="se">\|</span><span class="sh">NOPERM</span><span class="se">\)</span><span class="sh">'
CmdTest </span><span class="k">${</span><span class="nv">DBPORT</span><span class="k">}</span><span class="sh"> </span><span class="k">${</span><span class="nv">DBUSER</span><span class="k">}</span><span class="sh"> </span><span class="k">${</span><span class="nv">DBPASS</span><span class="k">}</span><span class="sh"> "STREAM Read             " "XLEN mystream" '</span><span class="se">\(</span><span class="sh">ERR</span><span class="se">\|</span><span class="sh">WRONGPASS</span><span class="se">\|</span><span class="sh">(error)</span><span class="se">\|</span><span class="sh">NOAUTH</span><span class="se">\|</span><span class="sh">NOPERM</span><span class="se">\)</span><span class="sh">'
CmdTest </span><span class="k">${</span><span class="nv">DBPORT</span><span class="k">}</span><span class="sh"> </span><span class="k">${</span><span class="nv">DBUSER</span><span class="k">}</span><span class="sh"> </span><span class="k">${</span><span class="nv">DBPASS</span><span class="k">}</span><span class="sh"> "Generic commands        " "INFO KEYSPACE" '</span><span class="se">\(</span><span class="sh">ERR</span><span class="se">\|</span><span class="sh">WRONGPASS</span><span class="se">\|</span><span class="sh">(error)</span><span class="se">\|</span><span class="sh">NOAUTH</span><span class="se">\|</span><span class="sh">NOPERM</span><span class="se">\)</span><span class="sh">'
CmdTest </span><span class="k">${</span><span class="nv">DBPORT</span><span class="k">}</span><span class="sh"> </span><span class="k">${</span><span class="nv">DBUSER</span><span class="k">}</span><span class="sh"> </span><span class="k">${</span><span class="nv">DBPASS</span><span class="k">}</span><span class="sh"> "DANGEROUS ADMIN commands" "FLUSHALL" '</span><span class="se">\(</span><span class="sh">ERR</span><span class="se">\|</span><span class="sh">WRONGPASS</span><span class="se">\|</span><span class="sh">(error)</span><span class="se">\|</span><span class="sh">NOAUTH</span><span class="se">\|</span><span class="sh">NOPERM</span><span class="se">\)</span><span class="sh">'
}

for account in orders-update orders-invoice products-update products-stocks Angelina Paul Pierre David Denis Didier; do
clear
BatchTest </span><span class="k">${</span><span class="nv">account</span><span class="k">}</span><span class="sh"> </span><span class="k">${</span><span class="nv">account</span><span class="k">}</span><span class="sh"> orders 12000
BatchTest </span><span class="k">${</span><span class="nv">account</span><span class="k">}</span><span class="sh"> </span><span class="k">${</span><span class="nv">account</span><span class="k">}</span><span class="sh"> products 12001
BatchTest </span><span class="k">${</span><span class="nv">account</span><span class="k">}</span><span class="sh"> </span><span class="k">${</span><span class="nv">account</span><span class="k">}</span><span class="sh"> messaging 12002
read
done
</span><span class="no">EOF
</span><span class="nb">chmod</span> +x RBAC-tests.sh
./RBAC-tests.sh
</code></pre></div></div>

<p>Le résultat pour le compte <em>orders-update</em> sur les différentes bases est :
<img src="..//assets/posts/en/BlogVlogApprendreRedisAvecFran%C3%A7ois5minutes10HowtomanageRBACsecuritywithACLandRole/6c237af6bc414f9fae13cea181372a4e.png" alt="66ed1a36882f850e4769c9c66f1e54b8.png" /></p>

<p>puis pour <em>orders-invoice</em> :
<img src="..//assets/posts/en/BlogVlogApprendreRedisAvecFran%C3%A7ois5minutes10HowtomanageRBACsecuritywithACLandRole/66581cbe080044fda397887dc1e5ecd9.png" alt="b16b1b38b04b311c2a79eb3b385181e8.png" /></p>

<p>Et ainsi de suite. On constate que les permissions initialement définies sont
bien implémentées et appliquées aux différents comptes sur les différentes
bases.</p>

<h1 id="maintenance-des-permissions">Maintenance des permissions</h1>
<p>Après la phase de mise en place et d’initialisation des projets, les choses
peuvent changer.</p>

<h2 id="arrivée-dun-développeur">Arrivée d’un développeur</h2>
<p>Un nouveau développeur, Didier, rejoint l’équipe de développement du projet
<em>orders</em>.</p>

<p><img src="..//assets/posts/en/BlogVlogApprendreRedisAvecFran%C3%A7ois5minutes10HowtomanageRBACsecuritywithACLandRole/702e407f3f71433a8ecaf303049c4c0a.png" alt="Slides - 56.png" /></p>

<p>Il n’y a pas besoin de créer son compte dans les bases <em>orders</em> et <em>messaging</em>,
puis de lui accorder des permissions spécifiques… Il suffit de lui attribuer
le rôle <em>Orders-DEV</em> et le cluster Redis Enterprise se chargera du reste.</p>

<div class="language-bash highlighter-rouge"><div class="highlight"><pre class="highlight"><code>UserCreate <span class="s2">"Didier"</span> <span class="s2">"Didier@example.org"</span> <span class="s2">"Didier"</span>
UserSetRole <span class="s2">"Didier"</span> <span class="s2">"Orders-DEV"</span>
</code></pre></div></div>

<h2 id="changement-de-projet">Changement de projet</h2>
<p>Un développeur existant, David, est retiré du projet <em>orders</em> pour se trouver
affecter au projet <em>products</em>.</p>

<p><img src="..//assets/posts/en/BlogVlogApprendreRedisAvecFran%C3%A7ois5minutes10HowtomanageRBACsecuritywithACLandRole/e7d208a5788c450eb16255d53b9b8cab.png" alt="Slides - 57.png" /></p>

<p>Encore une fois, il est inutile de parcourir les différentes bases pour l’en
retirer, puis d’ajouter son compte et les permissions du projet <em>products</em> dans
les bases <em>products</em> et <em>messaging</em>. Il suffit de changer son rattachement pour
lui affecter le rôle <em>Products-DEV</em> :</p>

<div class="language-bash highlighter-rouge"><div class="highlight"><pre class="highlight"><code>UserSetRole <span class="s2">"David"</span> <span class="s2">"Products-DEV"</span>
</code></pre></div></div>

<h2 id="départ-dun-développeur">Départ d’un développeur</h2>
<p>Un développeur, Denis, quitte le projet ou l’entreprise, que ce soit parce qu’il
démissionne ou qu’il était consultant externe ou stagiaire.</p>

<p><img src="..//assets/posts/en/BlogVlogApprendreRedisAvecFran%C3%A7ois5minutes10HowtomanageRBACsecuritywithACLandRole/33de59415b6c47fabb3f57644c4eea0b.png" alt="Slides - 58.png" /></p>

<p>Il suffit de désactiver ou de supprimer son compte, le cluster Redis Enterprise
s’occupera de supprimer son compte, mot de passe et ACL de toutes les bases où
il avait été déclaré grâce à son rôle <em>Products-DEV</em>. Aucun risque d’erreur ou
de permissions fantômes.</p>

<div class="language-bash highlighter-rouge"><div class="highlight"><pre class="highlight"><code>UserDelete <span class="s2">"Denis"</span>
</code></pre></div></div>

<h2 id="modification-dun-projet">Modification d’un projet</h2>
<p>Désormais, les fonctionalités de bus de communication entre les microservices
nécessite l’utilisation des structures de données Streams de Redis. Il faut donc
autoriser l’utilisation des commandes liées aux Streams.</p>

<p><img src="..//assets/posts/en/BlogVlogApprendreRedisAvecFran%C3%A7ois5minutes10HowtomanageRBACsecuritywithACLandRole/3bf90d9456944ecf9bb8c69ff939eabc.png" alt="Slides - 59.png" /></p>

<p>Pour cela, il suffit de mettre à jour les deux ACLs reflétant les permission de
lecture-seule <em>Msg-RO</em> et de lecture-écriture <em>Msg-RW</em> pour l’usage des
messages. Ces ACL sont accordées par les rôles à qui en a besoin, sur la base
<em>messaging</em>.</p>

<div class="language-bash highlighter-rouge"><div class="highlight"><pre class="highlight"><code>ACLUpdate <span class="s2">"MsgRW"</span>   <span class="s1">'-@all +publish +subscribe +@stream -@dangerous ~*'</span>
ACLUpdate <span class="s2">"MsgRO"</span>   <span class="s1">'-@all +subscribe +@stream -@write -@dangerous ~*'</span>
</code></pre></div></div>

<p>Les comptes ayant des rôles accordant ces ACLs seront automatiquement mis à jour
dans la base <em>messaging</em>, sans en oublier aucun et sans erreur.</p>

<h1 id="conclusion-et-ldap">Conclusion et LDAP</h1>

<p>Désormais, les applications, les développeurs, les chefs de projet et les
administrateurs sont authentifié par un identifiant et un mot de passe personnel
dans les bases auxquelles ils doivent avoir accès. Par ailleurs, il ne disposent
que des permissions nécessaires selon leur rôle dans ces bases et dans le
cluster. Mon prochain article traitera de l’association automatique entre LDAP
et les rôles. En effet, même si les rôles facilitent et industrialisent la
gestion des permissions pour éviter les oublis et les erreurs, ils dupliquent
des informations se trouvant déjà dans l’annuaire LDAP de l’entreprise. Autant
en bénéficier et refléter les informations du LDAP dans les rôles,
automatiquement et en temps réel.</p>

<h1 id="supports-et-liens">Supports et liens</h1>

<table>
  <thead>
    <tr>
      <th>Liens</th>
      <th>Description</th>
    </tr>
  </thead>
  <tbody>
    <tr>
      <td><a href="https://youtu.be/hFKZHZrpusM" title="Vidéo d'explication et de démonstration">Video</a></td>
      <td>Vidéo d’explication et de démonstration</td>
    </tr>
  </tbody>
</table>

<h1 id="notes-de-bas-de-page">Notes de bas de page</h1>]]></content><author><name>François Cerbelle</name></author><category term="Redis en 5 minutes" /><category term="Redis" /><category term="Authentification" /><category term="Autorisations" /><category term="Permissions" /><category term="Rôles" /><category term="ACL" /><category term="RBAC" /><category term="Contrôle d&apos;accès" /><category term="Accès" /><category term="Sécurité" /><category term="Administration" /><category term="Groupes de sécurité" /><category term="REST" /><category term="API REST" /><summary type="html"><![CDATA[Les ACL Redis peuvent authentifier un compte et accorder des permissions sur les données et les commandes dans une base Redis. Comment utiliser le contrôle d’accès basé sur les roles (RBAC) pour gérer des groupes avec des permissions similaires sur différentes bases. Démo incluse.]]></summary></entry><entry xml:lang="en"><title type="html">Redis 09 - How to manage security, data-access and permissions with Redis ACL</title><link href="https://fcerbell.github.io//Howtomanagesecuritydataaccessandpermi-en/" rel="alternate" type="text/html" title="Redis 09 - How to manage security, data-access and permissions with Redis ACL" /><published>2022-05-13T14:59:00+00:00</published><updated>2022-05-13T14:59:00+00:00</updated><id>https://fcerbell.github.io//Howtomanagesecuritydataaccessandpermi-en</id><content type="html" xml:base="https://fcerbell.github.io//Howtomanagesecuritydataaccessandpermi-en/"><![CDATA[<p>How to secure Redis with accounts and passwords for authentication and with access control lists for commands and data permissions. Introduction, explanation and demonstration of what are ACLs in Redis.</p>

<p>You can find links to the related video recordings and printable materials at
the <a href="#materials-and-links">end of this post</a>.</p>

<ul id="markdown-toc">
  <li><a href="#video" id="markdown-toc-video">Video</a></li>
  <li><a href="#introduction" id="markdown-toc-introduction">Introduction</a></li>
  <li><a href="#the-security-problem" id="markdown-toc-the-security-problem">The security problem</a></li>
  <li><a href="#limits-of-the-existing-solution" id="markdown-toc-limits-of-the-existing-solution">Limits of the existing solution</a></li>
  <li><a href="#implemented-solution-and-results" id="markdown-toc-implemented-solution-and-results">Implemented solution and results</a>    <ul>
      <li><a href="#what-is-a-redis-acl" id="markdown-toc-what-is-a-redis-acl">What is a Redis ACL</a></li>
      <li><a href="#account-initialization" id="markdown-toc-account-initialization">Account initialization</a></li>
      <li><a href="#disabling-an-account" id="markdown-toc-disabling-an-account">Disabling an account</a></li>
      <li><a href="#multiple-passwords-per-account" id="markdown-toc-multiple-passwords-per-account">Multiple passwords per account</a></li>
      <li><a href="#command-categories" id="markdown-toc-command-categories">Command categories</a></li>
      <li><a href="#data-access-restrictions" id="markdown-toc-data-access-restrictions">Data-access restrictions</a></li>
      <li><a href="#specific-command-restrictions" id="markdown-toc-specific-command-restrictions">Specific command restrictions</a></li>
      <li><a href="#importance-of-rules-ordering" id="markdown-toc-importance-of-rules-ordering">Importance of rules ordering</a></li>
    </ul>
  </li>
  <li><a href="#what-about-our-example" id="markdown-toc-what-about-our-example">What about our example</a>    <ul>
      <li><a href="#create-accounts" id="markdown-toc-create-accounts">Create accounts</a></li>
      <li><a href="#disable-or-limit-the-default-account" id="markdown-toc-disable-or-limit-the-default-account">Disable or limit the default account</a></li>
      <li><a href="#tests" id="markdown-toc-tests">Tests</a>        <ul>
          <li><a href="#anonymous-account" id="markdown-toc-anonymous-account">Anonymous account</a></li>
          <li><a href="#order-update-microservice" id="markdown-toc-order-update-microservice">order-update microservice</a></li>
          <li><a href="#order-invoice-microservice" id="markdown-toc-order-invoice-microservice">order-invoice microservice</a></li>
          <li><a href="#david-developer" id="markdown-toc-david-developer">David developer</a></li>
          <li><a href="#paul-project-manager" id="markdown-toc-paul-project-manager">Paul Project manager</a></li>
          <li><a href="#angelina-adminstrator" id="markdown-toc-angelina-adminstrator">Angelina adminstrator</a></li>
        </ul>
      </li>
      <li><a href="#security-management-at-scale" id="markdown-toc-security-management-at-scale">Security management at scale</a></li>
    </ul>
  </li>
  <li><a href="#materials-and-links" id="markdown-toc-materials-and-links">Materials and Links</a></li>
</ul>

<h1 id="video">Video</h1>

<center><iframe width="420" height="315" src="https://www.youtube.com/embed/DxhRIlrj660" frameborder="0" allowfullscreen=""></iframe></center>

<h1 id="introduction">Introduction</h1>
<p>Do you know that Redis can be secured with accounts and passwords for
authentication and with access control lists for commands and data permissions ?
You will learn how do ACL work, how to implement it.</p>

<h1 id="the-security-problem">The security problem</h1>
<p>Until version 6, Redis only had a single anonymous default user, potentially
with a single password, to grant full privileges. This security weakness is not
a real concern for developers who love Redis for its flexibility, performances
and other data manipulation and storage capabilities. They use it everywhere in
nearly every company. This is a problem for ops and for the company’s security
team, but they got used to it. They, you, might not know that Redis has named
accounts with personal passwords for a real authentication and access control
lists (ACL) for authorization and permission management. Redis can be secured,
let’s see how it works and how to implement it with a sample project.</p>

<h1 id="limits-of-the-existing-solution">Limits of the existing solution</h1>
<p>We have a single database to store orders and two microservices, one to update
an order, another one to generate the invoice. This is a project, so we have one
developer for each microservice, David and Denis, a project manager, Paul, and
an administrator, Angelina. The microservices and the people are all using the
same anonymous account, with the same single shared password. This password
grants them  full access to the whole dataset and to every Redis command.
Everyone with this potential password can execute any command, with read-write
permissions on the whole dataset. When a microservice needs read-write access to
update a database and another one only needs read-only access, if the second one
has a bug, is corrupted or compromised, it can corrupt the data of the first one
or even delete the data. If a contractor or an intern work on the project, they
have full access and the global simple shared password will probably not be
changed when they leave, the microservices configuration would have to be
changed, too. It makes it also impossible to track and audit who made what.
Let’s see how Redis 6 and later can address this data-access security concern.</p>

<p><img src="..//assets/posts/en/Howtomanagesecuritydataaccessandpermi/57eff1ee469c4c33b1672d5bfa0220e9.png" alt="Capture d’écran_2022-05-11_16-59-12.png" /></p>

<h1 id="implemented-solution-and-results">Implemented solution and results</h1>
<p>First, I assume that all connections to the Redis database are encrypted with
TLS, otherwise, the passwords can be intercepted.</p>

<h2 id="what-is-a-redis-acl">What is a Redis ACL</h2>
<p>An ACL, for access control list, is an ordered list of rules or ACE, for access
control entries. Each rule can grant or revoke permissions on Redis commands,
Redis key patterns or Redis channels to a named account, potentially protected
by a password. Let’s see how to define ACLs.</p>
<div class="language-plaintext highlighter-rouge"><div class="highlight"><pre class="highlight"><code>acl setuser &lt;account&gt; [rulelist]
</code></pre></div></div>

<p><img src="..//assets/posts/en/Howtomanagesecuritydataaccessandpermi/663e944fc6b0482ca4000a55e5242b31.png" alt="Capture d’écran_2022-05-11_16-59-29.png" /></p>

<p><img src="..//assets/posts/en/Howtomanagesecuritydataaccessandpermi/682363d73c9b4f018161ed40284a812d.png" alt="Capture d’écran_2022-05-11_16-59-47.png" /></p>

<h2 id="account-initialization">Account initialization</h2>
<p>An account can be reinitialized with the <code class="language-plaintext highlighter-rouge">reset</code> rule to its initial state :
with password enforced but not defined, without limiting rules, no command is
allowed, no key is available, and disabled.</p>

<div class="language-bash highlighter-rouge"><div class="highlight"><pre class="highlight"><code><span class="c"># Init the account and allow passwordless authentication</span>
redis-cli acl setuser francois reset nopass
<span class="c"># The account is disabled</span>
redis-cli <span class="nt">--user</span> francois <span class="nt">--pass</span> <span class="s1">'anything'</span> quit
</code></pre></div></div>

<h2 id="disabling-an-account">Disabling an account</h2>
<p>An account can be temporarily disabled with the <code class="language-plaintext highlighter-rouge">off</code> rule or enabled with the
<code class="language-plaintext highlighter-rouge">on</code> rule.</p>

<div class="language-bash highlighter-rouge"><div class="highlight"><pre class="highlight"><code><span class="c"># Enable the account</span>
redis-cli acl setuser francois on
<span class="c"># The connection succeed</span>
redis-cli <span class="nt">--user</span> francois <span class="nt">--pass</span> <span class="s1">'anything'</span> quit
<span class="c"># Disable the account</span>
redis-cli acl setuser francois off
<span class="c"># No more connection possible</span>
redis-cli <span class="nt">--user</span> francois <span class="nt">--pass</span> <span class="s1">'anything'</span> quit
<span class="c"># Renable the account</span>
redis-cli acl setuser francois on
</code></pre></div></div>

<h2 id="multiple-passwords-per-account">Multiple passwords per account</h2>
<p>The ACL can set one or several passwords to authenticate an account, with the
<code class="language-plaintext highlighter-rouge">&gt;</code> sign for a cleartext password or with the <code class="language-plaintext highlighter-rouge">#</code> sign for a hashed password. It
can also invalidate one of the previously assigned password respectively with
the <code class="language-plaintext highlighter-rouge">&lt;</code> or <code class="language-plaintext highlighter-rouge">!</code> sign. All passwords can be invalidated at once with the <code class="language-plaintext highlighter-rouge">nopass</code>
rule, also allowing passwordless connections.</p>

<div class="language-bash highlighter-rouge"><div class="highlight"><pre class="highlight"><code><span class="c"># Add a password to the account</span>
redis-cli acl setuser francois <span class="s1">'&gt;mypassword'</span>
<span class="c"># No more passwordless connection possible</span>
redis-cli <span class="nt">--user</span> francois <span class="nt">--pass</span> <span class="s1">'anything'</span> quit
redis-cli <span class="nt">--user</span> francois <span class="nt">--pass</span> mypassword quit
<span class="c"># Add a second password to the account</span>
redis-cli acl setuser francois <span class="s1">'&gt;mysecondpassword'</span>
<span class="c"># The first password still works</span>
redis-cli <span class="nt">--user</span> francois <span class="nt">--pass</span> mypassword quit
<span class="c"># The second password also works</span>
redis-cli <span class="nt">--user</span> francois <span class="nt">--pass</span> mysecondpassword quit
<span class="c"># Remove the first password</span>
redis-cli acl setuser francois <span class="s1">'&lt;mypassword'</span>
<span class="c"># The first password does not work anymore</span>
redis-cli <span class="nt">--user</span> francois <span class="nt">--pass</span> mypassword quit
<span class="c"># The second password still works</span>
redis-cli <span class="nt">--user</span> francois <span class="nt">--pass</span> mysecondpassword quit
</code></pre></div></div>

<h2 id="command-categories">Command categories</h2>
<p>Rules can grant or revoke execution privileges on common command-categories,
respectively with the <code class="language-plaintext highlighter-rouge">+</code> or <code class="language-plaintext highlighter-rouge">-</code> sign, followed by the <code class="language-plaintext highlighter-rouge">@</code> sign and the
category.</p>

<p><code class="language-plaintext highlighter-rouge">nocommands</code> and <code class="language-plaintext highlighter-rouge">allcommands</code> are special keywords for <code class="language-plaintext highlighter-rouge">-@all</code> and <code class="language-plaintext highlighter-rouge">+@all</code></p>

<p><img src="..//assets/posts/en/Howtomanagesecuritydataaccessandpermi/d41f9e12a4cb44c6b6bed51956714bcf.png" alt="Capture d’écran_2022-05-11_16-59-41.png" /></p>

<div class="language-bash highlighter-rouge"><div class="highlight"><pre class="highlight"><code><span class="c"># Reset the account with all keys access</span>
redis-cli acl setuser francois reset on <span class="s1">'&gt;mypassword'</span> ~<span class="k">*</span>
<span class="c"># String commands are disabled</span>
redis-cli <span class="nt">--user</span> francois <span class="nt">--pass</span> mypassword <span class="nb">set </span>strkey value1
<span class="c"># Limit the account to string related commands only</span>
redis-cli acl setuser francois reset on <span class="s1">'&gt;mypassword'</span> +@string ~<span class="k">*</span>
<span class="c"># String keys write and read are allowed</span>
redis-cli <span class="nt">--user</span> francois <span class="nt">--pass</span> mypassword <span class="nb">set </span>strkey value1
redis-cli <span class="nt">--user</span> francois <span class="nt">--pass</span> mypassword get strkey
<span class="c"># But not the other datatypes commands</span>
redis-cli <span class="nt">--user</span> francois <span class="nt">--pass</span> mypassword sadd setkey value
<span class="c"># And not the general commands</span>
redis-cli <span class="nt">--user</span> francois <span class="nt">--pass</span> mypassword info
<span class="c"># Grant a read-only access to string values only</span>
redis-cli acl setuser francois reset on <span class="s1">'&gt;mypassword'</span> +@string -@write ~<span class="k">*</span>
<span class="c"># The account can not write</span>
redis-cli <span class="nt">--user</span> francois <span class="nt">--pass</span> mypassword <span class="nb">set </span>strkey value1
<span class="c"># But the account can read</span>
redis-cli <span class="nt">--user</span> francois <span class="nt">--pass</span> mypassword get strkey
</code></pre></div></div>

<h2 id="data-access-restrictions">Data-access restrictions</h2>
<p>Rules can limit the available keyspace to glob patterns prefixed with the <code class="language-plaintext highlighter-rouge">~</code>
sign.</p>

<div class="language-bash highlighter-rouge"><div class="highlight"><pre class="highlight"><code><span class="c"># Access to all keys</span>
redis-cli acl setuser francois reset on <span class="s1">'&gt;mypassword'</span> +@all ~<span class="k">*</span>
redis-cli <span class="nt">--user</span> francois <span class="nt">--pass</span> mypassword <span class="nb">set </span>mykey value1
redis-cli <span class="nt">--user</span> francois <span class="nt">--pass</span> mypassword <span class="nb">set </span>yourkey valuer2
redis-cli <span class="nt">--user</span> francois <span class="nt">--pass</span> mypassword <span class="nb">set </span>hiskey valuer3
<span class="c"># Access to my keys and your keys only</span>
redis-cli acl setuser francois reset on <span class="s1">'&gt;mypassword'</span> +@all ~my<span class="k">*</span> ~your<span class="k">*</span>
redis-cli <span class="nt">--user</span> francois <span class="nt">--pass</span> mypassword <span class="nb">set </span>mykey value1
redis-cli <span class="nt">--user</span> francois <span class="nt">--pass</span> mypassword <span class="nb">set </span>yourkey valuer2
redis-cli <span class="nt">--user</span> francois <span class="nt">--pass</span> mypassword <span class="nb">set </span>hiskey valuer3
</code></pre></div></div>

<h2 id="specific-command-restrictions">Specific command restrictions</h2>
<p>A rule can also grant or revoke execution privileges on specific commands with
the <code class="language-plaintext highlighter-rouge">+</code> or <code class="language-plaintext highlighter-rouge">-</code> sign, respectively, and the command itself.</p>

<div class="language-bash highlighter-rouge"><div class="highlight"><pre class="highlight"><code><span class="c"># Grant read-only access to string values, and to expiry information</span>
redis-cli acl setuser francois reset on <span class="s1">'&gt;mypassword'</span> -@all +get <span class="nt">-set</span> +ttl <span class="nt">-expire</span> <span class="nt">-del</span> +exists ~<span class="k">*</span>
<span class="c"># The account can not write</span>
redis-cli <span class="nt">--user</span> francois <span class="nt">--pass</span> mypassword <span class="nb">set </span>strkey value1
<span class="c"># The account can not change the key's TTL</span>
redis-cli <span class="nt">--user</span> francois <span class="nt">--pass</span> mypassword expire strkey 60
<span class="c"># But it can read the value</span>
redis-cli <span class="nt">--user</span> francois <span class="nt">--pass</span> mypassword get strkey
<span class="c"># And get the remaining TTL</span>
redis-cli <span class="nt">--user</span> francois <span class="nt">--pass</span> mypassword ttl strkey
</code></pre></div></div>

<h2 id="importance-of-rules-ordering">Importance of rules ordering</h2>
<p>The rule order is important, rules are evaluated from left to right. A rule list
can grant execution on hash commands only, but revoke execution on all the write
commands.</p>

<div class="language-bash highlighter-rouge"><div class="highlight"><pre class="highlight"><code><span class="c"># Grant read-only access to hash keys</span>
redis-cli acl setuser francois reset on <span class="s1">'&gt;mypassword'</span> -@all +@hash -@write ~<span class="k">*</span>
<span class="c"># A write attempt fails</span>
redis-cli <span class="nt">--user</span> francois <span class="nt">--pass</span> mypassword hset hashkey field1 value1 field2 value2
<span class="c"># Revoke write commands, but grant them afterwards</span>
redis-cli acl setuser francois reset on <span class="s1">'&gt;mypassword'</span> -@all -@write +@hash ~<span class="k">*</span>
<span class="c"># The revocation is useless and writes are possible !</span>
redis-cli <span class="nt">--user</span> francois <span class="nt">--pass</span> mypassword hset hashkey field1 value1 field2 value2
</code></pre></div></div>

<h1 id="what-about-our-example">What about our example</h1>

<h2 id="create-accounts">Create accounts</h2>
<p>We need to create six password protected accounts with different permissions</p>

<ul>
  <li>orders-update : read-write access on hashes and lists starting with <em>order:</em>’’</li>
  <li>orders-invoice : same, but read-only</li>
  <li>david : same as orders-invoice</li>
  <li>denis : same as orders-invoice</li>
  <li>paul : same as orders-update, to manually fix data</li>
  <li>angelina : admin access to potentially flush the database, but access to the
data</li>
</ul>

<p><img src="..//assets/posts/en/Howtomanagesecuritydataaccessandpermi/0f8f8094c5804dfc999377e3da6fe002.png" alt="11.png" /></p>

<p>So, our <em>orders</em> Redis database can revoke permissions on all commands, but
grant permissions on all of the hash and list manipulation commands, excluding
the dangerous commands, on keys begining with <code class="language-plaintext highlighter-rouge">order:*</code>to a named account
<em>order-update</em>, identified by a secret password. The first microservice can
connect with his own credentials, is limited to the needed commands on the
needed keys.</p>

<div class="language-bash highlighter-rouge"><div class="highlight"><pre class="highlight"><code>redis-cli acl setuser order-update reset on <span class="s1">'&gt;order-update'</span> -@all +@hash +@list -@dangerous ~order:<span class="k">*</span>
</code></pre></div></div>

<p>The <em>order-invoice</em> microservice needs the exact same permissions, without any
write command, the ACL would be :</p>

<div class="language-bash highlighter-rouge"><div class="highlight"><pre class="highlight"><code>redis-cli acl setuser order-invoice reset on <span class="s1">'&gt;order-invoice'</span> -@all +@hash +@list -@dangerous -@write ~order:<span class="k">*</span>
</code></pre></div></div>
<p>Now, David and Denis need to have the same read-only permissions</p>

<div class="language-bash highlighter-rouge"><div class="highlight"><pre class="highlight"><code>redis-cli acl setuser david reset on <span class="s1">'&gt;david'</span> -@all +@hash +@list -@dangerous -@write ~order:<span class="k">*</span>
redis-cli acl setuser denis reset on <span class="s1">'&gt;denis'</span> -@all +@hash +@list -@dangerous -@write ~order:<span class="k">*</span>
</code></pre></div></div>
<p>Paul, as a project manager, needs to be able to change values</p>

<div class="language-bash highlighter-rouge"><div class="highlight"><pre class="highlight"><code>redis-cli acl setuser paul reset on <span class="s1">'&gt;paul'</span> -@all +@hash +@list -@dangerous ~order:<span class="k">*</span>
</code></pre></div></div>
<p>Finally, Angelina needs full admin access, to potentially flush the database</p>

<div class="language-bash highlighter-rouge"><div class="highlight"><pre class="highlight"><code>redis-cli acl setuser angelina reset on <span class="s1">'&gt;angelina'</span> +@admin +@dangerous
</code></pre></div></div>

<p><img src="..//assets/posts/en/Howtomanagesecuritydataaccessandpermi/911065dd753643a6816304bf4faffe0c.png" alt="Capture d’écran_2022-05-11_17-08-37.png" /></p>

<h2 id="disable-or-limit-the-default-account">Disable or limit the default account</h2>
<p>The default anonymous account is a fallback to grant permissions when no
authentication occured or succeed. This account has to be limited. The second
execution should fail.</p>

<div class="language-bash highlighter-rouge"><div class="highlight"><pre class="highlight"><code>redis-cli acl setuser default reset +info
redis-cli acl setuser default reset +info
</code></pre></div></div>
<p>It can also be completely disabled. It is still enabled, but can only execute
the <code class="language-plaintext highlighter-rouge">AUTH</code> command to authenticate as another account. The second execution
should fail.</p>

<div class="language-bash highlighter-rouge"><div class="highlight"><pre class="highlight"><code>redis-cli acl setuser default off
redis-cli acl setuser default off
</code></pre></div></div>

<p>From that point, the only admin still available to change the permissions is… <em>Angélina</em></p>

<h2 id="tests">Tests</h2>
<p>The easiest way to test is to execute the following set of commands with each
account. We first test that the account can read and write string keys, then
hash keys, then list keys. Finally, we check that the info command can be
executed and how many keys are in the database before trying to flush the whole
database and check if it worked.</p>

<div class="language-bash highlighter-rouge"><div class="highlight"><pre class="highlight"><code>redis-cli <span class="nt">--user</span> angelina <span class="nt">--pass</span> angelina <span class="o">&lt;&lt;</span> <span class="no">EOF</span><span class="sh">
set key value
get key
hset order:key field1name field1value field2name field2value
hgetall order:key
lpush order:key:sub value1
lpush order:key:sub value2
llen order:key:sub
lpop order:key:sub
info keyspace
flushall
info keyspace
</span><span class="no">EOF
</span></code></pre></div></div>
<h3 id="anonymous-account">Anonymous account</h3>
<p>This account should not be able to execute any of these commands, with one
exception, the INFO command, if you chose to leave it to this user.</p>

<h3 id="order-update-microservice">order-update microservice</h3>
<p>This account should not be able to read and write the string keys, because he is
not allowed to execute string commands and because the key does not match the
allowed pattern. He should be able to read and write the hash and list keys, he
is allowed to use these commands and to access the keys. But it should not be
allowed to flush the database.</p>

<h3 id="order-invoice-microservice">order-invoice microservice</h3>
<p>This account has the same permissions, but not on the write commands, thus the
HSET will fail, as expected. But the LPOP also because this command not only
read a value, but also remove it from the list, this is a read-write combined
command.</p>

<h3 id="david-developer">David developer</h3>
<p>David and Denis have the exact same permissions as <code class="language-plaintext highlighter-rouge">order-invoice</code>.</p>

<h3 id="paul-project-manager">Paul Project manager</h3>
<p>Paul has the exact same permissions as <code class="language-plaintext highlighter-rouge">order-update</code> and should be able to
write the allowed hasn and list keys.</p>

<h3 id="angelina-adminstrator">Angelina adminstrator</h3>
<p>Angélina is not allowed to read or write any key, SET, GET, HSET, HGET, LPUSH
and LPOP commands will fail, but she can execute the INFO command to get the
number of keys on the database and to FLUSHALL the data.</p>

<h2 id="security-management-at-scale">Security management at scale</h2>
<p>Applications, developers, project managers and admins are uniquely identified
with their own credentials and have specific permissions on the database and on
the data. But what happens when microservices are added with their own
databases, with developers moving from a project to another, with new hired
people, leaving people, with another Redis database used as a message bus to
communicate with PubSub between all microservices… It is a pain to maintain
and Redis can also manage such situations with a role based access control
explained in my next content.</p>

<p><img src="..//assets/posts/en/Howtomanagesecuritydataaccessandpermi/83deb6b770204890a5a980121e3a3dfe.png" alt="25.png" /></p>

<h1 id="materials-and-links">Materials and Links</h1>

<table>
  <thead>
    <tr>
      <th>Link</th>
      <th>Description</th>
    </tr>
  </thead>
  <tbody>
    <tr>
      <td><a href="https://youtu.be/DxhRIlrj660" title="Demonstration video recording">Video</a></td>
      <td>Demonstration screencast recording</td>
    </tr>
  </tbody>
</table>]]></content><author><name>François Cerbelle</name></author><category term="Redis in 5 minutes" /><category term="Redis" /><category term="Database" /><category term="Data-access" /><category term="Access control" /><category term="Authentication" /><category term="Authorizations" /><category term="Permissions" /><category term="ACL" /><category term="Access Control Lists" /><category term="Security" /><category term="Administration" /><summary type="html"><![CDATA[How to secure Redis with accounts and passwords for authentication and with access control lists for commands and data permissions. Introduction, explanation and demonstration of what are ACLs in Redis.]]></summary></entry><entry xml:lang="fr"><title type="html">Redis 09 - Comment gérer sécurité, accès aux données et permissions avec les ACL de Redis</title><link href="https://fcerbell.github.io//CommentGererSecuriteAccesAuxDonneesEtPermissionsAvecLesACLRedis-fr/" rel="alternate" type="text/html" title="Redis 09 - Comment gérer sécurité, accès aux données et permissions avec les ACL de Redis" /><published>2022-05-13T14:58:06+00:00</published><updated>2022-05-13T14:58:06+00:00</updated><id>https://fcerbell.github.io//CommentGererSecuriteAccesAuxDonneesEtPermissionsAvecLesACLRedis-fr</id><content type="html" xml:base="https://fcerbell.github.io//CommentGererSecuriteAccesAuxDonneesEtPermissionsAvecLesACLRedis-fr/"><![CDATA[<p>Comment sécuriser Redis avec des identifiants et mots de passe pour l’authentification et avec des ACL pour l’accès aux commandes et aux données. Introduction, explication et démo des ACL de Redis.</p>

<p>Vous pouvez trouver des liens vers les enregistrements vidéo et les supports
imprimables associés à la <a href="#supports-et-liens">fin de cet article</a>.</p>

<ul id="markdown-toc">
  <li><a href="#vidéo" id="markdown-toc-vidéo">Vidéo</a></li>
  <li><a href="#introduction" id="markdown-toc-introduction">Introduction</a></li>
  <li><a href="#un-problème-de-sécurité" id="markdown-toc-un-problème-de-sécurité">Un problème de sécurité</a></li>
  <li><a href="#limites-de-la-solution-existante" id="markdown-toc-limites-de-la-solution-existante">Limites de la solution existante</a></li>
  <li><a href="#solution-implémentée-et-résultats" id="markdown-toc-solution-implémentée-et-résultats">Solution implémentée et résultats</a>    <ul>
      <li><a href="#quest-ce-quune-acl-redis" id="markdown-toc-quest-ce-quune-acl-redis">Qu’est-ce qu’une ACL Redis</a></li>
      <li><a href="#initialiser-un-compte" id="markdown-toc-initialiser-un-compte">Initialiser un compte</a></li>
      <li><a href="#désactiver-un-compte" id="markdown-toc-désactiver-un-compte">Désactiver un compte</a></li>
      <li><a href="#plusieurs-mots-de-passe-par-compte" id="markdown-toc-plusieurs-mots-de-passe-par-compte">Plusieurs mots de passe par compte</a></li>
      <li><a href="#catégories-de-commandes" id="markdown-toc-catégories-de-commandes">Catégories de commandes</a></li>
      <li><a href="#restrictions-daccès-aux-données" id="markdown-toc-restrictions-daccès-aux-données">Restrictions d’accès aux données</a></li>
      <li><a href="#restrictions-sur-les-commandes" id="markdown-toc-restrictions-sur-les-commandes">Restrictions sur les commandes</a></li>
      <li><a href="#importance-de-lordre-des-règles" id="markdown-toc-importance-de-lordre-des-règles">Importance de l’ordre des règles</a></li>
    </ul>
  </li>
  <li><a href="#revenons-à-notre-exemple" id="markdown-toc-revenons-à-notre-exemple">Revenons à notre exemple</a>    <ul>
      <li><a href="#création-des-comptes" id="markdown-toc-création-des-comptes">Création des comptes</a></li>
      <li><a href="#désactivation-du-compte-anonyme-par-défaut" id="markdown-toc-désactivation-du-compte-anonyme-par-défaut">Désactivation du compte anonyme par défaut</a></li>
      <li><a href="#tests-des-privilèges" id="markdown-toc-tests-des-privilèges">Tests des privilèges</a>        <ul>
          <li><a href="#compte-anonyme" id="markdown-toc-compte-anonyme">Compte anonyme</a></li>
          <li><a href="#microservice-order-update" id="markdown-toc-microservice-order-update">Microservice order-update</a></li>
          <li><a href="#microservice-order-invoice" id="markdown-toc-microservice-order-invoice">Microservice order-invoice</a></li>
          <li><a href="#développeur-david" id="markdown-toc-développeur-david">Développeur David</a></li>
          <li><a href="#chef-de-projet-paul" id="markdown-toc-chef-de-projet-paul">Chef de projet Paul</a></li>
          <li><a href="#administrateur-angelina" id="markdown-toc-administrateur-angelina">Administrateur Angelina</a></li>
        </ul>
      </li>
      <li><a href="#gestion-de-la-sécurité-à-léchelle" id="markdown-toc-gestion-de-la-sécurité-à-léchelle">Gestion de la sécurité à l’échelle</a></li>
    </ul>
  </li>
  <li><a href="#supports-et-liens" id="markdown-toc-supports-et-liens">Supports et liens</a></li>
</ul>

<h1 id="vidéo">Vidéo</h1>

<center><iframe width="420" height="315" src="https://www.youtube.com/embed/dyskQGkgdEY" frameborder="0" allowfullscreen=""></iframe></center>

<h1 id="introduction">Introduction</h1>
<p>Savez-vous que Redis peut être sécurisé par des comptes avec mots de passe pour
l’authentification et par des listes de controle d’accès pour les commandes et
l’accès aux données ? Voyons comment fonctionnent les ACL et comment les
utiliser.</p>

<h1 id="un-problème-de-sécurité">Un problème de sécurité</h1>
<p>Jusqu’à la version 6, Redis n’avait qu’un unique utilisateur anonyme par défaut,
éventuellement avec un mot de passe, pour accorder les pleins pouvoirs. Cette
faiblesse de sécurité n’est pas un vrai problème pour les développeurs qui
aiment Redis pour sa flexibilité, ses performances et ses possibilités de
manipulation et de stockage des données. Ils l’utilisent partout, dans presque
toutes les entreprises. C’est un problème pour les ops et les équipes de
sécurité, mais ils s’y sont habitués. Ils, vous, ne savez peut-être pas que
Redis dispose de comptes nominatifs, avec des mots de passe individuels, pour
l’authentification et de listes de contrôles d’accès (ACL), pour la gestion des
autorisations et permissions. Redis peut être sécurisé, voyons comment cela
fonctionne et comment l’implémenter avec un exemple de projet.</p>

<h1 id="limites-de-la-solution-existante">Limites de la solution existante</h1>
<p>Nous disposons d’une unique base pour enregistrer les commandes et de deux
microservices, un pour modifier une commande, l’autre pour générer la facture.
C’est un projet, nous avons donc un développeur par microservice, David et
Denis, un chef de projet, Paul, et un administrateur, Angélina. Les
microservices et les personnes utilisent toutes le même compte anonyme avec son
unique mot de passe. Ce simple mot de passe leur donne un accès complet aux
données et aux commandes Redis. Chacun peut exécuter n’importe quelle commande,
avec le droit d’écriture, sur le jeu de données.</p>

<p>Lorsqu’un microservice a besoin de lire et d’écrire, alors que le second n’a
besoin que de lire, si le second a un bug, est corrompu ou compromis, il peut
corrompre les données du premier. Si un prestataire ou un stagiaire arrive, il
aura un accès complet aux données et l’unique mot de passe partagé ne sera
probablement pas changé à leur départ, il faudrait aussi modifier la
configuration des applications. Aucun audit n’est possible, pour vérifier qui a
fait quoi. Voyons comment Redis 6 permet de gérer ce problème de sécurité.</p>

<p><img src="..//assets/posts/en/Howtomanagesecuritydataaccessandpermi/57eff1ee469c4c33b1672d5bfa0220e9.png" alt="Capture d’écran_2022-05-11_16-59-12.png" /></p>

<h1 id="solution-implémentée-et-résultats">Solution implémentée et résultats</h1>
<p>Je suppose que les connexions à la base Redis sont chiffrées par TLS, sinon, les
mots de passe circulent en clair sur le réseau.</p>

<h2 id="quest-ce-quune-acl-redis">Qu’est-ce qu’une ACL Redis</h2>
<p>Une ACL, pour Access Control List, est une liste ordonée de règles ou ACE, pour
Access Control Entries. Chaque règle accorde ou retire des privilèges à un
compte nommé, sur des commandes Redis, des clés ou des channels. Le compte peut
être protégé par son propre mot de passe. Comment définir des ACL ?</p>

<div class="language-plaintext highlighter-rouge"><div class="highlight"><pre class="highlight"><code>acl setuser &lt;account&gt; [rulelist]
</code></pre></div></div>

<p><img src="..//assets/posts/en/Howtomanagesecuritydataaccessandpermi/663e944fc6b0482ca4000a55e5242b31.png" alt="Capture d’écran_2022-05-11_16-59-29.png" /></p>

<p><img src="..//assets/posts/en/Howtomanagesecuritydataaccessandpermi/682363d73c9b4f018161ed40284a812d.png" alt="Capture d’écran_2022-05-11_16-59-47.png" /></p>

<h2 id="initialiser-un-compte">Initialiser un compte</h2>
<p>Un compte peut être initialisé, par la règle <code class="language-plaintext highlighter-rouge">reset</code>, avec un mot de passe
obligatoire mais non défini, sans règles, et désactivé.</p>

<div class="language-bash highlighter-rouge"><div class="highlight"><pre class="highlight"><code><span class="c"># Initialise le compte sans obligation de mot de passe</span>
redis-cli acl setuser francois reset nopass
<span class="c"># Connexion impossible, le compte est désactivé</span>
redis-cli <span class="nt">--user</span> francois <span class="nt">--pass</span> <span class="s1">'nimportequoi'</span> quit
</code></pre></div></div>

<h2 id="désactiver-un-compte">Désactiver un compte</h2>
<p>Un compte peut être temporairement désactivé avec la règle <code class="language-plaintext highlighter-rouge">off</code> ou activé avec
<code class="language-plaintext highlighter-rouge">on</code>.</p>

<div class="language-bash highlighter-rouge"><div class="highlight"><pre class="highlight"><code><span class="c"># Activation du compte</span>
redis-cli acl setuser francois on
<span class="c"># La connexion est possible</span>
redis-cli <span class="nt">--user</span> francois <span class="nt">--pass</span> <span class="s1">'nimportequoi'</span> quit
<span class="c"># Désactivation</span>
redis-cli acl setuser francois off
<span class="c"># Plus de connexion</span>
redis-cli <span class="nt">--user</span> francois <span class="nt">--pass</span> <span class="s1">'nimportequoi'</span> quit
<span class="c"># Réactivation pour la suite</span>
redis-cli acl setuser francois on
</code></pre></div></div>

<h2 id="plusieurs-mots-de-passe-par-compte">Plusieurs mots de passe par compte</h2>
<p>Les ACL peuvent affecter un ou plusieurs mots de passe pour authentifier un
compte, avec le signe <code class="language-plaintext highlighter-rouge">&gt;</code> pour un mot de passe en clair ou le signe <code class="language-plaintext highlighter-rouge">#</code> pour un
mot de passe chiffré. Elles peuvent aussi invalider un des mots de passe
respectivement avec les signes <code class="language-plaintext highlighter-rouge">&lt;</code> et <code class="language-plaintext highlighter-rouge">!</code>. Tous les mots de passe sont invalidés
par la règle <code class="language-plaintext highlighter-rouge">nopass</code>.</p>

<div class="language-bash highlighter-rouge"><div class="highlight"><pre class="highlight"><code><span class="c"># Ajout d'un mot de passe à un compte</span>
redis-cli acl setuser francois <span class="s1">'&gt;mypassword'</span>
<span class="c"># Plus de connexion possible sans mot de passe</span>
redis-cli <span class="nt">--user</span> francois <span class="nt">--pass</span> <span class="s1">'nimportequoi'</span> quit
redis-cli <span class="nt">--user</span> francois <span class="nt">--pass</span> mypassword quit
<span class="c"># Ajout d'un second mot de passe</span>
redis-cli acl setuser francois <span class="s1">'&gt;mysecondpassword'</span>
<span class="c"># Le premier fonctionne toujours</span>
redis-cli <span class="nt">--user</span> francois <span class="nt">--pass</span> mypassword quit
<span class="c"># Le second fonctionne aussi</span>
redis-cli <span class="nt">--user</span> francois <span class="nt">--pass</span> mysecondpassword quit
<span class="c"># Invalidation du premier</span>
redis-cli acl setuser francois <span class="s1">'&lt;mypassword'</span>
<span class="c"># Il ne fonctionne plus</span>
redis-cli <span class="nt">--user</span> francois <span class="nt">--pass</span> mypassword quit
<span class="c"># Le second fonctionne toujours</span>
redis-cli <span class="nt">--user</span> francois <span class="nt">--pass</span> mysecondpassword quit
</code></pre></div></div>

<h2 id="catégories-de-commandes">Catégories de commandes</h2>
<p>Les règles peuvent accorder ou révoquer des privilèges sur des catégories de
commandes, respectivement avec les signes <code class="language-plaintext highlighter-rouge">+</code> et <code class="language-plaintext highlighter-rouge">-</code> suivis de <code class="language-plaintext highlighter-rouge">@</code> et du nom de
la catégorie.</p>

<p><code class="language-plaintext highlighter-rouge">nocommands</code> et <code class="language-plaintext highlighter-rouge">allcommands</code> sont des synonymes de <code class="language-plaintext highlighter-rouge">-@all</code> et <code class="language-plaintext highlighter-rouge">+@all</code></p>

<p><img src="..//assets/posts/en/Howtomanagesecuritydataaccessandpermi/d41f9e12a4cb44c6b6bed51956714bcf.png" alt="Capture d’écran_2022-05-11_16-59-41.png" /></p>

<div class="language-bash highlighter-rouge"><div class="highlight"><pre class="highlight"><code><span class="c"># Réinitialiser le compte avec accès aux données</span>
redis-cli acl setuser francois reset on <span class="s1">'&gt;mypassword'</span> ~<span class="k">*</span>
<span class="c"># La manipulation des strings est désactivée</span>
redis-cli <span class="nt">--user</span> francois <span class="nt">--pass</span> mypassword <span class="nb">set </span>strkey value1
<span class="c"># Accorde le droit de manipuler les strings</span>
redis-cli acl setuser francois reset on <span class="s1">'&gt;mypassword'</span> +@string ~<span class="k">*</span>
<span class="c"># Commandes de lecture et écriture sur les strings sont autorisées</span>
redis-cli <span class="nt">--user</span> francois <span class="nt">--pass</span> mypassword <span class="nb">set </span>strkey value1
redis-cli <span class="nt">--user</span> francois <span class="nt">--pass</span> mypassword get strkey
<span class="c"># Mais pas les autres</span>
redis-cli <span class="nt">--user</span> francois <span class="nt">--pass</span> mypassword sadd setkey value
<span class="c"># Ni les commandes générales</span>
redis-cli <span class="nt">--user</span> francois <span class="nt">--pass</span> mypassword info
<span class="c"># Interdiction des commandes d'écriture</span>
redis-cli acl setuser francois reset on <span class="s1">'&gt;mypassword'</span> +@string -@write ~<span class="k">*</span>
<span class="c"># Le compte ne peut plus exécuter de commandes d'écriture</span>
redis-cli <span class="nt">--user</span> francois <span class="nt">--pass</span> mypassword <span class="nb">set </span>strkey value1
<span class="c"># Mais peut toujours lire les strings</span>
redis-cli <span class="nt">--user</span> francois <span class="nt">--pass</span> mypassword get strkey
</code></pre></div></div>

<h2 id="restrictions-daccès-aux-données">Restrictions d’accès aux données</h2>
<p>Les règles peuvent limiter les données accessibles par des masques, préfixés par
le signe <code class="language-plaintext highlighter-rouge">~</code>.</p>

<div class="language-bash highlighter-rouge"><div class="highlight"><pre class="highlight"><code><span class="c"># Accorder un accès global</span>
redis-cli acl setuser francois reset on <span class="s1">'&gt;mypassword'</span> +@all ~<span class="k">*</span>
redis-cli <span class="nt">--user</span> francois <span class="nt">--pass</span> mypassword <span class="nb">set </span>mykey value1
redis-cli <span class="nt">--user</span> francois <span class="nt">--pass</span> mypassword <span class="nb">set </span>yourkey valuer2
redis-cli <span class="nt">--user</span> francois <span class="nt">--pass</span> mypassword <span class="nb">set </span>hiskey valuer3
<span class="c"># Limiter l'accès à mes clés et à tes clés</span>
redis-cli acl setuser francois reset on <span class="s1">'&gt;mypassword'</span> +@all ~my<span class="k">*</span> ~your<span class="k">*</span>
redis-cli <span class="nt">--user</span> francois <span class="nt">--pass</span> mypassword <span class="nb">set </span>mykey value1
redis-cli <span class="nt">--user</span> francois <span class="nt">--pass</span> mypassword <span class="nb">set </span>yourkey valuer2
redis-cli <span class="nt">--user</span> francois <span class="nt">--pass</span> mypassword <span class="nb">set </span>hiskey valuer3
</code></pre></div></div>

<h2 id="restrictions-sur-les-commandes">Restrictions sur les commandes</h2>
<p>Une règle peut aussi accorder ou retirer des droits sur des commandes
spécifiques avec les signes <code class="language-plaintext highlighter-rouge">+</code> et <code class="language-plaintext highlighter-rouge">-</code> suivis du nom de la commande.</p>

<div class="language-bash highlighter-rouge"><div class="highlight"><pre class="highlight"><code><span class="c"># Accorde un droit de lecture seule sur les strings et les TTL</span>
redis-cli acl setuser francois reset on <span class="s1">'&gt;mypassword'</span> -@all +get <span class="nt">-set</span> +ttl <span class="nt">-expire</span> <span class="nt">-del</span> +exists ~<span class="k">*</span>
<span class="c"># Le compte ne peut pas écrire</span>
redis-cli <span class="nt">--user</span> francois <span class="nt">--pass</span> mypassword <span class="nb">set </span>strkey value1
<span class="c"># Ni changer les TTL</span>
redis-cli <span class="nt">--user</span> francois <span class="nt">--pass</span> mypassword expire strkey 60
<span class="c"># Mais il peut consulter les valeurs</span>
redis-cli <span class="nt">--user</span> francois <span class="nt">--pass</span> mypassword get strkey
<span class="c"># Et les TTL</span>
redis-cli <span class="nt">--user</span> francois <span class="nt">--pass</span> mypassword ttl strkey
</code></pre></div></div>

<h2 id="importance-de-lordre-des-règles">Importance de l’ordre des règles</h2>
<p>L’ordre des règles est important. Elles sont évaluées de gauche à droite. Par
exemple, une liste peut accorder les droits pour toutes les commandes sur les
hash puis retirer celles qui modifient les données.</p>

<div class="language-bash highlighter-rouge"><div class="highlight"><pre class="highlight"><code><span class="c"># Accès total sur les hash, en retirant les écritures</span>
redis-cli acl setuser francois reset on <span class="s1">'&gt;mypassword'</span> -@all +@hash -@write ~<span class="k">*</span>
<span class="c"># Une écriture échoue</span>
redis-cli <span class="nt">--user</span> francois <span class="nt">--pass</span> mypassword hset hashkey field1 value1 field2 value2
<span class="c"># Interdictions des écriture, puis ajout d'un accès total sur les hash</span>
redis-cli acl setuser francois reset on <span class="s1">'&gt;mypassword'</span> -@all -@write +@hash ~<span class="k">*</span>
<span class="c"># La révocation est inutile</span>
redis-cli <span class="nt">--user</span> francois <span class="nt">--pass</span> mypassword hset hashkey field1 value1 field2 value2
</code></pre></div></div>

<h1 id="revenons-à-notre-exemple">Revenons à notre exemple</h1>

<h2 id="création-des-comptes">Création des comptes</h2>
<p>Nous avons besoin de six comptes protégés par mot de passe avec différentes permissions.</p>

<ul>
  <li>orders-update : droit complet de manipuler les hash et list, limité aux clés
commençant par <em>order</em></li>
  <li>orders-invoice : accès identique, mais en lecture seule</li>
  <li>david : comme pour le microservice orders-invoice</li>
  <li>denis : comme pour david</li>
  <li>paul : identique au microservice <em>orders-update</em> pour pouvoir corriger les
données</li>
  <li>angelina : accès aux commandes d’administration, mais pas de manipulation des
donées, ni aux clés</li>
</ul>

<p>Notre base “orders” peut révoquer les permissions sur toutes les commandes, puis
accorder les permissions sur les commandes manipulant les hash et les lists,
exclure les commandes dangereuses à un utilisateur “order-update” identifié par
un mot de passe. Et ce, sur toutes les clés commençant par “order:”. Ce
microservice pourra se connecter avec son propre identifiant et sera limité aux
commandes et clé dont il a besoin.</p>

<div class="language-bash highlighter-rouge"><div class="highlight"><pre class="highlight"><code>redis-cli acl setuser order-update reset on <span class="s1">'&gt;order-update'</span> -@all +@hash +@list -@dangerous ~order:<span class="k">*</span>
</code></pre></div></div>

<p>Le microservice “order-invoice” a besoin des mêmes permissions, auxquelles on
retire l’accès aux commandes d’écriture.</p>

<div class="language-bash highlighter-rouge"><div class="highlight"><pre class="highlight"><code>redis-cli acl setuser order-invoice reset on <span class="s1">'&gt;order-invoice'</span> -@all +@hash +@list -@dangerous -@write ~order:<span class="k">*</span>
</code></pre></div></div>

<p>David et Denis ont besoin des mêmes permissions en lecture seule.</p>

<div class="language-bash highlighter-rouge"><div class="highlight"><pre class="highlight"><code>redis-cli acl setuser david reset on <span class="s1">'&gt;david'</span> -@all +@hash +@list -@dangerous -@write ~order:<span class="k">*</span>
redis-cli acl setuser denis reset on <span class="s1">'&gt;denis'</span> -@all +@hash +@list -@dangerous -@write ~order:<span class="k">*</span>
</code></pre></div></div>

<p>Paul, comme chef de projet, doit pouvoir modifier les valeurs.</p>

<div class="language-bash highlighter-rouge"><div class="highlight"><pre class="highlight"><code>redis-cli acl setuser paul reset on <span class="s1">'&gt;paul'</span> -@all +@hash +@list -@dangerous ~order:<span class="k">*</span>
</code></pre></div></div>

<p>Enfin, Angélina a besoin d’accéder aux commandes d’administration uniquement
pour éventuellement vider la base.</p>

<div class="language-bash highlighter-rouge"><div class="highlight"><pre class="highlight"><code>redis-cli acl setuser angelina reset on <span class="s1">'&gt;angelina'</span> +@admin +@dangerous
</code></pre></div></div>

<p><img src="..//assets/posts/en/Howtomanagesecuritydataaccessandpermi/911065dd753643a6816304bf4faffe0c.png" alt="Capture d’écran_2022-05-11_17-08-37.png" /></p>

<h2 id="désactivation-du-compte-anonyme-par-défaut">Désactivation du compte anonyme par défaut</h2>
<p>Ce compte est un compte de repli pour attribuer des permissions par défaut
lorsqu’aucune authentification ne s’est produite ou a réussi. Ce compte doit
être limité. La seconde exécution devrait échouer.</p>

<div class="language-bash highlighter-rouge"><div class="highlight"><pre class="highlight"><code>redis-cli acl setuser default reset +info
redis-cli acl setuser default reset +info
</code></pre></div></div>

<p>Il peut aussi être désactivé. Il pourra uniquement exécuter la commande <code class="language-plaintext highlighter-rouge">AUTH</code>
pour s’authentifier. La seconde exécution devrait échouer.</p>

<div class="language-bash highlighter-rouge"><div class="highlight"><pre class="highlight"><code>redis-cli acl setuser default off
redis-cli acl setuser default off
</code></pre></div></div>

<p>À partir de maintenant, le seul administrateur disponible pour changer les
permissions est… <em>Angélina</em>.</p>

<h2 id="tests-des-privilèges">Tests des privilèges</h2>
<p>Le moyen le plus simple pour tester est d’exécuter le jeu de commandes suivant
avec chacun des comptes. Nous testons d’abord que l’ compte peut lire et écrire
des clé de type string, de type hash et de type list. Enfin, nous testons la
disponibilité de la commande INFO pour connaître le nombre de clés dans la base
et la commande FLUSHALL pour vider la base.</p>

<div class="language-bash highlighter-rouge"><div class="highlight"><pre class="highlight"><code>redis-cli <span class="nt">--user</span> angelina <span class="nt">--pass</span> angelina <span class="o">&lt;&lt;</span> <span class="no">EOF</span><span class="sh">
set key value
get key
hset order:key field1name field1value field2name field2value
hgetall order:key
lpush order:key:sub value1
lpush order:key:sub value2
llen order:key:sub
lpop order:key:sub
info keyspace
flushall
info keyspace
</span><span class="no">EOF
</span></code></pre></div></div>
<h3 id="compte-anonyme">Compte anonyme</h3>
<p>Ce compte ne devrait pouvoir exécuter aucune de ces commandes, sauf
éventuellement la commande INFO si vous avez décidé de la lui laisser.</p>

<h3 id="microservice-order-update">Microservice order-update</h3>
<p>Ce compte ne devrait pas pouvoir accéder aux clés de type STRING, can les
commandes ne lui sont pas accordées et car le nom de la clé ne correspond pas à
ceux autorisés. Il devrait pouvoir lire et écrire les HASH et les LIST, car il a
accès à ces commandes et à ces clés. En revanche, il ne doit pas pouvoir vider
la base.</p>

<h3 id="microservice-order-invoice">Microservice order-invoice</h3>
<p>Ce compte dispose exactement des mêmes permissions, sauf en ce qui concerne les
commandes d’écriture qui doivent donc échouer. On note que la commande LPOP est
une commande combinant à la fois une lecture et une écriture, pour retirer
l’élément lu, et qu’elle échoue.</p>

<h3 id="développeur-david">Développeur David</h3>
<p>David et Denis ont les mêmes permissions que <code class="language-plaintext highlighter-rouge">order-invoice</code>.</p>

<h3 id="chef-de-projet-paul">Chef de projet Paul</h3>
<p>Paul dispose des mêmes permissions que <code class="language-plaintext highlighter-rouge">order-update</code>.</p>

<h3 id="administrateur-angelina">Administrateur Angelina</h3>
<p>Angélina n’a aucun droit d’exécution sur les commandes de manipulation des clés,
SET, GET, HSET, HGET, LPUSH, LPOP, qui échoueront. Mais elle peut consulter le
nombre d’enregistrements de la base et vider la base.</p>

<h2 id="gestion-de-la-sécurité-à-léchelle">Gestion de la sécurité à l’échelle</h2>
<p>Les applications, développeurs, chefs de projets et admins sont identifiés par
leurs propre identifiants et disposent de permissions spécifiques sur les
commandes et les données. Mais que se passe-t-il lorsque des microservices sont
ajoutés, avec leurs bases de données, lorsque des développeurs changent de
projet, lorsque les équipes recrutent, que des employés s’en vont, qu’une base
Redis est ajoutée pour servir de bus de message PubSub entre tous les
microservices…. Un cauchemard à maintenir, mais Redis peut aussi gérer ce type
de situation avec une gestion par role (RBAC) décrite dans le prochain épisode.</p>

<p><img src="..//assets/posts/en/Howtomanagesecuritydataaccessandpermi/83deb6b770204890a5a980121e3a3dfe.png" alt="25.png" /></p>

<h1 id="supports-et-liens">Supports et liens</h1>

<table>
  <thead>
    <tr>
      <th>Lien</th>
      <th>Description</th>
    </tr>
  </thead>
  <tbody>
    <tr>
      <td><a href="https://youtu.be/dyskQGkgdEY&quot;Enregistrement vidéo de la démonstration&quot;">Video</a></td>
      <td>Enregistrement vidéo de la démonstration</td>
    </tr>
  </tbody>
</table>]]></content><author><name>François Cerbelle</name></author><category term="Redis en 5 minutes" /><category term="Redis" /><category term="Base de données" /><category term="Accès aux données" /><category term="Contrôle d&apos;accès" /><category term="Authentication" /><category term="Authorisations" /><category term="Permissions" /><category term="ACL" /><category term="Access Control Lists" /><category term="Sécurité" /><category term="Administration" /><summary type="html"><![CDATA[Comment sécuriser Redis avec des identifiants et mots de passe pour l'authentification et avec des ACL pour l'accès aux commandes et aux données. Introduction, explication et démo des ACL de Redis.]]></summary></entry><entry xml:lang="fr"><title type="html">Avis, installation et utilisation de la tablette Huion Inspiroy WH1409 sous Debian</title><link href="https://fcerbell.github.io//LinuxDebianBusterHuionWH1409/" rel="alternate" type="text/html" title="Avis, installation et utilisation de la tablette Huion Inspiroy WH1409 sous Debian" /><published>2021-09-24T00:00:00+00:00</published><updated>2021-09-24T00:00:00+00:00</updated><id>https://fcerbell.github.io//LinuxDebianBusterHuionWH1409</id><content type="html" xml:base="https://fcerbell.github.io//LinuxDebianBusterHuionWH1409/"><![CDATA[<p>Comment installer, configurer et utiliser une tablette graphique <a href="https://www.huion.com/">Huion</a> Inspiroy <a href="https://www.huion.com/pen_tablet/Huion/WH1409(8192).html">WH1409</a> sous Linux <a href="https://www.debian.org/index.fr.html">Debian</a> Buster. Installation d’un pilote (driver), configuration du serveur XOrg, configuration des paramètres de la tablette pour les boutons, configuration multi-écran. Configuration et utilisation dans <a href="https://www.blender.org/">Blender</a>, <a href="https://krita.org/fr/">Krita</a>, <a href="https://opentoonz.github.io/e/">OpenToonz</a>, Compiz, <a href="https://wonderunit.com/storyboarder/">StoryBoarder</a>, <a href="http://zoom.us">Zoom</a>, Microsoft <a href="https://www.microsoft.com/fr-fr/microsoft-teams">Teams</a>, Google <a href="https://hangouts.google.com/">Hangout</a>, <a href="https://www.goto.com/fr">GoToMeeting</a>, BigBlueButton, Open Broadcast Studio (OBS), Compiz …</p>

<p>Vous pouvez trouver des liens vers les enregistrements vidéo et les supports
imprimables associés à la <a href="#supports-et-liens">fin de cet article</a>.</p>

<ul id="markdown-toc">
  <li><a href="#vidéo" id="markdown-toc-vidéo">Vidéo</a></li>
  <li><a href="#mon-besoin" id="markdown-toc-mon-besoin">Mon besoin</a></li>
  <li><a href="#pourquoi-huion-inspiroy-wh1409" id="markdown-toc-pourquoi-huion-inspiroy-wh1409">Pourquoi Huion Inspiroy WH1409</a></li>
  <li><a href="#installation-sans-pilote" id="markdown-toc-installation-sans-pilote">Installation sans pilote</a></li>
  <li><a href="#installation-avec-le-pilote-noyau-digimend-et-x11-wacom" id="markdown-toc-installation-avec-le-pilote-noyau-digimend-et-x11-wacom">Installation avec le pilote noyau Digimend et X11 Wacom</a></li>
  <li><a href="#configuration-multi-écrans" id="markdown-toc-configuration-multi-écrans">Configuration multi-écrans</a>    <ul>
      <li><a href="#xinput-et-une-matrice-de-conversion" id="markdown-toc-xinput-et-une-matrice-de-conversion">xinput et une matrice de conversion</a></li>
      <li><a href="#xinput-map-to-output" id="markdown-toc-xinput-map-to-output">xinput map-to-output</a></li>
      <li><a href="#xsetwacom-maptooutput" id="markdown-toc-xsetwacom-maptooutput">xsetwacom MapToOutput</a></li>
    </ul>
  </li>
  <li><a href="#configuration-des-boutons" id="markdown-toc-configuration-des-boutons">Configuration des boutons</a></li>
  <li><a href="#gestionnaire-de-fenêtresession" id="markdown-toc-gestionnaire-de-fenêtresession">Gestionnaire de fenêtre/session</a>    <ul>
      <li><a href="#compiz" id="markdown-toc-compiz">Compiz</a>        <ul>
          <li><a href="#changements-décran" id="markdown-toc-changements-décran">Changements d’écran</a></li>
          <li><a href="#annotations-interractives" id="markdown-toc-annotations-interractives">Annotations interractives</a></li>
        </ul>
      </li>
      <li><a href="#pour-les-autres" id="markdown-toc-pour-les-autres">Pour les autres</a>        <ul>
          <li><a href="#xbindkeys" id="markdown-toc-xbindkeys">xbindkeys</a></li>
          <li><a href="#gromit" id="markdown-toc-gromit">Gromit</a></li>
        </ul>
      </li>
    </ul>
  </li>
  <li><a href="#applications" id="markdown-toc-applications">Applications</a>    <ul>
      <li><a href="#gimp" id="markdown-toc-gimp">Gimp</a></li>
      <li><a href="#krita" id="markdown-toc-krita">Krita</a></li>
      <li><a href="#opentoonz" id="markdown-toc-opentoonz">OpenToonz</a></li>
      <li><a href="#storyboarder" id="markdown-toc-storyboarder">Storyboarder</a></li>
      <li><a href="#blender-3d" id="markdown-toc-blender-3d">Blender 3D</a></li>
      <li><a href="#zoom-teams-hangout-gotomeeting-bigbluebutton" id="markdown-toc-zoom-teams-hangout-gotomeeting-bigbluebutton">Zoom, Teams, Hangout, GoToMeeting, BigBlueButton</a></li>
      <li><a href="#freecad" id="markdown-toc-freecad">FreeCAD</a></li>
      <li><a href="#libreoffice--openoffice" id="markdown-toc-libreoffice--openoffice">LibreOffice / OpenOffice</a></li>
      <li><a href="#audacity" id="markdown-toc-audacity">Audacity</a></li>
      <li><a href="#lmms" id="markdown-toc-lmms">LMMS</a></li>
      <li><a href="#natron" id="markdown-toc-natron">Natron</a></li>
      <li><a href="#cinelerra" id="markdown-toc-cinelerra">Cinelerra</a></li>
      <li><a href="#openshot-shotcut-olive-et-autres" id="markdown-toc-openshot-shotcut-olive-et-autres">OpenShot, Shotcut, Olive et autres</a></li>
    </ul>
  </li>
  <li><a href="#supports-et-liens" id="markdown-toc-supports-et-liens">Supports et liens</a></li>
  <li><a href="#notes-de-bas-de-page" id="markdown-toc-notes-de-bas-de-page">Notes de bas de page</a></li>
</ul>

<h1 id="vidéo">Vidéo</h1>

<center><iframe width="420" height="315" src="https://www.youtube.com/embed/wofhUDzIUtU" frameborder="0" allowfullscreen=""></iframe></center>

<h1 id="mon-besoin">Mon besoin</h1>

<p>Je travaille en télétravail à temps plein depuis plus de 10 ans, j’avais acheté une mini tablette
graphique à 15 € en grande surface pour tester. Je ne l’ai jamais vraiment utilisée, je ne l’ai
probablement jamais configurée correctement, ne sachant pas quoi attendre d’une tablette et
encore moins de celle-ci. J’ai décidé d’acheter une véritable tablette dont je pouvais être sûr du
niveau à attendre, à moi de la configurer correctement.</p>

<p>J’ai plusieurs utilisations :</p>
<ul>
  <li>Annoter l’écran lorsque je fais des présentation à distance, quel que soit le logiciel (<a href="http://zoom.us">Zoom</a>, <a href="https://www.microsoft.com/fr-fr/microsoft-teams">Teams</a>,
<a href="https://www.goto.com/fr">GoToMeeting</a>, Google <a href="https://hangouts.google.com/">Hangout</a>, …)</li>
  <li>Faire des schémas et animations 2D à partager (<a href="https://www.gimp.org/">Gimp</a>, <a href="https://krita.org/fr/">Krita</a>, <a href="https://opentoonz.github.io/e/">OpenToonz</a>, <a href="https://wonderunit.com/storyboarder/">StoryBoarder</a>)</li>
  <li>M’aider en modélisation 3D (Sculpter dans <a href="https://www.blender.org/">Blender</a> 3D)</li>
  <li>Pas ou très peu de retouche photo (<a href="https://www.gimp.org/">Gimp</a>)</li>
</ul>

<p>Par ailleurs, je n’utilise que Linux <a href="https://www.debian.org/index.fr.html">Debian</a>, elle doit donc impérativement être supportée par Linux et
ses options accessoires (boutons, molettes, …) aussi, si possible. J’utilise un triple affichage 3 x
27 pouces FHD, et la tablette doit avoir une taille physique en rapport.</p>

<h1 id="pourquoi-huion-inspiroy-wh1409">Pourquoi Huion Inspiroy WH1409</h1>

<p>J’ai éliminé les tablettes à écran intégré, car j’ai déjà assez d’écrans et de cables. De plus, je n’ai
plus de sortie video disponible, il me faudrait acheter une carte graphique supplémentaire. La <em><a href="https://fr.gaomon.net/products/">Gaomon</a></em>
aurait pu convenir.</p>

<p>J’ai été frustré par la taille de ma première mini-tablette, il me faut donc au minimum une taille A5.
Mais vu la taille de mon affichage (même en limitant à un seul écran), cela risque de ne pas être
confortable. En plus, les formats A5 ne disposent souvent pas de boutons d’extension.</p>

<p>Il est évident qu’avec une telle configuration, je n’ai pas une utilisation nomade, le sans-fil n’est
pas un critère, mais il faut qu’une connexion filiaire soit possible (moins de problèmes de
configuration et de latence).</p>

<p>Avec tous ces critères, il y a évidemment mon bonheur dans la marque <em><a href="https://www.wacom.com/fr-fr">Wacom</a></em>, mais je me suis fixé un
budget de 100€ max. Il reste donc principalement les <em><a href="https://www.xp-pen.fr/">XP-Pen</a></em>, <em><a href="https://www.huion.com/">Huion</a></em> et <em><a href="https://fr.gaomon.net/products/">Gaomon</a></em>. Après quelques
recherches, lectures d’avis et d’articles. Principalement celui de <a href="https://www.davidrevoy.com/">David Revoy</a>, artiste
professionel avec une configuration similaire à la mienne, je me suis orienté sur le modèle <em><a href="https://www.huion.com/pen_tablet/Huion/WH1409(8192).html">WH1409</a></em> de
chez <em><a href="https://www.huion.com/">Huion</a></em>.</p>

<p>Elle est grande, mais j’ai de la place sur mon bureau et elle peut éventuellement tenir dans un grand
sac à dos pour ordinateur. Elle dispose de 12 boutons programmables, même si je m’attendais à avoir des
difficultés à les utiliser d’après l’article de David. Elle se connecte avec un fil en USB ou sans fil
avec une clé fournie (jamais testée). Elle est fournie avec plein de mines de rechange. Le stylet gère
plus de 8000 niveaux de pression, mais il a aussi des défauts : il est actif et a besoin d’être
rechargé, il ne gère pas l’inclinaison, il n’a pas de gomme. Les défauts sont faibles, je n’ai pas vu un
seul avis se plaignant de l’autonomie d’une charge, je n’ai pas vraiment besoin de la gestion de
l’inclinaison et l’utilisation d’une touche gomme et d’une touche annulation à programmer sur la
tablette me semble bien plus ergonomique que de retourner le stylet pour gommer.</p>

<p>Commandée sur <em><a href="https://www.amazon.fr/gp/product/B06XKXPJD8">Amazon</a></em>, car <em><a href="https://www.cdiscount.com/arts-loisirs/beaux-arts/huion-wh1409-v2-tablette-graphique-sans-pile-en-mo/f-161010507-auc6934062472205.html">CDiscount</a></em> était beaucoup plus cher et livrait plus lentement, elle est
arrivée dans un triple emballage depuis un entrepôt Allemand. On peut déjà trouver des vidéos de
déballage/unboxing sur Internet, je ne le ferai donc pas.</p>

<h1 id="installation-sans-pilote">Installation sans pilote</h1>

<p>Avec le noyau 4.19, la tablette est immédiatement reconnue et gérée comme un périphérique de pointage
par le système. Cependant, les 12 boutons sur la tablette ne sont pas programmables et correspondent à
une souris avec 16 boutons… Il va falloir configurer, lorsque c’est possible, chaque application. De
même, le seuil de pression, la courbe de pression, et d’autres paramètres de confort ne sont pas
configurables.</p>

<h1 id="installation-avec-le-pilote-noyau-digimend-et-x11-wacom">Installation avec le pilote noyau Digimend et X11 Wacom</h1>

<p>J’ai donc choisi d’utiliser le driver <a href="https://digimend.github.io/" title="Projet Digimend">Digimend</a> que j’utilisais déjà avec mon ancienne
tablette, pour faire reconnaitre celle-ci comme une tablette <em><a href="https://www.wacom.com/fr-fr">Wacom</a></em>, et disposer des fonctionnalités
supplémentaires de ce pilote. Dans l’historique des notes de version, on peut voir que la marque et le
modèle de ma tablette sont gérés depuis les 5 dernières versions, je m’attends donc à une certaine
maturité.</p>

<p>Pour installer ce driver noyau, il suffit de télécharger et d’installer le paquet <em><a href="https://www.debian.org/index.fr.html">Debian</a></em>. Il va
installer, par ses dépendances, le pilote X11 pour <em><a href="https://www.wacom.com/fr-fr">Wacom</a></em> et les outils auxquels j’ajoute <em>xinput</em> :</p>
<div class="language-bash highlighter-rouge"><div class="highlight"><pre class="highlight"><code>wget <span class="nt">-c</span> https://github.com/DIGImend/digimend-kernel-drivers/releases/download/v10/digimend-dkms_10_all.deb
<span class="nb">sudo </span>gdebi <span class="nt">-n</span> digimend-dkms_10_all.deb
<span class="nb">sudo </span>apt-get <span class="nb">install </span>xinput
</code></pre></div></div>

<p>Je force le déchargement des pilotes éventuellement déjà en mémoire :</p>
<div class="language-bash highlighter-rouge"><div class="highlight"><pre class="highlight"><code>modprobe <span class="nt">-r</span> hid-kye hid-uclogic
</code></pre></div></div>

<p>Après quelques secondes, tout fonctionne comme avant, mais la commande <code class="language-plaintext highlighter-rouge">xsetwacom list</code> ne détecte pas
de tablette <em>wacom</em> dans X11. Le stylet et la tablette sont pourtant bien trouvés par X11 comme on peut
le voir avec la commande <code class="language-plaintext highlighter-rouge">xinput</code>, mais pas à travers le pilote <em>wacom</em>.  Il faut indiquer à X11
d’utiliser le pilote <em>wacom</em> et non le pilote <em>evdev</em>. Pour cela, il faut utiliser le fichier de
configuration fourni par <em>Digimend</em> et le placer dans la configuration de X11 :</p>
<div class="language-bash highlighter-rouge"><div class="highlight"><pre class="highlight"><code><span class="nb">mkdir</span> /etc/X11/xorg.conf.d
<span class="nb">ln</span> <span class="nt">-s</span> /usr/share/X11/xorg.conf.d/50-digimend.conf /etc/X11/xorg.conf.d/
</code></pre></div></div>

<p>Pas d’autre choix que de redémarrer X11 pour le prendre en compte. Le plus simple est de redémarrer
l’ordinateur, ça marchera pour tout le monde, sinon, il faut redémarrer le gestionnaire de connexion que
vous utilisez (<em><a href="https://github.com/canonical/lightdm">lightdm</a></em> dans mon cas), attention, cette commande ferme brutalement votre session et vos
applications ouvertes sans sauvegarder :</p>
<div class="language-bash highlighter-rouge"><div class="highlight"><pre class="highlight"><code>systemctl restart lightdm.service
</code></pre></div></div>

<p>Suite à cela, <code class="language-plaintext highlighter-rouge">xsetwacom list</code> fonctionne et trouve le stylet, la tablette et un troisième périphérique
logique lié à cette tablette que je n’ai pas identifié : le <em>Touch Strip Pad</em>, mais dont je n’ai pas le
besoin. On constate que ces périphériques pris en charge par le driver <em>wacom</em> sont ensuite gérés par
X11 grâce à la commande <code class="language-plaintext highlighter-rouge">xinput</code>… Super ! Plus qu’à configurer.</p>

<h1 id="configuration-multi-écrans">Configuration multi-écrans</h1>

<p>Il faut savoir que la surface de la tablette couvre la totalité du bureau, le mien étant large de 3
écrans FHD. Cela signifie que je dois faire de tout petits déplacements horizontaux par rapport à mes
déplacements verticaux. C’est acceptable dans certains cas, mais pas très naturel. Je vais donc affecter
la tablette à un des trois écrans. Il y a plusieurs possibilités. J’utilise celle avec la matrice de
correspondance et j’ai configuré des icones de raccourci sur mon pannel <a href="https://xfce.org/">XFCE</a>.</p>

<h2 id="xinput-et-une-matrice-de-conversion">xinput et une matrice de conversion</h2>

<p>C’est ma favorite car : je ne connais pas mes écrans par leur nom, mais par leur position. Je souhaite
affecter la tablette à celui de gauche, du milieu de droite ou à tout le bureau, peu importe leur nom et
il pourrait changer si je modifie mes branchements. Je n’ai pas d’écran au-dessus ou en-dessous, mais
cette méthode permet de les gérer aussi. Enfin, on peut effectuer des corrections de paralaxe ou de
proportions de déplacement. Enfin, le plus important, on peut, avec cette méthode, affecter la surface
de la tablette à une zone du bureau plus petite qu’un écran ou débordant sur plusieurs écrans.</p>

<p>Il suffit de connaître trois informations :</p>
<ul>
  <li>le nom ou l’id du stylet, fourni par <code class="language-plaintext highlighter-rouge">xinput</code> (<em>HID 256c:006e stylus</em> dans mon cas)</li>
  <li>le pourcentage horizontal du bureau à partir duquel la surface de la tablette est associée</li>
  <li>le pourcentage horizontal de bureau sur lequel la surface de la tablette agit</li>
</ul>

<p>J’ai trois écran :</p>
<ul>
  <li>pour celui de gauche, il commence à 0% et s’étend sur 33%
    <div class="language-bash highlighter-rouge"><div class="highlight"><pre class="highlight"><code>xinput set-prop <span class="s2">"HID 256c:006e stylus"</span> <span class="nt">--type</span><span class="o">=</span>float <span class="s2">"Coordinate Transformation Matrix"</span> 0.333333 0 0 0 1 0 0 0 1<span class="s1">'
</span></code></pre></div>    </div>
  </li>
  <li>pour celui du centre, il commence à 33% et s’étend sur 33%
    <div class="language-bash highlighter-rouge"><div class="highlight"><pre class="highlight"><code>xinput set-prop <span class="s2">"HID 256c:006e stylus"</span> <span class="nt">--type</span><span class="o">=</span>float <span class="s2">"Coordinate Transformation Matrix"</span> 0.333333 0 0.333333 0 1 0 0 0 1<span class="s1">'
</span></code></pre></div>    </div>
  </li>
  <li>pour celui de droite, il commence à 66% et s’étend sur 33%
    <div class="language-bash highlighter-rouge"><div class="highlight"><pre class="highlight"><code>xinput set-prop <span class="s2">"HID 256c:006e stylus"</span> <span class="nt">--type</span><span class="o">=</span>float <span class="s2">"Coordinate Transformation Matrix"</span> 0.333333 0 0.666666 0 1 0 0 0 1<span class="s1">'
</span></code></pre></div>    </div>
  </li>
  <li>pour le bureau complet, il commence à 0% et s’étend sur 100%
    <div class="language-bash highlighter-rouge"><div class="highlight"><pre class="highlight"><code>xinput set-prop <span class="s2">"HID 256c:006e stylus"</span> <span class="nt">--type</span><span class="o">=</span>float <span class="s2">"Coordinate Transformation Matrix"</span> 1 0 0 0 1 0 0 0 1<span class="s1">'
</span></code></pre></div>    </div>
  </li>
</ul>

<h2 id="xinput-map-to-output">xinput map-to-output</h2>

<p>L’autre possibilité avec <code class="language-plaintext highlighter-rouge">xinput</code> est d’utiliser le nom des écrans. Dans mon cas, ils sont tous
connectés à une seule carte graphique en HDMI, DVI et Display Port. On peut récupérer les noms de
plusieurs manière, j’utilise <code class="language-plaintext highlighter-rouge">xrandr</code> :</p>
<div class="language-bash highlighter-rouge"><div class="highlight"><pre class="highlight"><code>root@toutatis:~# xrandr | <span class="nb">grep </span>connected
DVI-D-0 connected primary 1920x1080+1920+0 <span class="o">(</span>normal left inverted right x axis y axis<span class="o">)</span> 598mm x 336mm
HDMI-0 connected 1920x1080+0+0 <span class="o">(</span>normal left inverted right x axis y axis<span class="o">)</span> 598mm x 336mm
DP-0 connected 1920x1080+3840+0 <span class="o">(</span>normal left inverted right x axis y axis<span class="o">)</span> 598mm x 336mm
DP-1 disconnected <span class="o">(</span>normal left inverted right x axis y axis<span class="o">)</span>
</code></pre></div></div>

<p>Je peux donc utiliser donc les commandes <code class="language-plaintext highlighter-rouge">xinput</code> suivantes pour associer la tablette à un seul écran,
mais je n’ai pas de commande pour l’associer à plusieurs écrans, à une partie d’un écran ou à tout le bureau :</p>
<div class="language-bash highlighter-rouge"><div class="highlight"><pre class="highlight"><code>xinput map-to-output <span class="s2">"HID 256c:006e stylus"</span> <span class="s2">"HDMI-0"</span>
</code></pre></div></div>
<div class="language-bash highlighter-rouge"><div class="highlight"><pre class="highlight"><code>xinput map-to-output <span class="s2">"HID 256c:006e stylus"</span> <span class="s2">"DVI-D--0"</span>
</code></pre></div></div>
<div class="language-bash highlighter-rouge"><div class="highlight"><pre class="highlight"><code>xinput map-to-output <span class="s2">"HID 256c:006e stylus"</span> <span class="s2">"DP-0"</span>
</code></pre></div></div>

<h2 id="xsetwacom-maptooutput">xsetwacom MapToOutput</h2>

<p>Il est possible d’obtenir le même résultat avec la commande <code class="language-plaintext highlighter-rouge">MapToOutput</code> de <code class="language-plaintext highlighter-rouge">xsetwacom</code> qu’avec 
l’option <code class="language-plaintext highlighter-rouge">map-to-output</code> de <code class="language-plaintext highlighter-rouge">xinput</code>. Techniquement, la correspondance ne se fait pas au même niveau
dans l’enchainement des couches logicielles, mais le résultat est le même. Je ne l’utilise pas du tout,
mais c’est aussi possible.</p>

<h1 id="configuration-des-boutons">Configuration des boutons</h1>

<p>Actuellement, les boutons du stylet sont configurés comme les trois boutons de la souris (gauche,
molette et droit). Personnellement, cela me convient.</p>

<p>Par contre, les boutons de la tablette sont configurés comme les 16 boutons d’une souris. J’aimerais
pouvoir les configurer et reconfigurer de manière complètement arbitraire pour m’adresser à mon
gestionnaire de fenêtres (Compiz) pour lancer des commandes, à <a href="https://www.blender.org/">Blender</a>, à <a href="https://krita.org/fr/">Krita</a>, … pour effectuer des
actions.</p>

<p>Je n’ai pas encore beaucoup d’expérience et je ne sais pas encore de quelle commande ou action je vais
avoir le plus besoin. Je prévois donc :</p>
<ul>
  <li>un bouton undo (Ctrl-Z), un bouton redo (dépendant de l’application, soit Ctrl-Y ou Shift-Ctrl-Z)</li>
  <li>quatre boutons pour changer l’affectation de la surface à chaque écran ou au bureau</li>
</ul>

<p>Un bouton peut remonter une séquence d’événement d’enfoncement ou de relachement d’une touche clavier ou d’un bouton
souris, éventuellement accompagné de modifieurs (Alt, Shift, Ctrl, …). Par exemple, pour simuler
l’annulation de la dernière action dans la plupart des logiciels, il faut faire <em>Ctrl-Z</em>, ce qui
correspond dans la réalité à :</p>

<ol>
  <li>Appuyer sur <em>Ctrl</em> gauche ou droit</li>
  <li>Appuyer sur <em>Z</em></li>
  <li>Relacher <em>Z</em></li>
  <li>Relacher <em>Ctrl</em></li>
</ol>

<p>Dans certains logiciels, il est possible de configurer l’action à effectuer en fonction de l’appui sur
un des boutons d’un périphérique de pointage spécifique. Ce n’est pas toujours possible d’avoir cette
logique et encore moins souvent de pouvoir choisir le périphérique. Parfois, on peut le faire dans le
gestionnaire de fenêtre ou de sessions, ou utiliser <code class="language-plaintext highlighter-rouge">xbindkeys</code> pour être indépendant du gestionnaire
utilisé. Je préfère demander au pilote de générer la séquence, quitte à avoir une configuration
spécifique du pilote pour chaque application.</p>

<p>Pour indiquer au pilote de faire <em>Undo</em> (la séquence décrite) lorsque j’appuie sur le bouton 1 de la
tablette (pas du stylet), je dois utiliser les modifieurs connus et listés par <code class="language-plaintext highlighter-rouge">xsetwacom --list
modifiers</code> et les symboles d’appui/relachement (+/-) :</p>

<div class="language-bash highlighter-rouge"><div class="highlight"><pre class="highlight"><code>xsetwacom <span class="nt">--set</span> <span class="s1">'HID 256c:006e Pad pad'</span> Button 1 key +ctrl +z <span class="nt">-z</span> <span class="nt">-ctrl</span>
</code></pre></div></div>

<p>En revanche, sous <em>Cinelerra</em>, il y a plusieurs <em>Undo</em>, un sur <em>Z</em> et un sur <em>Shift-Z</em> :</p>
<div class="language-bash highlighter-rouge"><div class="highlight"><pre class="highlight"><code>xsetwacom <span class="nt">--set</span> <span class="s1">'HID 256c:006e Pad pad'</span> Button 1 key +z <span class="nt">-z</span>
</code></pre></div></div>
<p>ou</p>
<div class="language-bash highlighter-rouge"><div class="highlight"><pre class="highlight"><code>xsetwacom <span class="nt">--set</span> <span class="s1">'HID 256c:006e Pad pad'</span> Button 1 key +shift +z <span class="nt">-z</span> <span class="nt">-shift</span>
</code></pre></div></div>

<p>Pour le bouton <em>Redo</em>, sous certains logiciels (par exemple <a href="https://www.gimp.org/">Gimp</a> ou LibreOffice), c’est <em>Ctrl-Y</em> :</p>
<div class="language-bash highlighter-rouge"><div class="highlight"><pre class="highlight"><code>xsetwacom <span class="nt">--set</span> <span class="s1">'HID 256c:006e Pad pad'</span> Button 2 key +ctrl +y <span class="nt">-y</span> <span class="nt">-ctrl</span>
</code></pre></div></div>

<p>par contre, sous d’autres, ce sera <em>Shift-Ctrl-Z</em>, comme sous <em><a href="https://krita.org/fr/">Krita</a></em> ou <em><a href="https://www.blender.org/">Blender</a></em>…</p>

<div class="language-bash highlighter-rouge"><div class="highlight"><pre class="highlight"><code>xsetwacom <span class="nt">--set</span> <span class="s1">'HID 256c:006e Pad pad'</span> Button 2 key +shift +ctrl +z <span class="nt">-z</span> <span class="nt">-ctrl</span> <span class="nt">-shift</span>
</code></pre></div></div>

<p>Bon, vous l’avez compris, il n’y a pas de standard, même pour les raccourcis de <em>Undo</em>/<em>Redo</em> ou de
<em>Copier</em>/<em>Couper</em>/<em>Coller</em> et je vais probablement devoir faire un fichier de configuration commun pour
les touches qui doivent toujours fonctionner indépendemment de l’application en cours d’utilisation
(affectation de la tablette à un écran) qui sera inclus depuis des fichiers de configuration propres à
l’application en cours d’utilisation.</p>

<p>Pour exécuter les commandes de changement d’affectation de la tablette vues précédement, je considère
que ces commandes doivent être lancée lorsque j’appuie sur les boutons 13 à 16 du périphérique de
pointage <em>Tablette</em>. Je dois donc m’assurer que les quatres boutons physiques de ma tablette renvoient
bien un événement bouton de pointage correspondant :</p>
<div class="language-bash highlighter-rouge"><div class="highlight"><pre class="highlight"><code>xsetwacom <span class="nt">--set</span> <span class="s1">'HID 256c:006e Pad pad'</span> Button 13 button 13
</code></pre></div></div>
<p>sans symbole <em>+</em> ou <em>-</em>, c’est une séquence appui-relachement qui se fait :</p>
<div class="language-bash highlighter-rouge"><div class="highlight"><pre class="highlight"><code>xsetwacom <span class="nt">--get</span> <span class="s1">'HID 256c:006e Pad pad'</span> Button 13 
button +13 <span class="nt">-13</span> 
</code></pre></div></div>
<p>Ensuite, selon le gestionnaire de fenêtre ou de session utilisé, il faut demander l’exécution des
commandes <em>xinput</em> sur l’événement <em>bouton 13</em>. Cela dépend de votre gestionnaire, moi c’est <em>Compiz</em>,
dans la section <em>Commandes</em> de la configuration. On peut le faire avec l’outil <code class="language-plaintext highlighter-rouge">xbindkeys</code> également.</p>

<h1 id="gestionnaire-de-fenêtresession">Gestionnaire de fenêtre/session</h1>

<p>Attention à bien concevoir vos cartographies de touches. Si la fonction d’annulation <em>Undo</em> se trouve
sur une touche dans une application et sur une autre dans une autre application, vous allez vous y
perdre. Les fonctions similaires dans plusieurs applications doivent se trouver sur les mêmes touches de
la tablette, sinon : boulettes garanties.</p>

<h2 id="compiz">Compiz</h2>

<h3 id="changements-décran">Changements d’écran</h3>

<p>Nous allons utiliser les quatres boutons du bas de la tablette pour cela. Le premier étend la surface de
la tablette sur tout le bureau pour une utilisation en remplacement de la souris, le second associe la
surface de la tablette au premier écran (gauche), le troisième à l’écran central et le dernier à l’écran
de gauche.</p>

<p>Il faut donc générer des événements enfoncement/relachement à ces boutons en évitant les éventuels
conflits. Rares sont les outils utilisant les boutons au delà du dixième. Je vais donc utiliser les
événements <em>bouton 13</em>, <em>bouton 14</em>, <em>bouton 15</em> et <em>bouton 16</em>, que je vais associer aux touches du bas
(portant le même numéro dans mon cas, mais ce n’est pas une obligation) :</p>
<div class="language-bash highlighter-rouge"><div class="highlight"><pre class="highlight"><code>xsetwacom <span class="nt">--set</span> <span class="s1">'HID 256c:006e Pad pad'</span> Button 13 button 13
xsetwacom <span class="nt">--set</span> <span class="s1">'HID 256c:006e Pad pad'</span> Button 14 button 14
xsetwacom <span class="nt">--set</span> <span class="s1">'HID 256c:006e Pad pad'</span> Button 15 button 15
xsetwacom <span class="nt">--set</span> <span class="s1">'HID 256c:006e Pad pad'</span> Button 16 button 16
</code></pre></div></div>
<p>Ces commandes doivent être placées dans un fichier exécutable à exécuter à la demande ou automatiquement lors du
démarrage des sessions.</p>

<p>Puis, dans l’outil graphique de configuration de <em>Compiz</em>, j’active le module <em>Commandes</em> et je saisis
les 4 commandes à exécuter :</p>
<ul>
  <li>
    <div class="language-bash highlighter-rouge"><div class="highlight"><pre class="highlight"><code>xinput set-prop <span class="s2">"HID 256c:006e stylus"</span> <span class="nt">--type</span><span class="o">=</span>float <span class="s2">"Coordinate Transformation Matrix"</span> 1 0 0 0 1 0 0 0 1<span class="s1">'
</span></code></pre></div>    </div>
  </li>
  <li>
    <div class="language-bash highlighter-rouge"><div class="highlight"><pre class="highlight"><code>xinput set-prop <span class="s2">"HID 256c:006e stylus"</span> <span class="nt">--type</span><span class="o">=</span>float <span class="s2">"Coordinate Transformation Matrix"</span> 0.333333 0 0 0 1 0 0 0 1<span class="s1">'
</span></code></pre></div>    </div>
  </li>
  <li>
    <div class="language-bash highlighter-rouge"><div class="highlight"><pre class="highlight"><code>xinput set-prop <span class="s2">"HID 256c:006e stylus"</span> <span class="nt">--type</span><span class="o">=</span>float <span class="s2">"Coordinate Transformation Matrix"</span> 0.333333 0 0.333333 0 1 0 0 0 1<span class="s1">'
</span></code></pre></div>    </div>
  </li>
  <li>
    <div class="language-bash highlighter-rouge"><div class="highlight"><pre class="highlight"><code>xinput set-prop <span class="s2">"HID 256c:006e stylus"</span> <span class="nt">--type</span><span class="o">=</span>float <span class="s2">"Coordinate Transformation Matrix"</span> 0.333333 0 0.666666 0 1 0 0 0 1<span class="s1">'
</span></code></pre></div>    </div>
  </li>
</ul>

<p>Enfin, dans l’onglet <em>Assignation des boutons</em> (de souris), j’assigne respectivement les boutons 13, 14,
15 et 16 aux commandes 0, 1, 2 et 3.</p>

<p><img src="/assets/posts/LinuxDebianBusterHuionWH1409/CompizConfig.png" alt="CompizConfig" title="Association de boutons" /></p>

<h3 id="annotations-interractives">Annotations interractives</h3>

<video autoplay="" muted="" controls="" loop="">
  <source src="/assets/posts/LinuxDebianBusterHuionWH1409/Demo.mp4" type="video/mp4" />
Your browser does not support the video tag.
</video>

<p>J’ai besoin de cette fonctionnalité quelque soit mon activité, mais rarement, je ne souhaite donc pas
monopoliser d’autres boutons de la tablette pour cela.</p>

<p>Dans l’outil de configuration de <em>Compiz</em>, j’active le module <em>Annotations</em> et je laisse la
configuration par défaut. Désormais, je peux activer les annotation en gardant les touches <em>Meta</em> et
<em>Alt</em> enfondées :</p>
<ul>
  <li>Je dessine avec la pointe du stylet</li>
  <li>Je gomme en survolant la zone avec le bouton 3 du stylet enfoncé</li>
  <li>J’efface tout avec la touche <em>K</em> (<em>Meta+Alt+K</em>)</li>
</ul>

<p><img src="/assets/posts/LinuxDebianBusterHuionWH1409/CompizAnnoter.png" alt="CompizAnnoter" title="Annotation Compiz" /></p>

<p>Astuce : Le module <em>Montrer le curseur</em> peut être activé pour rendre le pointeur beaucoup plus facile à
suivre à l’écran lors des présentations à distance ou des session de capture d’écran grâce à la
combinaison <em>Meta+K</em></p>

<p><img src="/assets/posts/LinuxDebianBusterHuionWH1409/CompizCurseur.png" alt="CompizCurseur" title="Curseur Compiz" /></p>

<h2 id="pour-les-autres">Pour les autres</h2>

<h3 id="xbindkeys">xbindkeys</h3>
<p><code class="language-plaintext highlighter-rouge">xbindkeys</code> associe une commande à exécuter à une combinaison de touches. L’installation du paquet doit
être suivie de la création d’un fichier de configuration par défaut <code class="language-plaintext highlighter-rouge">.xbindkeysrc</code> dans le répertoire
<em>home</em> :</p>

<div class="language-bash highlighter-rouge"><div class="highlight"><pre class="highlight"><code><span class="nb">sudo </span>apt-get <span class="nb">install</span> <span class="nt">-y</span> xbindkeys
xbindkeys <span class="nt">--defaults</span> <span class="o">&gt;</span> ~/.xbindkeysrc
</code></pre></div></div>

<p>Il faut ensuite ajouter les lignes suivantes :</p>
<div class="language-plaintext highlighter-rouge"><div class="highlight"><pre class="highlight"><code>"xinput set-prop "HID 256c:006e stylus" --type=float "Coordinate Transformation Matrix" 1 0 0 0 1 0 0 0 1'"
  b:13

"xinput set-prop "HID 256c:006e stylus" --type=float "Coordinate Transformation Matrix" 0.333333 0 0 0 1 0 0 0 1'"
  b:14

"xinput set-prop "HID 256c:006e stylus" --type=float "Coordinate Transformation Matrix" 0.333333 0 0.333333 0 1 0 0 0 1'"
  b:15

"xinput set-prop "HID 256c:006e stylus" --type=float "Coordinate Transformation Matrix" 0.333333 0 0.666666 0 1 0 0 0 1'"
  b:16
</code></pre></div></div>

<p>Et faire en sorte que <code class="language-plaintext highlighter-rouge">xbindkeys</code> se lance au démarrage de la session grâce à son helper fourni dans le
paquet <em>Debian</em> : <code class="language-plaintext highlighter-rouge">xbindkeys_autostart</code></p>

<h3 id="gromit">Gromit</h3>

<p>Il suffit d’installer le pquet <code class="language-plaintext highlighter-rouge">gromit</code> et de le lancer au démarrage de la session, par défault, il
capture la touche <em>Pause</em> ou <em>Arrêt Défil.</em> du clavier pour activer/désactiver les annotations.
<em>Shift+Pause</em> efface l’écran, <em>Ctrl-Pause</em> masque/montre les annotations sans les perdre et <em>Alt-Pause</em>
quitte le programme. Il est possible de le configurer différemment. On peut assigner les raccourcis 
claviers de <em>Gromit</em> à des touches sur la tablette, par exemple.</p>

<div class="language-bash highlighter-rouge"><div class="highlight"><pre class="highlight"><code><span class="nb">sudo </span>apt-get <span class="nb">install </span>gromit
</code></pre></div></div>

<h1 id="applications">Applications</h1>

<p>Je ne vais pas détailler la configuration de ces applications, ce sont celles que j’utilise un peu,
beaucoup, passionément et à la folie. Je vais me contenter d’indiquer le niveau de support que j’ai
obtenu et qui me convient.</p>

<h2 id="gimp">Gimp</h2>
<p><em><a href="https://www.gimp.org/">Gimp</a></em> gère très bien la pression, la position, la vitesse et permet d’utiliser ces informations pour
modifier l’épaisseur, l’opacité, … Il faut aller configurer les <em>Périphériques d’entrée</em>.</p>

<p>Ensuite, attention, la configuration de l’outil courant est différente lorsque l’on utilise un
périphérique de pointage ou un autre. Il est possible d’avoir une gestion de la pression <em>Dynamic</em> avec
le stylet et <em>Off</em> avec la souris. Si on bouge la souris, on voit <em>Off</em>, alors que le stylet est bien en
<em>Dynamic</em>.  Je recommande d’utiliser exclusivement le stylet dans <a href="https://www.gimp.org/">Gimp</a> et de ne pas passer de l’un à
l’autre sans s’être habitué à ce comportement.</p>

<h2 id="krita">Krita</h2>
<p><em><a href="https://krita.org/fr/">Krita</a></em> gère également nativement la pression et permet de faire de jolis dessins. Il est possible de
vérifier le bon fonctionnement de la tablette dans le menu <em>Settings</em>/<em>Configure Krita</em>/<em>Tablet
settings</em>. On peut même y ajuster la courbe de réponse en pression.</p>

<h2 id="opentoonz">OpenToonz</h2>
<p>La tablette fonctionne nativement avec <em><a href="https://opentoonz.github.io/e/">opentoonz</a></em>, il faut bien penser à régler l’épaisseur minimale et
maximale dans la barre d’outils sous les menus lorsque l’outil sélectionné le permet.
<img src="/assets/posts/LinuxDebianBusterHuionWH1409/OpenToonz.png" alt="OpenToonz" title="OpenToonz" /></p>

<h2 id="storyboarder">Storyboarder</h2>
<p><em><a href="https://wonderunit.com/storyboarder/">StoryBoarder</a></em> de <em>WonderUnit</em> n’est pas empaqueté dans les dépôts <em><a href="https://www.debian.org/index.fr.html">Debian</a></em>. J’utilisais le fichier
AppImage jusqu’à ce que <em>WonderUnit</em> fournisse aussi un paquet <em>.deb</em>. C’est un logiciel OpenSource très
pratique pour écrire des storyboard. Il s’agit d’une application <em>Electron</em> (Javascript/NodeJS utilisant
le framework de Chrome/Chromium pour l’affichage comme une application native). Malheureusement, je n’ai
pas réussi à faire fonctionner la gestion de la pression pour le framework <em>Chrome</em>, pour <em>Chrome</em> et
toutes les applications <em>Electron</em>. J’ai donc un support qui permet de dessiner, comme avec la souris,
en plus confortable, mais sans la pression.</p>

<h2 id="blender-3d">Blender 3D</h2>
<p>La configuration et l’utilisation de <em><a href="https://www.blender.org/">Blender</a></em> est un sujet en soi. La tablette est reconnue nativement,
il faut bien penser à activer l’icone <em>gestion de la pression</em> en face des sliders le supportant.
Principalement en mode <em>sculpt</em>. Ceci dit, elle fonctionne dans tous les modes, la navigation en 3D est
très pratique, combinée aux touche <em>Ctrl</em> et <em>Shift</em>. Je recommande d’assigner <em>Undo</em>/<em>Redo</em> sur des
touches de la tablette, ainsi que <em>q</em> (menu rapide des favoris), <em>ESC</em> et <em>Tab</em> ou <em>Ctrl-Tab</em>.</p>
<video autoplay="" muted="" controls="" loop="">
  <source src="/assets/posts/LinuxDebianBusterHuionWH1409/Blender.mp4" type="video/mp4" />
Your browser does not support the video tag.
</video>

<h2 id="zoom-teams-hangout-gotomeeting-bigbluebutton">Zoom, Teams, Hangout, GoToMeeting, BigBlueButton</h2>
<p>À ma connaissance, aucun d’entre-eux ne gère la pression. Pour ceux qui disposent d’un mode annotation
ou d’un mode tableau blanc, le stylet est reconnu comme une souris et permet de dessiner
confortablement, pour les autres, il suffit de partager un écran avec un fond blanc ou une diapositive
et de dessiner dessus grâce à <em>Gromit</em> ou <em>Compiz</em>.</p>

<h2 id="freecad">FreeCAD</h2>
<p>Je pense que la tablette est utile pour <code class="language-plaintext highlighter-rouge">freecad</code>, mais je ne l’ai pas encore testée dans ce contexte.
Dans tous les cas, avec les bon raccourcis sur les boutons, ce sera plus confortable.</p>

<h2 id="libreoffice--openoffice">LibreOffice / OpenOffice</h2>
<p>Encore une fois, je ne l’ai pas encore testé, mais ce sera au pire comme une super souris améliorée avec
des boutons raccourcis bien choisis. Je n’ai pas trouvé (en 30 secondes de recherche) comment prendre la
pression en compte. Mais, en allant dans <em>Affichage</em>/<em>Barre d’outils</em>/<em>Dessin</em>, et en sélectionnant
l’outil de dessin à main levée, on peut déjà bien dessiner.</p>

<h2 id="audacity">Audacity</h2>
<p>Je n’ai pas encore testé, mais les raccourcis doivent pouvoir bien aider. Pour le côté pointage, je ne
suis pas certain que ce soit très utile. Mais ce n’est que mon opinion.</p>

<h2 id="lmms">LMMS</h2>

<p>On doit pouvoir utiliser les boutons de raccourcis, si jamais… le clavier midi maître n’en comportait
pas assez ;) Mon APK-Mini dépasse déjà largement mes besoins et compétences ;)</p>

<h2 id="natron">Natron</h2>
<p>Encore un outil opensource merveilleux, non disponibles dans les dépôts <em>Debian</em>. C’est un logiciel de
compositing vidéo de niveau professionel, clone d’un logiciel commercial, et … Français ! Les
raccourcis claviers sont bien pratiques, et le stylet permet le dessin des masques, le positionnement
des trackers, le <em>rotopainting</em> (pour faire disparaître la cousine Berthe de la vidéo du mariage, ou le
cousin Gaston qui était complètement bourré !)</p>

<h2 id="cinelerra">Cinelerra</h2>
<p>Ici aussi, l’association des raccourcis peut être utile. <code class="language-plaintext highlighter-rouge">cinelerra</code> comporte, par exemple, plusieurs
variantes de copier/coller/supprimer/undo/redo (pour les contenu ou pour les courbes). Même sans la
gestion de la pression, le positionnement de la caméra ou du projecteur se fait bien au stylet. Le
dessin de masques est aussi pratique.</p>

<h2 id="openshot-shotcut-olive-et-autres">OpenShot, Shotcut, Olive et autres</h2>
<p>Je n’utilise plus <code class="language-plaintext highlighter-rouge">OpenShot</code>, il est toujours installé et je l’ai mis dans la liste. Je pense que la
tablette et le stylet peuvent servir, même sans gestion de la pression. Je n’utilise pas (encore) les
autres, pour l’instant. J’aime trop <code class="language-plaintext highlighter-rouge">cinelerra</code>. Mais l’utilisation doit être aussi utile.</p>

<h1 id="supports-et-liens">Supports et liens</h1>

<table>
  <thead>
    <tr>
      <th>Lien</th>
      <th>Description</th>
    </tr>
  </thead>
  <tbody>
    <tr>
      <td><a href="https://youtu.be/wofhUDzIUtU" title="Enregistrement vidéo de la démonstration">Video</a></td>
      <td>Enregistrement vidéo de la démonstration</td>
    </tr>
  </tbody>
</table>

<h1 id="notes-de-bas-de-page">Notes de bas de page</h1>]]></content><author><name>François Cerbelle</name></author><category term="Informatique" /><category term="Linux" /><category term="Debian" /><category term="Buster" /><category term="Tablette graphique" /><category term="Huion" /><category term="WH1409" /><category term="Inspiroy" /><category term="Pilotes" /><category term="Drivers" /><category term="X11" /><category term="Xorg" /><category term="Compiz" /><category term="Krita" /><category term="Blender" /><category term="OpenToonz" /><category term="StoryBoarder" /><category term="Zoom" /><category term="Microsoft Teams" /><category term="Teams" /><category term="Google Hangout" /><category term="Hangout" /><category term="Citrix GoToMeeting" /><category term="GoToMeeting" /><category term="BigBlueButton" /><category term="OBS" /><category term="Open Broadcast Studio" /><category term="Digimend" /><category term="Compiz" /><summary type="html"><![CDATA[Comment installer, configurer et utiliser une tablette graphique Huion Inspiroy WH1409 sous Linux Debian Buster. Installation d'un pilote(driver), configuration du serveur XOrg, configuration des paramètres de la tablette pour les boutons, configuration multi-écran. Configuration et utilisation dans Blender, Krita, OpenToonz, Compiz, StoryBoarder, Zoom, Microsoft Teams, Google Hangout, GoToMeeting, BigBlueButton, Open Broadcast Studio (OBS), Compiz...]]></summary></entry><entry xml:lang="en"><title type="html">Debian11, Server, FWLogWatch for a daily firewall log analysis</title><link href="https://fcerbell.github.io//Debian113Server130FWLogWatchforadailyfirewallloganalysis-en/" rel="alternate" type="text/html" title="Debian11, Server, FWLogWatch for a daily firewall log analysis" /><published>2021-06-24T09:59:39+00:00</published><updated>2021-06-24T09:59:39+00:00</updated><id>https://fcerbell.github.io//Debian113Server130FWLogWatchforadailyfirewallloganalysis-en</id><content type="html" xml:base="https://fcerbell.github.io//Debian113Server130FWLogWatchforadailyfirewallloganalysis-en/"><![CDATA[<p><em>FWLogWatch</em> installation and configuration to parse the <em>IPTables</em> logs and report them groupped in very few summary lines by email. It helps to very quickly identify potential attacks and maintain the filter rules.</p>

<ul id="markdown-toc">
  <li><a href="#fwlogwatch-presentation" id="markdown-toc-fwlogwatch-presentation">FWLogWatch presentation</a></li>
  <li><a href="#prerequisites" id="markdown-toc-prerequisites">Prerequisites</a></li>
  <li><a href="#installation" id="markdown-toc-installation">Installation</a>    <ul>
      <li><a href="#preconfiguration" id="markdown-toc-preconfiguration">Preconfiguration</a></li>
      <li><a href="#install" id="markdown-toc-install">Install</a></li>
      <li><a href="#bugfix" id="markdown-toc-bugfix">Bugfix</a></li>
    </ul>
  </li>
  <li><a href="#test-with-notification" id="markdown-toc-test-with-notification">Test with notification</a></li>
  <li><a href="#materials-and-links" id="markdown-toc-materials-and-links">Materials and links</a></li>
  <li><a href="#footnotes" id="markdown-toc-footnotes">Footnotes</a></li>
</ul>

<h1 id="fwlogwatch-presentation">FWLogWatch presentation</h1>

<p><img src="/assets/posts/en/Debian113Server130FWLogWatchforadailyfirewallloganalysis/259766c721e146a3915b27508df948df.png" alt="64ac9bbbf41a4f6cfa07cf4ae9c027e0.png" /></p>

<p><em><a href="http://fwlogwatch.inside-security.de/">FWLogWatch</a></em> <sup id="fnref:1" role="doc-noteref"><a href="#fn:1" class="footnote" rel="footnote">1</a></sup> is a log parser, very similar to <em>LogWatch</em>, specialized on <em>IPTables</em> lines. It keeps only the <em>IPTables</em> related log lines, group them by source, destination, port, rule, … count them and sort them. At the end, it sends a summary email with the tops counts of the list.</p>

<p>It is very useful to immediately list the bad guys IP addresses and blacklist them, or to detect distributed attack trends. Then, is is easy to decide to block the attacks specifically.</p>

<h1 id="prerequisites">Prerequisites</h1>
<p>This article only depends on the <a href="/pages/en/tags/#debian11-preparation">Generic machine preparation</a> post serie.</p>

<h1 id="installation">Installation</h1>
<p>This tool takes most of the configuration from the commandline invocation. The invocation script uses options defined in <code class="language-plaintext highlighter-rouge">/etc/default/fwlogwatch</code> and this file is automagically generated by <em>DebConf</em> and <em>dpkg</em> at installation time, from interractive questions. The first step is to pre-answer the questions to avoid interractive prompts, before the installation.</p>

<h2 id="preconfiguration">Preconfiguration</h2>
<p>Basically, I force the following settings :</p>
<ul>
  <li>Service name resolution (-N), to have the clear name of the port, it is easier to read</li>
  <li>At least 20 similar lines (-m) to include the log line in the email, to avoid single packet notifications and keep the email notification focused on the important stuff</li>
  <li>with duration (-z) to have an idea of the potential attack pattern in time,</li>
  <li>Notifications to root
    <div class="language-bash highlighter-rouge"><div class="highlight"><pre class="highlight"><code><span class="nb">echo </span>fwlogwatch fwlogwatch/realtime boolean <span class="nb">true</span> | debconf-set-selections
<span class="nb">echo </span>fwlogwatch fwlogwatch/cron_email string <span class="s2">"root"</span> | debconf-set-selections
<span class="nb">echo </span>fwlogwatch fwlogwatch/cron_parameters string <span class="s2">"-N -m 20 -z"</span> | debconf-set-selections
</code></pre></div>    </div>
  </li>
</ul>

<h2 id="install">Install</h2>
<p>Then, the installation is straightforward, all the preconfiguration questions were answered and <em>DebConf</em> will apply the answers automatically.</p>
<div class="language-bash highlighter-rouge"><div class="highlight"><pre class="highlight"><code>apt-get <span class="nb">install</span> <span class="nt">-y</span> fwlogwatch
</code></pre></div></div>

<h2 id="bugfix">Bugfix</h2>
<p>I found a Bug <a href="https://bugs.debian.org/cgi-bin/bugreport.cgi?bug=987315">#987315</a> <sup id="fnref:1:1" role="doc-noteref"><a href="#fn:1" class="footnote" rel="footnote">1</a></sup> and submitted it in the Debian Bug Tracking System (BTS). Waiting for the fix, I made a quick patch below. This bug is supposed to be fixed from the 1.4-3 version. In case of issue using <code class="language-plaintext highlighter-rouge">systemctl</code> to stop, start, restart <em>fwlogwatch</em>, here is a quick fix :</p>
<div class="language-bash highlighter-rouge"><div class="highlight"><pre class="highlight"><code><span class="nb">sed</span> <span class="nt">-i</span> <span class="s1">'s/htpdate/fwlogwatch/'</span> /lib/systemd/system/fwlogwatch.service
</code></pre></div></div>

<h1 id="test-with-notification">Test with notification</h1>
<p>Despite it should not return a lot of warnings, the installation can be tested quickly, both for the parsing and notifications, with the following command :</p>
<div class="language-bash highlighter-rouge"><div class="highlight"><pre class="highlight"><code>/etc/cron.daily/fwlogwatch
</code></pre></div></div>

<h1 id="materials-and-links">Materials and links</h1>

<ul>
  <li><a href="https://bugs.debian.org/cgi-bin/bugreport.cgi?bug=987315">Bug #987315</a> <sup id="fnref:1:2" role="doc-noteref"><a href="#fn:1" class="footnote" rel="footnote">1</a></sup></li>
</ul>

<h1 id="footnotes">Footnotes</h1>

<div class="footnotes" role="doc-endnotes">
  <ol>
    <li id="fn:1" role="doc-endnote">
      <p>https://bugs.debian.org/cgi-bin/bugreport.cgi?bug=987315 <a href="#fnref:1" class="reversefootnote" role="doc-backlink">&#8617;</a> <a href="#fnref:1:1" class="reversefootnote" role="doc-backlink">&#8617;<sup>2</sup></a> <a href="#fnref:1:2" class="reversefootnote" role="doc-backlink">&#8617;<sup>3</sup></a></p>
    </li>
  </ol>
</div>]]></content><author><name>François Cerbelle</name></author><category term="Computers" /><category term="Debian11 Server" /><category term="GNU Linux" /><category term="Linux" /><category term="Debian" /><category term="Debian 10" /><category term="Debian 11" /><category term="Buster" /><category term="Bullseye" /><category term="Server" /><category term="Installation" /><category term="FWLogWatch" /><category term="Logs analysis" /><category term="Security" /><category term="Firewall" /><summary type="html"><![CDATA[FWLogWatch installation and configuration to parse the *IPTables* logs and report them groupped in very few summary lines by email. It helps to very quickly identify potential attacks and maintain the filter rules.]]></summary></entry><entry xml:lang="fr"><title type="html">Debian11, Serveur, FWLogWatch analyse quotidienne des logs du pare-feu</title><link href="https://fcerbell.github.io//Debian113Server130FWLogWatchforadailyfirewallloganalysis-fr/" rel="alternate" type="text/html" title="Debian11, Serveur, FWLogWatch analyse quotidienne des logs du pare-feu" /><published>2021-06-24T09:59:39+00:00</published><updated>2021-06-24T09:59:39+00:00</updated><id>https://fcerbell.github.io//Debian113Server130FWLogWatchforadailyfirewallloganalysis-fr</id><content type="html" xml:base="https://fcerbell.github.io//Debian113Server130FWLogWatchforadailyfirewallloganalysis-fr/"><![CDATA[<p>Installation et configuration de <em>FWLogWatch</em> pour analyser les journaux du pare-feu <em>IPTables</em> et les rapporter par courriel, groupés dans un résumé agrégé de quelques lignes. Cela aide grandement pour identifier très rapidement les attaques potentielles et maintenir les règles de filtrage.</p>

<ul id="markdown-toc">
  <li><a href="#présentation-de-fwlogwatch" id="markdown-toc-présentation-de-fwlogwatch">Présentation de FWLogWatch</a></li>
  <li><a href="#pré-requis" id="markdown-toc-pré-requis">Pré-requis</a></li>
  <li><a href="#installation" id="markdown-toc-installation">Installation</a>    <ul>
      <li><a href="#pré-configuration" id="markdown-toc-pré-configuration">Pré-configuration</a></li>
      <li><a href="#installation-1" id="markdown-toc-installation-1">Installation</a></li>
      <li><a href="#correctif-de-bogue" id="markdown-toc-correctif-de-bogue">Correctif de bogue</a></li>
    </ul>
  </li>
  <li><a href="#test-avec-notification" id="markdown-toc-test-avec-notification">Test avec notification</a></li>
  <li><a href="#supports-et-liens" id="markdown-toc-supports-et-liens">Supports et liens</a></li>
  <li><a href="#notes-de-bas-de-page" id="markdown-toc-notes-de-bas-de-page">Notes de bas de page</a></li>
</ul>

<h1 id="présentation-de-fwlogwatch">Présentation de FWLogWatch</h1>

<p><img src="/assets/posts/en/Debian113Server130FWLogWatchforadailyfirewallloganalysis/259766c721e146a3915b27508df948df.png" alt="64ac9bbbf41a4f6cfa07cf4ae9c027e0.png" /></p>

<p><em><a href="http://fwlogwatch.inside-security.de/">FWLogWatch</a></em> <sup id="fnref:1" role="doc-noteref"><a href="#fn:1" class="footnote" rel="footnote">1</a></sup> est un analyseur de journaux, très similaire à <em>LogWatch</em>, spécialisé sur les lignes d’<em>IPTables</em>. Il ne conserve que les entrées relatives à
<em>IPTables</em>, les groupe par origine, destination, port, règle, …, compte les occurences, et les trie. À la fin, il envoie un courriel de résumé avec le palmarès des lignes
les plus fréquentes de la liste.</p>

<p>C’est très utile pour immédiatement lister les adresses IP ou domaines douteux afin de les bloquer ou pour détecter des tendances d’attaques distribuées. Ensuite, il est
simple de décider de bloquer ces attaques spécifiquement.</p>

<h1 id="pré-requis">Pré-requis</h1>
<p>Cet article ne dépend que de la série sur la <a href="/pages/fr/tags/#préparation-debian11">préparation d’une machine générique</a>.</p>

<h1 id="installation">Installation</h1>
<p>Cet outil prend la plupart de sa configuration en paramètres de l’invocation en ligne de commande. Le script de démarrage utilise les options définies dans
<code class="language-plaintext highlighter-rouge">/etc/default/fwlogwatch</code> et ce fichier est automagiquement généré par <em>DebConf</em> et <em>dpkg</em> lors de l’installation, à partir de question interactives. La première étape est
donc de pré-répondre à ces questions pour éviter qu’elles ne soient posées lors de l’installation.</p>

<h2 id="pré-configuration">Pré-configuration</h2>
<p>En deux mots, je force la configuration suivante :</p>
<ul>
  <li>Résolution des noms de service (-N), pour avoir le nom humain du port, c’est plus facile à lire</li>
  <li>Au moins 20 occurence similaires (-m) pour qu’une ligne soit inclue dans le rapport, éviter les notifications de simple paquets et pour conserver le rapport concentré sur
les choses importantes</li>
  <li>Afficher le temps écoulé entre la première et la dernière occurence de l’attaque et avoir une idée de sa stratégie</li>
  <li>Envoi du courriel à <em>root</em>
    <div class="language-bash highlighter-rouge"><div class="highlight"><pre class="highlight"><code><span class="nb">echo </span>fwlogwatch fwlogwatch/realtime boolean <span class="nb">true</span> | debconf-set-selections
<span class="nb">echo </span>fwlogwatch fwlogwatch/cron_email string <span class="s2">"root"</span> | debconf-set-selections
<span class="nb">echo </span>fwlogwatch fwlogwatch/cron_parameters string <span class="s2">"-N -m 20 -z"</span> | debconf-set-selections
</code></pre></div>    </div>
  </li>
</ul>

<h2 id="installation-1">Installation</h2>
<p>Ensuite, l’installation est simple, toutes les questions de pré-configuration ont été répondues et <em>DebConf</em> va appliquer les réponses automatiquement.</p>
<div class="language-bash highlighter-rouge"><div class="highlight"><pre class="highlight"><code>apt-get <span class="nb">install</span> <span class="nt">-y</span> fwlogwatch
</code></pre></div></div>

<h2 id="correctif-de-bogue">Correctif de bogue</h2>
<p>J’ai trouvé un bogue <a href="https://bugs.debian.org/cgi-bin/bugreport.cgi?bug=987315">#987315</a> <sup id="fnref:1:1" role="doc-noteref"><a href="#fn:1" class="footnote" rel="footnote">1</a></sup> et l’ai soumis dans le BTS (Bug Tracking System) de <em>Debian</em>. En attendant le correctif officiel, j’ai préparé le mien rapidement,
ci-dessous. Ce bogue est supposé avoir été corrigé dans la version 1.4-3 du paquetage. En cas de problème lors de l’utilisation de la commande <code class="language-plaintext highlighter-rouge">systemctl</code>, voici mon
correctif :</p>
<div class="language-bash highlighter-rouge"><div class="highlight"><pre class="highlight"><code><span class="nb">sed</span> <span class="nt">-i</span> <span class="s1">'s/htpdate/fwlogwatch/'</span> /lib/systemd/system/fwlogwatch.service
</code></pre></div></div>

<h1 id="test-avec-notification">Test avec notification</h1>
<p>Bien qu’il ne devrait pas y avoir beaucoup d’avertissements, l’installation peut être testée rapidement, à la fois pour l’analyse et pour les notifications, avec la commande
suivante :</p>
<div class="language-bash highlighter-rouge"><div class="highlight"><pre class="highlight"><code>/etc/cron.daily/fwlogwatch
</code></pre></div></div>

<h1 id="supports-et-liens">Supports et liens</h1>

<ul>
  <li><a href="https://bugs.debian.org/cgi-bin/bugreport.cgi?bug=987315">Bug #987315</a> <sup id="fnref:1:2" role="doc-noteref"><a href="#fn:1" class="footnote" rel="footnote">1</a></sup></li>
</ul>

<h1 id="notes-de-bas-de-page">Notes de bas de page</h1>

<div class="footnotes" role="doc-endnotes">
  <ol>
    <li id="fn:1" role="doc-endnote">
      <p>https://bugs.debian.org/cgi-bin/bugreport.cgi?bug=987315 <a href="#fnref:1" class="reversefootnote" role="doc-backlink">&#8617;</a> <a href="#fnref:1:1" class="reversefootnote" role="doc-backlink">&#8617;<sup>2</sup></a> <a href="#fnref:1:2" class="reversefootnote" role="doc-backlink">&#8617;<sup>3</sup></a></p>
    </li>
  </ol>
</div>]]></content><author><name>François Cerbelle</name></author><category term="Informatique" /><category term="Debian11 Serveur" /><category term="GNU Linux" /><category term="Linux" /><category term="Debian" /><category term="Debian 10" /><category term="Debian 11" /><category term="Buster" /><category term="Bullseye" /><category term="Serveur" /><category term="Installation" /><category term="FWLogWatch" /><category term="Analyse de logs" /><category term="Logs" /><category term="Journaux" /><category term="Sécurité" /><category term="Firewall" /><category term="Pare-feu" /><summary type="html"><![CDATA[Installation et configuration de *FWLogWatch* pour analyser les journaux du pare-feu *IPTables* et les rapporter par courriel, groupés dans un résumé agrégé de quelques lignes. Cela aide grandement pour identifier très rapidement les attaques potentielles et maintenir les règles de filtrage.]]></summary></entry><entry xml:lang="en"><title type="html">Debian11, Server, LogWatch for a daily aggregated log analysis</title><link href="https://fcerbell.github.io//Debian113Server120LogWatchforadailyaggregatedloganalysis-en/" rel="alternate" type="text/html" title="Debian11, Server, LogWatch for a daily aggregated log analysis" /><published>2021-06-24T00:00:00+00:00</published><updated>2021-06-24T00:00:00+00:00</updated><id>https://fcerbell.github.io//Debian113Server120LogWatchforadailyaggregatedloganalysis-en</id><content type="html" xml:base="https://fcerbell.github.io//Debian113Server120LogWatchforadailyaggregatedloganalysis-en/"><![CDATA[<p>Whereas LogCheck is low level and hourly log lines extractions, LogWatch is higher level daily log analysis with aggregation to have behavior statistics and detect trends, slow scans or slow attacks. The email reports are shorter and consolidated. This is a very short basic default installation documentation blog post. Part of my default server installation.</p>

<ul id="markdown-toc">
  <li><a href="#logwatch-presentation" id="markdown-toc-logwatch-presentation">LogWatch presentation</a></li>
  <li><a href="#prerequisites" id="markdown-toc-prerequisites">Prerequisites</a></li>
  <li><a href="#installation" id="markdown-toc-installation">Installation</a></li>
  <li><a href="#default-configuration" id="markdown-toc-default-configuration">Default configuration</a></li>
  <li><a href="#test" id="markdown-toc-test">Test</a></li>
  <li><a href="#materials-and-links" id="markdown-toc-materials-and-links">Materials and links</a></li>
  <li><a href="#footnotes" id="markdown-toc-footnotes">Footnotes</a></li>
</ul>

<h1 id="logwatch-presentation">LogWatch presentation</h1>

<p><img src="/assets/posts/en/Debian113Server120LogWatchforadailyaggregatedloganalysis/f0495b89c2574697b62d4935f9fa6931.png" alt="ba17b78e47a8747e7559fd2ba367c6f3.png" /></p>

<p><a href="https://sourceforge.net/projects/logwatch/">LogWatch</a> <sup id="fnref:1" role="doc-noteref"><a href="#fn:1" class="footnote" rel="footnote">1</a></sup> only sends one single summary email per day. This is the first email to open in the morning. It is short, fast to read and gives a clue if something happened during the last 24h. Then, if you have doubts, or if there are other unusual emails, you can dive a little bit further with the daily TripWire email, fwlogcheck email, rkhunter email or logcheck emails.</p>

<p>Logwatch is very easy to configure, and I do not change any defaults, thus I even do not install any configuration file.</p>

<h1 id="prerequisites">Prerequisites</h1>
<p>This article only depends on the <a href="/pages/en/tags/#debian11-preparation">Generic machine preparation</a> post serie.</p>

<h1 id="installation">Installation</h1>
<p>Let’s install it from the official Linux Debian 11 Bullseye repositories :</p>
<div class="language-bash highlighter-rouge"><div class="highlight"><pre class="highlight"><code>apt-get <span class="nb">install</span> <span class="nt">-y</span> logwatch
</code></pre></div></div>

<h1 id="default-configuration">Default configuration</h1>
<p>As said previously, I do not need to change the configuration’s default values, thus I do not install the default configuration file. Anyway, if I want to change something, I’ll install it from the template and alter it.</p>
<div class="language-bash highlighter-rouge"><div class="highlight"><pre class="highlight"><code><span class="c">#cp /usr/share/logwatch/default.conf/logwatch.conf /etc/logwatch/conf/</span>
</code></pre></div></div>

<h1 id="test">Test</h1>
<p>This tests not only the log analysis but also the notifications. It can be executed several times, it is idempotent, it does not track the last execution and parses the last 24h.</p>
<div class="language-bash highlighter-rouge"><div class="highlight"><pre class="highlight"><code>/usr/sbin/logwatch <span class="nt">--output</span> mail
</code></pre></div></div>

<h1 id="materials-and-links">Materials and links</h1>

<ul>
  <li><a href="https://sourceforge.net/projects/logwatch/">Homepage</a> <sup id="fnref:1:1" role="doc-noteref"><a href="#fn:1" class="footnote" rel="footnote">1</a></sup></li>
</ul>

<h1 id="footnotes">Footnotes</h1>

<div class="footnotes" role="doc-endnotes">
  <ol>
    <li id="fn:1" role="doc-endnote">
      <p>https://sourceforge.net/projects/logwatch/ <a href="#fnref:1" class="reversefootnote" role="doc-backlink">&#8617;</a> <a href="#fnref:1:1" class="reversefootnote" role="doc-backlink">&#8617;<sup>2</sup></a></p>
    </li>
  </ol>
</div>]]></content><author><name>François Cerbelle</name></author><category term="Computers" /><category term="Debian11 Server" /><category term="Debian GNU Linux" /><category term="Linux" /><category term="Debian" /><category term="Debian 10" /><category term="Debian 11" /><category term="Buster" /><category term="Bullseye" /><category term="Server" /><category term="Installation" /><category term="Logwatch" /><category term="Analysis" /><category term="Aggregated log analysis" /><category term="Log Summary" /><category term="Security" /><summary type="html"><![CDATA[Whereas LogCheck is low level and hourly log lines extractions, LogWatch is higher level daily log analysis with aggregation to have behavior statistics and detect trends, slow scans or slow attacks. The email reports are shorter and consolidated. This is a very short basic default installation documentation blog post. Part of my default server installation.]]></summary></entry><entry xml:lang="fr"><title type="html">Debian11, Serveur, LogWatch pour une analyse quotidienne des logs</title><link href="https://fcerbell.github.io//Debian113Server120LogWatchforadailyaggregatedloganalysis-fr/" rel="alternate" type="text/html" title="Debian11, Serveur, LogWatch pour une analyse quotidienne des logs" /><published>2021-06-24T00:00:00+00:00</published><updated>2021-06-24T00:00:00+00:00</updated><id>https://fcerbell.github.io//Debian113Server120LogWatchforadailyaggregatedloganalysis-fr</id><content type="html" xml:base="https://fcerbell.github.io//Debian113Server120LogWatchforadailyaggregatedloganalysis-fr/"><![CDATA[<p>Alors que <em>LogCheck</em> est un outil bas-niveau d’extraction de lignes des journaux, <em>LogWatch</em> est un outil d’analyse quotidien de plus haut-niveau avec une agrégation renvoyant des statistiques comportementales et détectant des tendances, scans lents ou attaques lentes. Le courriel est plus court et consolidé. Je décris une configuration tres courte et basique dans cet article. C’est un des outils installés par défaut sur mes serveurs.</p>

<ul id="markdown-toc">
  <li><a href="#présentation-de-logwatch" id="markdown-toc-présentation-de-logwatch">Présentation de LogWatch</a></li>
  <li><a href="#pré-requis" id="markdown-toc-pré-requis">Pré-requis</a></li>
  <li><a href="#installation" id="markdown-toc-installation">Installation</a></li>
  <li><a href="#configuration-par-défaut" id="markdown-toc-configuration-par-défaut">Configuration par défaut</a></li>
  <li><a href="#test" id="markdown-toc-test">Test</a></li>
  <li><a href="#supports-et-liens" id="markdown-toc-supports-et-liens">Supports et liens</a></li>
  <li><a href="#notes-de-bas-de-page" id="markdown-toc-notes-de-bas-de-page">Notes de bas de page</a></li>
</ul>

<h1 id="présentation-de-logwatch">Présentation de LogWatch</h1>

<p><img src="/assets/posts/en/Debian113Server120LogWatchforadailyaggregatedloganalysis/f0495b89c2574697b62d4935f9fa6931.png" alt="ba17b78e47a8747e7559fd2ba367c6f3.png" /></p>

<p><a href="https://sourceforge.net/projects/logwatch/">LogWatch</a> <sup id="fnref:1" role="doc-noteref"><a href="#fn:1" class="footnote" rel="footnote">1</a></sup> n’envoie qu’un seul courriel de résumé par jour. C’est probablement le premier courriel à ouvrir le matin. Il est court, rapide à lire et donne une
indication si quelquechose d’inhabituel s’est produit dans les 24 dernières heures. En cas de doutes ou s’il y a d’autres courriels d’alerte, il est possible d’enquêter un
peu plus avec les courriels de <em>TripWire</em>, <em>FWLogCheck</em>, <em>RKHunter</em> ou <em>LogCheck</em>.</p>

<p><em>LogWatch</em> est très facile à configurer et je ne change aucune configuration par défaut, je n’ai donc pas besoin d’installer de fichier de configuration.</p>

<h1 id="pré-requis">Pré-requis</h1>
<p>Cet article ne dépend que de la série d’articles sur la <a href="/pages/fr/tags/#préparation-debian11">préparation d’une machine générique</a>.</p>

<h1 id="installation">Installation</h1>
<p>Installon le depuis les dépôts officiels Debian Linux Debian 11 Bullseye :</p>
<div class="language-bash highlighter-rouge"><div class="highlight"><pre class="highlight"><code>apt-get <span class="nb">install</span> <span class="nt">-y</span> logwatch
</code></pre></div></div>

<h1 id="configuration-par-défaut">Configuration par défaut</h1>
<p>Comme indiqué précédemment, je n’ai pas besoin de modifier les valeurs par défaut de la configuration, je n’installe donc pas de fichier de configuration. Dans tous les cas
si je souhaite changer quelquechose, j’installerai le fichier à partir du modèle pour le modifier.</p>
<div class="language-bash highlighter-rouge"><div class="highlight"><pre class="highlight"><code><span class="c">#cp /usr/share/logwatch/default.conf/logwatch.conf /etc/logwatch/conf/</span>
</code></pre></div></div>

<h1 id="test">Test</h1>
<p>Test de l’analyse des journaux et de l’envoi d’une notification par courriel. Il peut être exécuté plusieurs fois, il est idempotent, il ne conserve pas l’état de sa dernière
exécution et ré-analyse les dernière vingt-quatre heures.</p>
<div class="language-bash highlighter-rouge"><div class="highlight"><pre class="highlight"><code>/usr/sbin/logwatch <span class="nt">--output</span> mail
</code></pre></div></div>

<h1 id="supports-et-liens">Supports et liens</h1>

<ul>
  <li><a href="https://sourceforge.net/projects/logwatch/">Homepage</a> <sup id="fnref:1:1" role="doc-noteref"><a href="#fn:1" class="footnote" rel="footnote">1</a></sup></li>
</ul>

<h1 id="notes-de-bas-de-page">Notes de bas de page</h1>

<div class="footnotes" role="doc-endnotes">
  <ol>
    <li id="fn:1" role="doc-endnote">
      <p>https://sourceforge.net/projects/logwatch/ <a href="#fnref:1" class="reversefootnote" role="doc-backlink">&#8617;</a> <a href="#fnref:1:1" class="reversefootnote" role="doc-backlink">&#8617;<sup>2</sup></a></p>
    </li>
  </ol>
</div>]]></content><author><name>François Cerbelle</name></author><category term="Informatique" /><category term="Debian11 Serveur" /><category term="Debian GNU Linux" /><category term="Linux" /><category term="Debian" /><category term="Debian 10" /><category term="Debian 11" /><category term="Buster" /><category term="Bullseye" /><category term="Serveiur" /><category term="Installation" /><category term="Logwatch" /><category term="Analyse agregée de logs" /><category term="Résumé des Logs" /><category term="Sécurité" /><summary type="html"><![CDATA[Alors que *LogCheck* est un outil bas-niveau d'extraction de lignes des journaux, *LogWatch* est un outil d'analyse quotidien de plus haut-niveau avec une agrégation renvoyant des statistiques comportementales et détectant des tendances, scans lents ou attaques lentes. Le courriel est plus court et consolidé. Je décris une configuration tres courte et basique dans cet article. C'est un des outils installés par défaut sur mes serveurs.]]></summary></entry><entry xml:lang="en"><title type="html">Debian11, Server, Logcheck to notify about any unknown activity</title><link href="https://fcerbell.github.io//Debian113Server110Logchecktonotifyaboutanyunknownactivit-en/" rel="alternate" type="text/html" title="Debian11, Server, Logcheck to notify about any unknown activity" /><published>2021-06-10T00:00:00+00:00</published><updated>2021-06-10T00:00:00+00:00</updated><id>https://fcerbell.github.io//Debian113Server110Logchecktonotifyaboutanyunknownactivit-en</id><content type="html" xml:base="https://fcerbell.github.io//Debian113Server110Logchecktonotifyaboutanyunknownactivit-en/"><![CDATA[<p>Logcheck installation and configuration with tuning. Logcheck parses the system logfiles, removing known legitimate patterns and sends the remaining lines to the administrator. It reports all the unusual activity, helping to detect attack attempts or successful attacks that would not be catched by other tools. I prefer to have less notifications, and to read them all, instead of having too many and skip them.</p>

<p><img src="/assets/posts/en/Debian113Server110Logchecktonotifyaboutanyunknownactivit/c17687e78dda446e875215f3f532a1f2.png" alt="21f46bed14e58132cf0942f03f62b1b7.png" /></p>

<ul id="markdown-toc">
  <li><a href="#logcheck-presentation" id="markdown-toc-logcheck-presentation">Logcheck presentation</a></li>
  <li><a href="#prerequisites" id="markdown-toc-prerequisites">Prerequisites</a>    <ul>
      <li><a href="#existing-variables" id="markdown-toc-existing-variables">Existing variables</a></li>
      <li><a href="#reload-the-variables" id="markdown-toc-reload-the-variables">Reload the variables</a></li>
    </ul>
  </li>
  <li><a href="#installation" id="markdown-toc-installation">Installation</a></li>
  <li><a href="#configuration-and-tuning" id="markdown-toc-configuration-and-tuning">Configuration and tuning</a>    <ul>
      <li><a href="#aggregate-groupcount-log-lines" id="markdown-toc-aggregate-groupcount-log-lines">Aggregate (group/count) log lines</a></li>
      <li><a href="#useful-filtering-patterns" id="markdown-toc-useful-filtering-patterns">Useful filtering patterns</a></li>
      <li><a href="#ignore-iptables-blocked-attacks" id="markdown-toc-ignore-iptables-blocked-attacks">Ignore IPTables blocked attacks</a></li>
      <li><a href="#ignore-blocked-ssh-connections" id="markdown-toc-ignore-blocked-ssh-connections">Ignore blocked SSH connections</a></li>
      <li><a href="#systemd-normal-activity" id="markdown-toc-systemd-normal-activity">Systemd normal activity</a></li>
      <li><a href="#cronapt" id="markdown-toc-cronapt">CronApt</a></li>
      <li><a href="#miscellaneous" id="markdown-toc-miscellaneous">Miscellaneous</a></li>
      <li><a href="#second-nic-specific-rules" id="markdown-toc-second-nic-specific-rules">Second NIC specific rules</a></li>
    </ul>
  </li>
  <li><a href="#tests" id="markdown-toc-tests">Tests</a>    <ul>
      <li><a href="#logcheck-test" id="markdown-toc-logcheck-test">Logcheck-test</a></li>
      <li><a href="#rules-test" id="markdown-toc-rules-test">Rules test</a></li>
      <li><a href="#notification-test" id="markdown-toc-notification-test">Notification test</a></li>
    </ul>
  </li>
  <li><a href="#materials-and-links" id="markdown-toc-materials-and-links">Materials and links</a></li>
  <li><a href="#footnotes" id="markdown-toc-footnotes">Footnotes</a></li>
</ul>

<h1 id="logcheck-presentation">Logcheck presentation</h1>

<p>LogCheck is a part of the global security of the servers. Basically, it parses all the main log files up-to-now, removing the known standard usual patterns and it sends the remaining lines to the administrator. It stores a cursor per log file to avoid parsing several times the same lines.</p>

<p>My policy is to consider the already blocked attacks as normal, because they were blocked and might be further blocked later, automatically. I am only interested in the unknown patterns. It would be useless to have so many notifications that I would not read them. I prefer to have less, and to read them. On my test system, in a protected network, my goal is to have no notification at all. If I receive a notification everyday when cron-daily triggers, I do not read it anymore and if there is an attack in this timeslot, I’ll miss it.</p>

<h1 id="prerequisites">Prerequisites</h1>
<p>This article only depends on the <a href="/pages/en/tags/#debian11-preparation">Generic machine preparation</a> post serie.</p>

<h2 id="existing-variables">Existing variables</h2>
<p>We need the <code class="language-plaintext highlighter-rouge">LAN_*</code> and <code class="language-plaintext highlighter-rouge">WAN_*</code> variables which were already defined in the configuration file, the <a href="/Debian111PostInstall010Configurationvariables-en/">Configuration variables</a> and the <a href="/Debian111PostInstall020Debian-Networkconfiguration-en/">Network configuration</a> posts.</p>

<h2 id="reload-the-variables">Reload the variables</h2>
<p>Ensure that the variables are available, by loading the configuration script :</p>
<div class="language-bash highlighter-rouge"><div class="highlight"><pre class="highlight"><code><span class="nb">source</span> /root/config.env
</code></pre></div></div>

<h1 id="installation">Installation</h1>
<p>Let’s install the tool with <code class="language-plaintext highlighter-rouge">apt-get</code>.</p>
<div class="language-bash highlighter-rouge"><div class="highlight"><pre class="highlight"><code>apt-get <span class="nb">install</span> <span class="nt">-y</span> logcheck
</code></pre></div></div>
<h1 id="configuration-and-tuning">Configuration and tuning</h1>

<h2 id="aggregate-groupcount-log-lines">Aggregate (group/count) log lines</h2>
<p>First, I do not want an extensive list of the remaining log lines in the notification emails, I prefer to have the similar lines grouped together, the email is more compact and as useful. The idea is to get notified and to potentially investigate further on the server itself, not to store logs in my mailbox. Then, I also configure the email address to send the notifications to.</p>
<div class="language-bash highlighter-rouge"><div class="highlight"><pre class="highlight"><code><span class="nb">sed</span> <span class="nt">-i</span> <span class="s1">'s/^#\?SYSLOGSUMMARY=0/SYSLOGSUMMARY=1/'</span> /etc/logcheck/logcheck.conf
<span class="nb">sed</span> <span class="nt">-i</span> <span class="s1">'s/^#\?\(SENDMAILTO=\).*/\1"root"/'</span> /etc/logcheck/logcheck.conf
</code></pre></div></div>

<h2 id="useful-filtering-patterns">Useful filtering patterns</h2>

<ul>
  <li>Interface <code class="language-plaintext highlighter-rouge">en[op][0-9]s[0-9](p[0-9])?</code></li>
  <li>IP4 <code class="language-plaintext highlighter-rouge">([0-9]{1,3}\.){3}[0-9]{1,3}</code></li>
  <li>IP6 <code class="language-plaintext highlighter-rouge">([[:xdigit:]]{4}:){7}[[:xdigit:]]{4}</code></li>
  <li>MAC <code class="language-plaintext highlighter-rouge">([[:xdigit:]]{2}:){13}[[:xdigit:]]{2}</code></li>
</ul>

<p>I strongly advice to <em>always</em> wrap the regular expressions between a carret and a dollar sign, to represent the whole line and avoid missing a useful line.</p>

<h2 id="ignore-iptables-blocked-attacks">Ignore IPTables blocked attacks</h2>
<p>IPTables still logs a lot of blocked connections. I don’t want to be notified about the blocked connections, they were blocked. I want to be notified about unusual activity, thus I filter all the already detected and managed issues. I keep only attemps LOG/DROPed by the generic catchall rule. These rules are very specific and restrictive to really known patterns, thus, it can leave a lot of remaining lines. If needed, I can adjust them to be less restrictive.</p>
<div class="language-bash highlighter-rouge"><div class="highlight"><pre class="highlight"><code><span class="nb">cat</span> <span class="o">&lt;&lt;</span> <span class="no">EOF</span><span class="sh"> &gt; /etc/logcheck/ignore.d.server/local-kernel
^</span><span class="se">\w</span><span class="sh">{3} [ :[:digit:]]{11} [-._[:alnum:]]+ kernel: </span><span class="se">\[</span><span class="sh">[ [:digit:]]+</span><span class="se">\.</span><span class="sh">[[:digit:]]+</span><span class="se">\]</span><span class="sh"> </span><span class="se">\[</span><span class="sh">STEALTH</span><span class="se">\]</span><span class="sh"> IN=[[:alnum:]]+ OUT= MAC=[[:alnum:]:]+ SRC=[.[:digit:]]{7,15} DST=[.[:digit:]]{7,15} LEN=[[:digit:]]+ TOS=0x[[:digit:]]+ PREC=0x[[:digit:]]+ TTL=[[:digit:]]+ ID=[[:digit:]]+ .*$
^</span><span class="se">\w</span><span class="sh">{3} [ :[:digit:]]{11} [-._[:alnum:]]+ kernel: </span><span class="se">\[</span><span class="sh">[ [:digit:]]+</span><span class="se">\.</span><span class="sh">[[:digit:]]+</span><span class="se">\]</span><span class="sh"> </span><span class="se">\[</span><span class="sh">SYNSCAN</span><span class="se">\]</span><span class="sh"> IN=[[:alnum:]]+ OUT= MAC=[[:alnum:]:]+ SRC=[.[:digit:]]{7,15} DST=[.[:digit:]]{7,15} LEN=[[:digit:]]+ TOS=0x[[:digit:]]+ PREC=0x[[:digit:]]+ TTL=[[:digit:]]+ ID=[[:digit:]]+ .*$
^</span><span class="se">\w</span><span class="sh">{3} [ :[:digit:]]{11} [-._[:alnum:]]+ kernel: </span><span class="se">\[</span><span class="sh">[ [:digit:]]+</span><span class="se">\.</span><span class="sh">[[:digit:]]+</span><span class="se">\]</span><span class="sh"> </span><span class="se">\[</span><span class="sh">CNSCAN</span><span class="se">\]</span><span class="sh"> IN=[[:alnum:]]+ OUT= MAC=[[:alnum:]:]+ SRC=[.[:digit:]]{7,15} DST=[.[:digit:]]{7,15} LEN=[[:digit:]]+ TOS=0x[[:digit:]]+ PREC=0x[[:digit:]]+ TTL=[[:digit:]]+ ID=[[:digit:]]+ .*$
^</span><span class="se">\w</span><span class="sh">{3} [ :[:digit:]]{11} [-._[:alnum:]]+ kernel: </span><span class="se">\[</span><span class="sh">[ [:digit:]]+</span><span class="se">\.</span><span class="sh">[[:digit:]]+</span><span class="se">\]</span><span class="sh"> </span><span class="se">\[</span><span class="sh">GRSCAN</span><span class="se">\]</span><span class="sh"> IN=[[:alnum:]]+ OUT= MAC=[[:alnum:]:]+ SRC=[.[:digit:]]{7,15} DST=[.[:digit:]]{7,15} LEN=[[:digit:]]+ TOS=0x[[:digit:]]+ PREC=0x[[:digit:]]+ TTL=[[:digit:]]+ ID=[[:digit:]]+ .*$
^</span><span class="se">\w</span><span class="sh">{3} [ :[:digit:]]{11} [-._[:alnum:]]+ kernel: </span><span class="se">\[</span><span class="sh">[ [:digit:]]+</span><span class="se">\.</span><span class="sh">[[:digit:]]+</span><span class="se">\]</span><span class="sh"> </span><span class="se">\[</span><span class="sh">INPUT</span><span class="se">\]</span><span class="sh"> IN=</span><span class="k">${</span><span class="nv">WAN_IF</span><span class="k">}</span><span class="sh"> OUT= MAC=([[:xdigit:]]{2}:){13}[[:xdigit:]]{2} SRC=([0-9]{1,3}</span><span class="se">\.</span><span class="sh">){3}[0-9]{1,3} DST=([0-9]{1,3}</span><span class="se">\.</span><span class="sh">){3}255 LEN=164 TOS=0x00 PREC=0x00 TTL=64 ID=[[:digit:]]+ DF PROTO=UDP SPT=44752 DPT=6771 LEN=[[:digit:]]+$
^</span><span class="se">\w</span><span class="sh">{3} [ :[:digit:]]{11} [-._[:alnum:]]+ kernel: </span><span class="se">\[</span><span class="sh">[ [:digit:]]+</span><span class="se">\.</span><span class="sh">[[:digit:]]+</span><span class="se">\]</span><span class="sh"> </span><span class="se">\[</span><span class="sh">INPUT</span><span class="se">\]</span><span class="sh"> IN=</span><span class="k">${</span><span class="nv">WAN_IF</span><span class="k">}</span><span class="sh"> OUT= MAC=([[:xdigit:]]{2}:){13}[[:xdigit:]]{2} SRC=([0-9]{1,3}</span><span class="se">\.</span><span class="sh">){3}[0-9]{1,3} DST=([0-9]{1,3}</span><span class="se">\.</span><span class="sh">){3}255 LEN=44 TOS=0x00 PREC=0x00 TTL=64 ID=[[:digit:]]+ DF PROTO=UDP SPT=8612 DPT=861[02] LEN=24$
^</span><span class="se">\w</span><span class="sh">{3} [ :[:digit:]]{11} [-._[:alnum:]]+ kernel: </span><span class="se">\[</span><span class="sh">[ [:digit:]]+</span><span class="se">\.</span><span class="sh">[[:digit:]]+</span><span class="se">\]</span><span class="sh"> </span><span class="se">\[</span><span class="sh">INPUT</span><span class="se">\]</span><span class="sh"> IN=</span><span class="k">${</span><span class="nv">WAN_IF</span><span class="k">}</span><span class="sh"> OUT= MAC=([[:xdigit:]]{2}:){13}[[:xdigit:]]{2} SRC=([0-9]{1,3}</span><span class="se">\.</span><span class="sh">){3}[0-9]{1,3} DST=255</span><span class="se">\.</span><span class="sh">255</span><span class="se">\.</span><span class="sh">255</span><span class="se">\.</span><span class="sh">255 LEN=101 TOS=0x00 PREC=0x00 TTL=64 ID=[[:digit:]]+ DF PROTO=UDP SPT=[[:digit:]]+ DPT=161 LEN=81$
^</span><span class="se">\w</span><span class="sh">{3} [ :[:digit:]]{11} [-._[:alnum:]]+ kernel: </span><span class="se">\[</span><span class="sh">[ [:digit:]]+</span><span class="se">\.</span><span class="sh">[[:digit:]]+</span><span class="se">\]</span><span class="sh"> </span><span class="se">\[</span><span class="sh">INPUT</span><span class="se">\]</span><span class="sh"> IN=</span><span class="k">${</span><span class="nv">WAN_IF</span><span class="k">}</span><span class="sh"> OUT= MAC=([[:xdigit:]]{2}:){13}[[:xdigit:]]{2} SRC=([0-9]{1,3}</span><span class="se">\.</span><span class="sh">){3}[0-9]{1,3} DST=255.255.255.255 LEN=[[:digit:]]+ TOS=0x[01]0 PREC=0x00 TTL=[[:digit:]]+ ID=[[:digit:]]+ (DF )?PROTO=UDP SPT=68 DPT=67 LEN=[[:digit:]]+$
# ff02:0000:0000:0000:0000:0000:0000:0002 = All local routers
# FF02:0000:0000:0000:0000:0000:0000:0001 = All local nodes
^</span><span class="se">\w</span><span class="sh">{3} [ :[:digit:]]{11} [-._[:alnum:]]+ kernel: </span><span class="se">\[</span><span class="sh">[ [:digit:]]+</span><span class="se">\.</span><span class="sh">[[:digit:]]+</span><span class="se">\]</span><span class="sh"> </span><span class="se">\[</span><span class="sh">IP6</span><span class="se">\]</span><span class="sh"> IN= OUT=en[op][0-9]s[0-9](p[0-9])? SRC=([[:xdigit:]]{4}:){7}[[:xdigit:]]{4} DST=ff02:(0000:){6}0002 LEN=56 TC=0 HOPLIMIT=255 FLOWLBL=0 PROTO=ICMPv6 TYPE=133 CODE=0$
^</span><span class="se">\w</span><span class="sh">{3} [ :[:digit:]]{11} [-._[:alnum:]]+ kernel: </span><span class="se">\[</span><span class="sh">[ [:digit:]]+</span><span class="se">\.</span><span class="sh">[[:digit:]]+</span><span class="se">\]</span><span class="sh"> </span><span class="se">\[</span><span class="sh">IP6</span><span class="se">\]</span><span class="sh"> IN= OUT=en[op][0-9]s[0-9](p[0-9])? SRC=(0000:){7}0000 DST=ff02:(0000:){6}0016 LEN=76 TC=0 HOPLIMIT=1 FLOWLBL=0 PROTO=ICMPv6 TYPE=143 CODE=0 MARK=0xd4$
^</span><span class="se">\w</span><span class="sh">{3} [ :[:digit:]]{11} [-._[:alnum:]]+ kernel: </span><span class="se">\[</span><span class="sh">[ [:digit:]]+</span><span class="se">\.</span><span class="sh">[[:digit:]]+</span><span class="se">\]</span><span class="sh"> </span><span class="se">\[</span><span class="sh">IP6</span><span class="se">\]</span><span class="sh"> IN= OUT=lo SRC=(0000:){7}0001 DST=(0000:){7}0001 LEN=[[:digit:]]+ TC=[[:digit:]]+ HOPLIMIT=64 FLOWLBL=[[:digit:]]+ PROTO=UDP SPT=[[:digit:]]+ DPT=[[:digit:]]+ LEN=[[:digit:]]+$
</span><span class="no">EOF
</span></code></pre></div></div>

<h2 id="ignore-blocked-ssh-connections">Ignore blocked SSH connections</h2>
<p>These lines are typical SSH connection failures. The connections were blocked, then the SSH rate limiter and the <a href="/Debian113Server070fail2bantobanobviousattacksources-en/">fail2ban</a> rules will take actions if the attack continue. I don’t need to be notified.</p>
<div class="language-bash highlighter-rouge"><div class="highlight"><pre class="highlight"><code><span class="nb">cat</span> <span class="o">&lt;&lt;</span> <span class="no">EOF</span><span class="sh"> &gt; /etc/logcheck/ignore.d.server/local-ssh
^</span><span class="se">\w</span><span class="sh">{3} [ :[:digit:]]{11} [-._[:alnum:]]+ sshd</span><span class="se">\[</span><span class="sh">[[:digit:]]+</span><span class="se">\]</span><span class="sh">: Received disconnect from [[:digit:].]+ port [[:digit:]]+.*</span><span class="se">\[</span><span class="sh">preauth</span><span class="se">\]</span><span class="sh">$
^</span><span class="se">\w</span><span class="sh">{3} [ :[:digit:]]{11} [-._[:alnum:]]+ sshd</span><span class="se">\[</span><span class="sh">[[:digit:]]+</span><span class="se">\]</span><span class="sh">: Disconnected from [[:digit:].]+ port [[:digit:]]+.*</span><span class="se">\[</span><span class="sh">preauth</span><span class="se">\]</span><span class="sh">$
^</span><span class="se">\w</span><span class="sh">{3} [ :[:digit:]]{11} [-._[:alnum:]]+ sshd</span><span class="se">\[</span><span class="sh">[[:digit:]]+</span><span class="se">\]</span><span class="sh">: Invalid user [_[:alnum:]]+ from [[:digit:].]+ port [[:digit:]]+$
^</span><span class="se">\w</span><span class="sh">{3} [ :[:digit:]]{11} [-._[:alnum:]]+ sshd</span><span class="se">\[</span><span class="sh">[[:digit:]]+</span><span class="se">\]</span><span class="sh">: Connection closed by [[:digit:].]+ port [[:digit:]:]+.*</span><span class="se">\[</span><span class="sh">preauth</span><span class="se">\]</span><span class="sh">$
</span><span class="no">EOF
</span></code></pre></div></div>

<h2 id="systemd-normal-activity">Systemd normal activity</h2>
<p>These are normal maintenance actions automatically triggered by <code class="language-plaintext highlighter-rouge">systemd</code>. I don’t care when it works ! ;)</p>
<div class="language-bash highlighter-rouge"><div class="highlight"><pre class="highlight"><code><span class="nb">cat</span> <span class="o">&lt;&lt;</span> <span class="no">EOF</span><span class="sh"> &gt; /etc/logcheck/ignore.d.server/local-systemd
^</span><span class="se">\w</span><span class="sh">{3} [ :[:digit:]]{11} [-._[:alnum:]]+ systemd</span><span class="se">\[</span><span class="sh">1</span><span class="se">\]</span><span class="sh">: [-/:. [:alnum:]]+: Succeeded.$
^</span><span class="se">\w</span><span class="sh">{3} [ :[:digit:]]{11} [-._[:alnum:]]+ systemd</span><span class="se">\[</span><span class="sh">1</span><span class="se">\]</span><span class="sh">: Started [-/:. [:alnum:]]+$
^</span><span class="se">\w</span><span class="sh">{3} [ :[:digit:]]{11} [-._[:alnum:]]+ systemd</span><span class="se">\[</span><span class="sh">1</span><span class="se">\]</span><span class="sh">: Created [-/:. [:alnum:]]+$
^</span><span class="se">\w</span><span class="sh">{3} [ :[:digit:]]{11} [-._[:alnum:]]+ systemd</span><span class="se">\[</span><span class="sh">1</span><span class="se">\]</span><span class="sh">: Starting [-/:. [:alnum:]]+$
^</span><span class="se">\w</span><span class="sh">{3} [ :[:digit:]]{11} [-._[:alnum:]]+ systemd</span><span class="se">\[</span><span class="sh">1</span><span class="se">\]</span><span class="sh">: Finished [-/:. [:alnum:]]+$
</span><span class="no">EOF
</span></code></pre></div></div>

<h2 id="cronapt">CronApt</h2>
<p>CronApt tells us that it managed to update its package database and to send us a notification… I don’t need a double notification.</p>
<div class="language-bash highlighter-rouge"><div class="highlight"><pre class="highlight"><code><span class="nb">cat</span> <span class="o">&lt;&lt;</span> <span class="no">EOF</span><span class="sh"> &gt; /etc/logcheck/ignore.d.server/local-cronapt
^</span><span class="se">\w</span><span class="sh">{3} [ :[:digit:]]{11} [-._[:alnum:]]+ cron-apt: CRON-APT ACTION: 9-notify$
^</span><span class="se">\w</span><span class="sh">{3} [ :[:digit:]]{11} [-._[:alnum:]]+ cron-apt: CRON-APT LINE: /usr/bin/apt-get -o quiet=2 -q -q --no-act upgrade$
^</span><span class="se">\w</span><span class="sh">{3} [ :[:digit:]]{11} [-._[:alnum:]]+ cron-apt: CRON-APT LINE: /usr/bin/apt-get -o quiet=2 update -o quiet=2$
</span><span class="no">EOF
</span></code></pre></div></div>

<h2 id="miscellaneous">Miscellaneous</h2>
<p>There is an audit procedure regularly triggered in the linux kernel to gather some metrics about performances. I has to be as transparent as possible, its trigger period is increased if the call takes too long. This is somehow a normal message, at least until the ideal period is found. Anyway, I would have other visible issues before this message could be useful.
I also grouped here some log lines about <em>fail2ban</em>, <em>dhcp</em>, <em>ntpd</em>, <em>RKHunter</em> and <em>rsyslogd</em> normal behavior.  <em>RKHunter</em> already sends emails by itself, no need to duplicate.</p>
<div class="language-bash highlighter-rouge"><div class="highlight"><pre class="highlight"><code><span class="nb">cat</span> <span class="o">&lt;&lt;</span> <span class="no">EOF</span><span class="sh"> &gt; /etc/logcheck/ignore.d.server/local-misc
^</span><span class="se">\w</span><span class="sh">{3} [ :[:digit:]]{11} [-._[:alnum:]]+ kernel: </span><span class="se">\[</span><span class="sh">[ [:digit:]]+</span><span class="se">\.</span><span class="sh">[[:digit:]]+</span><span class="se">\]</span><span class="sh"> perf: interrupt took too long </span><span class="se">\(</span><span class="sh">[[:digit:]]+ &gt; [[:digit:]]+</span><span class="se">\)</span><span class="sh">, lowering kernel.perf_event_max_sample_rate to [[:digit:]]+$
^</span><span class="se">\w</span><span class="sh">{3} [ :[:digit:]]{11} [-._[:alnum:]]+ fail2ban-server</span><span class="se">\[</span><span class="sh">[[:digit:]]+</span><span class="se">\]</span><span class="sh">: Server ready$
^</span><span class="se">\w</span><span class="sh">{3} [ :[:digit:]]{11} [-._[:alnum:]]+ isc-dhcp-server</span><span class="se">\[</span><span class="sh">[[:digit:]]+</span><span class="se">\]</span><span class="sh">: Starting ISC DHCPv4 server: dhcpd.$
^</span><span class="se">\w</span><span class="sh">{3} [ :[:digit:]]{11} [-._[:alnum:]]+ ntpd</span><span class="se">\[</span><span class="sh">[[:digit:]]+</span><span class="se">\]</span><span class="sh">: configuration OK$
^</span><span class="se">\w</span><span class="sh">{3} [ :[:digit:]]{11} [-._[:alnum:]]+ rsyslogd:  </span><span class="se">\[</span><span class="sh">origin software="rsyslogd" swVersion="8.1901.0" x-pid="[[:digit:]]+" x-info="https://www.rsyslog.com"</span><span class="se">\]</span><span class="sh"> rsyslogd was HUPed$
^</span><span class="se">\w</span><span class="sh">{3} [ :[:digit:]]{11} [-._[:alnum:]]+ rkhunter: Please inspect this machine, because it may be infected.$
</span><span class="no">EOF
</span></code></pre></div></div>

<h2 id="second-nic-specific-rules">Second NIC specific rules</h2>
<p>If there is a second NIC on the server, and if it is used as a router, the internal LAN can be restarted, unplugged, … Thus, I don’t want to be notified by email, it would be stupid to send the notification somewhere, in a location that I can not reach ;) Furthermore, these rules are specific to my hardware (NIC and Switch).</p>
<div class="language-bash highlighter-rouge"><div class="highlight"><pre class="highlight"><code><span class="nb">cat</span> <span class="o">&lt;&lt;</span> <span class="no">EOF</span><span class="sh"> &gt; /etc/logcheck/ignore.d.server/local-router
^</span><span class="se">\w</span><span class="sh">{3} [ :[:digit:]]{11} [-._[:alnum:]]+ kernel: </span><span class="se">\[\s</span><span class="sh">?[[:digit:]]+</span><span class="se">\.</span><span class="sh">[[:digit:]]+</span><span class="se">\]</span><span class="sh"> e1000e 0000:03:00.0 enp3s0: 10/100 speed: disabling TSO$
^</span><span class="se">\w</span><span class="sh">{3} [ :[:digit:]]{11} [-._[:alnum:]]+ kernel: </span><span class="se">\[\s</span><span class="sh">?[[:digit:]]+</span><span class="se">\.</span><span class="sh">[[:digit:]]+</span><span class="se">\]</span><span class="sh"> e1000e: </span><span class="k">${</span><span class="nv">LAN_IF</span><span class="k">}</span><span class="sh"> NIC Link is Down$
^</span><span class="se">\w</span><span class="sh">{3} [ :[:digit:]]{11} [-._[:alnum:]]+ kernel: </span><span class="se">\[\s</span><span class="sh">?[[:digit:]]+</span><span class="se">\.</span><span class="sh">[[:digit:]]+</span><span class="se">\]</span><span class="sh"> e1000e: </span><span class="k">${</span><span class="nv">LAN_IF</span><span class="k">}</span><span class="sh"> NIC Link is Up 1000 Mbps Full Duplex, Flow Control: Rx/Tx$
</span></code></pre></div></div>

<h1 id="tests">Tests</h1>

<h2 id="logcheck-test">Logcheck-test</h2>
<p>If you are unsure about rules, you can use the <code class="language-plaintext highlighter-rouge">logcheck-test</code> tool to apply a rule file on a logfile, either to get the matches or to get the remaining lines. This is not part of my standard installation, but I wanted to note this information here as it could be useful to debug rules and RegExps.</p>

<p><img src="/assets/posts/en/Debian113Server110Logchecktonotifyaboutanyunknownactivit/396b3e745f0f4317af54713d5a046584.png" alt="475eb6586aeb857ecd7a2a5848487b3c.png" /></p>

<h2 id="rules-test">Rules test</h2>
<p>This test will execute logcheck with a real configuration, but will not update the log cursor, thus you can execute it as many times as you want. It does not send a notification email neither.</p>
<div class="language-bash highlighter-rouge"><div class="highlight"><pre class="highlight"><code><span class="nb">sudo</span> <span class="nt">-u</span> logcheck logcheck <span class="nt">-o</span> <span class="nt">-t</span>
</code></pre></div></div>

<h2 id="notification-test">Notification test</h2>
<p>This one will not update the cursor, neither, thus you can execute it as many times as you want, until the notifications work as you expect.</p>
<div class="language-bash highlighter-rouge"><div class="highlight"><pre class="highlight"><code><span class="nb">sudo</span> <span class="nt">-u</span> logcheck logcheck <span class="nt">-t</span>
</code></pre></div></div>

<h1 id="materials-and-links">Materials and links</h1>

<ul>
  <li><a href="https://www1.zonewebmaster.eu/serveur-debian-securite">zonewebmaster</a> <sup id="fnref:1" role="doc-noteref"><a href="#fn:1" class="footnote" rel="footnote">1</a></sup></li>
  <li><a href="https://www.ictforce.be/2018/linux-security-logcheck/">ictforce</a> <sup id="fnref:2" role="doc-noteref"><a href="#fn:2" class="footnote" rel="footnote">2</a></sup>
    <h1 id="footnotes">Footnotes</h1>
  </li>
</ul>

<div class="footnotes" role="doc-endnotes">
  <ol>
    <li id="fn:1" role="doc-endnote">
      <p>https://www1.zonewebmaster.eu/serveur-debian-securite <a href="#fnref:1" class="reversefootnote" role="doc-backlink">&#8617;</a></p>
    </li>
    <li id="fn:2" role="doc-endnote">
      <p>https://www.ictforce.be/2018/linux-security-logcheck/ <a href="#fnref:2" class="reversefootnote" role="doc-backlink">&#8617;</a></p>
    </li>
  </ol>
</div>]]></content><author><name>François Cerbelle</name></author><category term="Computers" /><category term="Debian11 Server" /><category term="GNU Linux" /><category term="Linux" /><category term="Debian" /><category term="Debian 10" /><category term="Debian 11" /><category term="Buster" /><category term="Bullseye" /><category term="Server" /><category term="Installation" /><category term="Logcheck" /><category term="Log analysis" /><category term="Analysis" /><category term="Security" /><category term="Notification" /><category term="Detection" /><summary type="html"><![CDATA[Logcheck installation and configuration with tuning. Logcheck parses the system logfiles, removing known legitimate patterns and sends the remaining lines to the administrator. It reports all the unusual activity, helping to detect attack attempts or successful attacks that would not be catched by other tools. I prefer to have less notifications, and to read them all, instead of having too many and skip them.]]></summary></entry><entry xml:lang="fr"><title type="html">Debian11, Serveur, Logcheck pour notifier toute activité inconnue</title><link href="https://fcerbell.github.io//Debian113Server110Logchecktonotifyaboutanyunknownactivit-fr/" rel="alternate" type="text/html" title="Debian11, Serveur, Logcheck pour notifier toute activité inconnue" /><published>2021-06-10T00:00:00+00:00</published><updated>2021-06-10T00:00:00+00:00</updated><id>https://fcerbell.github.io//Debian113Server110Logchecktonotifyaboutanyunknownactivit-fr</id><content type="html" xml:base="https://fcerbell.github.io//Debian113Server110Logchecktonotifyaboutanyunknownactivit-fr/"><![CDATA[<p>Installation et configuration de LogCheck, avec réglages. LogCheck parcourt les fichiers journaux du système, retire les motifs légitimes connus et envoie les lignes restantes à l’dministrateur. Il rapporte toute l’activité anormale, aidant à détecter des tentatives d’attaques, éventuellement réussies, qui ne seraient pas stoppées par d’autres outils. Je préfère avoir peu de notifications et les lire toutes que d’en avoir trop et de les ignorer.</p>

<p><img src="/assets/posts/en/Debian113Server110Logchecktonotifyaboutanyunknownactivit/c17687e78dda446e875215f3f532a1f2.png" alt="21f46bed14e58132cf0942f03f62b1b7.png" /></p>

<ul id="markdown-toc">
  <li><a href="#présentation-de-logcheck" id="markdown-toc-présentation-de-logcheck">Présentation de LogCheck</a></li>
  <li><a href="#pré-requis" id="markdown-toc-pré-requis">Pré-requis</a>    <ul>
      <li><a href="#variables-existantes" id="markdown-toc-variables-existantes">Variables existantes</a></li>
      <li><a href="#chargement-des-variables" id="markdown-toc-chargement-des-variables">Chargement des variables</a></li>
    </ul>
  </li>
  <li><a href="#installation" id="markdown-toc-installation">Installation</a></li>
  <li><a href="#configuration-et-ajustements" id="markdown-toc-configuration-et-ajustements">Configuration et ajustements</a>    <ul>
      <li><a href="#agrégation-groupecompteur-des-lignes" id="markdown-toc-agrégation-groupecompteur-des-lignes">Agrégation (groupe/compteur) des lignes</a></li>
      <li><a href="#motifs-regex-utiles" id="markdown-toc-motifs-regex-utiles">Motifs RegEx utiles</a></li>
      <li><a href="#ignorer-les-attaques-bloquées-par-iptables" id="markdown-toc-ignorer-les-attaques-bloquées-par-iptables">Ignorer les attaques bloquées par IPTables</a></li>
      <li><a href="#ignore-les-connexions-ssh-bloquées" id="markdown-toc-ignore-les-connexions-ssh-bloquées">Ignore les connexions SSH bloquées</a></li>
      <li><a href="#activité-normale-de-systemd" id="markdown-toc-activité-normale-de-systemd">Activité normale de Systemd</a></li>
      <li><a href="#cronapt" id="markdown-toc-cronapt">CronApt</a></li>
      <li><a href="#divers" id="markdown-toc-divers">Divers</a></li>
      <li><a href="#interface-réseau-lan" id="markdown-toc-interface-réseau-lan">Interface réseau LAN</a></li>
    </ul>
  </li>
  <li><a href="#tests" id="markdown-toc-tests">Tests</a>    <ul>
      <li><a href="#logcheck-test" id="markdown-toc-logcheck-test">Logcheck-test</a></li>
      <li><a href="#test-des-règles" id="markdown-toc-test-des-règles">Test des règles</a></li>
      <li><a href="#test-de-notification" id="markdown-toc-test-de-notification">Test de notification</a></li>
    </ul>
  </li>
  <li><a href="#supports-et-liens" id="markdown-toc-supports-et-liens">Supports et liens</a></li>
  <li><a href="#notes-de-bas-de-page" id="markdown-toc-notes-de-bas-de-page">Notes de bas de page</a></li>
</ul>

<h1 id="présentation-de-logcheck">Présentation de LogCheck</h1>

<p>LogCheck fait partie de l’outillage global de la sécurité des serveurs. Il parcourt tous les principaux
fichiers journaux jusqu’à la fin, en retire les motifs habituels standard et envoie les lignes restantes à
l’administrateur. Il enregistre un curseur par fichier journal pour éviter de parcourir plusieurs fois les
mêmes lignes.</p>

<p>Ma politique est de considérer les attaques bloquées par ailleurs comme normales, car elles ont déjà été
bloquées et peuvent l’être encore plus, automatiquement. Je ne suis intéressé que par les motifs inconnus. Il
serait inutile d’avoir tellement de notifications que je ne les lise plus. Je préfère en recevoir moins et les
lire. Sur mes systèmes de test, dans un environnement protégé, mon but est de ne plus avoir de notification du
tout. Si je reçois une notification tous les jours lorsque <code class="language-plaintext highlighter-rouge">cron-daily</code> se déclenche, je ne vais plus les lire
car je les considère comme normales et je ne verrai pas si une attaque survient dans la même tranche horaire.</p>

<h1 id="pré-requis">Pré-requis</h1>
<p>Cet article ne dépend que de la série sur la <a href="/pages/fr/tags/#préparation-debian11">Préparation d’une machine générique</a>.</p>

<h2 id="variables-existantes">Variables existantes</h2>
<p>Nous avons besoin des variables <code class="language-plaintext highlighter-rouge">LAN_*</code> et <code class="language-plaintext highlighter-rouge">WAN_*</code> qui ont déjà été définies dans le fichier de configuration
par les articles <a href="/Debian111PostInstall010Configurationvariables-fr/">Variables de configuration</a> et <a href="/Debian111PostInstall020Debian-Networkconfiguration-fr/">Configuration réseau</a>.</p>

<h2 id="chargement-des-variables">Chargement des variables</h2>
<p>Assurons-nous que les variables sont bien disponibles dans l’environnement en exécutant le script de
configuration :</p>
<div class="language-bash highlighter-rouge"><div class="highlight"><pre class="highlight"><code><span class="nb">source</span> /root/config.env
</code></pre></div></div>

<h1 id="installation">Installation</h1>
<p>Installons simplement l’outil à l’aide d’<code class="language-plaintext highlighter-rouge">apt-get</code>. Il est léger et ne pose aucune question.</p>
<div class="language-bash highlighter-rouge"><div class="highlight"><pre class="highlight"><code>apt-get <span class="nb">install</span> <span class="nt">-y</span> logcheck
</code></pre></div></div>
<h1 id="configuration-et-ajustements">Configuration et ajustements</h1>

<h2 id="agrégation-groupecompteur-des-lignes">Agrégation (groupe/compteur) des lignes</h2>
<p>Tout d’abord, je ne souhaite pas reçevoir une liste exhaustive des lignes restantes dans mes courriels de
notification, je préfère les avoir groupées, le message est plus compact et utile. L’idée est de recevoir une
notification et d’enquêter éventuellement sur le serveur, pas d’historiser les journaux dans ma boite
électronique. Ensuite, je configure l’adresse électronique de destination à laquelle envoyer les notifications.</p>
<div class="language-bash highlighter-rouge"><div class="highlight"><pre class="highlight"><code><span class="nb">sed</span> <span class="nt">-i</span> <span class="s1">'s/^#\?SYSLOGSUMMARY=0/SYSLOGSUMMARY=1/'</span> /etc/logcheck/logcheck.conf
<span class="nb">sed</span> <span class="nt">-i</span> <span class="s1">'s/^#\?\(SENDMAILTO=\).*/\1"root"/'</span> /etc/logcheck/logcheck.conf
</code></pre></div></div>

<h2 id="motifs-regex-utiles">Motifs RegEx utiles</h2>

<ul>
  <li>Interface <code class="language-plaintext highlighter-rouge">en[op][0-9]s[0-9](p[0-9])?</code></li>
  <li>IP4 <code class="language-plaintext highlighter-rouge">([0-9]{1,3}\.){3}[0-9]{1,3}</code></li>
  <li>IP6 <code class="language-plaintext highlighter-rouge">([[:xdigit:]]{4}:){7}[[:xdigit:]]{4}</code></li>
  <li>MAC <code class="language-plaintext highlighter-rouge">([[:xdigit:]]{2}:){13}[[:xdigit:]]{2}</code></li>
</ul>

<p>Je recommende fortement de toujours <em>encapsuler</em> les expressions régulières entre un accent circonflexe et un
dollar pour représenter une ligne complète et éviter de filtrer des lignes utiles.</p>

<h2 id="ignorer-les-attaques-bloquées-par-iptables">Ignorer les attaques bloquées par IPTables</h2>
<p>IPTables continue à historiser beaucoup de connexions bloquées. Je ne souhaite pas être notifié de toutes ces
connexions bloquées, aucune action de ma part n’est requise, elles ont déjà été bloquées. Je veux être notifié
de l’activité anormale, non prévue, je filtre donc la plupart des problèmes déjà détectés et gérés. Je ne garde
que les tentatives non capturées par des règles spéficiques, celles qui atteignent la règle « attrape-tout ».
Les motifs sont très spécifiques et restrictifs sur des cas parfaitements connus, il peut donc subsister
beaucoup de lignes, au besoin, j’ajusterai les motifs pour filtrer avec moins de restrictions.</p>
<div class="language-bash highlighter-rouge"><div class="highlight"><pre class="highlight"><code><span class="nb">cat</span> <span class="o">&lt;&lt;</span> <span class="no">EOF</span><span class="sh"> &gt; /etc/logcheck/ignore.d.server/local-kernel
^</span><span class="se">\w</span><span class="sh">{3} [ :[:digit:]]{11} [-._[:alnum:]]+ kernel: </span><span class="se">\[</span><span class="sh">[ [:digit:]]+</span><span class="se">\.</span><span class="sh">[[:digit:]]+</span><span class="se">\]</span><span class="sh"> </span><span class="se">\[</span><span class="sh">STEALTH</span><span class="se">\]</span><span class="sh"> IN=[[:alnum:]]+ OUT= MAC=[[:alnum:]:]+ SRC=[.[:digit:]]{7,15} DST=[.[:digit:]]{7,15} LEN=[[:digit:]]+ TOS=0x[[:digit:]]+ PREC=0x[[:digit:]]+ TTL=[[:digit:]]+ ID=[[:digit:]]+ .*$
^</span><span class="se">\w</span><span class="sh">{3} [ :[:digit:]]{11} [-._[:alnum:]]+ kernel: </span><span class="se">\[</span><span class="sh">[ [:digit:]]+</span><span class="se">\.</span><span class="sh">[[:digit:]]+</span><span class="se">\]</span><span class="sh"> </span><span class="se">\[</span><span class="sh">SYNSCAN</span><span class="se">\]</span><span class="sh"> IN=[[:alnum:]]+ OUT= MAC=[[:alnum:]:]+ SRC=[.[:digit:]]{7,15} DST=[.[:digit:]]{7,15} LEN=[[:digit:]]+ TOS=0x[[:digit:]]+ PREC=0x[[:digit:]]+ TTL=[[:digit:]]+ ID=[[:digit:]]+ .*$
^</span><span class="se">\w</span><span class="sh">{3} [ :[:digit:]]{11} [-._[:alnum:]]+ kernel: </span><span class="se">\[</span><span class="sh">[ [:digit:]]+</span><span class="se">\.</span><span class="sh">[[:digit:]]+</span><span class="se">\]</span><span class="sh"> </span><span class="se">\[</span><span class="sh">CNSCAN</span><span class="se">\]</span><span class="sh"> IN=[[:alnum:]]+ OUT= MAC=[[:alnum:]:]+ SRC=[.[:digit:]]{7,15} DST=[.[:digit:]]{7,15} LEN=[[:digit:]]+ TOS=0x[[:digit:]]+ PREC=0x[[:digit:]]+ TTL=[[:digit:]]+ ID=[[:digit:]]+ .*$
^</span><span class="se">\w</span><span class="sh">{3} [ :[:digit:]]{11} [-._[:alnum:]]+ kernel: </span><span class="se">\[</span><span class="sh">[ [:digit:]]+</span><span class="se">\.</span><span class="sh">[[:digit:]]+</span><span class="se">\]</span><span class="sh"> </span><span class="se">\[</span><span class="sh">GRSCAN</span><span class="se">\]</span><span class="sh"> IN=[[:alnum:]]+ OUT= MAC=[[:alnum:]:]+ SRC=[.[:digit:]]{7,15} DST=[.[:digit:]]{7,15} LEN=[[:digit:]]+ TOS=0x[[:digit:]]+ PREC=0x[[:digit:]]+ TTL=[[:digit:]]+ ID=[[:digit:]]+ .*$
^</span><span class="se">\w</span><span class="sh">{3} [ :[:digit:]]{11} [-._[:alnum:]]+ kernel: </span><span class="se">\[</span><span class="sh">[ [:digit:]]+</span><span class="se">\.</span><span class="sh">[[:digit:]]+</span><span class="se">\]</span><span class="sh"> </span><span class="se">\[</span><span class="sh">INPUT</span><span class="se">\]</span><span class="sh"> IN=</span><span class="k">${</span><span class="nv">WAN_IF</span><span class="k">}</span><span class="sh"> OUT= MAC=([[:xdigit:]]{2}:){13}[[:xdigit:]]{2} SRC=([0-9]{1,3}</span><span class="se">\.</span><span class="sh">){3}[0-9]{1,3} DST=([0-9]{1,3}</span><span class="se">\.</span><span class="sh">){3}255 LEN=164 TOS=0x00 PREC=0x00 TTL=64 ID=[[:digit:]]+ DF PROTO=UDP SPT=44752 DPT=6771 LEN=[[:digit:]]+$
^</span><span class="se">\w</span><span class="sh">{3} [ :[:digit:]]{11} [-._[:alnum:]]+ kernel: </span><span class="se">\[</span><span class="sh">[ [:digit:]]+</span><span class="se">\.</span><span class="sh">[[:digit:]]+</span><span class="se">\]</span><span class="sh"> </span><span class="se">\[</span><span class="sh">INPUT</span><span class="se">\]</span><span class="sh"> IN=</span><span class="k">${</span><span class="nv">WAN_IF</span><span class="k">}</span><span class="sh"> OUT= MAC=([[:xdigit:]]{2}:){13}[[:xdigit:]]{2} SRC=([0-9]{1,3}</span><span class="se">\.</span><span class="sh">){3}[0-9]{1,3} DST=([0-9]{1,3}</span><span class="se">\.</span><span class="sh">){3}255 LEN=44 TOS=0x00 PREC=0x00 TTL=64 ID=[[:digit:]]+ DF PROTO=UDP SPT=8612 DPT=861[02] LEN=24$
^</span><span class="se">\w</span><span class="sh">{3} [ :[:digit:]]{11} [-._[:alnum:]]+ kernel: </span><span class="se">\[</span><span class="sh">[ [:digit:]]+</span><span class="se">\.</span><span class="sh">[[:digit:]]+</span><span class="se">\]</span><span class="sh"> </span><span class="se">\[</span><span class="sh">INPUT</span><span class="se">\]</span><span class="sh"> IN=</span><span class="k">${</span><span class="nv">WAN_IF</span><span class="k">}</span><span class="sh"> OUT= MAC=([[:xdigit:]]{2}:){13}[[:xdigit:]]{2} SRC=([0-9]{1,3}</span><span class="se">\.</span><span class="sh">){3}[0-9]{1,3} DST=255</span><span class="se">\.</span><span class="sh">255</span><span class="se">\.</span><span class="sh">255</span><span class="se">\.</span><span class="sh">255 LEN=101 TOS=0x00 PREC=0x00 TTL=64 ID=[[:digit:]]+ DF PROTO=UDP SPT=[[:digit:]]+ DPT=161 LEN=81$
^</span><span class="se">\w</span><span class="sh">{3} [ :[:digit:]]{11} [-._[:alnum:]]+ kernel: </span><span class="se">\[</span><span class="sh">[ [:digit:]]+</span><span class="se">\.</span><span class="sh">[[:digit:]]+</span><span class="se">\]</span><span class="sh"> </span><span class="se">\[</span><span class="sh">INPUT</span><span class="se">\]</span><span class="sh"> IN=</span><span class="k">${</span><span class="nv">WAN_IF</span><span class="k">}</span><span class="sh"> OUT= MAC=([[:xdigit:]]{2}:){13}[[:xdigit:]]{2} SRC=([0-9]{1,3}</span><span class="se">\.</span><span class="sh">){3}[0-9]{1,3} DST=255.255.255.255 LEN=[[:digit:]]+ TOS=0x[01]0 PREC=0x00 TTL=[[:digit:]]+ ID=[[:digit:]]+ (DF )?PROTO=UDP SPT=68 DPT=67 LEN=[[:digit:]]+$
# ff02:0000:0000:0000:0000:0000:0000:0002 = All local routers
# FF02:0000:0000:0000:0000:0000:0000:0001 = All local nodes
^</span><span class="se">\w</span><span class="sh">{3} [ :[:digit:]]{11} [-._[:alnum:]]+ kernel: </span><span class="se">\[</span><span class="sh">[ [:digit:]]+</span><span class="se">\.</span><span class="sh">[[:digit:]]+</span><span class="se">\]</span><span class="sh"> </span><span class="se">\[</span><span class="sh">IP6</span><span class="se">\]</span><span class="sh"> IN= OUT=en[op][0-9]s[0-9](p[0-9])? SRC=([[:xdigit:]]{4}:){7}[[:xdigit:]]{4} DST=ff02:(0000:){6}0002 LEN=56 TC=0 HOPLIMIT=255 FLOWLBL=0 PROTO=ICMPv6 TYPE=133 CODE=0$
^</span><span class="se">\w</span><span class="sh">{3} [ :[:digit:]]{11} [-._[:alnum:]]+ kernel: </span><span class="se">\[</span><span class="sh">[ [:digit:]]+</span><span class="se">\.</span><span class="sh">[[:digit:]]+</span><span class="se">\]</span><span class="sh"> </span><span class="se">\[</span><span class="sh">IP6</span><span class="se">\]</span><span class="sh"> IN= OUT=en[op][0-9]s[0-9](p[0-9])? SRC=(0000:){7}0000 DST=ff02:(0000:){6}0016 LEN=76 TC=0 HOPLIMIT=1 FLOWLBL=0 PROTO=ICMPv6 TYPE=143 CODE=0 MARK=0xd4$
^</span><span class="se">\w</span><span class="sh">{3} [ :[:digit:]]{11} [-._[:alnum:]]+ kernel: </span><span class="se">\[</span><span class="sh">[ [:digit:]]+</span><span class="se">\.</span><span class="sh">[[:digit:]]+</span><span class="se">\]</span><span class="sh"> </span><span class="se">\[</span><span class="sh">IP6</span><span class="se">\]</span><span class="sh"> IN= OUT=lo SRC=(0000:){7}0001 DST=(0000:){7}0001 LEN=[[:digit:]]+ TC=[[:digit:]]+ HOPLIMIT=64 FLOWLBL=[[:digit:]]+ PROTO=UDP SPT=[[:digit:]]+ DPT=[[:digit:]]+ LEN=[[:digit:]]+$
</span><span class="no">EOF
</span></code></pre></div></div>

<h2 id="ignore-les-connexions-ssh-bloquées">Ignore les connexions SSH bloquées</h2>
<p>Ces lignes sont des échecs de connexion SSH typiques. Elles ont été bloquées, puis le limiteur de débit et les
règles <a href="/Debian113Server070fail2bantobanobviousattacksources-fr/">Fail2ban</a> vont réagir, si l’attaque persiste. Je n’ai pas besoin d’en être notifié.</p>
<div class="language-bash highlighter-rouge"><div class="highlight"><pre class="highlight"><code><span class="nb">cat</span> <span class="o">&lt;&lt;</span> <span class="no">EOF</span><span class="sh"> &gt; /etc/logcheck/ignore.d.server/local-ssh
^</span><span class="se">\w</span><span class="sh">{3} [ :[:digit:]]{11} [-._[:alnum:]]+ sshd</span><span class="se">\[</span><span class="sh">[[:digit:]]+</span><span class="se">\]</span><span class="sh">: Received disconnect from [[:digit:].]+ port [[:digit:]]+.*</span><span class="se">\[</span><span class="sh">preauth</span><span class="se">\]</span><span class="sh">$
^</span><span class="se">\w</span><span class="sh">{3} [ :[:digit:]]{11} [-._[:alnum:]]+ sshd</span><span class="se">\[</span><span class="sh">[[:digit:]]+</span><span class="se">\]</span><span class="sh">: Disconnected from [[:digit:].]+ port [[:digit:]]+.*</span><span class="se">\[</span><span class="sh">preauth</span><span class="se">\]</span><span class="sh">$
^</span><span class="se">\w</span><span class="sh">{3} [ :[:digit:]]{11} [-._[:alnum:]]+ sshd</span><span class="se">\[</span><span class="sh">[[:digit:]]+</span><span class="se">\]</span><span class="sh">: Invalid user [_[:alnum:]]+ from [[:digit:].]+ port [[:digit:]]+$
^</span><span class="se">\w</span><span class="sh">{3} [ :[:digit:]]{11} [-._[:alnum:]]+ sshd</span><span class="se">\[</span><span class="sh">[[:digit:]]+</span><span class="se">\]</span><span class="sh">: Connection closed by [[:digit:].]+ port [[:digit:]:]+.*</span><span class="se">\[</span><span class="sh">preauth</span><span class="se">\]</span><span class="sh">$
</span><span class="no">EOF
</span></code></pre></div></div>

<h2 id="activité-normale-de-systemd">Activité normale de Systemd</h2>
<p>Ces actions sont des opérations de maintenance normales automatiquement déclenchées par <code class="language-plaintext highlighter-rouge">systemd</code>, je ne m’en
préoccupe pas, du moment qu’elles fonctionnent ! ;)</p>
<div class="language-bash highlighter-rouge"><div class="highlight"><pre class="highlight"><code><span class="nb">cat</span> <span class="o">&lt;&lt;</span> <span class="no">EOF</span><span class="sh"> &gt; /etc/logcheck/ignore.d.server/local-systemd
^</span><span class="se">\w</span><span class="sh">{3} [ :[:digit:]]{11} [-._[:alnum:]]+ systemd</span><span class="se">\[</span><span class="sh">1</span><span class="se">\]</span><span class="sh">: [-/:. [:alnum:]]+: Succeeded.$
^</span><span class="se">\w</span><span class="sh">{3} [ :[:digit:]]{11} [-._[:alnum:]]+ systemd</span><span class="se">\[</span><span class="sh">1</span><span class="se">\]</span><span class="sh">: Started [-/:. [:alnum:]]+$
^</span><span class="se">\w</span><span class="sh">{3} [ :[:digit:]]{11} [-._[:alnum:]]+ systemd</span><span class="se">\[</span><span class="sh">1</span><span class="se">\]</span><span class="sh">: Created [-/:. [:alnum:]]+$
^</span><span class="se">\w</span><span class="sh">{3} [ :[:digit:]]{11} [-._[:alnum:]]+ systemd</span><span class="se">\[</span><span class="sh">1</span><span class="se">\]</span><span class="sh">: Starting [-/:. [:alnum:]]+$
^</span><span class="se">\w</span><span class="sh">{3} [ :[:digit:]]{11} [-._[:alnum:]]+ systemd</span><span class="se">\[</span><span class="sh">1</span><span class="se">\]</span><span class="sh">: Finished [-/:. [:alnum:]]+$
</span><span class="no">EOF
</span></code></pre></div></div>

<h2 id="cronapt">CronApt</h2>
<p>CronApt nous indique qu’il a tenté et réussi à mettre la base des paquetages à jour, ou qu’il a téléchargé des
paquetages, ou qu’il…. nous a envoyé un courriel !!! C’est un comportement normal et je suis donc déjà
prévenu des informations importantes par rapport à ce qu’il fait.</p>
<div class="language-bash highlighter-rouge"><div class="highlight"><pre class="highlight"><code><span class="nb">cat</span> <span class="o">&lt;&lt;</span> <span class="no">EOF</span><span class="sh"> &gt; /etc/logcheck/ignore.d.server/local-cronapt
^</span><span class="se">\w</span><span class="sh">{3} [ :[:digit:]]{11} [-._[:alnum:]]+ cron-apt: CRON-APT ACTION: 9-notify$
^</span><span class="se">\w</span><span class="sh">{3} [ :[:digit:]]{11} [-._[:alnum:]]+ cron-apt: CRON-APT LINE: /usr/bin/apt-get -o quiet=2 -q -q --no-act upgrade$
^</span><span class="se">\w</span><span class="sh">{3} [ :[:digit:]]{11} [-._[:alnum:]]+ cron-apt: CRON-APT LINE: /usr/bin/apt-get -o quiet=2 update -o quiet=2$
</span><span class="no">EOF
</span></code></pre></div></div>

<h2 id="divers">Divers</h2>
<p>Il y a une procédure d’audit régulier déclenchée dans le noyau linux pour collecter des indicateurs de
performance. Cette procédure doit être aussi transparente que possible et sa période de déclenchement est
automatiquement ajustée si son appel prend trop de temps. C’est donc un message normal, au moins jusqu’à ce que
la période optimale soit trouvée (en fonction de la charge du système). Dans tous les cas, j’aurais bien
d’autres problèmes si la fréquence et les valeurs de ce message étaient anormales et qu’il devienne utile. J’ai
aussi regroupé dans ce fichier les filtrage des lignes normales concernant le démarrage de <em>fail2ban</em>, <em>dhcp</em>,
<em>ntp</em> et <em>rsyslogd</em>. <em>RKHunter</em> envoie déjà ses propres courriels de notification, inutile de dupliquer
l’information.</p>
<div class="language-bash highlighter-rouge"><div class="highlight"><pre class="highlight"><code><span class="nb">cat</span> <span class="o">&lt;&lt;</span> <span class="no">EOF</span><span class="sh"> &gt; /etc/logcheck/ignore.d.server/local-misc
^</span><span class="se">\w</span><span class="sh">{3} [ :[:digit:]]{11} [-._[:alnum:]]+ kernel: </span><span class="se">\[</span><span class="sh">[ [:digit:]]+</span><span class="se">\.</span><span class="sh">[[:digit:]]+</span><span class="se">\]</span><span class="sh"> perf: interrupt took too long </span><span class="se">\(</span><span class="sh">[[:digit:]]+ &gt; [[:digit:]]+</span><span class="se">\)</span><span class="sh">, lowering kernel.perf_event_max_sample_rate to [[:digit:]]+$
^</span><span class="se">\w</span><span class="sh">{3} [ :[:digit:]]{11} [-._[:alnum:]]+ fail2ban-server</span><span class="se">\[</span><span class="sh">[[:digit:]]+</span><span class="se">\]</span><span class="sh">: Server ready$
^</span><span class="se">\w</span><span class="sh">{3} [ :[:digit:]]{11} [-._[:alnum:]]+ isc-dhcp-server</span><span class="se">\[</span><span class="sh">[[:digit:]]+</span><span class="se">\]</span><span class="sh">: Starting ISC DHCPv4 server: dhcpd.$
^</span><span class="se">\w</span><span class="sh">{3} [ :[:digit:]]{11} [-._[:alnum:]]+ ntpd</span><span class="se">\[</span><span class="sh">[[:digit:]]+</span><span class="se">\]</span><span class="sh">: configuration OK$
^</span><span class="se">\w</span><span class="sh">{3} [ :[:digit:]]{11} [-._[:alnum:]]+ rsyslogd:  </span><span class="se">\[</span><span class="sh">origin software="rsyslogd" swVersion="8.1901.0" x-pid="[[:digit:]]+" x-info="https://www.rsyslog.com"</span><span class="se">\]</span><span class="sh"> rsyslogd was HUPed$
^</span><span class="se">\w</span><span class="sh">{3} [ :[:digit:]]{11} [-._[:alnum:]]+ rkhunter: Please inspect this machine, because it may be infected.$
</span><span class="no">EOF
</span></code></pre></div></div>

<h2 id="interface-réseau-lan">Interface réseau LAN</h2>
<p>S’il y a une seconde interface réseau sur le serveur, et s’il est utilisé comme routeur, le réseau interne peut
être redémarré, débranché, en panne, … Je ne souhaite pas être prévenu par courriel, ce serait stupide
d’envoyer une notification quelquepart où je ne peux pas la consulter ! ;) De plus ces règles sont spécifiques
à mon matériel (interface et switch).</p>
<div class="language-bash highlighter-rouge"><div class="highlight"><pre class="highlight"><code><span class="nb">cat</span> <span class="o">&lt;&lt;</span> <span class="no">EOF</span><span class="sh"> &gt; /etc/logcheck/ignore.d.server/local-router
^</span><span class="se">\w</span><span class="sh">{3} [ :[:digit:]]{11} [-._[:alnum:]]+ kernel: </span><span class="se">\[\s</span><span class="sh">?[[:digit:]]+</span><span class="se">\.</span><span class="sh">[[:digit:]]+</span><span class="se">\]</span><span class="sh"> e1000e 0000:03:00.0 enp3s0: 10/100 speed: disabling TSO$
^</span><span class="se">\w</span><span class="sh">{3} [ :[:digit:]]{11} [-._[:alnum:]]+ kernel: </span><span class="se">\[\s</span><span class="sh">?[[:digit:]]+</span><span class="se">\.</span><span class="sh">[[:digit:]]+</span><span class="se">\]</span><span class="sh"> e1000e: </span><span class="k">${</span><span class="nv">LAN_IF</span><span class="k">}</span><span class="sh"> NIC Link is Down$
^</span><span class="se">\w</span><span class="sh">{3} [ :[:digit:]]{11} [-._[:alnum:]]+ kernel: </span><span class="se">\[\s</span><span class="sh">?[[:digit:]]+</span><span class="se">\.</span><span class="sh">[[:digit:]]+</span><span class="se">\]</span><span class="sh"> e1000e: </span><span class="k">${</span><span class="nv">LAN_IF</span><span class="k">}</span><span class="sh"> NIC Link is Up 1000 Mbps Full Duplex, Flow Control: Rx/Tx$
</span></code></pre></div></div>

<h1 id="tests">Tests</h1>

<h2 id="logcheck-test">Logcheck-test</h2>
<p>Si vous n’êtes pas certains de vos règles, vous pouvez utiliser l’outil <code class="language-plaintext highlighter-rouge">logcheck-test</code> pour appliquer un
fichier de règles sur un fichier de journal, soit pour afficher les correspondances, soit pour afficher les
anomalies. Cela ne fait pas partie de mon installation standard, mais je voulais noter cette information car
elle peut toujours servir pour déboguer les règles et RegExp.</p>

<p><img src="/assets/posts/en/Debian113Server110Logchecktonotifyaboutanyunknownactivit/396b3e745f0f4317af54713d5a046584.png" alt="475eb6586aeb857ecd7a2a5848487b3c.png" /></p>

<h2 id="test-des-règles">Test des règles</h2>
<p>Ce test va exécuter <em>logcheck</em> avec une configuration réelle, mais ne mettra pas le curseur de lecture à jour,
il peut donc être exécuté plusieurs fois. Il n’envoie pas de courriel, non plus.</p>
<div class="language-bash highlighter-rouge"><div class="highlight"><pre class="highlight"><code><span class="nb">sudo</span> <span class="nt">-u</span> logcheck logcheck <span class="nt">-o</span> <span class="nt">-t</span>
</code></pre></div></div>

<h2 id="test-de-notification">Test de notification</h2>
<p>Celui-ci ne mettre pas le curseur à jour, non plus, il peut donc être rejoué autant que nécessaire, jusqu’à ce
que les notifications fonctionnent comme voulu.</p>
<div class="language-bash highlighter-rouge"><div class="highlight"><pre class="highlight"><code><span class="nb">sudo</span> <span class="nt">-u</span> logcheck logcheck <span class="nt">-t</span>
</code></pre></div></div>

<h1 id="supports-et-liens">Supports et liens</h1>

<ul>
  <li><a href="https://www1.zonewebmaster.eu/serveur-debian-securite">zonewebmaster</a> <sup id="fnref:1" role="doc-noteref"><a href="#fn:1" class="footnote" rel="footnote">1</a></sup></li>
  <li><a href="https://www.ictforce.be/2018/linux-security-logcheck/">ictforce</a> <sup id="fnref:2" role="doc-noteref"><a href="#fn:2" class="footnote" rel="footnote">2</a></sup></li>
</ul>

<h1 id="notes-de-bas-de-page">Notes de bas de page</h1>

<div class="footnotes" role="doc-endnotes">
  <ol>
    <li id="fn:1" role="doc-endnote">
      <p>https://www1.zonewebmaster.eu/serveur-debian-securite <a href="#fnref:1" class="reversefootnote" role="doc-backlink">&#8617;</a></p>
    </li>
    <li id="fn:2" role="doc-endnote">
      <p>https://www.ictforce.be/2018/linux-security-logcheck/ <a href="#fnref:2" class="reversefootnote" role="doc-backlink">&#8617;</a></p>
    </li>
  </ol>
</div>]]></content><author><name>François Cerbelle</name></author><category term="Informatique" /><category term="Debian11 Serveur" /><category term="GNU Linux" /><category term="Linux" /><category term="Debian" /><category term="Debian 10" /><category term="Debian 11" /><category term="Buster" /><category term="Bullseye" /><category term="Serveur" /><category term="Installation" /><category term="Logcheck" /><category term="Analyse de log" /><category term="Log" /><category term="Journaux Sécurité" /><category term="Notification" /><category term="Détection" /><summary type="html"><![CDATA[Installation et configuration de LogCheck, avec réglages. LogCheck parcourt les fichiers journaux du système, retire les motifs légitimes connus et envoie les lignes restantes à l'dministrateur. Il rapporte toute l'activité anormale, aidant à détecter des tentatives d'attaques, éventuellement réussies, qui ne seraient pas stoppées par d'autres outils. Je préfère avoir peu de notifications et les lire toutes que d'en avoir trop et de les ignorer.]]></summary></entry><entry xml:lang="en"><title type="html">Debian11, Server, Tripwire to detect penetration</title><link href="https://fcerbell.github.io//Debian113Server100Tripwiretodetectpenetration-en/" rel="alternate" type="text/html" title="Debian11, Server, Tripwire to detect penetration" /><published>2021-06-02T00:00:00+00:00</published><updated>2021-06-02T00:00:00+00:00</updated><id>https://fcerbell.github.io//Debian113Server100Tripwiretodetectpenetration-en</id><content type="html" xml:base="https://fcerbell.github.io//Debian113Server100Tripwiretodetectpenetration-en/"><![CDATA[<p>Tripwire is one of my favorite security tool, probably one of the most efficient. How to install and configure tripwire on a Linux Debian 11 Bullseye server to detect a penetration and react quickly. It takes securized footprints of files in the filesystem and periodically check that they did not change.</p>

<ul id="markdown-toc">
  <li><a href="#tripwire-presentation" id="markdown-toc-tripwire-presentation">Tripwire presentation</a></li>
  <li><a href="#tripwire-installation" id="markdown-toc-tripwire-installation">Tripwire installation</a></li>
  <li><a href="#configuration" id="markdown-toc-configuration">Configuration</a>    <ul>
      <li><a href="#disable-false-positive-checks" id="markdown-toc-disable-false-positive-checks">Disable false positive checks</a></li>
      <li><a href="#notifications" id="markdown-toc-notifications">Notifications</a></li>
      <li><a href="#compile-and-sign-the-configuration-file" id="markdown-toc-compile-and-sign-the-configuration-file">Compile and sign the configuration file</a></li>
      <li><a href="#compile-and-sign-the-policies-file" id="markdown-toc-compile-and-sign-the-policies-file">Compile and sign the policies file</a></li>
      <li><a href="#initialize-the-database" id="markdown-toc-initialize-the-database">Initialize the database</a></li>
    </ul>
  </li>
  <li><a href="#test-runs" id="markdown-toc-test-runs">Test runs</a>    <ul>
      <li><a href="#check-and-notify" id="markdown-toc-check-and-notify">Check and notify</a></li>
      <li><a href="#update-and-sign-the-database-according-to-the-last-checkreport" id="markdown-toc-update-and-sign-the-database-according-to-the-last-checkreport">Update and sign the database according to the last check/report</a></li>
      <li><a href="#interactive-update-and-sign" id="markdown-toc-interactive-update-and-sign">Interactive update and sign</a></li>
    </ul>
  </li>
  <li><a href="#materials-and-links" id="markdown-toc-materials-and-links">Materials and links</a></li>
  <li><a href="#footnotes" id="markdown-toc-footnotes">Footnotes</a></li>
</ul>

<h1 id="tripwire-presentation">Tripwire presentation</h1>
<p>Tripwire is an amazing tool to check the system files against modifications. It takes a snapshot of the files, the permissions, … and store this snapshot in a signed database. Then, it can scan the system, detect every single change occured to the monitored files and send an email report. It also protect his own configuration files, by signing them. It groups files by topic and apply check policies, depending on the file criticity. It is a real must on every server.</p>

<h1 id="tripwire-installation">Tripwire installation</h1>
<p>First, provide answers to the package questions to avoid interactive prompts and start the actual installation.</p>
<div class="language-bash highlighter-rouge"><div class="highlight"><pre class="highlight"><code><span class="nb">echo</span> <span class="s1">'tripwire tripwire/installed string ""'</span> | debconf-set-selections
<span class="nb">echo</span> <span class="s1">'tripwire tripwire/rebuild-config boolean true'</span> | debconf-set-selections
<span class="nb">echo</span> <span class="s1">'tripwire tripwire/rebuild-policy boolean true'</span> | debconf-set-selections
<span class="nb">echo</span> <span class="s1">'tripwire tripwire/use-localkey boolean true'</span> | debconf-set-selections
<span class="nb">echo</span> <span class="s1">'tripwire tripwire/use-sitekey boolean true'</span> | debconf-set-selections
apt-get <span class="nb">install</span> <span class="nt">-y</span> tripwire
</code></pre></div></div>

<h1 id="configuration">Configuration</h1>

<h2 id="disable-false-positive-checks">Disable false positive checks</h2>
<p>I disable monitoring on some folder structures, including the <code class="language-plaintext highlighter-rouge">/root/</code> folder, but I force the check of some exceptions such as <code class="language-plaintext highlighter-rouge">/root/bashrc</code> and <code class="language-plaintext highlighter-rouge">/root/bash_history</code>. I also change the policy for the log files, because they can have an inode change when LogRotate rotates them.</p>
<div class="language-bash highlighter-rouge"><div class="highlight"><pre class="highlight"><code><span class="nb">sed</span> <span class="nt">-i</span> <span class="s1">'s~/etc/rc.boot~#&amp;~'</span> /etc/tripwire/twpol.txt
<span class="nb">sed</span> <span class="nt">-i</span> <span class="s1">'s~/root/~#&amp;~'</span> /etc/tripwire/twpol.txt
<span class="nb">sed</span> <span class="nt">-i</span> <span class="s1">'s~/proc~#&amp;~'</span> /etc/tripwire/twpol.txt
<span class="c"># Ignore inode change because of logrotate</span>
<span class="nb">sed</span> <span class="nt">-i</span> <span class="s1">'s~/var/log[^;]*~&amp;-i ~'</span> /etc/tripwire/twpol.txt 
<span class="nb">sed</span> <span class="nt">-i</span> <span class="s1">'s~#\(/root/.bashrc.*\)~\1~'</span> /etc/tripwire/twpol.txt
<span class="nb">sed</span> <span class="nt">-i</span> <span class="s1">'s~#\(/root/.bash_history.*\)~\1~'</span> /etc/tripwire/twpol.txt
</code></pre></div></div>

<h2 id="notifications">Notifications</h2>
<p>Use a mail command instead of a direct SMTP connection (there is currently no real MTA on the server)</p>
<div class="language-bash highlighter-rouge"><div class="highlight"><pre class="highlight"><code><span class="nb">sed</span> <span class="nt">-i</span> <span class="s1">'s~^MAILMETHOD.*=.*~MAILMETHOD =SENDMAIL~'</span> /etc/tripwire/twcfg.txt
<span class="nb">echo</span> <span class="s1">'MAILPROGRAM=/usr/sbin/sendmail -oi -t'</span> <span class="o">&gt;&gt;</span> /etc/tripwire/twcfg.txt
<span class="nb">echo</span> <span class="s1">'GLOBALEMAIL = root'</span> <span class="o">&gt;&gt;</span> /etc/tripwire/twcfg.txt
</code></pre></div></div>

<h2 id="compile-and-sign-the-configuration-file">Compile and sign the configuration file</h2>
<p>This step freezes the TripWire configuration file by compiling it and signing it with the <em>site-key</em>.</p>
<div class="language-bash highlighter-rouge"><div class="highlight"><pre class="highlight"><code>/usr/sbin/twadmin <span class="nt">--create-cfgfile</span> <span class="nt">-S</span> /etc/tripwire/site.key /etc/tripwire/twcfg.txt
</code></pre></div></div>

<h2 id="compile-and-sign-the-policies-file">Compile and sign the policies file</h2>
<p>This step protects the policy definition file by compiling it and signing it with the <em>site-key</em>.</p>
<div class="language-bash highlighter-rouge"><div class="highlight"><pre class="highlight"><code>/usr/sbin/twadmin <span class="nt">--create-polfile</span> <span class="nt">-S</span> /etc/tripwire/site.key /etc/tripwire/twpol.txt
</code></pre></div></div>

<h2 id="initialize-the-database">Initialize the database</h2>
<p>Let’s ask TripWire to take a snapshot of the current system files status, write it in a database and sign the snapshot with the <em>local-key</em>.</p>
<div class="language-bash highlighter-rouge"><div class="highlight"><pre class="highlight"><code>/usr/sbin/tripwire <span class="nt">--init</span>
</code></pre></div></div>

<h1 id="test-runs">Test runs</h1>

<h2 id="check-and-notify">Check and notify</h2>

<p>This asks TripWire to check that all the current system files were not changed against the defined policies. We should have very little (to no) change, as we just built the database. The results will be compiled in a report that will be written to the disk and sent by email. This is not only a check test, but also an email alert test.</p>
<div class="language-bash highlighter-rouge"><div class="highlight"><pre class="highlight"><code>/usr/sbin/tripwire <span class="nt">--check</span> <span class="nt">--email-report</span>
</code></pre></div></div>

<p><img src="/assets/posts/en/Debian113Server100Tripwiretodetectpenetration/6441ef38a45147cc94b30adc8601a661.gif" alt="tripwirecheck.gif" /></p>

<h2 id="update-and-sign-the-database-according-to-the-last-checkreport">Update and sign the database according to the last check/report</h2>
<p>Once I receive an email alert from Tripwire informing me that there were unauthorized changes, I can investigate and finally <em>validate</em> the report and update the database according to the detected changes. This is also an administration command. Tripwire will ask for the <em>local-key</em> to update the database.</p>
<div class="language-bash highlighter-rouge"><div class="highlight"><pre class="highlight"><code>/usr/sbin/tripwire <span class="nt">--update</span> <span class="nt">-a</span> <span class="nt">-r</span> /var/lib/tripwire/report/<span class="sb">`</span><span class="nb">ls</span> <span class="nt">-rt</span> /var/lib/tripwire/report/ | <span class="nb">tail</span> <span class="nt">-n</span> 1<span class="sb">`</span>
</code></pre></div></div>

<h2 id="interactive-update-and-sign">Interactive update and sign</h2>

<p>When I make some system changes, such as an installation, a change in a configuration file, … I already know that Tripwire will complain and I don’t want to wait for the email report, thus I can acknowledge the changes immediately. This command triggers a check and opens the report in the text editor. In the report, every change is flagged as <em>normal</em> with <code class="language-plaintext highlighter-rouge">[x]</code>. I can reject some of them, and save/exit. Tripwire will ask for the <em>local-key</em> to update the database.</p>
<div class="language-bash highlighter-rouge"><div class="highlight"><pre class="highlight"><code>tripwire <span class="nt">--check</span> <span class="nt">--interactive</span> <span class="nt">--visual</span> vi
</code></pre></div></div>

<p><img src="/assets/posts/en/Debian113Server100Tripwiretodetectpenetration/589e99b15a494425b99d423ec9ab9974.gif" alt="TripwireInteractiveUpdate.gif" /></p>

<h1 id="materials-and-links">Materials and links</h1>

<p><a href="https://www1.zonewebmaster.eu/serveur-debian-securite:utilisation-tripwire">zonewebmaster</a> <sup id="fnref:1" role="doc-noteref"><a href="#fn:1" class="footnote" rel="footnote">1</a></sup></p>

<p><a href="https://www.howtoforge.com/tutorial/how-to-monitor-and-detect-modified-files-using-tripwire-on-ubuntu-1604/#step-configure-tripwire-policy-for-ubuntu-system">howtoforge</a> <sup id="fnref:2" role="doc-noteref"><a href="#fn:2" class="footnote" rel="footnote">2</a></sup></p>

<h1 id="footnotes">Footnotes</h1>

<div class="footnotes" role="doc-endnotes">
  <ol>
    <li id="fn:1" role="doc-endnote">
      <p>https://www1.zonewebmaster.eu/serveur-debian-securite:utilisation-tripwire <a href="#fnref:1" class="reversefootnote" role="doc-backlink">&#8617;</a></p>
    </li>
    <li id="fn:2" role="doc-endnote">
      <p>https://www.howtoforge.com/tutorial/how-to-monitor-and-detect-modified-files-using-tripwire-on-ubuntu-1604/#step-configure-tripwire-policy-for-ubuntu-system <a href="#fnref:2" class="reversefootnote" role="doc-backlink">&#8617;</a></p>
    </li>
  </ol>
</div>]]></content><author><name>François Cerbelle</name></author><category term="Computers" /><category term="Debian11 Server" /><category term="GNU Linux" /><category term="Linux" /><category term="Debian" /><category term="Debian 10" /><category term="Debian 11" /><category term="Buster" /><category term="Bullseye" /><category term="Server" /><category term="Installation" /><category term="HIDS" /><category term="IDS" /><category term="Integrity" /><category term="Intrusion" /><category term="Penetration" /><category term="Security" /><category term="Tripwire" /><summary type="html"><![CDATA[Tripwire is one of my favorite security tool, probably one of the most efficient. How to install and configure tripwire on a Linux Debian 11 Bullseye server to detect a penetration and react quickly. It takes securized footprints of files in the filesystem and periodically check that they did not change.]]></summary></entry><entry xml:lang="fr"><title type="html">Debian11, Serveur, Tripwire pour détecter les compromissions</title><link href="https://fcerbell.github.io//Debian113Server100Tripwiretodetectpenetration-fr/" rel="alternate" type="text/html" title="Debian11, Serveur, Tripwire pour détecter les compromissions" /><published>2021-06-02T00:00:00+00:00</published><updated>2021-06-02T00:00:00+00:00</updated><id>https://fcerbell.github.io//Debian113Server100Tripwiretodetectpenetration-fr</id><content type="html" xml:base="https://fcerbell.github.io//Debian113Server100Tripwiretodetectpenetration-fr/"><![CDATA[<p>Tripwire est un de mes outils de sécurité favoris, probablement un des plus efficaces. Comment l’installer et le configurer sur un serveur Linux Debian 11 Bullseye pour détecter une compromission et réagir rapidement. Il prend des empreintes sécurisées des fichiers dans le système et vérifie régulièrement qu’ils n’ont pas été modifiés.</p>

<ul id="markdown-toc">
  <li><a href="#présentation-de-tripwire" id="markdown-toc-présentation-de-tripwire">Présentation de Tripwire</a></li>
  <li><a href="#installation" id="markdown-toc-installation">Installation</a></li>
  <li><a href="#configuration" id="markdown-toc-configuration">Configuration</a>    <ul>
      <li><a href="#désactivation-des-faux-positifs" id="markdown-toc-désactivation-des-faux-positifs">Désactivation des faux positifs</a></li>
      <li><a href="#notifications" id="markdown-toc-notifications">Notifications</a></li>
      <li><a href="#compilation-et-signature-de-la-configuration" id="markdown-toc-compilation-et-signature-de-la-configuration">Compilation et signature de la configuration</a></li>
      <li><a href="#compilation-et-signature-des-politiques" id="markdown-toc-compilation-et-signature-des-politiques">Compilation et signature des politiques</a></li>
      <li><a href="#initialisation-de-la-base" id="markdown-toc-initialisation-de-la-base">Initialisation de la base</a></li>
    </ul>
  </li>
  <li><a href="#essais" id="markdown-toc-essais">Essais</a>    <ul>
      <li><a href="#vérification-et-notification" id="markdown-toc-vérification-et-notification">Vérification et notification</a></li>
      <li><a href="#mise-à-jour-de-la-base-avec-le-dernier-rapport" id="markdown-toc-mise-à-jour-de-la-base-avec-le-dernier-rapport">Mise à jour de la base avec le dernier rapport</a></li>
      <li><a href="#mise-à-jour-interactive-de-la-base" id="markdown-toc-mise-à-jour-interactive-de-la-base">Mise à jour interactive de la base</a></li>
    </ul>
  </li>
  <li><a href="#supports-et-liens" id="markdown-toc-supports-et-liens">Supports et liens</a></li>
  <li><a href="#notes-de-base-de-page" id="markdown-toc-notes-de-base-de-page">Notes de base de page</a></li>
</ul>

<h1 id="présentation-de-tripwire">Présentation de Tripwire</h1>
<p>Tripwire est un outil extraordinaire pour rechercher les modifications de fichiers dans un système. Il prend
une empreinte des fichiers, des permissions, … et enregistre cet instantané dans une base de données signée.
Ensuite, il peut scanner le système, détecter chaque modification intervenue sur les fichiers suivis et envoyer
un rapport par courriel. Il protège également sa propre configuration en la signant. Il groupe les fichiers par
sujet et applique des politiques de vérification différentes en fonction de la criticité des fichiers. C’est
véritables un outil à installer sur chaque serveur.</p>

<h1 id="installation">Installation</h1>
<p>Commençon par fournir les réponses aux questions du paquetage afin d’éviter des demandes interactives et
demandons l’installtion de Tripwire.</p>
<div class="language-bash highlighter-rouge"><div class="highlight"><pre class="highlight"><code><span class="nb">echo</span> <span class="s1">'tripwire tripwire/installed string ""'</span> | debconf-set-selections
<span class="nb">echo</span> <span class="s1">'tripwire tripwire/rebuild-config boolean true'</span> | debconf-set-selections
<span class="nb">echo</span> <span class="s1">'tripwire tripwire/rebuild-policy boolean true'</span> | debconf-set-selections
<span class="nb">echo</span> <span class="s1">'tripwire tripwire/use-localkey boolean true'</span> | debconf-set-selections
<span class="nb">echo</span> <span class="s1">'tripwire tripwire/use-sitekey boolean true'</span> | debconf-set-selections
apt-get <span class="nb">install</span> <span class="nt">-y</span> tripwire
</code></pre></div></div>

<h1 id="configuration">Configuration</h1>

<h2 id="désactivation-des-faux-positifs">Désactivation des faux positifs</h2>
<p>Je désactive la supervision de certaines structures de répertoires, incluant le répertoire <code class="language-plaintext highlighter-rouge">/root</code>, mais je
force quand même quelques exceptions, telles que <code class="language-plaintext highlighter-rouge">/root/bashrc</code> ou <code class="language-plaintext highlighter-rouge">/root/bash_history</code>. Je modifie aussi la
politique concernant les fichiers journaux car ils changent d’inode à chaque rotation faite par <em>logrotate</em>.</p>
<div class="language-bash highlighter-rouge"><div class="highlight"><pre class="highlight"><code><span class="nb">sed</span> <span class="nt">-i</span> <span class="s1">'s~/etc/rc.boot~#&amp;~'</span> /etc/tripwire/twpol.txt
<span class="nb">sed</span> <span class="nt">-i</span> <span class="s1">'s~/root/~#&amp;~'</span> /etc/tripwire/twpol.txt
<span class="nb">sed</span> <span class="nt">-i</span> <span class="s1">'s~/proc~#&amp;~'</span> /etc/tripwire/twpol.txt
<span class="c"># Ignore inode change because of logrotate</span>
<span class="nb">sed</span> <span class="nt">-i</span> <span class="s1">'s~/var/log[^;]*~&amp;-i ~'</span> /etc/tripwire/twpol.txt 
<span class="nb">sed</span> <span class="nt">-i</span> <span class="s1">'s~#\(/root/.bashrc.*\)~\1~'</span> /etc/tripwire/twpol.txt
<span class="nb">sed</span> <span class="nt">-i</span> <span class="s1">'s~#\(/root/.bash_history.*\)~\1~'</span> /etc/tripwire/twpol.txt
</code></pre></div></div>

<h2 id="notifications">Notifications</h2>
<p>Configuration de la commande d’envoi de courriel à la place d’une connexion SMTP directe, car nous ne disposons
pas d’un serveur de messagerie sur un serveur qui n’est pas supposé recevoir des courriels et les distribuer
localement.</p>
<div class="language-bash highlighter-rouge"><div class="highlight"><pre class="highlight"><code><span class="nb">sed</span> <span class="nt">-i</span> <span class="s1">'s~^MAILMETHOD.*=.*~MAILMETHOD =SENDMAIL~'</span> /etc/tripwire/twcfg.txt
<span class="nb">echo</span> <span class="s1">'MAILPROGRAM=/usr/sbin/sendmail -oi -t'</span> <span class="o">&gt;&gt;</span> /etc/tripwire/twcfg.txt
<span class="nb">echo</span> <span class="s1">'GLOBALEMAIL = root'</span> <span class="o">&gt;&gt;</span> /etc/tripwire/twcfg.txt
</code></pre></div></div>

<h2 id="compilation-et-signature-de-la-configuration">Compilation et signature de la configuration</h2>
<p>Cette étape verrouille la configuration de TripWire en la compilant et en la signant avec la clé de <em>site</em>.
Ainsi, seul le propriétaire de cette clé peut modifier et faire appliquer une nouvelle configuration à
TripWire.</p>
<div class="language-bash highlighter-rouge"><div class="highlight"><pre class="highlight"><code>/usr/sbin/twadmin <span class="nt">--create-cfgfile</span> <span class="nt">-S</span> /etc/tripwire/site.key /etc/tripwire/twcfg.txt
</code></pre></div></div>

<h2 id="compilation-et-signature-des-politiques">Compilation et signature des politiques</h2>
<p>Comme pour la configuration, cette étape fige les politiques en les compilant et en les signant avec la clé de
<em>site</em>. Il n’est donc pas possible de changer les politiques appliquées sans connaître cette clé.</p>
<div class="language-bash highlighter-rouge"><div class="highlight"><pre class="highlight"><code>/usr/sbin/twadmin <span class="nt">--create-polfile</span> <span class="nt">-S</span> /etc/tripwire/site.key /etc/tripwire/twpol.txt
</code></pre></div></div>

<h2 id="initialisation-de-la-base">Initialisation de la base</h2>
<p>Demandons à TripWire de prendre un instantané des empreintes des fichiers à superviser, puis de l’enregistrer
dans sa base de données et de la signer avec la clé <em>locale</em>. Cette empreinte note l’état supposé normal des
fichiers et ne peut pas être valablement modifiée sans disposer de la clé <em>locale</em>.</p>
<div class="language-bash highlighter-rouge"><div class="highlight"><pre class="highlight"><code>/usr/sbin/tripwire <span class="nt">--init</span>
</code></pre></div></div>

<h1 id="essais">Essais</h1>

<h2 id="vérification-et-notification">Vérification et notification</h2>

<p>Demandons à TripWire de vérifier que tous les fichiers supervisés du système n’ont pas été modifiés selon leur
politiques. Nous devrions avoir très peu de changements, voire aucun, car nous venons juste de prendre
l’empreinte. Les résultats seront compilés dans un rapport qui sera écrit sur le disque et envoyé par courriel.
Il s’agit à la fois d’un test de vérification et d’un test de notification.</p>
<div class="language-bash highlighter-rouge"><div class="highlight"><pre class="highlight"><code>/usr/sbin/tripwire <span class="nt">--check</span> <span class="nt">--email-report</span>
</code></pre></div></div>

<p><img src="/assets/posts/en/Debian113Server100Tripwiretodetectpenetration/6441ef38a45147cc94b30adc8601a661.gif" alt="tripwirecheck.gif" /></p>

<h2 id="mise-à-jour-de-la-base-avec-le-dernier-rapport">Mise à jour de la base avec le dernier rapport</h2>
<p>Lorsque je reçois un message d’alerte de TripWire m’informant de changements non autorisés, je peux enquêter et
finallement <em>valider</em> le rapport en incorporant les modifications recensées dans la base de donnée. Cette
commande est une de mes commandes d’administration. TripWire demandera la clé <em>locale</em> pour mettre a jour la
base de données.</p>
<div class="language-bash highlighter-rouge"><div class="highlight"><pre class="highlight"><code>/usr/sbin/tripwire <span class="nt">--update</span> <span class="nt">-a</span> <span class="nt">-r</span> /var/lib/tripwire/report/<span class="sb">`</span><span class="nb">ls</span> <span class="nt">-rt</span> /var/lib/tripwire/report/ | <span class="nb">tail</span> <span class="nt">-n</span> 1<span class="sb">`</span>
</code></pre></div></div>

<h2 id="mise-à-jour-interactive-de-la-base">Mise à jour interactive de la base</h2>
<p>Suite à des changements volontaires dans le système, comme une installation ou une modification de
configuration, je sais que TripWire va se plaindre et je n’ai pas envie d’attendre le rapport (ou de le
forcer). Je peux donc immédiatement acquiter les modifications. Cette commande déclenche une vérification et
ouvre le rapport dans un éditeur de texte. Chaque modification trouvée y est listée et elle est marquée d’une
croix pour indiquer qu’il faut la valider. Je peux en rejeter certaines si je le souhaite, avant d’enregistrer
le fichier. TripWire demandera la clé <em>locale</em> pour signer la base de données modifiée.</p>
<div class="language-bash highlighter-rouge"><div class="highlight"><pre class="highlight"><code>tripwire <span class="nt">--check</span> <span class="nt">--interactive</span> <span class="nt">--visual</span> vi
</code></pre></div></div>

<p><img src="/assets/posts/en/Debian113Server100Tripwiretodetectpenetration/589e99b15a494425b99d423ec9ab9974.gif" alt="TripwireInteractiveUpdate.gif" /></p>

<h1 id="supports-et-liens">Supports et liens</h1>

<p><a href="https://www1.zonewebmaster.eu/serveur-debian-securite:utilisation-tripwire">zonewebmaster</a> <sup id="fnref:1" role="doc-noteref"><a href="#fn:1" class="footnote" rel="footnote">1</a></sup></p>

<p><a href="https://www.howtoforge.com/tutorial/how-to-monitor-and-detect-modified-files-using-tripwire-on-ubuntu-1604/#step-configure-tripwire-policy-for-ubuntu-system">howtoforge</a> <sup id="fnref:2" role="doc-noteref"><a href="#fn:2" class="footnote" rel="footnote">2</a></sup></p>

<h1 id="notes-de-base-de-page">Notes de base de page</h1>

<div class="footnotes" role="doc-endnotes">
  <ol>
    <li id="fn:1" role="doc-endnote">
      <p>https://www1.zonewebmaster.eu/serveur-debian-securite:utilisation-tripwire <a href="#fnref:1" class="reversefootnote" role="doc-backlink">&#8617;</a></p>
    </li>
    <li id="fn:2" role="doc-endnote">
      <p>https://www.howtoforge.com/tutorial/how-to-monitor-and-detect-modified-files-using-tripwire-on-ubuntu-1604/#step-configure-tripwire-policy-for-ubuntu-system <a href="#fnref:2" class="reversefootnote" role="doc-backlink">&#8617;</a></p>
    </li>
  </ol>
</div>]]></content><author><name>François Cerbelle</name></author><category term="Informatique" /><category term="Debian11 Serveur" /><category term="GNU Linux" /><category term="Linux" /><category term="Debian" /><category term="Debian 10" /><category term="Debian 11" /><category term="Buster" /><category term="Bullseye" /><category term="Serveur" /><category term="Installation" /><category term="HIDS" /><category term="IDS" /><category term="Intégrité" /><category term="Intrusion" /><category term="Pénétration" /><category term="Sécurité" /><category term="Tripwire" /><summary type="html"><![CDATA[Tripwire est un de mes outils de sécurité favoris, probablement un des plus efficaces. Comment l'installer et le configurer sur un serveur Linux Debian 11 Bullseye pour détecter une compromission et réagir rapidement. Il prend des empreintes sécurisées des fichiers dans le système et vérifie régulièrement qu'ils n'ont pas été modifiés.]]></summary></entry><entry xml:lang="en"><title type="html">Debian11, Server, RKHunter to check for malwares and corruptions</title><link href="https://fcerbell.github.io//Debian113Server090RKHuntertocheckformalwaresandfilecorr-en/" rel="alternate" type="text/html" title="Debian11, Server, RKHunter to check for malwares and corruptions" /><published>2021-05-31T00:01:00+00:00</published><updated>2021-05-31T00:01:00+00:00</updated><id>https://fcerbell.github.io//Debian113Server090RKHuntertocheckformalwaresandfilecorr-en</id><content type="html" xml:base="https://fcerbell.github.io//Debian113Server090RKHuntertocheckformalwaresandfilecorr-en/"><![CDATA[<p>RKHunter installation and configuration to check for critical files changes against automatic snapshots and for known rootkits. It also checks for processus with open descriptor on deleted files, for binaries which are actually scripts, … This helps to detect when a system was compromised.</p>

<ul id="markdown-toc">
  <li><a href="#rkhunter-presentation" id="markdown-toc-rkhunter-presentation">RKHunter presentation</a></li>
  <li><a href="#prerequisites" id="markdown-toc-prerequisites">Prerequisites</a></li>
  <li><a href="#rkhunter-installation" id="markdown-toc-rkhunter-installation">RKHunter installation</a></li>
  <li><a href="#configuration" id="markdown-toc-configuration">Configuration</a>    <ul>
      <li><a href="#configure-email-notifications" id="markdown-toc-configure-email-notifications">Configure email notifications</a></li>
      <li><a href="#configure-database-update" id="markdown-toc-configure-database-update">Configure database update</a></li>
      <li><a href="#ignore-known-false-positives" id="markdown-toc-ignore-known-false-positives">Ignore known false positives</a></li>
      <li><a href="#miscellaneous-configuration" id="markdown-toc-miscellaneous-configuration">Miscellaneous configuration</a></li>
      <li><a href="#open-iptables-for-updates" id="markdown-toc-open-iptables-for-updates">Open IPTables for updates</a></li>
      <li><a href="#update-the-malware-database" id="markdown-toc-update-the-malware-database">Update the malware database</a></li>
      <li><a href="#initial-snapshot-of-system-files" id="markdown-toc-initial-snapshot-of-system-files">Initial snapshot of system files</a></li>
    </ul>
  </li>
  <li><a href="#test" id="markdown-toc-test">Test</a>    <ul>
      <li><a href="#test-check" id="markdown-toc-test-check">Test check</a></li>
      <li><a href="#email-test" id="markdown-toc-email-test">Email test</a></li>
    </ul>
  </li>
  <li><a href="#materials-and-links" id="markdown-toc-materials-and-links">Materials and links</a></li>
  <li><a href="#footnotes" id="markdown-toc-footnotes">Footnotes</a></li>
</ul>

<h1 id="rkhunter-presentation">RKHunter presentation</h1>
<p><code class="language-plaintext highlighter-rouge">rkhunter</code> means Root Kit Hunter. A Root kit is a set of programs installed by crackers when they manage to penetrate a system. It can be installed by viruses also. These programs are meant to send information from the infected system to the cracker’s machines or to execute any arbitrary command on behalf of the infected system owner’s. RKHunter has a database of known root kits and searches for any trace of these rootkits. It also takes fingerprints of critical system programs to detect any change. It automates the snapshots with <code class="language-plaintext highlighter-rouge">apt</code> at each package installation. It sends email notifications to the administrators when something was detected. I use RKHunter for the root kit database, I’ll install another tool, <code class="language-plaintext highlighter-rouge">tripwire</code> for the critical files alteration detection in the next post.</p>

<h1 id="prerequisites">Prerequisites</h1>
<p>This article only depends on the <a href="/pages/en/tags/#debian11-preparation">Generic machine preparation</a> post serie.</p>

<h1 id="rkhunter-installation">RKHunter installation</h1>
<p>I first give to debconf the answers to the questions which will be asked by the package at installation. I want RKHunter to be executed every day to check my filesystem, I want it to update the vulnerabilities database automatically and I want it to be automatically executed after each package installation to take a fingerprint of the supposed-clean package files. <strong>This last one can be dangerous</strong> if you use <code class="language-plaintext highlighter-rouge">apt</code> to install, upgrade or remove a package, it will automatically trigger a new snapshot and will <em>legitimate</em> current files. This is my choice for my architecture and I know what I’m doing on my servers, be sure to understand before applying.</p>
<div class="language-bash highlighter-rouge"><div class="highlight"><pre class="highlight"><code><span class="nb">echo</span> <span class="s1">'rkhunter rkhunter/cron_daily_run boolean true'</span> | debconf-set-selections
<span class="nb">echo</span> <span class="s1">'rkhunter rkhunter/cron_db_update boolean true'</span> | debconf-set-selections
<span class="nb">echo</span> <span class="s1">'rkhunter rkhunter/apt_autogen boolean true'</span> | debconf-set-selections
apt-get <span class="nb">install</span> <span class="nt">-y</span> rkhunter
</code></pre></div></div>

<h1 id="configuration">Configuration</h1>

<h2 id="configure-email-notifications">Configure email notifications</h2>
<p>RKHunter will send email notifications when something goes wrong during either a filesystem check or a
vulnerability database update. Thus, I need to configure the email address and email command to send emails.
Whatever happen, it also sends the details by email in another message.</p>
<div class="language-bash highlighter-rouge"><div class="highlight"><pre class="highlight"><code><span class="nb">sed</span> <span class="nt">-i</span> <span class="s1">'s/#\?MAIL-ON-WARNING=.*/#MAIL-ON-WARNING=root@localhost/'</span> /etc/rkhunter.conf
<span class="nb">sed</span> <span class="nt">-i</span> <span class="s1">'s/#\?MAIL_CMD=.*"/MAIL_CMD=mail -s "[rkhunter] Warnings found for \${HOST_NAME}"/'</span> /etc/rkhunter.conf
</code></pre></div></div>

<h2 id="configure-database-update">Configure database update</h2>
<p>RKHunter needs to update its known vulnerability database from time to time. I configure the download tool to use, the email notifications and I enable this automatic updates.</p>
<div class="language-bash highlighter-rouge"><div class="highlight"><pre class="highlight"><code><span class="nb">sed</span> <span class="nt">-i</span> <span class="s1">'s/#\?WEB_CMD=.*/WEB_CMD=wget/'</span> /etc/rkhunter.conf
<span class="nb">sed</span> <span class="nt">-i</span> <span class="s1">'s/DB_UPDATE_EMAIL=".*"/DB_UPDATE_EMAIL="true"/'</span> /etc/default/rkhunter
<span class="nb">sed</span> <span class="nt">-i</span> <span class="s1">'s/#\?UPDATE_MIRRORS=.*/UPDATE_MIRRORS=1/'</span> /etc/rkhunter.conf
<span class="nb">sed</span> <span class="nt">-i</span> <span class="s1">'s/#\?MIRRORS_MODE=.*/MIRRORS_MODE=0/'</span> /etc/rkhunter.conf
</code></pre></div></div>

<h2 id="ignore-known-false-positives">Ignore known false positives</h2>
<p>After bedtesting in a closed environment, I listed all the alerts relative to a normal activity and adjusted the configuration to tell RKHunter that these alerts are normal and should not trigger warnings.
The last one is because I do accept direct root connections with a key. You might not.</p>
<div class="language-bash highlighter-rouge"><div class="highlight"><pre class="highlight"><code><span class="nb">echo</span> <span class="s1">'ALLOWPROCDELFILE=/usr/sbin/cron'</span> <span class="o">&gt;&gt;</span> /etc/rkhunter.conf
<span class="nb">echo</span> <span class="s1">'ALLOWPROCDELFILE=/usr/bin/dash'</span> <span class="o">&gt;&gt;</span> /etc/rkhunter.conf
<span class="nb">echo</span> <span class="s1">'ALLOWPROCDELFILE=/usr/bin/run-parts'</span> <span class="o">&gt;&gt;</span> /etc/rkhunter.conf
<span class="nb">echo</span> <span class="s1">'SCRIPTWHITELIST=/usr/bin/egrep'</span> <span class="o">&gt;&gt;</span> /etc/rkhunter.conf
<span class="nb">echo</span> <span class="s1">'SCRIPTWHITELIST=/usr/bin/fgrep'</span> <span class="o">&gt;&gt;</span> /etc/rkhunter.conf
<span class="nb">echo</span> <span class="s1">'SCRIPTWHITELIST=/usr/bin/which'</span> <span class="o">&gt;&gt;</span> /etc/rkhunter.conf
<span class="nb">echo</span> <span class="s1">'PORT_PATH_WHITELIST=/usr/sbin/portsentry'</span> <span class="o">&gt;&gt;</span> /etc/rkhunter.conf
<span class="nb">echo</span> <span class="s1">'ALLOW_SSH_ROOT_USER=prohibit-password'</span> <span class="o">&gt;&gt;</span> /etc/rkhunter.conf
</code></pre></div></div>

<h2 id="miscellaneous-configuration">Miscellaneous configuration</h2>
<p>I also uncomment the dhclient line, because it was relevant in some cases, but you can keep it commented if you dont use <code class="language-plaintext highlighter-rouge">dhclient</code>. I activate the whole test suite and activate the SSH protocol version check, v1 should not be allowed, it is disabled and should remain disabled !</p>
<div class="language-bash highlighter-rouge"><div class="highlight"><pre class="highlight"><code><span class="nb">sed</span> <span class="nt">-i</span> <span class="s1">'s~#\?ALLOWPROCLISTEN=/sbin/dhclient~ALLOWPROCLISTEN=/sbin/dhclient~'</span> /etc/rkhunter.conf
<span class="nb">sed</span> <span class="nt">-i</span> <span class="s1">'s/^DISABLE_TESTS/#&amp;/'</span> /etc/rkhunter.conf
<span class="nb">sed</span> <span class="nt">-i</span> <span class="s1">'s/^#\?PKGMGR=.*/PKGMGR=DPKG/'</span> /etc/rkhunter.conf
<span class="nb">sed</span> <span class="nt">-i</span> <span class="s1">'s/^#\?\(ALLOW_SSH_PROT_V1\)=.*/\1=0/'</span> /etc/rkhunter.conf
</code></pre></div></div>

<h2 id="open-iptables-for-updates">Open IPTables for updates</h2>
<p>RKHunter needs to update its vulnerabilities database. We configured an automatic update and it needs to download files from Internet but the IPTables firewall blocks outgoing traffic by default, if not explicitely allowed. Thus, we need to create a new chain to list the RKHunter repositories IP addresses and to include this chain in the WAN_output validation chain :</p>
<div class="language-bash highlighter-rouge"><div class="highlight"><pre class="highlight"><code><span class="nb">sed</span> <span class="nt">-i</span> <span class="s1">'s/^-N WAN_input$/-N RKHunterRepositories\n-A RKHunterRepositories -d 216.105.38.10 -j ACCEPT\n\n&amp;/'</span> /etc/iptables/rules.v4
<span class="nb">sed</span> <span class="nt">-i</span> <span class="s1">'s/^-N WAN_output$/&amp;\n-A WAN_output -p tcp --dport 80 --tcp-flags FIN,SYN,RST,ACK SYN -j RKHunterRepositories/'</span> /etc/iptables/rules.v4
systemctl restart netfilter-persistent
</code></pre></div></div>

<h2 id="update-the-malware-database">Update the malware database</h2>
<p>Now, we can initiate the first database update manually to check the firewall rules and be sure that automatic updates will succeed.</p>
<div class="language-bash highlighter-rouge"><div class="highlight"><pre class="highlight"><code>rkhunter <span class="nt">--update</span>
</code></pre></div></div>

<h2 id="initial-snapshot-of-system-files">Initial snapshot of system files</h2>
<p>It is time to take a snapshot of the sytem files. RKHunter will compute hashes for critical files in the system and store the hashes. It is configured to execute this snapshot after each package upgrade, install or removal in the <code class="language-plaintext highlighter-rouge">apt</code> suite, to keep the hashes database up-to-date. Then, the file alteration check is configured to be executed everyday. Anyway, I’ll also install <code class="language-plaintext highlighter-rouge">tripwire</code> for this specific task, in the next post of this blog serie.</p>
<div class="language-bash highlighter-rouge"><div class="highlight"><pre class="highlight"><code>rkhunter <span class="nt">--propupd</span>
</code></pre></div></div>

<h1 id="test">Test</h1>

<h2 id="test-check">Test check</h2>
<p>Let’s execute a full test, with realtime colored output !</p>

<div class="language-bash highlighter-rouge"><div class="highlight"><pre class="highlight"><code>rkhunter <span class="nt">-c</span> <span class="nt">--enable</span> all <span class="nt">--disable</span> none <span class="nt">--skip-keypress</span>
</code></pre></div></div>

<p><img src="/assets/posts/en/Debian113Server090RKHuntertocheckformalwaresandfilecorr/rkhuntercheck.gif" alt="rkhuntercheck.gif" /></p>

<h2 id="email-test">Email test</h2>
<p>Let’s execute a faster test, with email notification to check that the notifications are also working.</p>
<div class="language-bash highlighter-rouge"><div class="highlight"><pre class="highlight"><code>/etc/cron.daily/rkhunter
</code></pre></div></div>

<h1 id="materials-and-links">Materials and links</h1>

<p><a href="https://www.ictforce.be/2018/linux-security-tool-rkhunter/">ICT Force site</a> <sup id="fnref:1" role="doc-noteref"><a href="#fn:1" class="footnote" rel="footnote">1</a></sup></p>

<p><a href="https://www1.zonewebmaster.eu/serveur-debian-securite:installer-rootkit-hunter">ZoneWebmaster site</a> <sup id="fnref:2" role="doc-noteref"><a href="#fn:2" class="footnote" rel="footnote">2</a></sup></p>

<h1 id="footnotes">Footnotes</h1>

<div class="footnotes" role="doc-endnotes">
  <ol>
    <li id="fn:1" role="doc-endnote">
      <p>https://www.ictforce.be/2018/linux-security-tool-rkhunter/ <a href="#fnref:1" class="reversefootnote" role="doc-backlink">&#8617;</a></p>
    </li>
    <li id="fn:2" role="doc-endnote">
      <p>https://www1.zonewebmaster.eu/serveur-debian-securite:installer-rootkit-hunter <a href="#fnref:2" class="reversefootnote" role="doc-backlink">&#8617;</a></p>
    </li>
  </ol>
</div>]]></content><author><name>François Cerbelle</name></author><category term="Computers" /><category term="Debian 11 Server" /><category term="GNU Linux" /><category term="Linux" /><category term="Debian" /><category term="Debian 10" /><category term="Debian 11" /><category term="Buster" /><category term="Bullseye" /><category term="Server" /><category term="Installation" /><category term="RKHunter" /><category term="Tripwire" /><category term="Security" /><category term="Rootkits" /><category term="IDS" /><category term="HIDS" /><summary type="html"><![CDATA[RKHunter installation and configuration to check for critical files changes against automatic snapshots and for known rootkits. It also checks for processus with open descriptor on deleted files, for binaries which are actually scripts, ... This helps to detect when a system was compromised.]]></summary></entry><entry xml:lang="fr"><title type="html">Debian11, Serveur, RKHunter pour tracker les malwares et corruptions</title><link href="https://fcerbell.github.io//Debian113Server090RKHuntertocheckformalwaresandfilecorr-fr/" rel="alternate" type="text/html" title="Debian11, Serveur, RKHunter pour tracker les malwares et corruptions" /><published>2021-05-31T00:01:00+00:00</published><updated>2021-05-31T00:01:00+00:00</updated><id>https://fcerbell.github.io//Debian113Server090RKHuntertocheckformalwaresandfilecorr-fr</id><content type="html" xml:base="https://fcerbell.github.io//Debian113Server090RKHuntertocheckformalwaresandfilecorr-fr/"><![CDATA[<p>Installation et configuration de RKHunter pour chercher les modifications des fichiers
critiques grâce à des empreintes prises régulièrement et chercher la présence de
rootkits/malwares connus. Il vérifie aussi les processus ayant des fichiers supprimés
ouverts, les binaires qui sont des scripts, … Cet outil aide à détecter la compromission
d’un système.</p>

<ul id="markdown-toc">
  <li><a href="#présentation-de-rkhunter" id="markdown-toc-présentation-de-rkhunter">Présentation de RKHunter</a></li>
  <li><a href="#pré-requis" id="markdown-toc-pré-requis">Pré-requis</a></li>
  <li><a href="#installation-de-rkhunter" id="markdown-toc-installation-de-rkhunter">Installation de RKHunter</a></li>
  <li><a href="#configuration" id="markdown-toc-configuration">Configuration</a>    <ul>
      <li><a href="#notifications-par-courriel" id="markdown-toc-notifications-par-courriel">Notifications par courriel</a></li>
      <li><a href="#mise-à-jour-de-la-base" id="markdown-toc-mise-à-jour-de-la-base">Mise à jour de la base</a></li>
      <li><a href="#filtrage-des-faux-positifs" id="markdown-toc-filtrage-des-faux-positifs">Filtrage des faux positifs</a></li>
      <li><a href="#divers" id="markdown-toc-divers">Divers</a></li>
      <li><a href="#flux-iptables-pour-les-mises-à-jour" id="markdown-toc-flux-iptables-pour-les-mises-à-jour">Flux IPTables pour les mises à jour</a></li>
      <li><a href="#mise-à-jour-de-la-base-1" id="markdown-toc-mise-à-jour-de-la-base-1">Mise à jour de la base</a></li>
      <li><a href="#prise-dempreinte-du-système" id="markdown-toc-prise-dempreinte-du-système">Prise d’empreinte du système</a></li>
    </ul>
  </li>
  <li><a href="#tests" id="markdown-toc-tests">Tests</a>    <ul>
      <li><a href="#vérification-complète" id="markdown-toc-vérification-complète">Vérification complète</a></li>
      <li><a href="#notifications-par-courriel-1" id="markdown-toc-notifications-par-courriel-1">Notifications par courriel</a></li>
    </ul>
  </li>
  <li><a href="#supports-et-liens" id="markdown-toc-supports-et-liens">Supports et liens</a></li>
  <li><a href="#notes-de-bas-de-page" id="markdown-toc-notes-de-bas-de-page">Notes de bas de page</a></li>
</ul>

<h1 id="présentation-de-rkhunter">Présentation de RKHunter</h1>
<p><code class="language-plaintext highlighter-rouge">rkhunter</code> signifie <em>Root Kit Hunter</em>. Un <em>Rootkit</em> est un ensemble de programmes
installés par des pirates lorsqu’ils parviennent à pénétrer un système. Il peut aussi être
installé par des virus. Ces programmes ont pour but d’envoyer des informations depuis le
système infecté vers les machines du pirate ou d’exécuter des commandes arbitraires au nom
du propriétaire. RKHunter dispose d’une base de données des malwares connus et recherche
leurs traces dans le système. Il prend aussi une empreinte des fichiers systèmes critiques
pour détecter d’éventuelles modifications. La prise d’empreinte est automatisée avec <code class="language-plaintext highlighter-rouge">apt</code>
lors de l’installation, la mise à jour ou la suppression de paquetages. Il envoie des
notifications aux administrateurs par courriel lorsque quelquechose a été détecté.
J’utilise RKHunter principalement pour la base de rootkits, j’installerai dans le prochain
article un autre outil, <code class="language-plaintext highlighter-rouge">tripwire</code> pour la détection des modifications de fichier.</p>

<h1 id="pré-requis">Pré-requis</h1>
<p>Cet article ne dépend que de la série d’articles que la <a href="/pages/fr/tags/#préparation-debian11">préparation générique d’une machine</a>.</p>

<h1 id="installation-de-rkhunter">Installation de RKHunter</h1>
<p>Je commence par donner à <code class="language-plaintext highlighter-rouge">debconf</code> les réponses aux questions qui seront posées par le
paquetage lors de son installation. Je souhaite que <code class="language-plaintext highlighter-rouge">rkhunter</code> soit exécuté tous les jours
pour vérifier mon système, je souhaite aussi qu’il mette à jour sa base de vulnérabilités
automatiquement. Enfin, je veux qu’il soit exécuté automatiquement lors de l’installation, la
suppression ou la mise à jour de paquetages afin de prendre une empreinte des fichiers
supposés propres. <strong>Cette dernière étape est potentiellement dangereuse</strong> si vous utilisez
<code class="language-plaintext highlighter-rouge">apt</code>, il déclenchera automatiquement une nouvelle photo des fichiers et <em>légitimera</em> les
fichiers présents sur le disque. C’est mon choix, pour mon architecture, et je sais ce que
je fais sur mes serveur en connaissance des risques. Assurez-vous de bien comprendre les
conséquences avant de le faire vous-même.</p>
<div class="language-bash highlighter-rouge"><div class="highlight"><pre class="highlight"><code><span class="nb">echo</span> <span class="s1">'rkhunter rkhunter/cron_daily_run boolean true'</span> | debconf-set-selections
<span class="nb">echo</span> <span class="s1">'rkhunter rkhunter/cron_db_update boolean true'</span> | debconf-set-selections
<span class="nb">echo</span> <span class="s1">'rkhunter rkhunter/apt_autogen boolean true'</span> | debconf-set-selections
apt-get <span class="nb">install</span> <span class="nt">-y</span> rkhunter
</code></pre></div></div>

<h1 id="configuration">Configuration</h1>

<h2 id="notifications-par-courriel">Notifications par courriel</h2>
<p>RKHunter va envoyer une notification par courriel lorsque quelquechose se passe mal durant
la vérification du système ou la mise à jour de la base de vulnérabilités. Ainsi, il faut
configurer l’adresse électronique et la commande à utiliser pour envoyer ces messages. Dans 
tous les cas, il envoie aussi le détail par courriel dans un autre message.</p>
<div class="language-bash highlighter-rouge"><div class="highlight"><pre class="highlight"><code><span class="nb">sed</span> <span class="nt">-i</span> <span class="s1">'s/#\?MAIL-ON-WARNING=.*/#MAIL-ON-WARNING=root@localhost/'</span> /etc/rkhunter.conf
<span class="nb">sed</span> <span class="nt">-i</span> <span class="s1">'s/#\?MAIL_CMD=.*"/MAIL_CMD=mail -s "[rkhunter] Warnings found for \${HOST_NAME}"/'</span> /etc/rkhunter.conf
</code></pre></div></div>

<h2 id="mise-à-jour-de-la-base">Mise à jour de la base</h2>
<p>RKHunter a besoin de maintenir sa base de connaissances à jour de temps en temps. J’ai
configuré l’outil de téléchargement à utiliser, l’activation des notifications et j’ai
activé la recherche de mises à jour.</p>
<div class="language-bash highlighter-rouge"><div class="highlight"><pre class="highlight"><code><span class="nb">sed</span> <span class="nt">-i</span> <span class="s1">'s/#\?WEB_CMD=.*/WEB_CMD=wget/'</span> /etc/rkhunter.conf
<span class="nb">sed</span> <span class="nt">-i</span> <span class="s1">'s/DB_UPDATE_EMAIL=".*"/DB_UPDATE_EMAIL="true"/'</span> /etc/default/rkhunter
<span class="nb">sed</span> <span class="nt">-i</span> <span class="s1">'s/#\?UPDATE_MIRRORS=.*/UPDATE_MIRRORS=1/'</span> /etc/rkhunter.conf
<span class="nb">sed</span> <span class="nt">-i</span> <span class="s1">'s/#\?MIRRORS_MODE=.*/MIRRORS_MODE=0/'</span> /etc/rkhunter.conf
</code></pre></div></div>

<h2 id="filtrage-des-faux-positifs">Filtrage des faux positifs</h2>
<p>Après quelques temps de test en environnement sécurisé, j’ai pu lister les alertes
relative à une activité normale. J’ajuste la configuration pour indiquer à <code class="language-plaintext highlighter-rouge">rkhunter</code>
que ces alertes sont normales et ne doivent pas déclencher d’avertissements.
La dernière ligne s’explique car j’accepte les connexions directe au compte <em>root</em>, ce que
vous ne faites peut-être pas.</p>
<div class="language-bash highlighter-rouge"><div class="highlight"><pre class="highlight"><code><span class="nb">echo</span> <span class="s1">'ALLOWPROCDELFILE=/usr/sbin/cron'</span> <span class="o">&gt;&gt;</span> /etc/rkhunter.conf
<span class="nb">echo</span> <span class="s1">'ALLOWPROCDELFILE=/usr/bin/dash'</span> <span class="o">&gt;&gt;</span> /etc/rkhunter.conf
<span class="nb">echo</span> <span class="s1">'ALLOWPROCDELFILE=/usr/bin/run-parts'</span> <span class="o">&gt;&gt;</span> /etc/rkhunter.conf
<span class="nb">echo</span> <span class="s1">'SCRIPTWHITELIST=/usr/bin/egrep'</span> <span class="o">&gt;&gt;</span> /etc/rkhunter.conf
<span class="nb">echo</span> <span class="s1">'SCRIPTWHITELIST=/usr/bin/fgrep'</span> <span class="o">&gt;&gt;</span> /etc/rkhunter.conf
<span class="nb">echo</span> <span class="s1">'SCRIPTWHITELIST=/usr/bin/which'</span> <span class="o">&gt;&gt;</span> /etc/rkhunter.conf
<span class="nb">echo</span> <span class="s1">'PORT_PATH_WHITELIST=/usr/sbin/portsentry'</span> <span class="o">&gt;&gt;</span> /etc/rkhunter.conf
<span class="nb">echo</span> <span class="s1">'ALLOW_SSH_ROOT_USER=prohibit-password'</span> <span class="o">&gt;&gt;</span> /etc/rkhunter.conf
</code></pre></div></div>

<h2 id="divers">Divers</h2>
<p>J’ai aussi décommenté la ligne concernant <code class="language-plaintext highlighter-rouge">dhclient</code> car j’utilise cet outil dans certains
cas, mais cela dépend de votre configuration, gardez-la commentée si vous n’utilisez pas
<code class="language-plaintext highlighter-rouge">dhclient</code>. J’active la suite de tests complète et la vérification de la version du
protocole SSH : la v1 doit être désactivée et le rester.</p>
<div class="language-bash highlighter-rouge"><div class="highlight"><pre class="highlight"><code><span class="nb">sed</span> <span class="nt">-i</span> <span class="s1">'s~#\?ALLOWPROCLISTEN=/sbin/dhclient~ALLOWPROCLISTEN=/sbin/dhclient~'</span> /etc/rkhunter.conf
<span class="nb">sed</span> <span class="nt">-i</span> <span class="s1">'s/^DISABLE_TESTS/#&amp;/'</span> /etc/rkhunter.conf
<span class="nb">sed</span> <span class="nt">-i</span> <span class="s1">'s/^#\?PKGMGR=.*/PKGMGR=DPKG/'</span> /etc/rkhunter.conf
<span class="nb">sed</span> <span class="nt">-i</span> <span class="s1">'s/^#\?\(ALLOW_SSH_PROT_V1\)=.*/\1=0/'</span> /etc/rkhunter.conf
</code></pre></div></div>

<h2 id="flux-iptables-pour-les-mises-à-jour">Flux IPTables pour les mises à jour</h2>
<p>RKHunter a besoin de mettre sa base de connaissances à jour. Nous avons configuré une
vérification et il a besoin de pouvoir télécharger des fichiers depuis Internet. IPTables
bloque tout le traffic sortant par défaut, s’il n’est pas explicitement autorisé. Il faut
donc créer une nouvelle chaine pour lister les adresses IP des dépôts de RKHunter et
l’inclure dans la chaine de validation du traffic sortant <em>WAN_output</em>.</p>
<div class="language-bash highlighter-rouge"><div class="highlight"><pre class="highlight"><code><span class="nb">sed</span> <span class="nt">-i</span> <span class="s1">'s/^-N WAN_input$/-N RKHunterRepositories\n-A RKHunterRepositories -d 216.105.38.10 -j ACCEPT\n\n&amp;/'</span> /etc/iptables/rules.v4
<span class="nb">sed</span> <span class="nt">-i</span> <span class="s1">'s/^-N WAN_output$/&amp;\n-A WAN_output -p tcp --dport 80 --tcp-flags FIN,SYN,RST,ACK SYN -j RKHunterRepositories/'</span> /etc/iptables/rules.v4
systemctl restart netfilter-persistent
</code></pre></div></div>

<h2 id="mise-à-jour-de-la-base-1">Mise à jour de la base</h2>
<p>Il est maintenant temps d’initier la première mise à jour de la base manuellement pour
tester la configuration des règles du pare-feu et s’assurer que les recherches de mise à
jour fonctionneront.</p>
<div class="language-bash highlighter-rouge"><div class="highlight"><pre class="highlight"><code>rkhunter <span class="nt">--update</span>
</code></pre></div></div>

<h2 id="prise-dempreinte-du-système">Prise d’empreinte du système</h2>
<p>Il faut aussi prendre un instantané des fichiers critiques du système. RKHunter va
calculer des empreintes (hash) pour chacun de ces fichiers et les enregistrer. Il
est configuré pour exécuter cette prise d’empreinte après chaque installation, mise à jour
ou suppression de paquetage demandée à <code class="language-plaintext highlighter-rouge">apt</code>. Il maintient sa base d’empreinte à jour. La
recherche de modification des fichiers est exécutée tous les jours. Quoiqu’il en soit,
j’installerai aussi <code class="language-plaintext highlighter-rouge">tripwire</code> pour cette tâche spécifique, dans le prochain article.</p>
<div class="language-bash highlighter-rouge"><div class="highlight"><pre class="highlight"><code>rkhunter <span class="nt">--propupd</span>
</code></pre></div></div>

<h1 id="tests">Tests</h1>

<h2 id="vérification-complète">Vérification complète</h2>
<p>Exécutons un test complet du système, avec une sortie colorée en temps réel !</p>

<div class="language-bash highlighter-rouge"><div class="highlight"><pre class="highlight"><code>rkhunter <span class="nt">-c</span> <span class="nt">--enable</span> all <span class="nt">--disable</span> none <span class="nt">--skip-keypress</span>
</code></pre></div></div>

<p><img src="/assets/posts/en/Debian113Server090RKHuntertocheckformalwaresandfilecorr/rkhuntercheck.gif" alt="rkhuntercheck.gif" /></p>

<h2 id="notifications-par-courriel-1">Notifications par courriel</h2>
<p>Exécuton un test plus rapide, avec une notification par courriel, pour vérifier que les
notifications fonctionnent bien.</p>
<div class="language-bash highlighter-rouge"><div class="highlight"><pre class="highlight"><code>/etc/cron.daily/rkhunter
</code></pre></div></div>

<h1 id="supports-et-liens">Supports et liens</h1>

<p><a href="https://www.ictforce.be/2018/linux-security-tool-rkhunter/">ICT Force site</a> <sup id="fnref:1" role="doc-noteref"><a href="#fn:1" class="footnote" rel="footnote">1</a></sup></p>

<p><a href="https://www1.zonewebmaster.eu/serveur-debian-securite:installer-rootkit-hunter">ZoneWebmaster site</a> <sup id="fnref:2" role="doc-noteref"><a href="#fn:2" class="footnote" rel="footnote">2</a></sup></p>

<h1 id="notes-de-bas-de-page">Notes de bas de page</h1>

<div class="footnotes" role="doc-endnotes">
  <ol>
    <li id="fn:1" role="doc-endnote">
      <p>https://www.ictforce.be/2018/linux-security-tool-rkhunter/ <a href="#fnref:1" class="reversefootnote" role="doc-backlink">&#8617;</a></p>
    </li>
    <li id="fn:2" role="doc-endnote">
      <p>https://www1.zonewebmaster.eu/serveur-debian-securite:installer-rootkit-hunter <a href="#fnref:2" class="reversefootnote" role="doc-backlink">&#8617;</a></p>
    </li>
  </ol>
</div>]]></content><author><name>François Cerbelle</name></author><category term="Informatique" /><category term="Debian 11 Serveur" /><category term="GNU Linux" /><category term="Linux" /><category term="Debian" /><category term="Debian 10" /><category term="Debian 11" /><category term="Buster" /><category term="Bullseye" /><category term="Serveur" /><category term="Installation" /><category term="RKHunter" /><category term="Tripwire" /><category term="Sécurité" /><category term="Rootkits" /><category term="IDS" /><category term="HIDS" /><summary type="html"><![CDATA[Installation et configuration de RKHunter pour chercher les modifications des fichiers critiques grâce à des empreintes prises régulièrement et chercher la présence de rootkits/malwares connus. Il vérifie aussi les processus ayant des fichiers supprimés ouverts, les binaires qui sont des scripts, ... Cet outil aide à détecter la compromission d'un système.]]></summary></entry><entry xml:lang="en"><title type="html">Debian11, Server, Portsentry to block port scans</title><link href="https://fcerbell.github.io//Debian113Server080Portsentrytoblockportscans-en/" rel="alternate" type="text/html" title="Debian11, Server, Portsentry to block port scans" /><published>2021-05-31T00:00:00+00:00</published><updated>2021-05-31T00:00:00+00:00</updated><id>https://fcerbell.github.io//Debian113Server080Portsentrytoblockportscans-en</id><content type="html" xml:base="https://fcerbell.github.io//Debian113Server080Portsentrytoblockportscans-en/"><![CDATA[<p>Installing and configuring Portsentry as a second line of defense against port scanning, after IPTables lscan and psd rules. It will ban attacker’s machines temporarily of definitely, but will whitelist my own network and IP addresses.</p>

<ul id="markdown-toc">
  <li><a href="#portsentry-presentation" id="markdown-toc-portsentry-presentation">Portsentry presentation</a></li>
  <li><a href="#prerequisites" id="markdown-toc-prerequisites">Prerequisites</a>    <ul>
      <li><a href="#existing-variables" id="markdown-toc-existing-variables">Existing variables</a></li>
      <li><a href="#reload-the-variables" id="markdown-toc-reload-the-variables">Reload the variables</a></li>
    </ul>
  </li>
  <li><a href="#common-installation" id="markdown-toc-common-installation">Common installation</a>    <ul>
      <li><a href="#automatic-bind-to-unused-ports" id="markdown-toc-automatic-bind-to-unused-ports">Automatic bind to unused ports</a></li>
      <li><a href="#block-scans-with-iptables-chaos-and-tcpwrappers" id="markdown-toc-block-scans-with-iptables-chaos-and-tcpwrappers">Block scans with IPTables, CHAOS and TCPWrappers</a></li>
      <li><a href="#whitelist-safe-ips" id="markdown-toc-whitelist-safe-ips">Whitelist safe IPs</a></li>
      <li><a href="#apply-the-configuration" id="markdown-toc-apply-the-configuration">Apply the configuration</a></li>
    </ul>
  </li>
  <li><a href="#strengthen-with-fail2ban" id="markdown-toc-strengthen-with-fail2ban">Strengthen with Fail2ban</a></li>
  <li><a href="#supports-and-links" id="markdown-toc-supports-and-links">Supports and links</a></li>
  <li><a href="#footnotes" id="markdown-toc-footnotes">Footnotes</a></li>
</ul>

<h1 id="portsentry-presentation">Portsentry presentation</h1>

<p>Portsentry listen to most unused network ports. It receives all the incoming connections and can detect sequences of connections from a source to detect a network port scan. Then, it can react with arbitrary commands, to block the scans, to return garbage, to trigger countermeasures… Most scans will be detected and blocked by the IPTables chain, PortSentry is configured as a second line of defense. It will use TCPWrappers and IPTables to block the scans on UDP and TCP. It will also be configured to ignore my own IP addresses.</p>

<h1 id="prerequisites">Prerequisites</h1>
<p>This article only depends on the <a href="/pages/en/tags/#debian11-preparation">Generic machine preparation</a> post serie.</p>

<h2 id="existing-variables">Existing variables</h2>
<p>We need the <code class="language-plaintext highlighter-rouge">LAN_*</code> variable which was already defined in the configuration file, the <a href="/Debian111PostInstall010Configurationvariables-en/">Configuration variables</a> post.</p>

<h2 id="reload-the-variables">Reload the variables</h2>
<p>Ensure that the variables are available, by loading the configuration script :</p>
<div class="language-bash highlighter-rouge"><div class="highlight"><pre class="highlight"><code><span class="nb">source</span> /root/config.env
</code></pre></div></div>

<h1 id="common-installation">Common installation</h1>
<p>I first pre-configure the answer to a question that would otherwise be asked by the package and I install it.</p>
<div class="language-bash highlighter-rouge"><div class="highlight"><pre class="highlight"><code><span class="nb">echo </span>portsentry portsentry/warn_no_block string <span class="s2">""</span> | debconf-set-selections
apt-get <span class="nb">install</span> <span class="nt">-y</span> portsentry
</code></pre></div></div>

<h2 id="automatic-bind-to-unused-ports">Automatic bind to unused ports</h2>
<p>Configure <code class="language-plaintext highlighter-rouge">portsentry</code> to use the <em>advanced</em> mode, which listen to all the ports below a threashold, both for UDP and TCP. This could be an issue if a service try to bind himself, later to a dynamic port and if portsentry is already bound to this port. By default, the threshold is set to <em>1024</em></p>
<div class="language-bash highlighter-rouge"><div class="highlight"><pre class="highlight"><code><span class="nb">sed</span> <span class="nt">-i</span> <span class="s1">'s/TCP_MODE="tcp"/TCP_MODE="atcp"/'</span> /etc/default/portsentry
<span class="nb">sed</span> <span class="nt">-i</span> <span class="s1">'s/UDP_MODE="udp"/UDP_MODE="audp"/'</span> /etc/default/portsentry
</code></pre></div></div>

<h2 id="block-scans-with-iptables-chaos-and-tcpwrappers">Block scans with IPTables, CHAOS and TCPWrappers</h2>
<p>Then, let’s activate the scan blocking using IPTables and TCPWrappers. Portsentry will execute the provided <code class="language-plaintext highlighter-rouge">iptables</code> command and add the attacking host in the <code class="language-plaintext highlighter-rouge">/etc/hosts.deny</code> file. Both are useful because IPTables is not persistent, whereas TCP wrappers is persistent. Furthermore, I provide my own <code class="language-plaintext highlighter-rouge">iptables</code> command to use the <em>CHAOS</em> target instead of <em>DROP</em>. The attacker knows that there is machine, ignoring the packets would inform him that we are protecting the machine and he will try something else. Using the <em>CHAOS</em> target returns random data, it will not look like we are protecting ourself but will not provide him useful information.
<strong>It would be better</strong> to insert the iptable blocking rules <strong>after</strong> the iptables whitelist rule, and <strong>before</strong> the <em>ACCEPT</em> rules. I would need to know the white list rule number to do that, so I’d need to create a whitelist <code class="language-plaintext highlighter-rouge">iptables</code> chain in the <a href="/Debian113Server045IPTables-en/">IPTable configuration</a>, but I did not. You can improve your scripts.</p>
<div class="language-bash highlighter-rouge"><div class="highlight"><pre class="highlight"><code><span class="nb">sed</span> <span class="nt">-i</span> <span class="s1">'s/BLOCK_UDP="0"/BLOCK_UDP="1"/'</span> /etc/portsentry/portsentry.conf
<span class="nb">sed</span> <span class="nt">-i</span> <span class="s1">'s/BLOCK_TCP="0"/BLOCK_TCP="1"/'</span> /etc/portsentry/portsentry.conf
<span class="nb">sed</span> <span class="nt">-i</span> <span class="s1">'s/RESOLVE_HOST = "0"/RESOLVE_HOST = "1"/'</span> /etc/portsentry/portsentry.conf
<span class="nb">sed</span> <span class="nt">-i</span> <span class="s1">'s/^KILL_ROUTE/#&amp;/'</span> /etc/portsentry/portsentry.conf
<span class="nb">sed</span> <span class="nt">-i</span> <span class="s1">'s/^#\?KILL_ROUTE="\/sbin\/iptables -I INPUT -s $TARGET$ -j DROP"/KILL_ROUTE="\/sbin\/iptables -I INPUT -s $TARGET$ -j CHAOS"/'</span> /etc/portsentry/portsentry.conf
</code></pre></div></div>

<h2 id="whitelist-safe-ips">Whitelist safe IPs</h2>
<p>I can make some mistake, I could want to scan my own server… But I dont want to be blocked. Thus, I add my own IP address in the list to ignore and, just in case, I also add it to the TCPWrapper’s whitelist.</p>
<div class="language-bash highlighter-rouge"><div class="highlight"><pre class="highlight"><code><span class="nb">echo</span> <span class="s2">"ALL: </span><span class="k">${</span><span class="nv">LAN_IP</span><span class="k">}</span><span class="s2">/</span><span class="k">${</span><span class="nv">LAN_NM</span><span class="k">}</span><span class="s2">"</span> <span class="o">&gt;&gt;</span> /etc/hosts.allow
<span class="nb">echo</span> <span class="s2">"</span><span class="k">${</span><span class="nv">LAN_IP</span><span class="k">}</span><span class="s2">/</span><span class="k">${</span><span class="nv">LAN_NM</span><span class="k">}</span><span class="s2">"</span> <span class="o">&gt;&gt;</span> /etc/portsentry/portsentry.ignore.static
</code></pre></div></div>

<h2 id="apply-the-configuration">Apply the configuration</h2>
<div class="language-bash highlighter-rouge"><div class="highlight"><pre class="highlight"><code>systemctl restart portsentry
</code></pre></div></div>

<h1 id="strengthen-with-fail2ban">Strengthen with Fail2ban</h1>
<p><a href="/Debian113Server070fail2bantobanobviousattacksources-en/">Fail2ban</a> can use <code class="language-plaintext highlighter-rouge">portsentry</code> log to take further actions. When <code class="language-plaintext highlighter-rouge">portsentry</code> blocks a scan, it blocks it with <code class="language-plaintext highlighter-rouge">iptables</code> for TCP and UDP scans, but this is not persisted in case of server reboot or service restart. It uses also TCPWrappers, which are persisted. <code class="language-plaintext highlighter-rouge">fail2ban</code> will double block using <code class="language-plaintext highlighter-rouge">iptables</code>, but it also has a persisted database and will restore the blocking rules in case or restart.</p>
<div class="language-bash highlighter-rouge"><div class="highlight"><pre class="highlight"><code><span class="o">&gt;</span> /var/lib/portsentry/portsentry.history
<span class="nb">cat</span> <span class="o">&lt;&lt;</span> <span class="no">EOF</span><span class="sh"> &gt; /etc/fail2ban/jail.d/portsentry.conf
[portsentry]
enabled = true
</span><span class="no">EOF
</span>systemctl restart fail2ban
</code></pre></div></div>

<h1 id="supports-and-links">Supports and links</h1>

<h1 id="footnotes">Footnotes</h1>]]></content><author><name>François Cerbelle</name></author><category term="Computers" /><category term="Debian11 Server" /><category term="GNU Linux" /><category term="Linux" /><category term="Debian" /><category term="Debian 10" /><category term="Debian 11" /><category term="Buster" /><category term="Bullseye" /><category term="Server" /><category term="Installation" /><category term="Portsentry" /><category term="Fail2ban" /><category term="Security" /><category term="IPTables" /><category term="TCPWrappers" /><summary type="html"><![CDATA[Installing and configuring Portsentry as a second line of defense against port scanning, after IPTables lscan and psd rules. It will ban attacker's machines temporarily of definitely, but will whitelist my own network and IP addresses.]]></summary></entry><entry xml:lang="fr"><title type="html">Debian11, Serveur, Portsentry pour bloquer les scans de port</title><link href="https://fcerbell.github.io//Debian113Server080Portsentrytoblockportscans-fr/" rel="alternate" type="text/html" title="Debian11, Serveur, Portsentry pour bloquer les scans de port" /><published>2021-05-31T00:00:00+00:00</published><updated>2021-05-31T00:00:00+00:00</updated><id>https://fcerbell.github.io//Debian113Server080Portsentrytoblockportscans-fr</id><content type="html" xml:base="https://fcerbell.github.io//Debian113Server080Portsentrytoblockportscans-fr/"><![CDATA[<p>Installation et configuration de Portsentry comme seconde ligne de défense contre les scans de port, après les règles lscan et psd d’IPTables. Il bloquera temporairement ou définitivement les machines des attaquants mais ignorera mon propre réseau ou mes adresses IP.</p>

<ul id="markdown-toc">
  <li><a href="#présentation-de-portsentry" id="markdown-toc-présentation-de-portsentry">Présentation de Portsentry</a></li>
  <li><a href="#pré-requis" id="markdown-toc-pré-requis">Pré-requis</a>    <ul>
      <li><a href="#variables-existantes" id="markdown-toc-variables-existantes">Variables existantes</a></li>
      <li><a href="#chargement-des-variables" id="markdown-toc-chargement-des-variables">Chargement des variables</a></li>
    </ul>
  </li>
  <li><a href="#installation-commune" id="markdown-toc-installation-commune">Installation commune</a>    <ul>
      <li><a href="#configuration-de-lécoute-avancée" id="markdown-toc-configuration-de-lécoute-avancée">Configuration de l’écoute avancée</a></li>
      <li><a href="#blocage-avec-iptables-chaos-et-tcpwrappers" id="markdown-toc-blocage-avec-iptables-chaos-et-tcpwrappers">Blocage avec IPTables, CHAOS et TCPWrappers</a></li>
      <li><a href="#ignorer-les-adresses-ip-sûres" id="markdown-toc-ignorer-les-adresses-ip-sûres">Ignorer les adresses IP sûres</a></li>
      <li><a href="#application-de-la-configuration" id="markdown-toc-application-de-la-configuration">Application de la configuration</a></li>
    </ul>
  </li>
  <li><a href="#durcissement-avec-fail2ban" id="markdown-toc-durcissement-avec-fail2ban">Durcissement avec fail2ban</a></li>
  <li><a href="#supports-and-links" id="markdown-toc-supports-and-links">Supports and links</a></li>
  <li><a href="#footnotes" id="markdown-toc-footnotes">Footnotes</a></li>
</ul>

<h1 id="présentation-de-portsentry">Présentation de Portsentry</h1>

<p>Portsentry écoute sur la plupart des ports réseaux inutilisés. Il reçoit toutes les connexions entrantes et peut donc détecter les
séquences de connexion depuis une source pour en déduire les tentatives de scan. Ensuite, il peut réagir à l’aide de commandes
arbitraires, pour bloquer les scans, pour renvoyer des données aléatoires, pour déclencher des contre-mesures. La plupart des
scans seront détectés et bloqués par la chaine IPTables, Portsentry est configuré en seconde ligne de défense. Il utilise
TCPWrappers et IPTables pour bloquer les scans UDP et TCP. Je vais également lui faire ignorer mes propres adresses IP, supposées
sûres.</p>

<h1 id="pré-requis">Pré-requis</h1>
<p>Cet article ne dépend que de la série d’articles sur la <a href="/pages/fr/tags/#préparation-debian11">Préparation d’une machine générique</a>.</p>

<h2 id="variables-existantes">Variables existantes</h2>
<p>Nous avons besoin des variables <code class="language-plaintext highlighter-rouge">LAN_*</code> qui ont déjà été configurées dans le fichier de configuration par l’article <a href="/Debian111PostInstall010Configurationvariables-fr/">Variables de
configuration</a>.</p>

<h2 id="chargement-des-variables">Chargement des variables</h2>
<p>Assurons-nous que les variables soient disponibles dans l’environnement :</p>
<div class="language-bash highlighter-rouge"><div class="highlight"><pre class="highlight"><code><span class="nb">source</span> /root/config.env
</code></pre></div></div>

<h1 id="installation-commune">Installation commune</h1>
<p>Je commence par préconfigurer la réponse à une question qui me serait posée par le paquetage, autrement, et je l’installe :</p>
<div class="language-bash highlighter-rouge"><div class="highlight"><pre class="highlight"><code><span class="nb">echo </span>portsentry portsentry/warn_no_block string <span class="s2">""</span> | debconf-set-selections
apt-get <span class="nb">install</span> <span class="nt">-y</span> portsentry
</code></pre></div></div>

<h2 id="configuration-de-lécoute-avancée">Configuration de l’écoute avancée</h2>
<p>Écoute automatique sur tous les ports inutilisés. Configuration de <code class="language-plaintext highlighter-rouge">portsentry</code> pour utiliser le mode <em>avancé</em>, qui écoute sur
tous les ports en-dessous d’un seuil, à la fois en UDP et en TCP. Cela pourait être un problème si un service tentait de se mettre
lui-aussi à l’écoute sur un port déjà utilisé par portsentry. Par défaut, la valeur du seuil est <em>1024</em>.</p>
<div class="language-bash highlighter-rouge"><div class="highlight"><pre class="highlight"><code><span class="nb">sed</span> <span class="nt">-i</span> <span class="s1">'s/TCP_MODE="tcp"/TCP_MODE="atcp"/'</span> /etc/default/portsentry
<span class="nb">sed</span> <span class="nt">-i</span> <span class="s1">'s/UDP_MODE="udp"/UDP_MODE="audp"/'</span> /etc/default/portsentry
</code></pre></div></div>

<h2 id="blocage-avec-iptables-chaos-et-tcpwrappers">Blocage avec IPTables, CHAOS et TCPWrappers</h2>

<p>Activons le blocage grâce à IPTables et TCPWrappers. Portsentry exécutera la commande <code class="language-plaintext highlighter-rouge">iptables</code> fournie et ajoutera la machine de
l’attaquant dans le fichier <code class="language-plaintext highlighter-rouge">/etc/hosts.deny</code>. Les deux sont utiles car IPTables n’est pas persistent alors que TCPWrappers l’est.
De plus, je personnalise la commande <code class="language-plaintext highlighter-rouge">iptables</code> afin d’utiliser la cible <em>CHAOS</em> à la place de <em>DROP</em>. L’attaquant sait qu’il y a
une machine, ignorer ses paquets l’informe que nous protégeons la machine et il tentera autrechose. L’utilisation de <em>CHAOS</em>
renvoie des données aléatoires, nous ne semblerons pas protéger la machine, et nous ne fournirons pas d’informations utiles.</p>

<p><strong>Il serait probablement mieux</strong> d’insérer la règle de blocage <strong>après</strong> la règle de liste blanche et <strong>avant</strong> les règles
<em>ACCEPT</em>. Je devrais connaître le numéro de la règle de liste blanche pour cela, j’aurais donc besoin de créer une chaine
<code class="language-plaintext highlighter-rouge">iptables</code> de liste blanche dans la <a href="/Debian113Server045IPTables-fr/">Configuration d’IPTables</a>, mais je ne l’ai pas fait. Libre à vous de le faire.</p>
<div class="language-bash highlighter-rouge"><div class="highlight"><pre class="highlight"><code><span class="nb">sed</span> <span class="nt">-i</span> <span class="s1">'s/BLOCK_UDP="0"/BLOCK_UDP="1"/'</span> /etc/portsentry/portsentry.conf
<span class="nb">sed</span> <span class="nt">-i</span> <span class="s1">'s/BLOCK_TCP="0"/BLOCK_TCP="1"/'</span> /etc/portsentry/portsentry.conf
<span class="nb">sed</span> <span class="nt">-i</span> <span class="s1">'s/RESOLVE_HOST = "0"/RESOLVE_HOST = "1"/'</span> /etc/portsentry/portsentry.conf
<span class="nb">sed</span> <span class="nt">-i</span> <span class="s1">'s/^KILL_ROUTE/#&amp;/'</span> /etc/portsentry/portsentry.conf
<span class="nb">sed</span> <span class="nt">-i</span> <span class="s1">'s/^#\?KILL_ROUTE="\/sbin\/iptables -I INPUT -s $TARGET$ -j DROP"/KILL_ROUTE="\/sbin\/iptables -I INPUT -s $TARGET$ -j CHAOS"/'</span> /etc/portsentry/portsentry.conf
</code></pre></div></div>

<h2 id="ignorer-les-adresses-ip-sûres">Ignorer les adresses IP sûres</h2>
<p>Je peux faire des erreurs, je pourrais vouloir scanner mon propre serveur… Mais je ne veux pas me bloquer moi-même. J’ajoute
donc mon adresse IP dans la liste à ignorer et, au cas où, je l’ajoute aussi dans la liste blanche de TCPWrappers.</p>
<div class="language-bash highlighter-rouge"><div class="highlight"><pre class="highlight"><code><span class="nb">echo</span> <span class="s2">"ALL: </span><span class="k">${</span><span class="nv">LAN_IP</span><span class="k">}</span><span class="s2">/</span><span class="k">${</span><span class="nv">LAN_NM</span><span class="k">}</span><span class="s2">"</span> <span class="o">&gt;&gt;</span> /etc/hosts.allow
<span class="nb">echo</span> <span class="s2">"</span><span class="k">${</span><span class="nv">LAN_IP</span><span class="k">}</span><span class="s2">/</span><span class="k">${</span><span class="nv">LAN_NM</span><span class="k">}</span><span class="s2">"</span> <span class="o">&gt;&gt;</span> /etc/portsentry/portsentry.ignore.static
</code></pre></div></div>

<h2 id="application-de-la-configuration">Application de la configuration</h2>
<div class="language-bash highlighter-rouge"><div class="highlight"><pre class="highlight"><code>systemctl restart portsentry
</code></pre></div></div>

<h1 id="durcissement-avec-fail2ban">Durcissement avec fail2ban</h1>
<p><a href="/Debian113Server070fail2bantobanobviousattacksources-fr/">Fail2ban</a> peut utiliser les journaux de <code class="language-plaintext highlighter-rouge">portsentry</code> pour effectuer des actions. Lorsque <code class="language-plaintext highlighter-rouge">portsentry</code> bloque une tentative de scan,
il le bloque avec <code class="language-plaintext highlighter-rouge">iptables</code> pour TCP et UDP, mais ce n’est pas persisté dans le cas d’un redémarrage de service. Il utilise
<em>TCPWrappers</em> qui est persisté. <code class="language-plaintext highlighter-rouge">fail2ban</code> peut doubler le blocage avec <code class="language-plaintext highlighter-rouge">iptables</code>, mais surtout, il dispose d’une base de données
persistée et restaurera les règles de blocage and cas de redémarrage.</p>
<div class="language-bash highlighter-rouge"><div class="highlight"><pre class="highlight"><code><span class="o">&gt;</span> /var/lib/portsentry/portsentry.history
<span class="nb">cat</span> <span class="o">&lt;&lt;</span> <span class="no">EOF</span><span class="sh"> &gt; /etc/fail2ban/jail.d/portsentry.conf
[portsentry]
enabled = true
</span><span class="no">EOF
</span>systemctl restart fail2ban
</code></pre></div></div>

<h1 id="supports-and-links">Supports and links</h1>

<h1 id="footnotes">Footnotes</h1>]]></content><author><name>François Cerbelle</name></author><category term="Informatique" /><category term="Debian11 Serveur" /><category term="GNU Linux" /><category term="Linux" /><category term="Debian" /><category term="Debian 10" /><category term="Debian 11" /><category term="Buster" /><category term="Bullseye" /><category term="Serveur" /><category term="Installation" /><category term="Portsentry" /><category term="Fail2ban" /><category term="Sécurité" /><category term="IPTables" /><category term="TCPWrappers" /><summary type="html"><![CDATA[Installation et configuration de Portsentry comme seconde ligne de défense contre les scans de port, après les règles lscan et psd d'IPTables. Il bloquera temporairement ou définitivement les machines des attaquants mais ignorera mon propre réseau ou mes adresses IP.]]></summary></entry></feed>