Redis 12 - Managed Redis for Python Microservice in CloudRun
I explain step by step how to implement a #Python FastAPI stateless microservice to serve data from a local dockerized Redis-stack, a local dockerized #Redis Enterprise and a managed DBaaS Redis Enterprise. I also explain how to dockerize the API, execute it locally, and make it run as a Google #CloudRun service. With source code and #RedisInsight developer companion client connection to the different databases.
You can find links to the related video recordings and printable materials at the end of this post.
- Video
- Python and FastAPI skeleton
- Local DB: Redis-Stack
- Local dockerized Redis Enterprise
- Package the microservice
- Use a managed Redis Enterprise
- Deploy in Google CloudRun
- Materials and Links
- Footnotes
Video
Python and FastAPI skeleton
Environment and dependencies
First, You need to create a folder to create and store the sources and a Python virtual environment :
mkdir FastApiDemo
cd FastApiDemo
python3 -m venv venv
source venv/bin/activate
pip install fastapi
pip install uvicorn
Write code
Then, you can start with a very simple list of object stored in an array and two basic REST API endpoints implementing GET and PUT endpoints.
main.py :
# Data model
#
from pydantic import BaseModel
from typing import Union
class User(BaseModel):
    name: str
    email: str
    age: int
    city: str
    height: float
    weight: float
    gender: Union[bool, None] = None

users = []

# Expose data access with a REST API provided by FastAPI
#
from fastapi import FastAPI
app = FastAPI()

# Read endpoint
#
@app.get("/users/{user_id}")
def read_user(user_id: int):
    return users[user_id]

# Write endpoint
#
@app.put("/users/{user_id}")
def update_user(user_id: int, user: User):
    while (len(users)<=user_id):
        users.append("");
    users[user_id]=user
    return True
Test the code
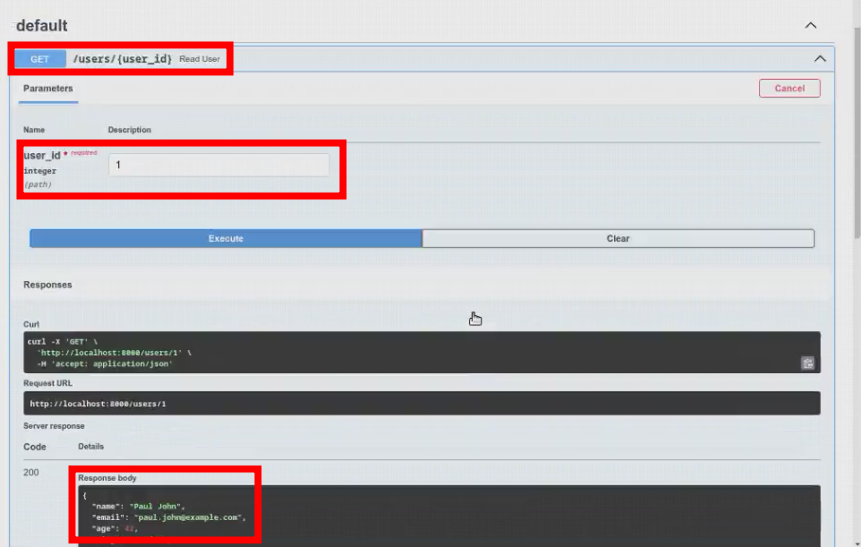
Now, we can start the uvicorn server and test the GET/PUT endpoints both with curl in command line and with the embedded Swagger Web user interface (http://localhost:8000/docs)
uvicorn main:app --reload
curl http://localhost:8000/users/1 --request GET --header 'content-type: application/json'
curl --request PUT --url "http://localhost:8000/users/1" --header 'content-type: application/json' --data '{"name":"Paul John","email":"paul.john@example.com","age":42,"city":"London","height":0,"weight":0,"gender":"True"}'
curl http://localhost:8000/users/1 --request GET --header 'content-type: application/json'
xdg-open http://localhost:8000/docs
Local DB: Redis-Stack
Now, we want to use a Redis database to store the records instead of a simple object array. This will make our microservice completely stateless.
Setup
First, we can start a dockerized image of Redis Open-source with all the official modules. It exposes the Redis database on the standard port 6379 and a RedisInsight client Web user interface on port 8001 :
docker run -p 6379:6379 -p 8001:8001 --name redis-stack redis/redis-stack
Then, you need to add the Redis Python client library to the development environment and use environment variables to store the database connection details :
pip install "redis[hiredis]"
export REDISHOST=localhost
export REDISPORT=6379
Update the code
Now, you can update the code :
- remove the object array
- include the Redis Python client library
- open a connection to the database
- optionnaly prepopulate the database with some sample records
- update the GET endpoint to fetch data from Redis
- update the PUT endpoint to store data in Redis
# Data model
#
from pydantic import BaseModel
from typing import Union
class User(BaseModel):
    name: str
    email: str
    age: int
    city: str
    height: float
    weight: float
    gender: Union[bool, None] = None

#users = []
# Data storage in Redis
#
import redis
import os
r = redis.Redis(
        host=os.environ.get('REDISHOST'),
        port=os.environ.get('REDISPORT'),
        )

# Prepopulate wih sample data
# JSON data stored in a Redis JSON datastructure
#
from redis.commands.json.path import Path
r.json().set("user:1", Path.root_path(), { "name": "Paul John", "email": "paul.john@example.com", "age": 42, "city": "London" })
r.json().set("user:2", Path.root_path(), { "name": "Eden Zamir", "email": "eden.zamir@example.com", "age": 29, "city": "Tel Aviv" })
r.json().set("user:3", Path.root_path(), { "name": "Paul Zamir", "email": "paul.zamir@example.com", "age": 35, "city": "Tel Aviv" })

# Expose data access with a REST API provided by FastAPI
#
from fastapi import FastAPI
app = FastAPI()

# Read endpoint
#
@app.get("/users/{user_id}")
def read_user(user_id: int):
    return r.json().get("user:"+str(user_id))

# Write endpoint
#
@app.put("/users/{user_id}")
def update_user(user_id: int, user: User):
    return r.json().set('user:'+str(user_id), Path.root_path(),
        { "name": user.name, "email": user.email, "age": user.age, "city": user.city, "height": user.height, "weight": user.weight, "gender": user.gender })
Test the code
Now, we can restart the local application server :
uvicorn main:app --reload
and try to get the 4 first records :
for i in 1 2 3 4; do
  printf "\n%s: " "$i"
  curl http://localhost:8000/users/$i --request GET --header 'content-type: application/json'
done

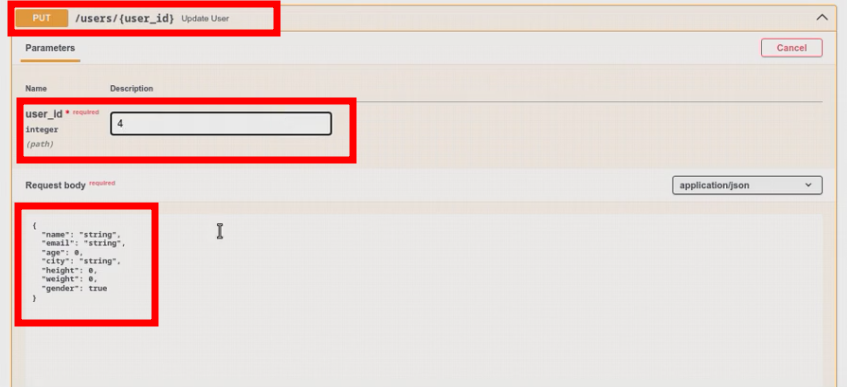
The fourth one does not exist yet and should return null. Lets create it and check in the Swagger interface :
curl --request PUT --url "http://localhost:8000/users/4" --header 'content-type: application/json' --data '{"name":"Francois Cerbelle","email":"francois@redis.com","age":48,"city":"Paris","height":179,"weight":84,"gender":"True"}'
xdg-open http://localhost:8000/docs
Local dockerized Redis Enterprise
The goal is to use a development environment as close as possible to the final production environment. Thus, lets replace our local dockerized redis-stack by a local dockerized redis-enterprise database.
Provision Redis Enterprise
First, we can start the redis-enterprise docker image. I expose the ports for both the web administration interface and the REST API :
docker run -d --cap-add sys_resource --name redisenterprise1 -p 8443:8443 -p 9443:9443 redislabs/redis
Create a cluster
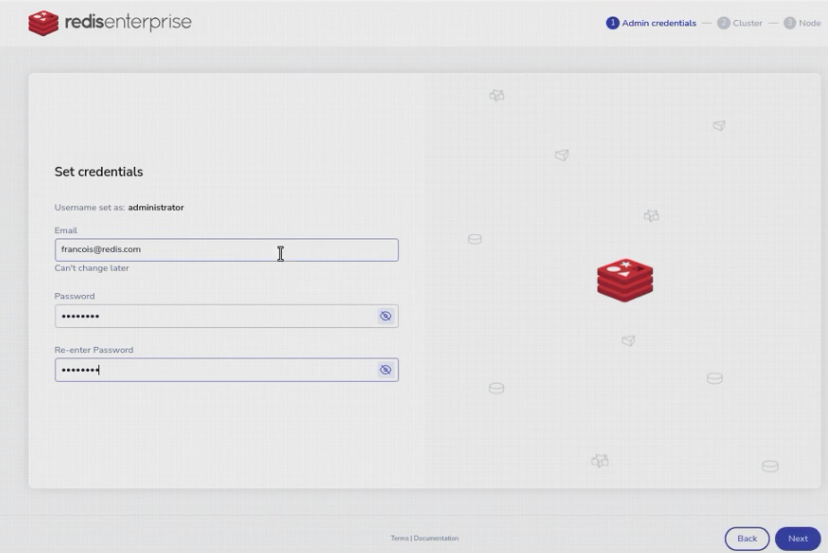
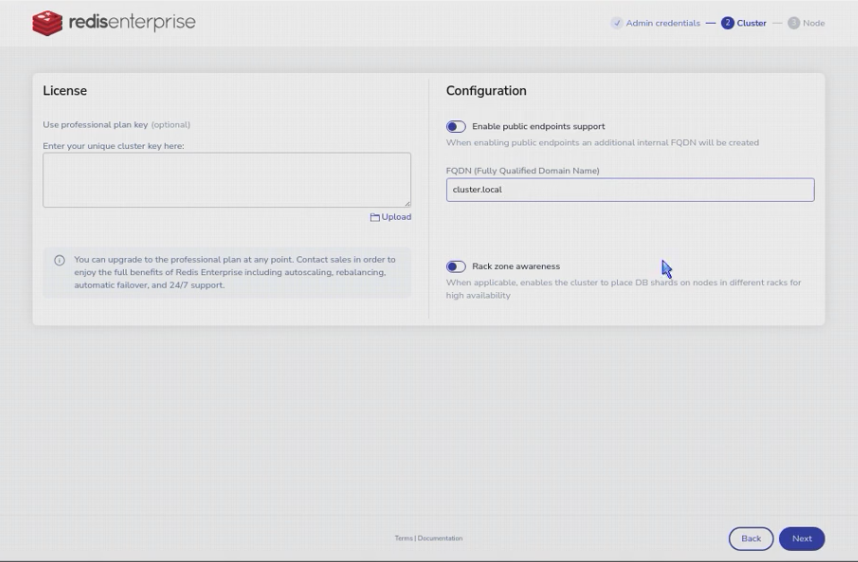
First, we need to initialize the Redis-Enterprise cluster with a first, and only, node. We can use to web admin interface (https://localhost:8443) ;
xdg-open https://localhost:8443
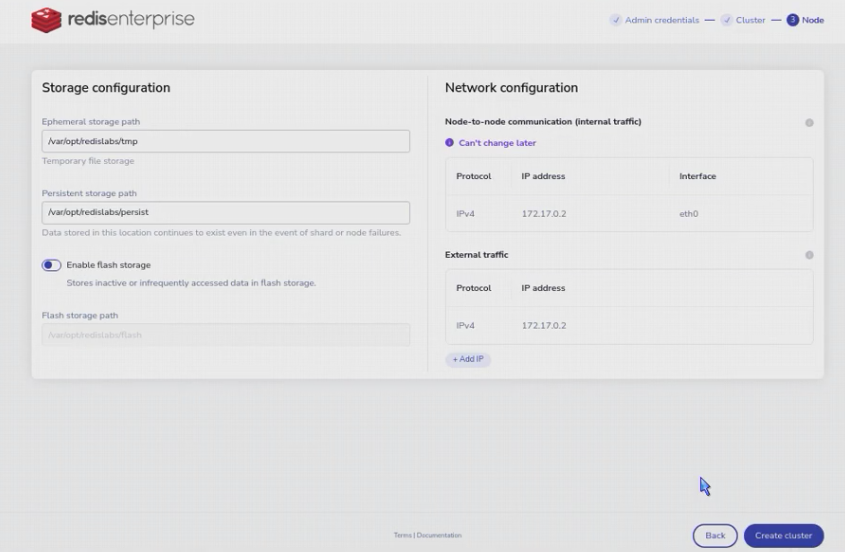
or the REST API
curl "https://127.0.0.1:9443/v1/bootstrap/create_cluster" --insecure -X "POST" -H "Accept:application/json" -H "Content-Type:application/json" -u "francois@redis.com:password" -d '{"action": "create_cluster","cluster": { "name": "cluster.local" },"node": {"paths": {"persistent_path": "/var/opt/redislabs/persist","ephemeral_path": "/var/opt/redislabs/tmp","bigredis_storage_path": "/var/opt/redislabs/flash"}},"license": "","credentials": {"username": "francois@redis.com","password": "password"}}'
Create a database with needed modules
Then, we can ask the Redis-cluster to create, monitor, maintain and expose a redis database with the required modules only (JSON and Search). We will use the web administration interface, but we could also use the REST API.
xdg-open https://localhost:8443
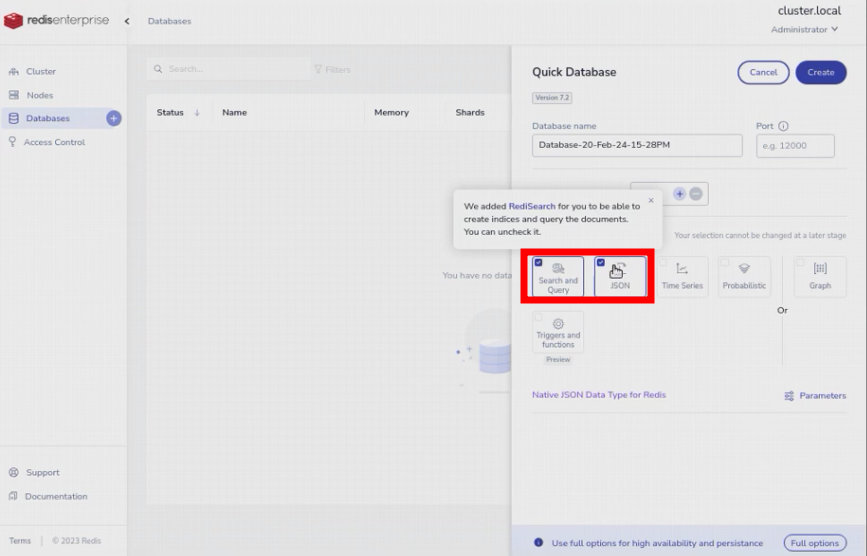
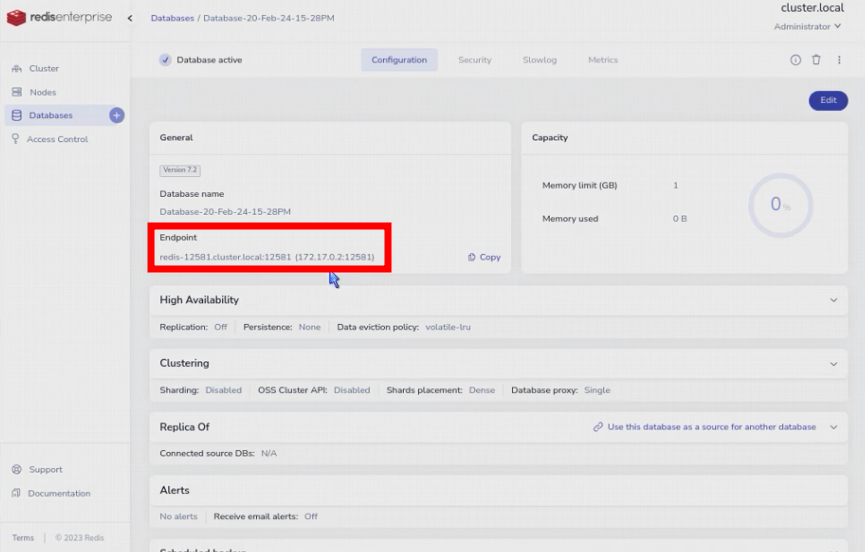
We now have a redis database, lets define the connection details in the environment variables for our application. We will use the web administration interface to find them, but we could also use the REST API.
export REDISHOST=172.17.0.2
export REDISPORT=12581
export REDISPASS=xxx
Update the code with password authentication
Now, we have to update our source code to use the provided connection password.
# Data model
#
from pydantic import BaseModel
from typing import Union
class User(BaseModel):
    name: str
    email: str
    age: int
    city: str
    height: float
    weight: float
    gender: Union[bool, None] = None

#users = []
# Data storage in Redis
#
import redis
import os
r = redis.Redis(
        host=os.environ.get('REDISHOST'),
        port=os.environ.get('REDISPORT'),
        password=os.environ.get('REDISPASS'),
        )

# Prepopulate wih sample data
# JSON data stored in a Redis JSON datastructure
#
from redis.commands.json.path import Path
r.json().set("user:1", Path.root_path(), { "name": "Paul John", "email": "paul.john@example.com", "age": 42, "city": "London" })
r.json().set("user:2", Path.root_path(), { "name": "Eden Zamir", "email": "eden.zamir@example.com", "age": 29, "city": "Tel Aviv" })
r.json().set("user:3", Path.root_path(), { "name": "Paul Zamir", "email": "paul.zamir@example.com", "age": 35, "city": "Tel Aviv" })

# Expose data access with a REST API provided by FastAPI
#
from fastapi import FastAPI
app = FastAPI()

# Read endpoint
#
@app.get("/users/{user_id}")
def read_user(user_id: int):
    return r.json().get("user:"+str(user_id))

# Write endpoint
#
@app.put("/users/{user_id}")
def update_user(user_id: int, user: User):
    return r.json().set('user:'+str(user_id), Path.root_path(),
        { "name": user.name, "email": user.email, "age": user.age, "city": user.city, "height": user.height, "weight": user.weight, "gender": user.gender })
Test the code
We can test our microservice, you should be confortable, now. Restart the service
uvicorn main:app --reload
Use the same test scenario as previously
for i in 1 2 3 4; do
  printf "\n%s: " "$i"
  curl http://localhost:8000/users/$i --request GET --header 'content-type: application/json'
done
curl --request PUT --url "http://localhost:8000/users/4" --header 'content-type: application/json' --data '{"name":"Francois Cerbelle","email":"francois@redis.com","age":48,"city":"Paris","height":179,"weight":84,"gender":"True"}'
xdg-open http://localhost:8000/docs
Package the microservice
Environment and dependencies
requirements.txt :
typing
pydantic
fastapi
uvicorn
redis
Dockerfile :
# From https://cloud.google.com/run/docs/quickstarts/build-and-deploy/python?hl=fr

# Use the official lightweight Python image.
# https://hub.docker.com/_/python
FROM python:3.10-slim

# Allow statements and log messages to immediately appear in the Knative logs
ENV PYTHONUNBUFFERED True

# Copy local code to the container image.
ENV APP_HOME /app
WORKDIR $APP_HOME
COPY . ./

# Install production dependencies.
RUN pip install --no-cache-dir -r requirements.txt

# Run the web service on container startup. Here we use the gunicorn
# webserver, with one worker process and 8 threads.
# For environments with multiple CPU cores, increase the number of workers
# to be equal to the cores available.
# Timeout is set to 0 to disable the timeouts of the workers to allow Cloud Run to handle instance scaling.
#CMD exec gunicorn --bind :$PORT --workers 1 --threads 8 --timeout 0 main:app
CMD exec uvicorn --host 0.0.0.0 --port $PORT main:app
.dockerignore :
Dockerfile
README.md
*.pyc
*.pyo
*.pyd
__pycache__
.pytest_cache
Build the docker container
docker build -t fastapi .
Run the packaged microservice
docker run --env PORT=8000 --env REDISHOST=$REDISHOST --env REDISPORT=$REDISPORT --env REDISPASS=$REDISPASS -p 8000:8000 --rm fastapi
Test the microservice
for i in 1 2 3 4; do
  printf "\n%s: " "$i"
  curl http://localhost:8000/users/$i --request GET --header 'content-type: application/json'
done
curl --request PUT --url "http://localhost:8000/users/4" --header 'content-type: application/json' --data '{"name":"Francois Cerbelle","email":"francois@redis.com","age":48,"city":"Paris","height":179,"weight":84,"gender":"True"}'
xdg-open http://localhost:8000/docs
Use a managed Redis Enterprise
Next step is to use a real Redis-Enterprise managed instance (DBaaS) in the cloud from our local dockerized microservice.
Create a Redis Enterprise database in GCP
You need to create an account and connect to the Redis Cloud portal (https://app.redislabs.com)
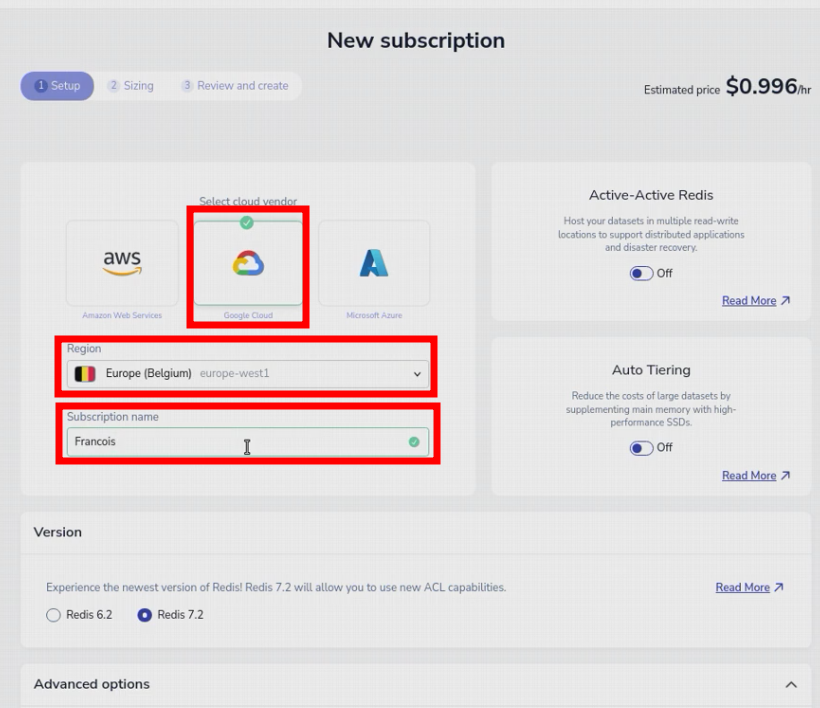
Then, you need to create a new subscription (cluster). You have to choose the Plan (flexible),
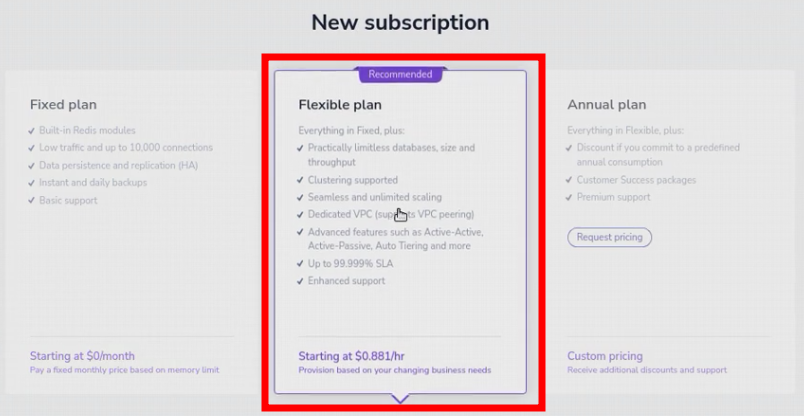
the cloud provider (GCP), the region (europe-west1) and to give it a name.
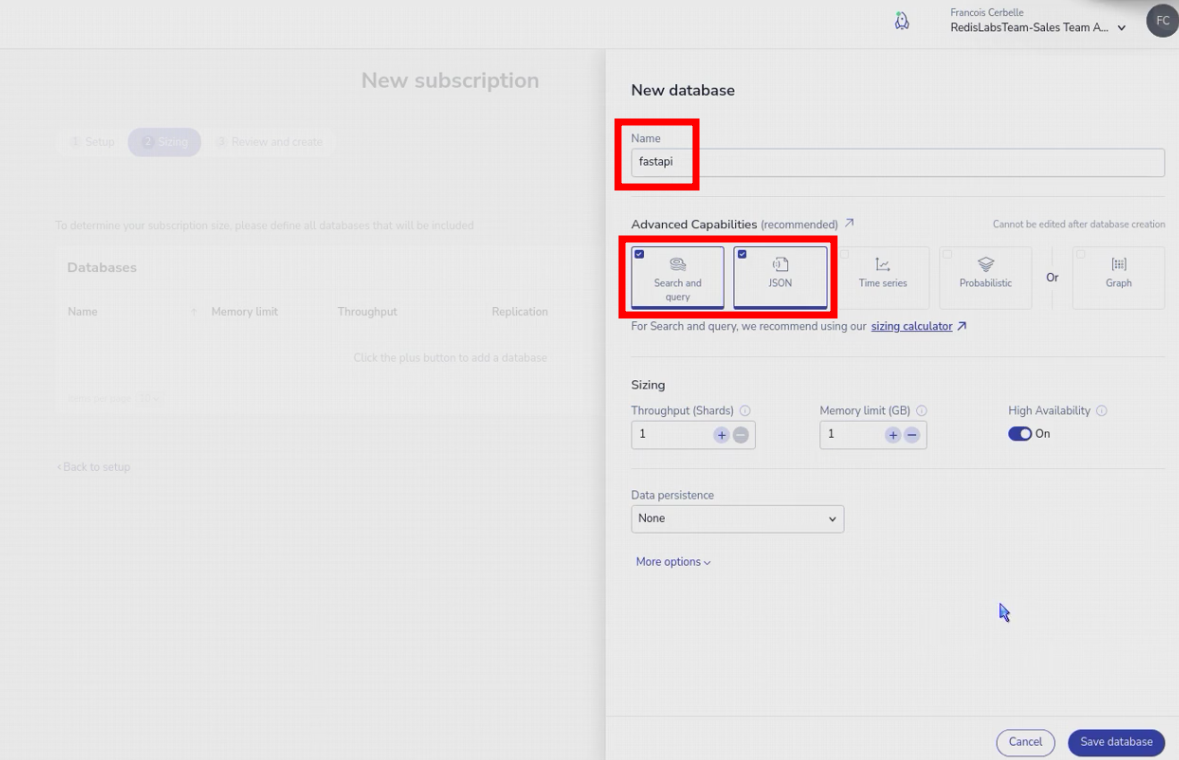
Next, you have to list the database specifications : a name, optionnaly a port, the activated modules (only JSON and Search), the dataset size and throughput, the high-availability option and validate. We only need one database.
Next screen lets you check all the details and enter your payment details. You can use free trial links from https://redis.com.
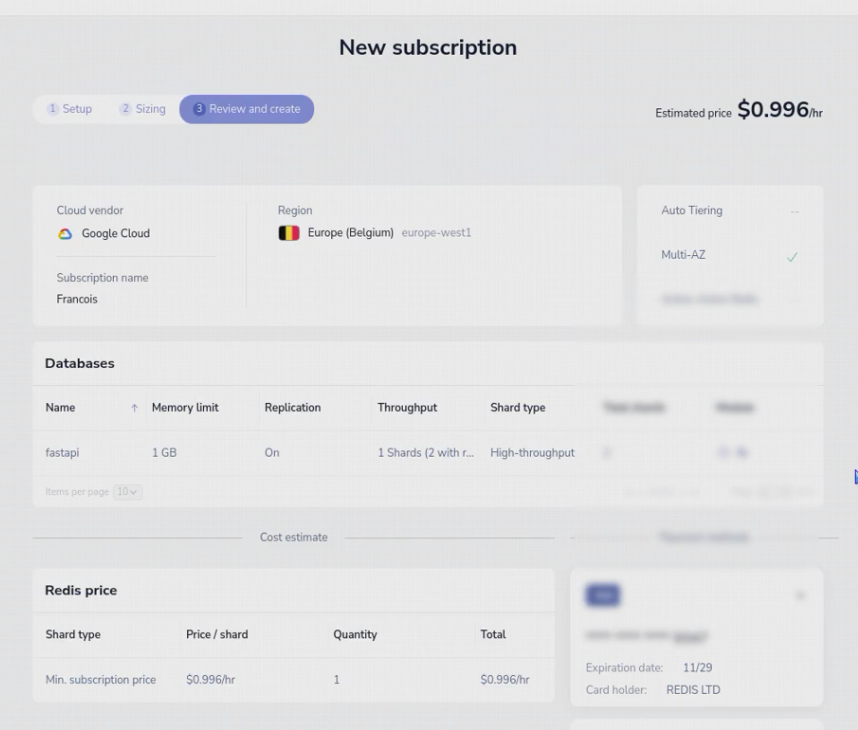
The cluster will be provisionned, the database created and it will be available approximately 15 minutes later.
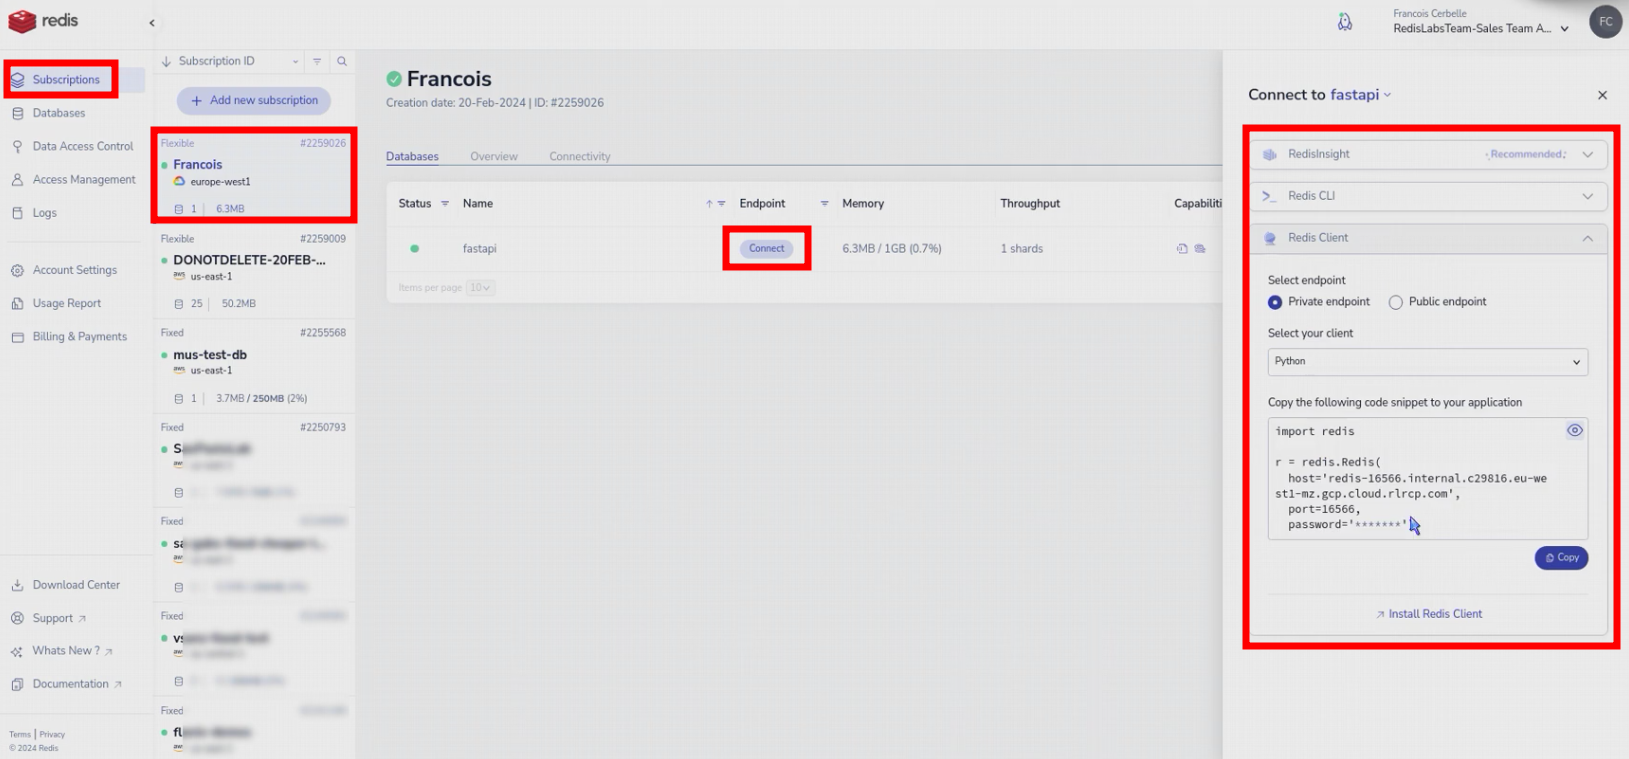
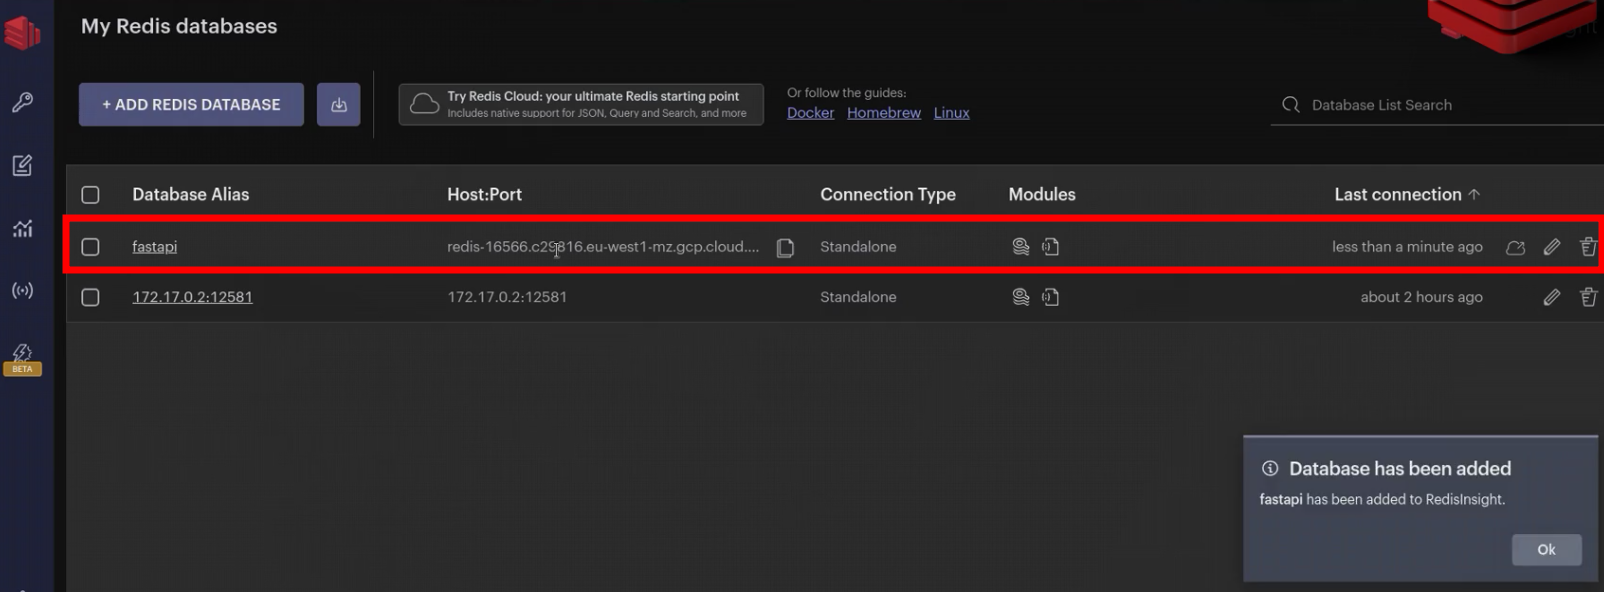
You can connect RedisInsight, Redis Command Line or several source codes, using either a private endpoint (only reachable from GCP) or a public endpoint.
Update the connection details
Use the connection details from the portal to update the connection environment variables.
export REDISHOST=redis-16566.c29816.eu-west1-mz.gcp.cloud.rlcp.com
export REDISPORT=16566
export REDISPASS=
Test the packaged microservice
docker run --env PORT=8000 --env REDISHOST=$REDISHOST --env REDISPORT=$REDISPORT --env REDISPASS=$REDISPASS -p 8000:8000 --rm fastapi
for i in 1 2 3 4; do
  printf "\n%s: " "$i"
  curl http://localhost:8000/users/$i --request GET --header 'content-type: application/json'
done
curl --request PUT --url "http://localhost:8000/users/4" --header 'content-type: application/json' --data '{"name":"Francois Cerbelle","email":"francois@redis.com","age":48,"city":"Paris","height":179,"weight":84,"gender":"True"}'
xdg-open http://localhost:8000/docs
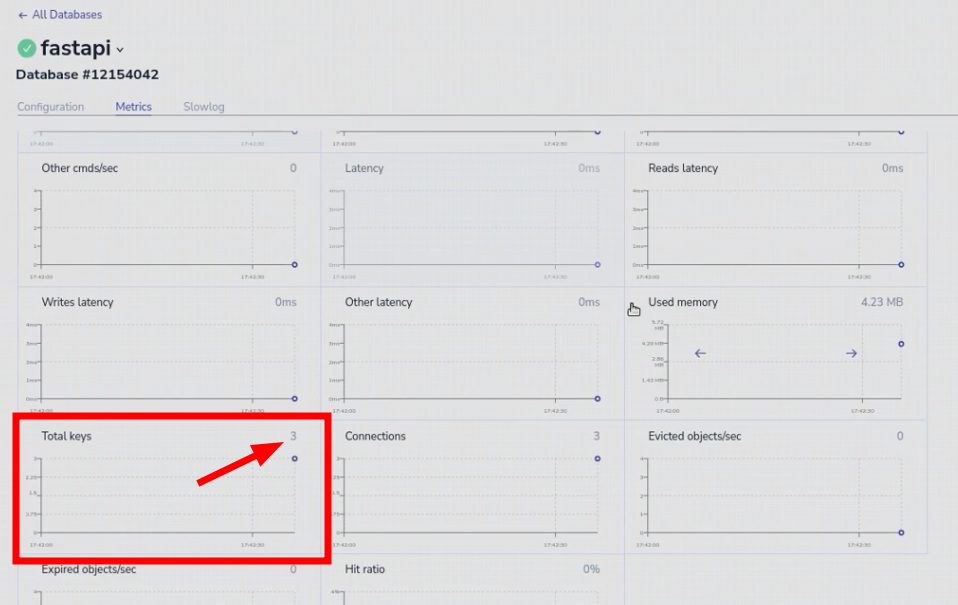
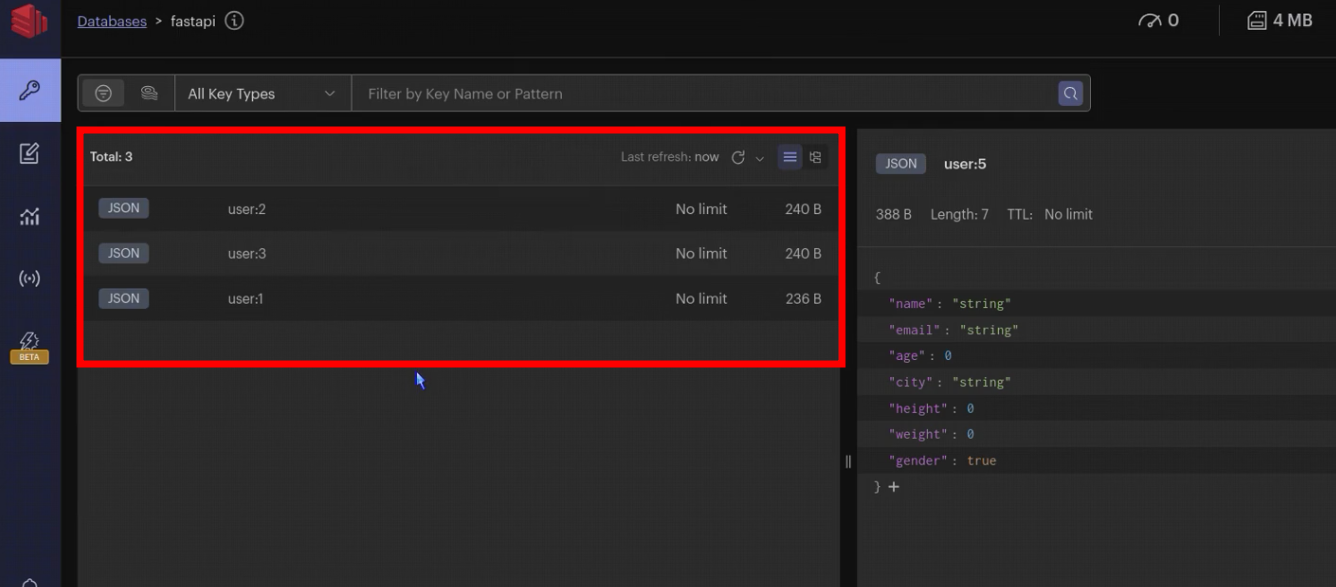
Deploy in Google CloudRun
Finally, we have a containerizable microservice which can be run anywhere and which can connect to any Redis database. We have a managed Redis Enterprise database. Last step is to deploy the microservice in Google CloudRun and make it use our Redis database.
Create the application
Despite we could upload the docker image to the “Google Artefact Repository” and the choose it to be executed by the “Google CloudRun” service. In my case, for the demo, I use a single command line to send the current folder’s source code to Google, to ask Google to create the Docker image, to store the image in the “Artefact Repository” and to use it in a new “fastapi” CloudRun service with the Redis enterprise connection parameters :
gcloud run deploy --source . --allow-unauthenticated --port=8080 --service-account=319143195410-compute@developer.gserviceaccount.com --min-instances=1 --set-env-vars=REDISHOST=$REDISHOST,REDISPORT=$REDISPORT,REDISPASS=$REDISPASS --cpu-boost --region=europe-west1 --project=central-beach-194106

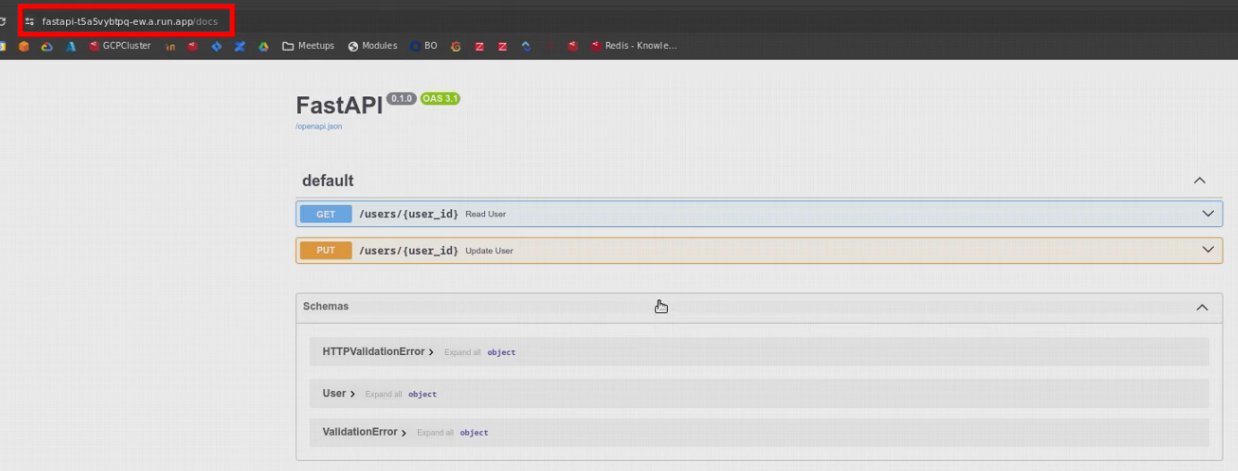
It is deployed as a Google CloudRun service

Test the application
It exposes the Swagger web user interface
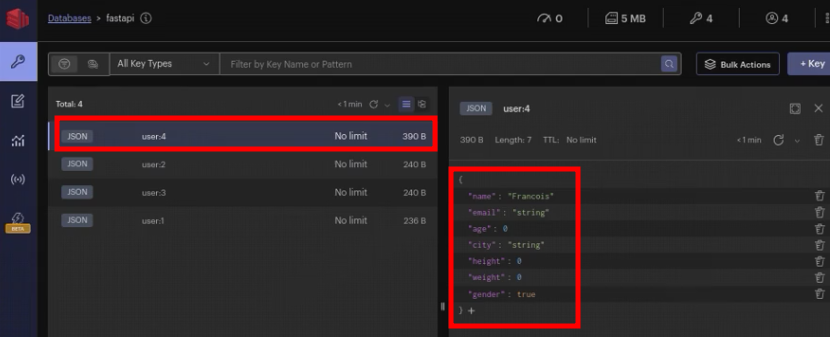
New records are stored in Redis Enterprise Cloud (Managed) on GCP
Materials and Links
Footnotes
-
[https://youtu.be/kK4GxAwJKD0] ↩