Create a D3 chart with CEAN and N1QL on Couchbase
• •


Couchbase, has a full CEAN stack (Couchbase Express Angular NodeJS) to quickly develop NodeJS application. We will see in this tutorial how to initialize the development of a new NodeJS application using CEAN with Yeoman, create a server-side service, a controller and views for client side graphical and modern representation of data
- Prerequisites
- Couchbase’s CEAN stack installation
- Application creation
- Data loading
- Application skeleton initialization
- Route addition to execute a N1QL query
- N1QL querying method addition in the client-side service
- D3js and nvD3 installation
- Chart and input controls addition in the main view
- Controler change to query the cluster and update the chart with the answer
- Final testing
- Voila
Prerequisites
As for all my tutorials, there are prerequisites. Here are those to implement this small application.
Operating System
I’m a big fan of Debian since 1999, so I will use this Linux distribution to create my application. Commands will be very similar on Debian-derived distributions (Ubuntu) and their derivatives (Mint). You will certainly have to adapt them for other distributions and other operating systems (BSD, Windows, MacOS), but the NodeJS application should remain the same.
I will use a fresh default Debian install, only with the standard set of packages (no GUI, no print server, no HTTP server, …).
Couchbase Server
First, we must obviously have a Couchbase cluster at least in version 4.0. At the time of this writing, it is available for download on the Couchbase website. This cluster must have at least one node with the Index service and at least one node with the Query service.
Couchbase’s CEAN stack installation
We’ll see how to install step by step the CEAN stack on a Debian GNU/Linux 8 (jessie) distribution. For this, we will follow the official website instructions.
I install the installation dependencies and NodeJS:
sudo aptitude install -y git gcc make nodejs nodejs-legacy npm
I make sure that I have the latest version of npm available to avoid errors
and warnings during the installation of other dependencies:
sudo npm install -g npm
I then use NodeJS Package Manager to install yeoman. The CEAN generator for yeoman will need bower to install the dependencies of my future application. Although grunt is optional, it will facilitate the development of my application, so I install it all:
sudo npm install -g yo bower grunt grunt-cli
Then, I install the CEAN generator for yeoman and make it available:
git clone https://github.com/dmaier-couchbase/cean.git
cd cean/src/yeoman-generators/generator-cean
sudo npm link
cd
Voilà, all the dependencies are ok to generate a CEAN application skeleton.
Application creation
For this tutorial, I’m using a small dataset. The schema is very simple: each document lists the annual values of a Development Indicator between 2006 and 2012 for a given country and a given indicator. As we will access to documents for a country and a given indicator, we will use this information as a primary key, even if we do not use these key directly (we will make N1QL requests and not Key / Value).
Data loading
We must first create a small bucket in the Couchbase cluster and name it « WorldDataBank ». I will not describe in detail how to create a new bucket. Simply connect to the Couchbase Cluster Administration interface using a browser with an administrator account , then go in the « Buckets » tab, click on the « New bucket » button. There is no need to give more than 100 MB of memory to this bucket.
Then, the easiest way is to download the dataset that I have prepared for this tutorial, and unzip the compressed archive:
unzip WorldDataBank.dump.zip
You need to upload the resulting folder on a computer which has the Couchbase backup and restore tools :
scp -r WorldDataBank.dump user@name_of_one_cluster_node:
and to connect to this computer’s command line interface :
ssh user@cluster_node_name
Then, you need to load it in the « WorldDataBank » bucket thanks to the
cbrestore restore tool, as in the following sample (dont forget to replace
localhost by the address or the name of one of the cluster’s nodes):
/opt/couchbase/bin/cbrestore -u Administrator -p Administrator /home/vagrant/WorldDataBank.dump http://localhost:8091/ -b WorldDataBank
As we will use N1QL, we need to create at least the primary index. So, we will
use the command line query tool provided by Couchbase :
/opt/couchbase/bin/cbq to execute the following SQL commands :
CREATE PRIMARY INDEX ON WorldDataBank USING GSI;
CREATE INDEX Cat ON WorldDataBank(Category) USING GSI;
CREATE INDEX Counry ON WorldDataBank(Country_Name) USING GSI;
Now, we can check that the data are available and that we can execute N1QL queries. Still in the command line query tool, you can try a N1QL query :
SELECT YR2006,YR2007 FROM WorldDataBank WHERE Country_Name='FRA' AND Category='LEB';
And you should get the following answer :
{
    "requestID": "11fcb1ff-59ab-4c6a-9b72-fb6782a2d154",
    "signature": {
        "YR2006": "json",
        "YR2007": "json"
    },
    "results": [
        {
            "YR2006": "81.1121951219512",
            "YR2007": "81.2146341463415"
        }
    ],
    "status": "success",
    "metrics": {
        "elapsedTime": "42.479238ms",
        "executionTime": "42.479087ms",
        "resultCount": 1,
        "resultSize": 94
    }
}
Application skeleton initialization
Yeoman is an application skeleton generator. CEAN is provided as a skeleton generator for Yeoman. We will use it to initialize our future application skeleton. The generator will create the application folders, populate them with source file templates and install all the dependencies that our application will need to work properly.
mkdir myapp
cd myapp/
yo cean myapp
I noticed that the Couchbase C library (libcouchbase) is not always properly installed. We will force this installation manually to be sure :
npm install couchbase
It is time to check that our sample application skeleton was generated and that all the dependencies are installed :
grunt
Route addition to execute a N1QL query
We will begin by creating a new route on the server that maps a parametrized
URL to a N1QL query execution, passing the parameters. This server-side route
will be called by the client-side service. In order to add the route and the
associated logic, we will add it to the routes/demo.js file :
/**
 * Get a N1ql Resultset
 */
router.get('/getN1ql', function (req, res) {
    var countryId = req.query.countryId;
    var categoryId = req.query.categoryId;

    if (helper.isDefined(countryId)&&helper.isDefined(categoryId))
    {
        var q="SELECT YR2006, YR2007, YR2008, YR2009, YR2010, YR2011, YR2012 FROM WorldDataBank WHERE Country_Name='"+countryId+"' AND Category='"+categoryId+"'";
        console.log("N1QLQUERY:" + q);
        var n1qlQuery = couchbase.N1qlQuery.fromString(q);
        bucket.query(n1qlQuery,
                function(err, cbres) {
                    if (err) {
                        var emsg = "Could not get the document!";
                        console.log("ERROR" + emsg);
                        res.json({ "error" : emsg });

                    } else {
                        console.log("Got " + JSON.stringify(cbres));
                        res.json(cbres);
                    }
                });
    }
    else
    {
        var emsg = "Did you pass all mandatory parameters?";
        console.log("ERROR: " + emsg);
        res.json({"error" : emsg});
    }
});
This method builds the N1QL query, fill the parameters, send it on the server’s console to log, and execute it. In case of error, it is also sent to the console and back to the client’s service, otherwise the result is written to the console and sent back to the client.
It is possible to test the route from an internet browser with the following
URL http://localhost:9000/service/getN1ql?countryId=FRA&categoryId=LEB that
should return the following result (pretty printed here for the tutorial) :
[
    {
        "YR2006":"81.1121951219512",
        "YR2007":"81.2146341463415",
        "YR2008":"81.4146341463415",
        "YR2009":"81.6634146341463",
        "YR2010":"82.1146341463415",
        "YR2011":"81.9682926829268",
        "YR2012":"81.9682926829268"
    }
]
N1QL querying method addition in the client-side service
The idea is that the client embeds a service that can be used to query the server on an URL (and a route with an associated function). We already defined the route with two parameters on the server, we will now create the client-side service to be called.
We will add a new method in the already existing service myservice to query
the Couchbase cluster. Here is the method to add in the
public/scripts/services/myservice.js file to get the yearly values given a
country and an indicator name :
TMyService.prototype.getN1ql = function(countryId,categoryId)
{
    var url = "/service/getN1ql?countryId=" + countryId + "&categoryId=" + categoryId;
    var promise = this.httpService.get(url, {}).success(function (data) { /*Allows to handle the result and errors */ });
    return promise;
}
Now, the client-side, in the browser, embeds a javascript service that can be called with two parameters. This service will asynchroneously call (without waiting for the result) an URL on the server-side, passing the parameters. The server will use the route to map this URL call with the parameters to a function that will generate and execute a N1QL query and return the result to the client-side service.
D3js and nvD3 installation
We will use the D3 library to render the results with charts. In order to make it easier, we will use the nvD3 wrapping library and its port to Angular, Angular-nvD3.
The following command line will install it when executed from the application folder :
bower install angular-nvd3
Theorically, it should automatically install all the dependencies (Angular, D3 and nvD3). Nevertheless, as a precaution, in case of dependency installation failure, it is still possible to manually install them :
bower install angular
bower install d3
bower install nvd3
We will also add all these dependencies installation in the bower’s
configuration file, bower.json :
{
  "name": "myapp",
  "version": "0.0.0",
  "dependencies": {
    "angular": "1.3.x",
    "json3": "^3.3.0",
    "es5-shim": "^4.0.0",
    "bootstrap": "^3.2.0",
    "angular-cookies": "1.3.x",
    "angular-resource": "1.3.x",
    "angular-route": "1.3.x",
    "angular-nvd3": "~0.1.1",
    "nvd3": "~1.8.1"
  },
  "devDependencies": {
    "angular-mocks": "1.3.x",
    "angular-scenario": "1.3.x"
  },
  "appPath": "app"
}
Chart and input controls addition in the main view
First, lets add the library inclusion in our application, in the
public/scripts/app.js file :
/**
 * @ngdoc overview
 * @name cbDemoQaApp
 * @description
 * # 'myapp
 *
 * Main module of the application.
 */
var app = angular.module('myapp', [
    'ngCookies',
    'ngResource',
    'nvd3',
    'ngRoute'
]);

app.config(function($routeProvider) {
    $routeProvider
    .when('/', {
       templateUrl : 'views/main.html',
       controller : 'MyCtrl'
    })
    .otherwise({
        redirectTo: '/'
    });
});
Then, you need to add the required lines to generate and display the chart in
the public/index.html file headers :
    <link rel="stylesheet" href="bower_components/nvd3/nv.d3.css">
    <script src="bower_components/d3/d3.js"></script>
    <script src="bower_components/nvd3/nv.d3.js"></script> <!-- or use another assembly -->
    <script src="bower_components/angular-nvd3/dist/angular-nvd3.js"></script>
The application use an MVC architecture (Model-View-Controler) with templates.
We will add the input controls in the main view file public/views/main.html to
enable the parameter selection. We will also remove the sample application
button :
<div ng-include="'views/header.html'"/>
<div class = "row marketing">
    <div class = "well">
        <h3>Welcome!</h3>
        <p>
            {{msg}}
        </p>
        <nvd3 options="options"
              data="data"
              config="config"
              events="events"
              api="api"></nvd3>
    </div>
    <form id="add" role="form">
    <select id="selectCountry" class="btn btn-default" ng-click="onFilterChange()">
        <option value="FRA">France</option>
        <option value="CAN">Canada</option>
        <option value="DEU">Germany</option>
    </select>
    <select id="selectCategory" class="btn btn-default" ng-click="onFilterChange()">
        <option value="LBTP">Population</option>
        <option value="LEB">Life expectancy at birth</option>
        <option value="NID">Number of infant death</option>
    </select>
        <!--button id="buttonAdd" class="btn btn-default" ng-click="onAddClicked()">Add Test Document</button-->
    </form>
</div>
<div ng-include="'views/footer.html'"/>
Controler change to query the cluster and update the chart with the answer
We will now write the client-side code that triggers the service call when the
input control values are changed, passing them as parameters and that updates
the chart when the results are received (asynchroneously). Lets change the main
controller file scripts/controllers/mycontroller.js to add this function :
   $scope.onFilterChange = function () {
       var countryId=document.getElementById("selectCountry").value;
       var categoryId=document.getElementById("selectCategory").value;

       MyService.getN1ql(countryId,categoryId).then(
           function(ctx) {
               var result = ctx.data;
                $scope.options = {
                    chart: {
                        type: 'discreteBarChart',
                        height: 450,
                        margin : {
                            top: 20,
                            right: 20,
                            bottom: 60,
                            left: 55
                        },
                        x: function(d){ return d.label; },
                        y: function(d){ return d.value; },
                        showValues: true,
                        valueFormat: function(d){
                            return d3.format(',.2f')(d);
                        },
                        transitionDuration: 500,
                        xAxis: {
                            axisLabel: 'Years'
                        },
                        yAxis: {
                            axisLabel: categoryId,
                            axisLabelDistance: 30
                        }
                    }
                };

                $scope.data = [{
                    key: "Cumulative Return",
                    values: [
                        { "label" : "2006" , "value" : result[0].YR2006 },
                        { "label" : "2007" , "value" : result[0].YR2007 },
                        { "label" : "2008" , "value" : result[0].YR2008 },
                        { "label" : "2009" , "value" : result[0].YR2009 },
                        { "label" : "2010" , "value" : result[0].YR2010 },
                        { "label" : "2011" , "value" : result[0].YR2011 },
                        { "label" : "2012" , "value" : result[0].YR2012 }
                        ]
                    }];
           }
        );
   }
Final testing
If you stopped grunt, you need to restart it :
grunt
Running "parallel:web" (parallel) task
Running "watch:frontend" (watch) task
Waiting...
Running "watch:web" (watch) task
Waiting...

Running "express:web" (express) task
Starting background Express server
cluster = {"dsnObj":{"scheme":"couchbase","hosts":[["192.168.56.101",0]],"bucket":"default","options":{}}}
bucket = {"_name":"default","_username":"default","_password":"","_cb":{},"connected":null,"waitQueue":[],"_events":{},"httpAgent":{"domain":null,"_events":{},"_maxListeners":10,"options":{},"requests":{},"sockets":{},"maxSockets":250}}

Running "watch:web" (watch) task
Completed in 0.249s at Mon Oct 19 2015 05:05:44 GMT-0400 (EDT) - Waiting...
Example app listening at http://0.0.0.0:9000
You can now connect your internet browser to the IP address or hostname and port
that your application is listening on http://localhost:9000/ and you should be
able to use your brand new shiny application :
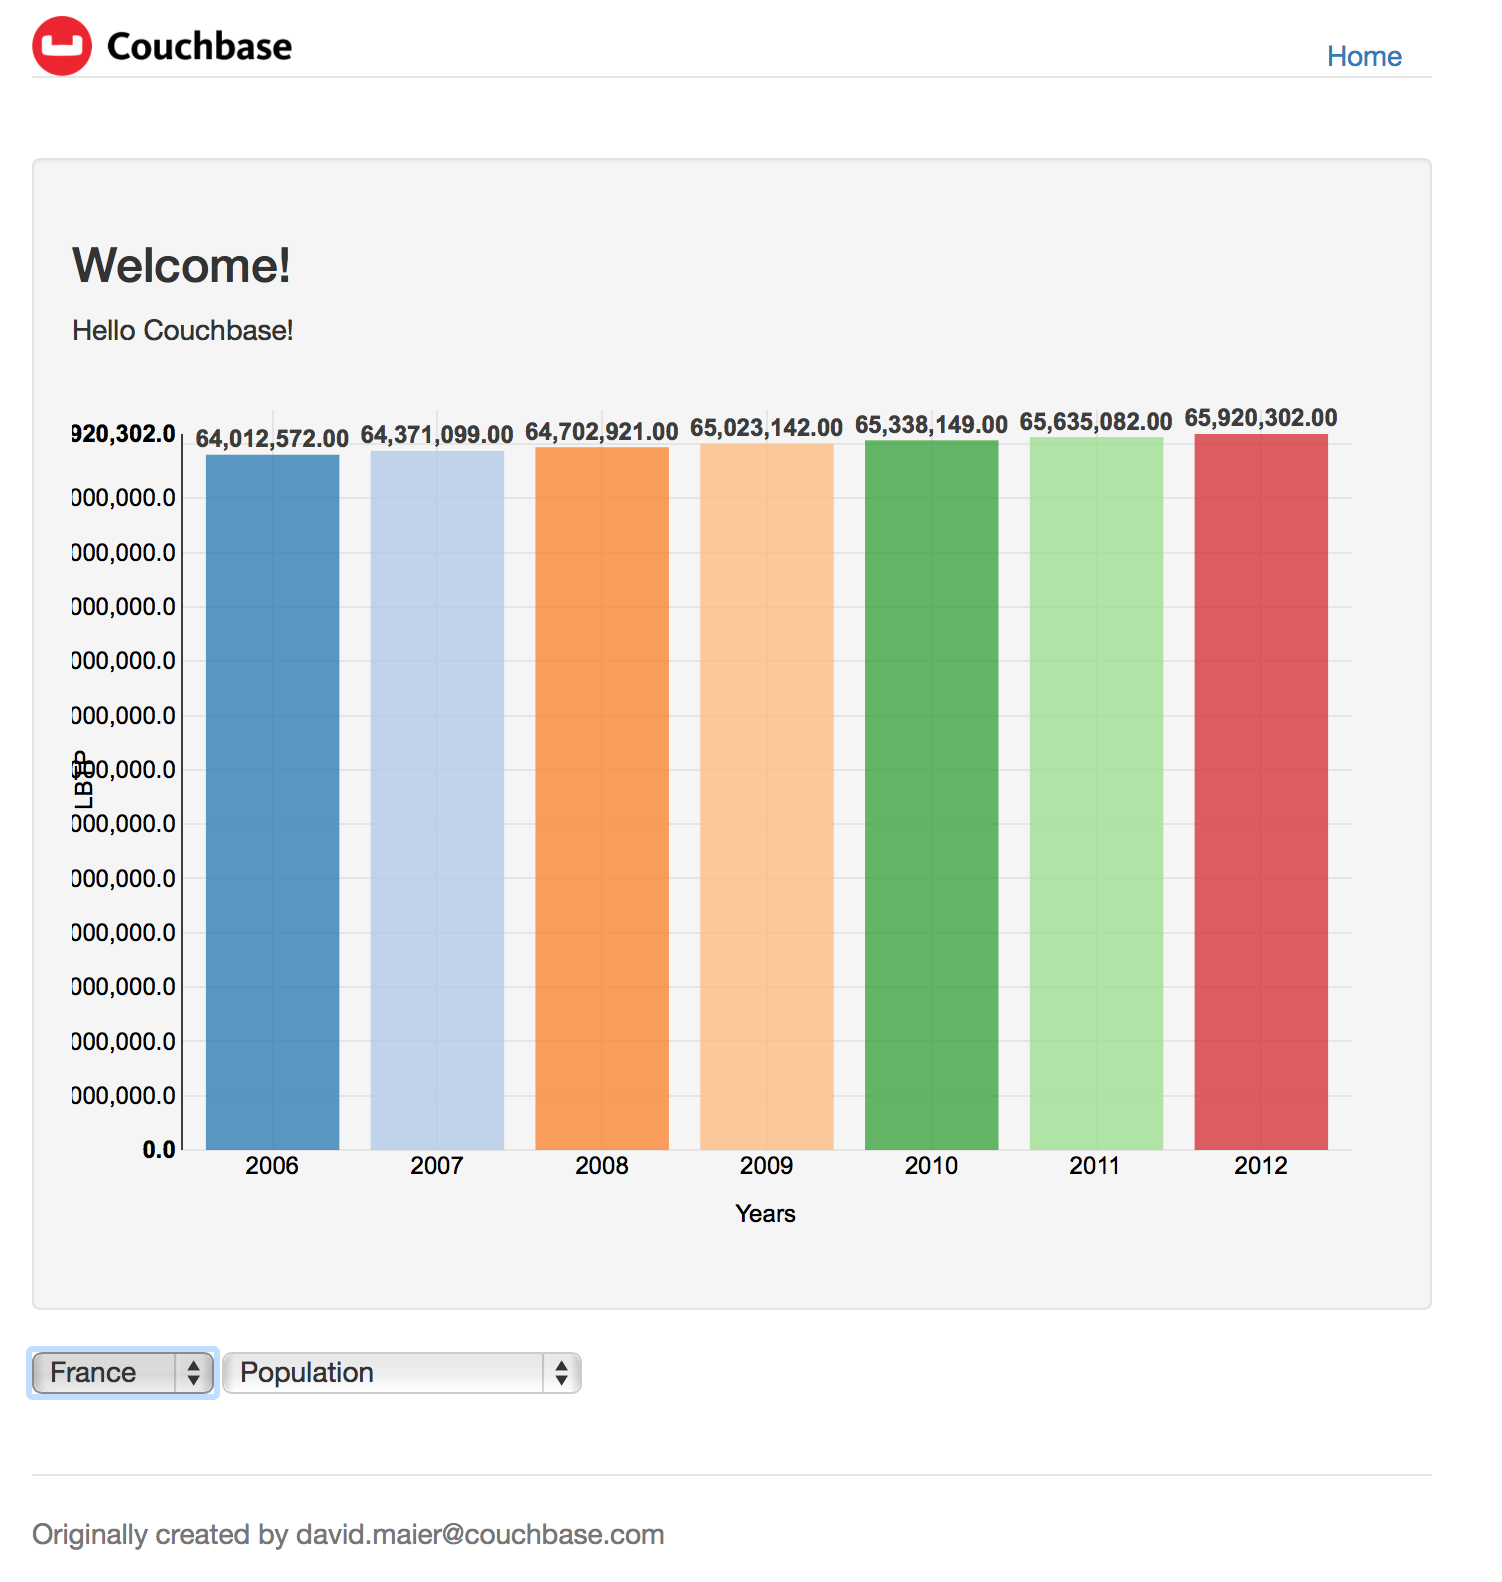
The server’s console should list all the N1QL queries that are generated and the returned results:
N1QLQUERY:SELECT YR2006, YR2007, YR2008, YR2009, YR2010, YR2011, YR2012 FROM
WorldDataBank WHERE Country_Name='FRA' AND Category='LBTP'
Got
[{"YR2006":64012572,"YR2007":64371099,"YR2008":64702921,"YR2009":65023142,"YR2010":65338149,"YR2011":65635082,"YR2012":65920302}]
Voila
You have seen how to bootstrap a new NodeJS application based on the CEAN stack, how the routes, services, controllers, and views work, how to execute a parametrized N1QL query, get the results and display the results in an interactive D3 chart.